AndroidStudio使用入门
1_AndroidStudio activity的基本使用
log.v("","");//在控制面板输出内容
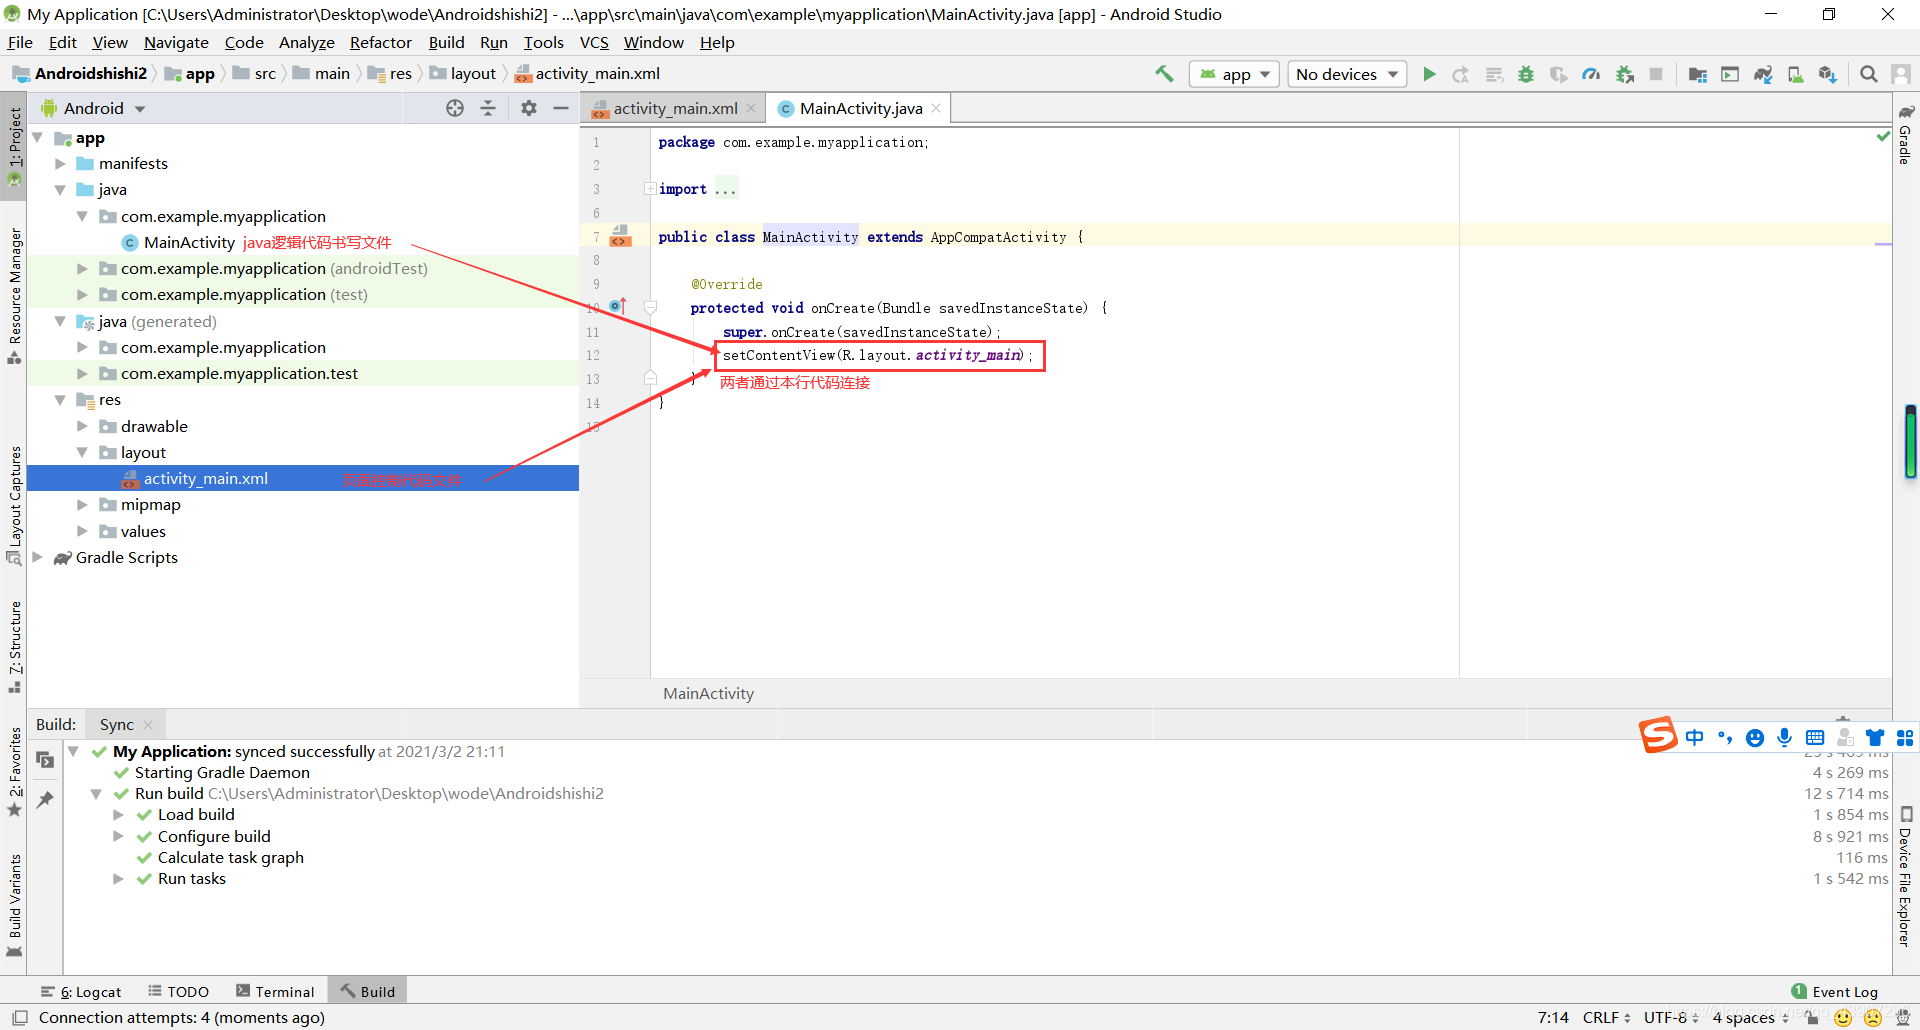
1.1_MainActivity和activity_main的初识
- 在MainActivity所在文件夹中可以创建任意“?Activity”文件作为后端逻辑代码文件
- 同理在activity_main所在文件夹中可以创建任意“activity_?”文件作为前端页面控制代码文件
注意两个文件名的“?”部分要相互对应
1.2_Activity的清单文件简介

1.3_几种重要文件的介绍
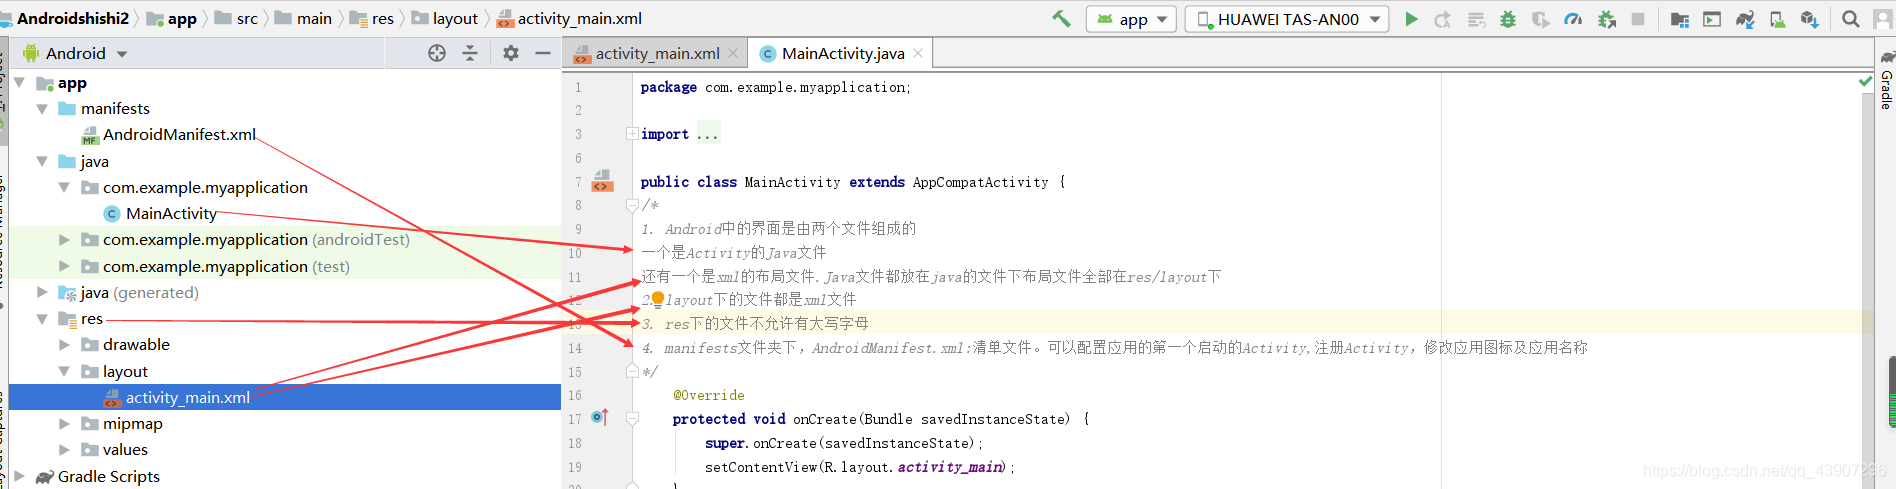
Android中的界面是由两个文件组成的 一个是Activity的Java文件 还有一个是xml的布局文件.Java文件都放在java的文件下布局文件全部在res/layout下
layout下的文件都是xml文件
res下的文件不允许有大写字母
manifests文件夹下,AndroidManifest.xml:清单文件。可以配置应用的第一个启动的Activity,注册Activity,修改应用图标及应用名称
values自定义变量名
colors.xml:
strings.xml:
在此文件中定义变量类似C语言中的#define
多语言支持方式drawable文件夹和mipmap文件夹
一般将APP的icon放在minmap文件夹下,其他图片资源放在drawable文件夹下

1.4_基本布局的认识与使用
基本布局的认识:
- View:表示为Android视图
Java文件和xml文件都能编写View
不管是Java还是xml文件最后都会变成Java文件的视图(其中java编写的视图和java课上学的视图一样,一般开发软件不用java编写视图)
- ViewGroup:表示为布局(在xml中布局可以嵌套)
布局控件可以放其它控件常用布局 LinearLayout(线性布局)、RelativeLayout(相对布局)、ConstraintLayout(约束布局)
如果只有一个子控件,则不需要写orientation属性,有多个必须要写,在新工具不一定
常用控件 Button(按钮)、TextView(文本)、EditText(输入框)
- 根布局需要加代码
<RelativeLayout xmlns:android="http://schemas.android.com/apk/res/android" xmlns:tools="http://schemas.android.com/tools" xmlns:app="http://schemas.android.com/apk/res-auto"
其中xmlns:app只在相对布局中加
1.4.1_RelativeLayout(相对布局)
没有方向性,但是有Z轴,代码在后的Z轴值越大,即可以悬浮必须要参照物
1、布局本身为参照
android:layout_centerHrizontal 水平居中
android:layout_centerVertical 垂直居中
android:layout_centerInparent 相对于父元素完全居中
android:layout_alignParentBottom 贴紧父元素的下边缘
android:layout_alignParentLeft 贴紧父元素的左边缘
android:layout_alignParentRight 贴紧父元素的右边缘
android:layout_alignParentTop 贴紧父元素的上边缘2、通过id来指定参照物
android:layout_below 在某元素的下方
android:layout_above 在某元素的的上方
android:layout_toLeftOf 在某元素的左边
android:layout_toRightOf 在某元素的右边
android:layout_alignTop 本元素的上边缘和某元素的的上边缘对齐
android:layout_alignLeft 本元素的左边缘和某元素的的左边缘对齐
android:layout_alignBottom 本元素的下边缘和某元素的的下边缘对齐
android:layout_alignRight 本元素的右边缘和某元素的的右边缘对齐
3. 属性值为具体的像素值,如 30dip,40px
android:layout_marginBottom 离某元素底边缘的距离
android:layout_marginLeft 离某元素左边缘的距离
android:layout_marginRight 离某元素右边缘的距离
android:layout_marginTop 离某元素上边缘的距离
1.4.2_线性布局
如果只有一个子控件,则不需要写orientation属性,有多个必须要写,在新工具不一定在线性布局中
空间大小:android:layout_width="" android:layout_height=""
match_parent只会占满剩余的空间 wrap_content适应文本大小 除此之外,还可以写固定数值,单位是dp或dip
layout_weight是权重
<LinearLayout
        android:layout_width="match_parent"
        android:layout_height="match_parent"
        android:orientation="horizontal"
        >
        <Button
            android:id="@+id/button_alterdialog"
            android:layout_width="0dp"
            android:layout_height="wrap_content"
            android:layout_weight="1"
            android:text="删除"
            android:onClick="delete"
            />
        <Button

            android:layout_width="0dp"
            android:layout_height="wrap_content"
            android:layout_weight="1"
            android:text="增加"
            android:onClick="delete"
            />
    </LinearLayout>
2_访问资源的方式
2.1_java访问资源的方式
R.resource_type.name//R可以理解为资源中的最高包
Android.R.//官方资源
2.2_xml访问资源的方式
@pakage_name:resource_type/name
3_控件的使用
3.1_通用属性
- gravity(对齐方式):center、left、rightbottom
多个布局方式以"|"分隔
- 边距
内边距:padding
外边距:margin
- 限制文本行数
android: lines="2" android:ellipsize="end"----超出的部分“。。。”表示
- 放置图片(图片存储在mipmap(drawable)文件夹)
Android:drawable- 背景图片和颜色
Android:background="@mipmap/drawable_name"(背景图片)
Android:background=“颜色”
3.2_选择器的使用
3.3_TextView的使用
<TextView
 android:layout_width="fill_parent"
 android:layout_height="wrap_content"
 android:textSize="16sp"
 android:textColor="#ffffff"
 android:padding="10dip"
 android:background="#cc0000"
 android:layout_gravity="center"
 android:text="Android Studio 工具箱"/>
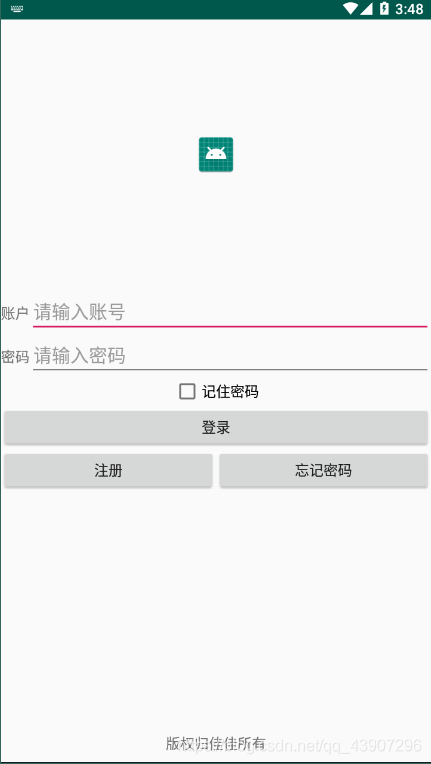
3.4_Button按钮和点击事件的添加
-
Button继承于TextView
-
Button点击事件的添加(最简单的方式,另外两种方式见3.6)
java文件下:
MainActivity文件中
public void login(View view){


        //动作
    }
res.layout文件夹下activity_main文件中
<Button
        android:layout_width="90dp"
        android:layout_height="70dp"
        android:text="登录"
        android:textSize="25dp"
        android:onClick="login">
        </Button>
3.5_EditText的使用
基本使用:
<EditText
        android:layout_width="match_parent"
        android:layout_height="wrap_content"
        android:hint="提示"
        android:inputType="datetime"
        ></EditText>
其中inputType是输入类型,输入类型有密码、数字、文本、日期等
如何在后端获取编辑框中的内容:
在java文件中
 EditText edit_text1 = findViewById(R.id.id名);
 edit_text1.getText().toString;
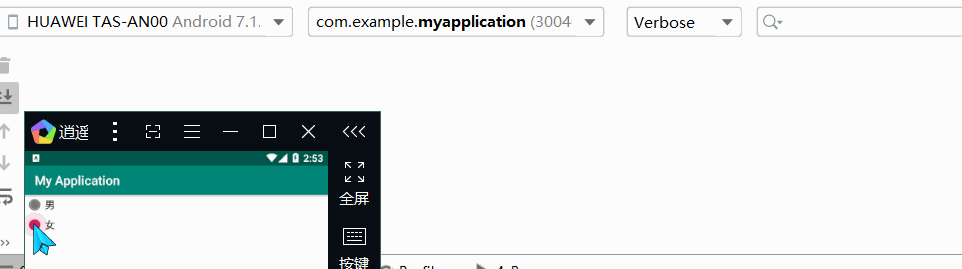
3.6_单选框radio button和radio group的使用
- 直接应用:
RadioGroup radioGroup = findViewById(R.id.radiogroup);
        radioGroup.setOnCheckedChangeListener(new RadioGroup.OnCheckedChangeListener() {


            @Override
            public void onCheckedChanged(RadioGroup group, int checkedId) {


                switch (checkedId){


                    case R.id.radiobutton_man:{


                        Log.i("radiobutton_man","男生");
                        break;
                    }
                    case R.id.radiobutton_woman:{


                        Log.i("radiobutton_woman","女生");
                        break;
                    }
                }
            }
        });
效果:
2. 继承接口:
public class MainActivity extends AppCompatActivity implements RadioGroup.OnCheckedChangeListener {


    @Override
    protected void onCreate(Bundle savedInstanceState) {


        super.onCreate(savedInstanceState);
        setContentView(R.layout.activity_main);
        RadioGroup radioGroup = findViewById(R.id.radiogroup_1);
        radioGroup.setOnCheckedChangeListener(this);//this在此使用的多态的属性,表示继承的接口类而不是MainActivity类
    }
    @Override//实现接口中的抽象类
    public void onCheckedChanged(RadioGroup group, int checkedId) {


        switch (checkedId){


            case R.id.radiobutton_man:{


                Log.i("radiobutton_man","男生");
                break;
            }
            case R.id.radiobutton_woman:{


                Log.i("radiobutton_woman","女生");
                break;
            }
        }
    }
}
效果:
3.7_CheckBox的使用
<CheckBox
    android:id="@+id/chaoxiong"
    android:layout_width="wrap_content"
    android:layout_height="wrap_content"
    android:text="超凶"
    ></CheckBox>
CheckBox checkBox = findViewById(R.id.chaoxiong);//获取控件
        checkBox.setOnCheckedChangeListener(new CompoundButton.OnCheckedChangeListener() {

    //进行监听
            @Override
            public void onCheckedChanged(CompoundButton buttonView, boolean isChecked) {


                if (isChecked){

    //如果被选中
                    Log.i("OnCheckedChange",buttonView.toString()+"被选中");
                }
            }
        });
3.8_Toast提示的使用
Toast.makeText(MainActivity.this,"被选中",Toast.LENGTH_LONG).show();
3.9_AlertDialog的使用
3.9.1_AlertDialog的简单使用
        <Button
        android:id="@+id/button_alterdialog"
        android:layout_width="wrap_content"
        android:layout_height="wrap_content"
        android:text="删除"
        android:onClick="delete"
        />
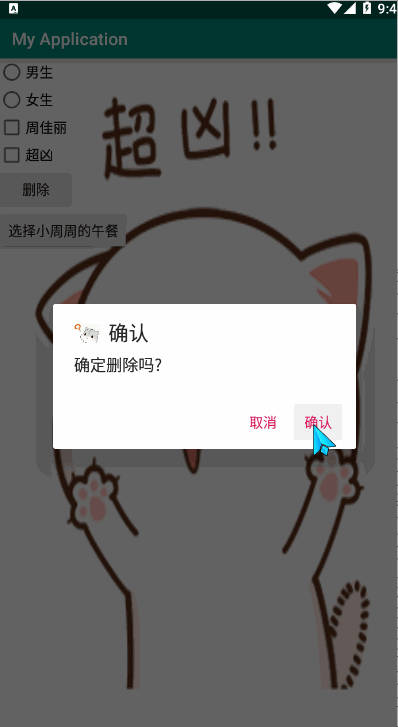
public void delete(View v){


        AlertDialog.Builder builder = new AlertDialog.Builder(MainActivity.this);
        builder.setTitle("确认").setIcon(R.mipmap.why).setMessage("确定删除吗?")
                .setPositiveButton("确认", new DialogInterface.OnClickListener() {

    //创建确认选项按钮及其点击事件
            @Override
            public void onClick(DialogInterface dialog, int which) {


                Toast.makeText(MainActivity.this,"删除成功",Toast.LENGTH_SHORT).show();
            }
        }).setNegativeButton("取消", new DialogInterface.OnClickListener() {

    //创建取消选项按钮及其点击事件
            @Override
            public void onClick(DialogInterface dialog, int which) {


            }
        });
        //下面两个千万不能忘记
        AlertDialog dialog = builder.create();//创建
        dialog.show();//显示
    }
效果:
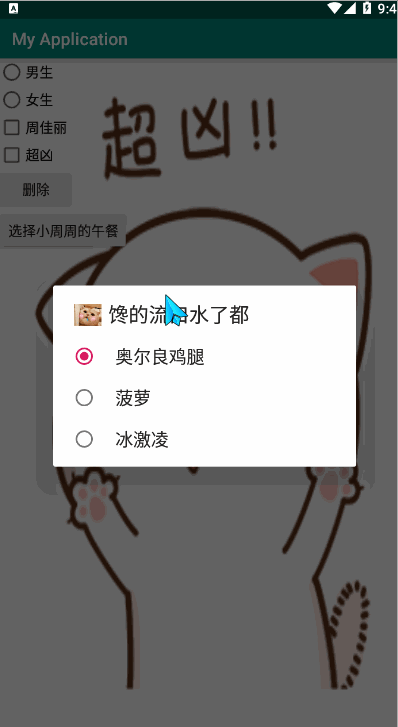
3.9.2_AlertDialog的单选框使用
<Button
        android:layout_width="wrap_content"
        android:layout_height="wrap_content"
        android:text="选择小周周的午餐"
        android:onClick="select"
        ></Button>
public void select(View view){


        AlertDialog.Builder builder = new AlertDialog.Builder(MainActivity.this);
        builder.setTitle("馋的流口水了都").setIcon(R.mipmap.greedy).setSingleChoiceItems(new String[]{

    "奥尔良鸡腿", "菠萝", "冰激凌"}, 0, new DialogInterface.OnClickListener() {


            @Override
            public void onClick(DialogInterface dialog, int which) {


                Toast.makeText(MainActivity.this, "中午吃"+which, Toast.LENGTH_SHORT).show();
            }
        });
        //下面两个千万不能忘记
        AlertDialog dialog = builder.create();//创建
        dialog.show();//显示
    }
效果:
3.9.3_AlertDialog的自定义界面的使用
<Button
        android:layout_width="wrap_content"
        android:layout_height="wrap_content"
        android:text="打开自定义界面"
        android:onClick="customView"></Button>
public void customView(View view){


        AlertDialog.Builder builder = new AlertDialog.Builder(MainActivity.this);
        builder.setTitle("新窗口").setView(R.layout.activity_new);
        //下面两个千万不能忘记
        AlertDialog dialog = builder.create();//创建
        dialog.show();//显示
    };
效果:

3.10_ListView的使用
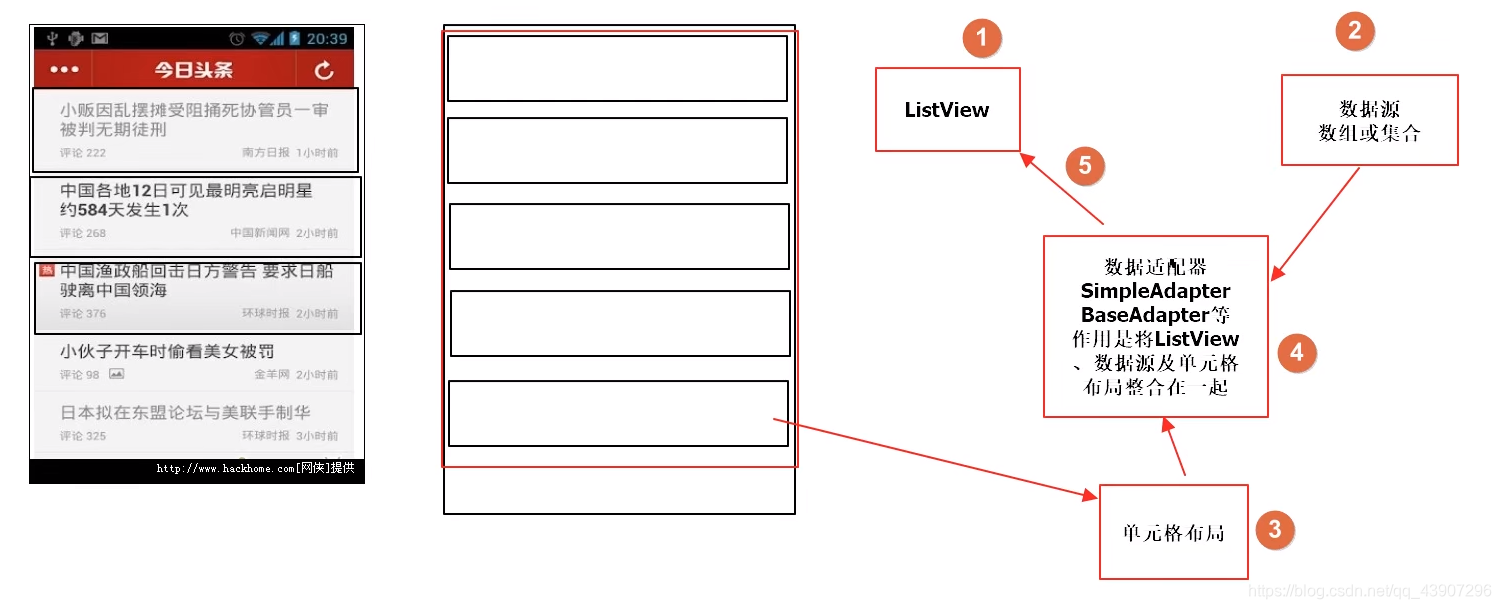
3.10.1_SimpleAdapter的使用(略)
3.10.2_ArrayAdapter的使用
<ListView
        android:id="@+id/listview"
        android:layout_width="wrap_content"
        android:layout_height="match_parent"

        ></ListView>
ListView listView = findViewById(R.id.listview);
        String[] name = {

    "菠萝","青皮桔","香蕉","西瓜"};
        ArrayAdapter arrayAdapter = new ArrayAdapter(newActivity.this,android.R.layout.simple_list_item_1,android.R.id.text1,name);
        listView.setAdapter(arrayAdapter);
3.10.3_BaseAdapter的使用(略)
4_生命周期与intent的使用
4.1_生命周期
@Override
protected void onCreate(Bundle savedInstanceState) {


    super.onCreate(savedInstanceState);
    setContentView(R.layout.activity_main);
    LogUtils.d(TAG,"onCreate ---> 创建时调用");
}

@Override
protected void onRestart() {


    super.onRestart();
    LogUtils.d(TAG,"onRestart ---> 重启时调用");
}

@Override
protected void onStart() {


    super.onStart();
    LogUtils.d(TAG,"onStart ---> 即将可见不可交互时调用");
}

@Override
protected void onResume() {


    super.onResume();
    LogUtils.d(TAG,"onResume ---> 可见可交互时调用");
}

@Override
protected void onPause() {


    super.onPause();
    LogUtils.d(TAG,"onPause ---> 即将暂停时调用");
}

@Override
protected void onStop() {


    super.onStop();
    LogUtils.d(TAG,"onStop ---> 即将停止不可见时调用");
}

@Override
protected void onDestroy() {


    super.onDestroy();
    LogUtils.d(TAG,"onDestroy ---> 即将销毁时调用");
}
4.2_页面跳转
AndroidManifest.xml代码注意,若要显示某个页面,必须将其在此文件夹中声明
<?xml version="1.0" encoding="utf-8"?>
<manifest xmlns:android="http://schemas.android.com/apk/res/android"
    package="com.example.myapplication">

    <application
        android:allowBackup="true"
        android:icon="@mipmap/angry"
        android:label="@string/app_name"
        android:roundIcon="@mipmap/ic_launcher_round"
        android:supportsRtl="true"
        android:theme="@style/AppTheme">
        <activity android:name=".MainActivity">
            <intent-filter>
                <action android:name="android.intent.action.MAIN" />
                <category android:name="android.intent.category.LAUNCHER" />
            </intent-filter>

        </activity>
        <activity android:name=".newActivity">
        </activity>

    </application>

</manifest>
public void windowSkip(View view){

    //按钮点击事件
        Intent intent = new Intent();
        intent.setClass(MainActivity.this,newActivity.class);//从前者跳往后者
        startActivity(intent);//启动
    }
4.3_intent跳转页面传值
MainActivity文件:
    public void loginSkip(View view){


        Intent intent = new Intent();
        intent.setClass(MainActivity.this,LoginActivity.class);//从前者跳往后者
        intent.putExtra("name","jiajia");
        intent.putExtra("sex","男");
        intent.putExtra("hobby",new String[] {

    "篮球","乒乓球","羽毛球"});
        startActivity(intent);//启动
    }
}
LoginActivity文件:
public class LoginActivity extends AppCompatActivity {


    protected void onCreate(Bundle savedInstanceState){


        super.onCreate(savedInstanceState);
        setContentView(R.layout.activity_login);
        //接收传值
        Intent intent = getIntent();
        String name = intent.getStringExtra("name");
        String sex = intent.getStringExtra("sex");
        String[] hobbies = intent.getStringArrayExtra("hobby");
        Log.i("LoginActivity",name+sex+hobbies);//打印
    }
}
4.4_intent传值自定义类
只要继承了parcelable或者serializable接口就可以进行传值,注意接收的时候需要强行转成此自定义类的类型
4.5_回传数据(略)
5_小问题汇总
5.1_去除AppCompatActivity自带标题

进入AndroidManifest.xml文件
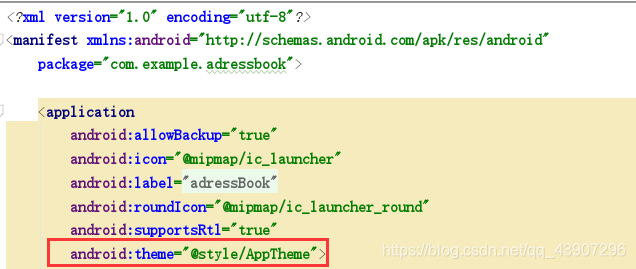
ctrl进入AppTheme改代码如下
<style name="AppTheme" parent="Theme.AppCompat.Light.NoActionBar">
5.2_解决不能安装问题
Android studio 打包apk后发给别人,安装失败。
失败原因显示:应用是非正式发布版本,当前设备不支持安装。
在自己手机上也无法安装,之后连接USB进行调试时可以运行,打包成APK安装就会显示下图错误:
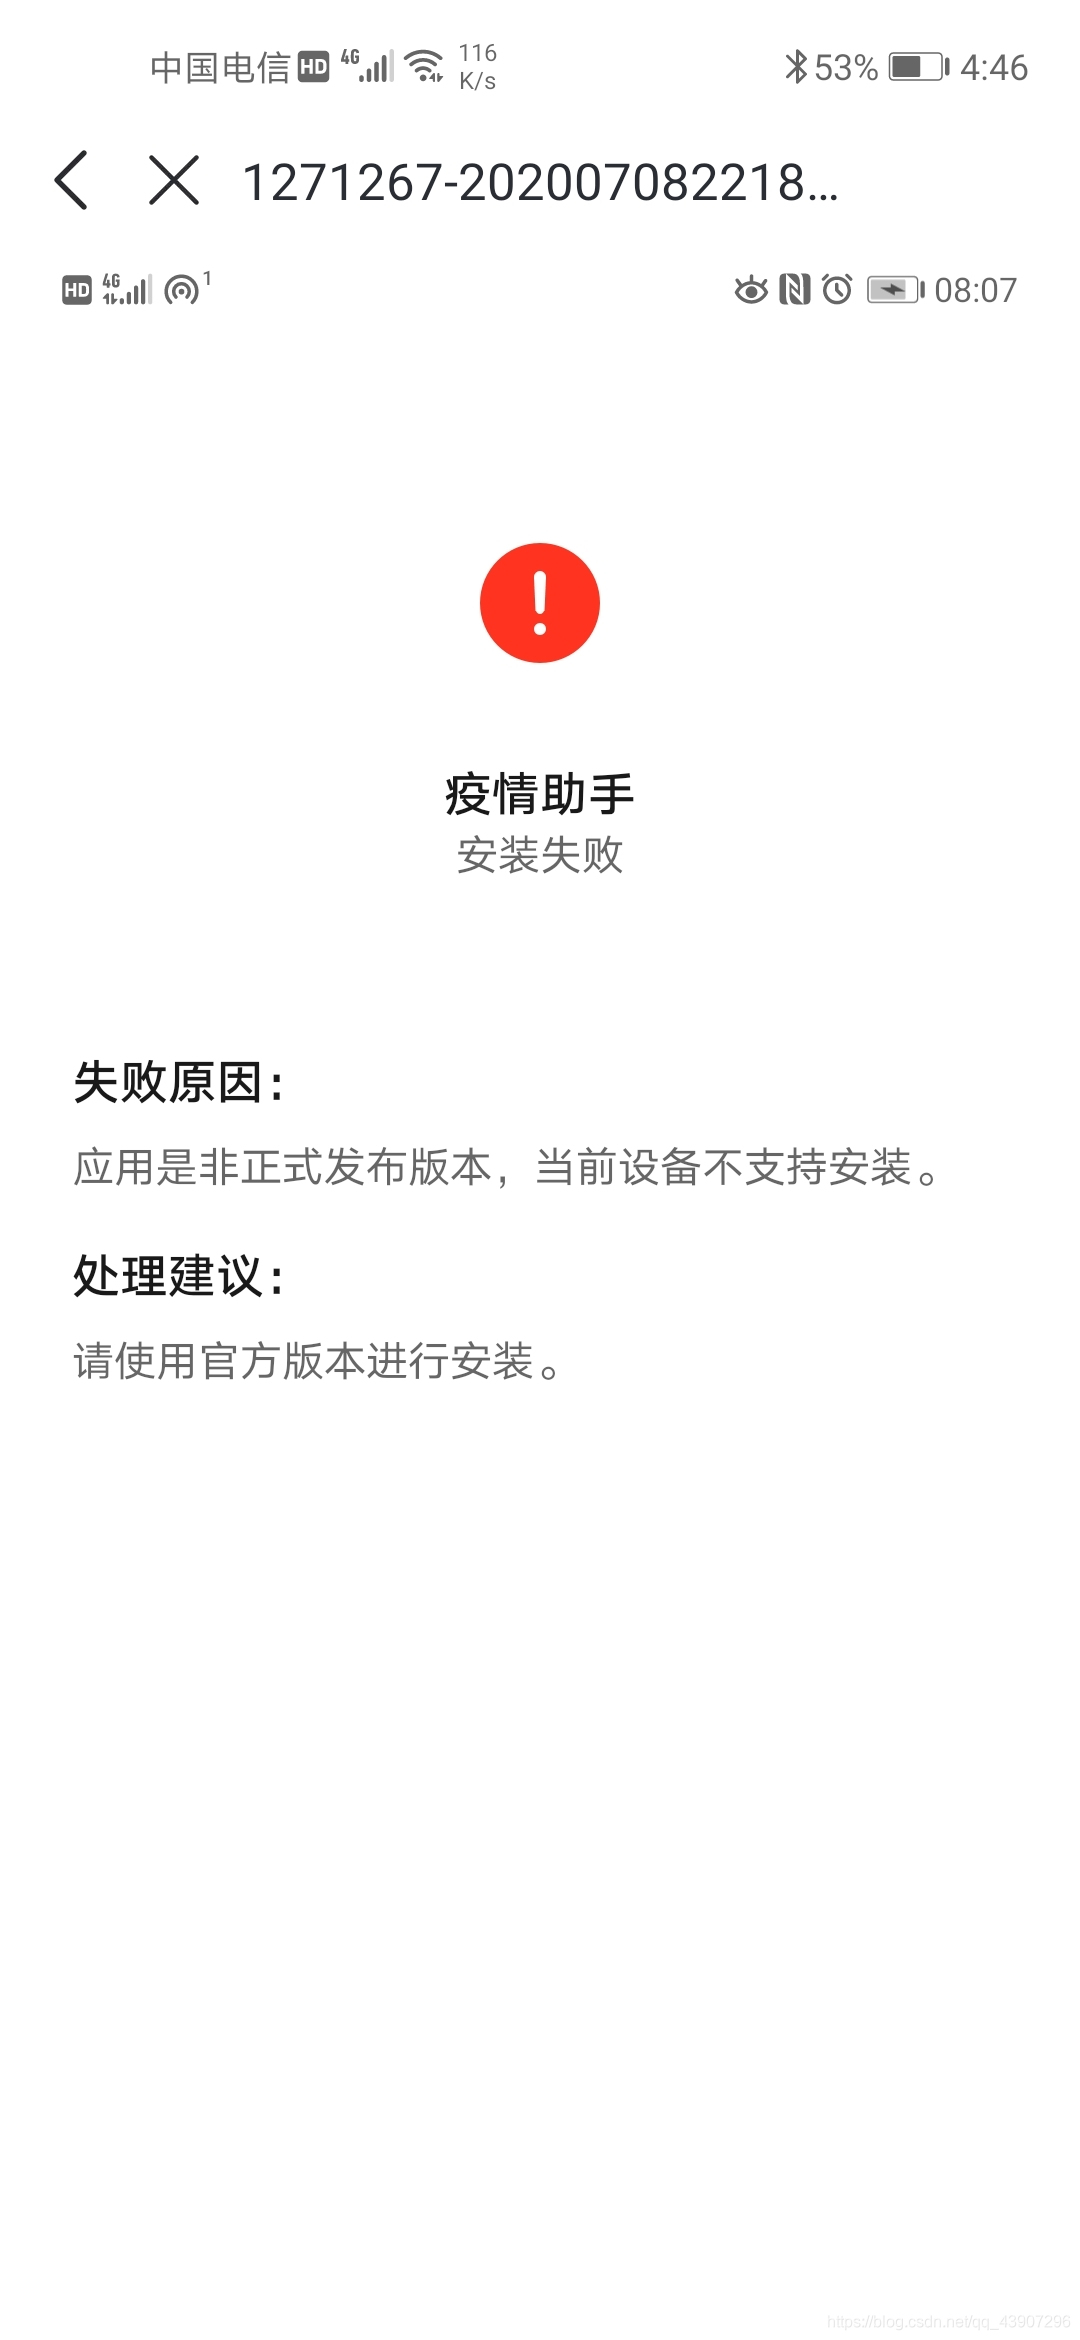
2.原因分析:
造成该问题的原因是Android Studio 3.0会在debug apk的manifest文件application标签里自动添加 android:testOnly="true"属性。该属性导致在IDE中使用Run生成的apk在大部分手机上只能用adb install -t 来安装。
这种apk在某些手机上甚至安装不了。
3.解决方法:
在gradle.properties 文件中添加如下指令:
android.injected.testOnly=false