配置文件的几种方式
1,最原始的 是application.properties 这种的是一个key=value
2,使用application.yml 一定要是applicatin 名字,否则Springboot 不认识。配置的话比较严格 key:空格属性格式如下面的所示
#实体类的
Username:
  id: ${

    random.int(10)}
  name: 娇娇
  pwd: ${

    random.long}

#thymeleaf 模板配置
spring:
  thymeleaf:
    prefix: classpath:/templates/
    suffix: .html
    cache: false
#    邮箱的配置
  mail:
    host: smtp.163.com
    username: *******2020@163.com
    password: ***************
    protocol: smtp
    default-encoding: UTF-8
    #数据库的配置
  datasource:
    driver-class-name: com.mysql.cj.jdbc.Driver
    url: jdbc:mysql://localhost:3306/op?useUnicode=true&characterEncoding=utf8&serverTimezone=GMT
    username: root
    password: 123456
#    Spring mvc 的配置
  mvc:

    view:
      prefix: /
      suffix: .jsp
#mybatis的配置
mybatis:
  configuration:
    #   sql日志显示,这里使用标准显示
    log-impl: org.apache.ibatis.logging.stdout.StdOutImpl
    #  数据库中如果有类似 如  user_name 等命名,会将 _后的字母大写,这里是为了和实体类对应
#    map-underscore-to-camel-case: true
  #  配置mapper文件的路径
  mapper-locations: classpath*:com/jj/**/dao/*.xml
  #pageHelper配置(官网推荐配置)
# 分页配置
## pagehelper 分页插件配制
pagehelper:
  reasonable: false # 禁用合理化时,如果pageNum<1或pageNum>pages会返回空数据
  support-methods-arguments: true
  params: count=countSql
  row-bounds-with-count: true
  helper-dialect: mysql
  auto-dialect: com.github.pagehelper.dialect.helper.MySqlDialect
为什么使用yml 而不用properties

用yml 赋值的几个小demo
实体类,如果导入@ConfigurationProperties 报红的话加入下面的依赖
     <dependency>
            <groupId>org.springframework.boot</groupId>
            <artifactId>spring-boot-configuration-processor</artifactId>
            <optional>true</optional>
        </dependency>
@Component
@ConfigurationProperties(prefix = "username")
public class Username {


    private int id;

    private String name;

    private String pwd;

    public Username() {


    }
yml 的配置
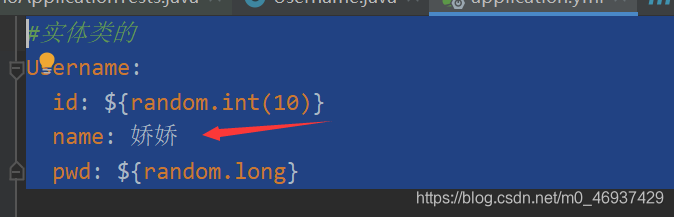
#实体类的
Username:
  id: ${

    random.int(10)}
  name: 娇娇
  pwd: ${

    random.long}
测试类
package com.jj.demo;

import com.jj.demo.pojo.Username;
import org.junit.jupiter.api.Test;
import org.springframework.beans.factory.annotation.Autowired;
import org.springframework.boot.test.context.SpringBootTest;

@SpringBootTest
class DemoApplicationTests {


@Autowired
private Username username;
    @Test
    void contextLoads() {


        System.out.println("username = " + username);
    }

}
yml 的松散绑定
数据库中如果有类似 如 user_name 等命名,会将 _后的字母大写,这里是为了和实体类对应
JSR303 数据校验
小demo 加入我们在name 上加
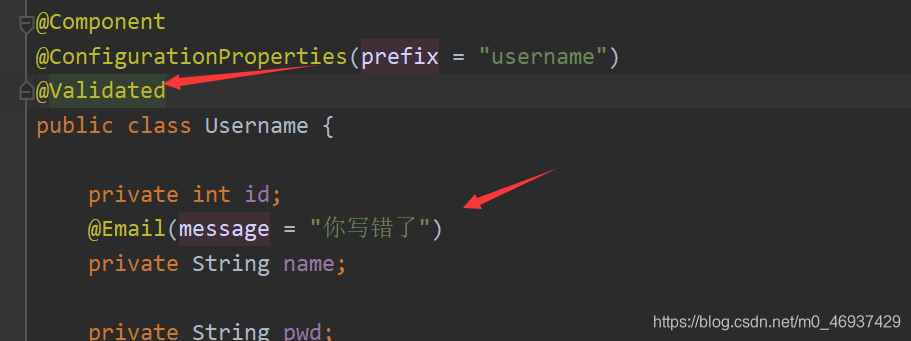
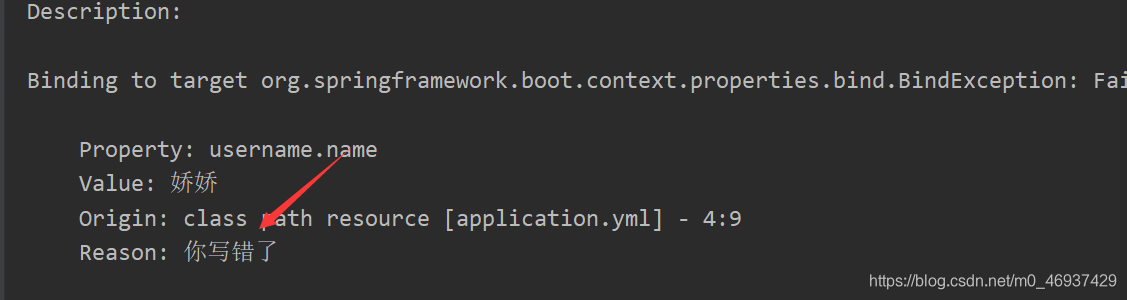
但是我们的 yml 里写的是
 此刻就会报错
空检查
- @Null 验证对象是否为null
- @NotNull 验证对象是否不为null, 无法查检长度为0的字符串
- @NotBlank 检查约束字符串是不是Null还有被Trim的长度是否大于0,只对字符串,且会去掉前后空格.
- @NotEmpty 检查约束元素是否为NULL或者是EMPTY.
Booelan检查
5. @AssertTrue 验证 Boolean 对象是否为 true
6. @AssertFalse 验证 Boolean 对象是否为 false
长度检查
7. @Size(min=, max=) 验证对象(Array,Collection,Map,String)长度是否在给定的范围之内
8. @Length(min=, max=) string is between min and max included.
日期检查
9. @Past 验证 Date 和 Calendar 对象是否在当前时间之前
10. @Future 验证 Date 和 Calendar 对象是否在当前时间之后
11. @Pattern验证 String 对象是否符合正则表达式的规则
20.@Max(value=120,message=“年龄最大不能查过120”)验证字段最大值,并给出了默认值和错误提示信息
21.@Email(message=“邮箱格式错误”)判断字段是否为邮件格式。
配置文件放的位置以及位置的先后顺序
1,项目路径下的config 文件夹配置文件
2,项目路径下配置文件
3,资源路径下配置文件
4,资源路径下配置文件
**如果需要配置多个端口号可以用以下的这种方式 **
---
server:
  port: 8081
spring:
  profiles: dev
---
server:
  port: 8082
spring:
  profiles: dev
---
server:
  port: 8083
spring:
  profiles: test
xxx.properties跟配置文件的关系
1,spring boot 启动会加载大量的自动配置类
2, 如果我们需要的功能在不在Springboot 默认配置类中
3, 可以看看我们组件在不在自动配置类里,如果不在的话
4,给容器中自动配置类,就会从properties里拿到。
xxxx AutoConfigurartion 自动配置类,添加组件
xxx.properties :封装配置文件中相关的属性
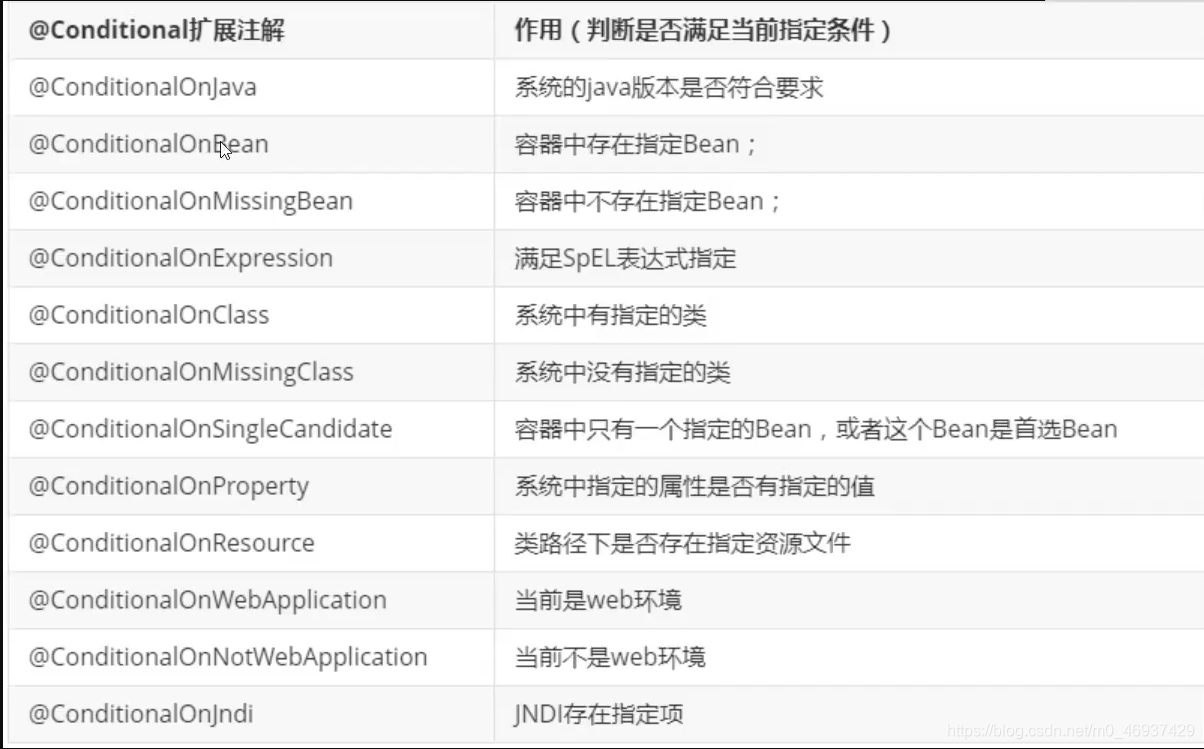
一些注解