什么是学习,一个很小的知识,从最初的让你无从下手到最后的任你摆布。从当初的懵懂无知到
知识和阅历的提升,这就是成长吧!
这年头谁还不会NIO!
预备知识
提起IO,当然不能忘了传统的IO,当然这种传统也是相对而言的,关于传统IO,可以看我的博客IO如此简单,如有问题,欢迎留言。既然我们要学习NIO,就要知道它跟传统IO相比有什么样的优势,这种优势不是随随便便的背诵度娘,而是自己总结,比如可以用传统IO和NIO分别写个聊天室、发送同样大小的文件,比较时长等等。
你应该知道的IO模型
- Java BIO:同步并阻塞,服务器实现模式为一个连接一个线程,适用于连接数目较小且固定的架构
- Java NIO:同步非阻塞,服务器实现模式为一个线程处理多个请求(连接),适用于连接数目多且连接比较短(轻操作)的架构
- Java AIO:异步非阻塞,适用于连接数目较多且连接比较长(重操作)的架构
回忆BIO中TCP编程简单流程
- 服务器端启动一个ServerSocket,绑定监听端口
- 客户端启动Socket与服务器端进行通信,默认情况下服务器端需要对每个客户建立一个线程与之通讯
- 客户端发出请求后,先咨询服务器是否有线程响应,如果没有则会等待,或者被拒绝
- 如果有响应,客户端线程会等待请求结束后,再继续执行
NIO三大组件
缓冲区
类别
ByteBuffer、CharBuffer、DoubleBuffer、FloatBuffer、IntBuffer、LongBuffer、ShortBuffer均继承自抽象类Buffer,尽管他们本身也均是抽象类
获取方式
ByteBuffer.allocate(int capacity);//分配一个指定大小的缓冲区
基本属性
| 名称 | 说明 |
|---|---|
| capacity | 表示缓冲区最大存储数据的容量,一旦声明不能改变 |
| limit | 分割可读数据与不可读数据,其后的数据不可读 |
| position | 表示缓冲区中正在操作数据的位置 |
| mark | 调用mark()方法可以记录当前position的位置,当调用reset()方法时可以恢复到此位置 |
重要方法介绍
-
ByteBuffer put(byte [] src);//存入数据
ByteBuffer buffer = ByteBuffer.allocate(1024);

        System.out.println(buffer.position());
        System.out.println(buffer.limit());
        System.out.println(buffer.capacity());

        buffer.put("a".getBytes());
        System.out.println(buffer.position());
        System.out.println(buffer.limit());
        System.out.println(buffer.capacity());

        buffer.put("d".getBytes());
        System.out.println(buffer.position());
        System.out.println(buffer.limit());
        System.out.println(buffer.capacity());
执行上面代码后发现,每次往缓冲区中存入数据时,position的值都会增加以指向下次操作字节的位置,我们来看一下源码实现,put方法中一定调用了此方法
    final int nextPutIndex() {

                              // package-private
        if (position >= limit)
            throw new BufferOverflowException();
        return position++;
    }
补充一点,首先我们要明确ByteBuffer是抽象类,不能被实例化,那么我们是如何得到ByteBuffer引用从而指向其对象的呢?一定是有一个类继承了该抽象类ByteBuffer,回顾下刚刚分配缓冲区的代码,我们调用的静态方法allocate,打开源码看一下,哦!,是HeapByteBuffer类,它继承了ByteBuffer
public static ByteBuffer allocate(int capacity) {


        if (capacity < 0)
            throw new IllegalArgumentException();
        return new HeapByteBuffer(capacity, capacity);
    }
我们看下它的put方法
    public ByteBuffer put(byte[] src, int offset, int length) {


        checkBounds(offset, length, src.length);
        if (length > remaining())
            throw new BufferOverflowException();
        System.arraycopy(src, offset, hb, ix(position()), length);
        position(position() + length);//position值得设置
        return this;
    }
再看一下put方法得另一个重载方法
public ByteBuffer put(byte x) {


    hb[ix(nextPutIndex())] = x;//的确调用了nextPutIndex()方法
    return this;
}
-
ByteBuffer get(byte [] dst);//获取数据 -
ByteBuffer flip();//切换读取数据模式
NIO中的缓冲区是全双工的,也就是既可以写,又可以读,不同于传统的IO,那么,怎么知道现在该写还是该读呢?就是flip()方法,先看下方法实现
    public final Buffer flip() {


        limit = position;
        position = 0;
        mark = -1;
        return this;
    }
一看代码,清楚了许多,首先将limit赋值为当前position的值,然后将position赋值为0,从而当我们读取数据的时候,便可以从position开始读,当读到limit位置时,就不能读了,我们写个代码测试下
ByteBuffer buffer = ByteBuffer.allocate(1024);//分配固定大小的缓冲区
        String word = "Hello NIO!";
        buffer.put(word.getBytes());//存入数据

        System.out.println(buffer.position());
        System.out.println(buffer.limit());
        System.out.println(buffer.capacity());

        buffer.flip();//将写模式切换为读模式

        System.out.println(buffer.position());
        System.out.println(buffer.limit());
        System.out.println(buffer.capacity());

        byte[] dst = new byte[buffer.limit()];//buffer.limit指数据长度
        buffer.get(dst);//读取数据到dst数组中

        System.out.println(buffer.position());
        System.out.println(buffer.limit());
        System.out.println(buffer.capacity());

        System.out.println(new String(dst));
大家有没有疑问,读取完数据后,再次切换读写模式,各个属性的值又会是多少呢?我们试一下。
其实通过flip()方法的实现也可以知道,limit的值为position的值,position值被置为0,再来做个测试,我们往里写数据,会不会出现问题呢?
        System.out.println("再次切换");
        buffer.flip();
        System.out.println(buffer.position());
        System.out.println(buffer.limit());
        System.out.println(buffer.capacity());

        word = "Hello Java NIO!";
        buffer.put(word.getBytes());
[外链图片转存失败,源站可能有防盗链机制,建议将图片保存下来直接上传(img-G5dAbS5b-1600599947292)(C:\Users\ASUS\AppData\Roaming\Typora\typora-user-images\image-20200919102939267.png)]
出问题了哦!不解释!
-
Buffer rewind();//倒带这个缓冲区
还是,先看源码
    public final Buffer rewind() {


        position = 0;
        mark = -1;
        return this;
    }
一看便知,就是将position的值置为0了,他的功能是啥,大家想一想,是不是可以实现多次读啊,我想读几次就读几次。
-
Buffer clear();
    public final Buffer clear() {
        position = 0;
        limit = capacity;
        mark = -1;
        return this;
    }
一看名字就知道,清空嘛,上面我们发现当想再次往缓冲区中写入数据时,通过flip方法已经写不进去了,我们可以用clear一下,重新做缓冲区!但是要注意,尽管清空了,但是里面的数据仍然还在,不妨试一下,这个注意下就可以了。
        for (int i = 0; i < 10; i++) {


            System.out.print((char) buffer.get());
        }
-
reset()和mark()
以一段代码,结束该模块
        ByteBuffer buffer = ByteBuffer.allocate(1024);//获取指定大小的缓冲区
        String word = "mark() and reset()";
        buffer.put(word.getBytes());//存入数据
        buffer.flip();//写模式切换为读模式
        byte[] dst = new byte[buffer.limit()];//够用了
        buffer.get(dst,0,2);//我只要两个,注意哦!宁要龙头不要凤尾,要头不要尾
        System.out.println(new String(dst,0,2));//看看啥玩意
        buffer.mark();//标记下,我还会回来的
        buffer.get(dst,2,2);//继续读两个
        System.out.println(new String(dst,2,2));//打印下给爷看看
        buffer.reset();//回去
        System.out.println(buffer.position());//看看position跑哪了 回2去了
        if(buffer.hasRemaining()){

    //我还能不能读啊
            System.out.println(buffer.remaining());//快告诉我
        }
非直接缓冲区和直接缓冲区

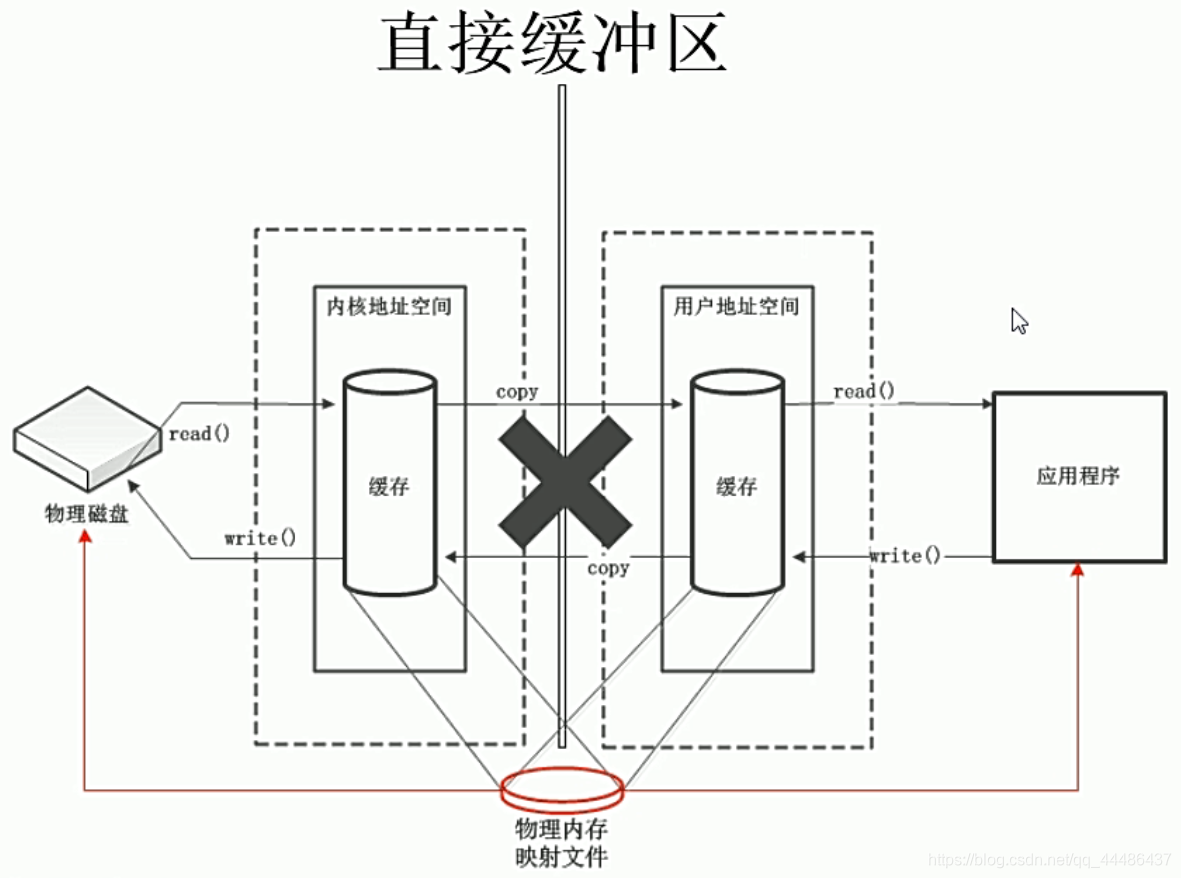
上面是原理图,看着好深奥,看代码好了,我们可以通过一下方法创建直接缓冲区
        ByteBuffer directBuffer = ByteBuffer.allocateDirect(1024);
        System.out.println(directBuffer.isDirect());//true

        ByteBuffer nonDirectBuffer = ByteBuffer.allocate(1024);
        System.out.println(nonDirectBuffer.isDirect());//false
通道
概念及实现
用于源节点和目标节点的连接,在JAVA NIO中负责缓冲区中数据的传输,其本身不存储数据,需配合缓冲区使用
通过查看API文档我们发现,Channel是一个接口,它的实现类有许多,我们提炼出几个最常用的
FileChannel//用于读取、写入、映射和操作文件的通道
ServerSocketChannel//用于TCP协议服务器端信息传输通道
SocketChannel//用于TCP协议客户端信息传输通道
DatagramChannel//用于UDP协议的信息传输通道
获取
- 对支持通道的类均提供了getChannel的方法
        FileChannel channel1 = new FileInputStream("channel.txt").getChannel();
        FileChannel channel2 = new RandomAccessFile((File) null,null).getChannel();
        ServerSocketChannel serverSocketChannel = new ServerSocket().getChannel();
        SocketChannel socketChanne = new Socket().getChannel();
        DatagramChannel datagramChanne = new DatagramSocket().getChannel();
- 通过各个通道的静态方法open()获取
        FileChannel fileChannel = FileChannel.open(null);
        ServerSocketChannel serverSocketChannel = ServerSocketChannel.open();
        SocketChannel socketChannel = SocketChannel.open();
        DatagramChannel datagramChannel = DatagramChannel.open();
- 通过Files工具类的静态方法newByteChannel获取
数据传输(仅对于FileChannel)
public abstract long transferFrom(ReadableByteChannel src,long position, long count);//从给定的可读字节通道将字节传输到该通道的文件中
public abstract long transferTo(long position, long count,WritableByteChannel target);//将该通道文件的字节传输到给定的可写字节通道
案例
- 利用通道完成文件的复制(非直接缓冲区)
        //案例一:利用通道完成文件的复制
        FileChannel inChannel = null;
        FileChannel outChannel = null;
        try {


            inChannel = new FileInputStream("channel.txt").getChannel();//获取文件输入流的通道
            outChannel = new FileOutputStream("study.txt").getChannel();//获取文件输出流的通道
            ByteBuffer buffer = ByteBuffer.allocate(1024);//创建指定大小的非直接缓冲区
            while (inChannel.read(buffer)!=-1){

    //若没有读取到文件末尾,则将数据读取到缓冲区中
                buffer.flip();//写之前,一定一定一定记得切换读写模式
                outChannel.write(buffer);//将缓冲区数据写入到文件输出流的通道中
                buffer.clear();//清空缓冲区
            }
        } catch (FileNotFoundException e) {


            e.printStackTrace();
        } catch (IOException e) {


            e.printStackTrace();
        }finally {


            if(inChannel!=null){


                try {


                    inChannel.close();
                } catch (IOException e) {


                    e.printStackTrace();
                }
            }
            if(outChannel!=null){


                try {


                    outChannel.close();
                } catch (IOException e) {


                    e.printStackTrace();
                }
            }
        }
- 使用直接缓冲区(内存映射文件)完成文件的复制
//使用直接缓冲区(内存映射文件)完成文件的复制
FileChannel inChannel = null;
FileChannel outChannel = null;
        try {


            inChannel = FileChannel.open(Paths.get("channel.txt"), StandardOpenOption.READ);//建立通道 读
            outChannel = FileChannel.open(Paths.get("study.txt"),StandardOpenOption.CREATE_NEW,StandardOpenOption.READ,StandardOpenOption.WRITE);//建立通道 读写 若文件不存在则创建 否则报错
            MappedByteBuffer inBuffer = inChannel.map(FileChannel.MapMode.READ_ONLY, 0, inChannel.size());//获取缓冲区
            MappedByteBuffer outBuffer = outChannel.map(FileChannel.MapMode.READ_WRITE, 0, inChannel.size());
            byte[] dst = new byte[(int) inChannel.size()];//因为在内存中
            inBuffer.get(dst);//直接得到数据
            outBuffer.put(dst);//再写回去
        } catch (IOException e) {


            e.printStackTrace();
        }
- 通道之间数据传输
//通道之间数据传输
FileChannel inChannel = null;
FileChannel outChannel = null;
try {


            inChannel = FileChannel.open(Paths.get("channel.txt"), StandardOpenOption.READ);
            outChannel = FileChannel.open(Paths.get("study.txt"),StandardOpenOption.CREATE_NEW,StandardOpenOption.READ,StandardOpenOption.WRITE);
//            inChannel.transferTo(0,inChannel.size(),outChannel);
            outChannel.transferFrom(inChannel,0,inChannel.size());
        } catch (IOException e) {


            e.printStackTrace();
        }finally {


            if(inChannel!=null){


                try {


                    inChannel.close();
                } catch (IOException e) {


                    e.printStackTrace();
                }
            }
            if(outChannel!=null){


                try {


                    outChannel.close();
                } catch (IOException e) {


                    e.printStackTrace();
                }
            }
        }
分散读取和聚集写入
        FileChannel channel = null;
        FileChannel channel1 = null;
        try {


            channel = new RandomAccessFile("channel.txt","rw").getChannel();
            //分散读取
            ByteBuffer buffer1 = ByteBuffer.allocate(100);
            ByteBuffer buffer2 = ByteBuffer.allocate(1024);
            ByteBuffer [] buffers = {

    buffer1,buffer2};
            channel.read(buffers);//分散读取

            for (ByteBuffer buffer : buffers) {


                buffer.flip();//模式切换
            }

            System.out.println(new String(buffer1.array()));
            System.out.println("======================华丽丽======================");
            System.out.println(new String(buffer2.array()));

            //聚集写入
            channel1 = new RandomAccessFile("study.txt", "rw").getChannel();
            channel1.write(buffers);//聚集写入
        } catch (FileNotFoundException e) {


            e.printStackTrace();
        } catch (IOException e) {


            e.printStackTrace();
        }finally {


            if(channel!=null){


                try {


                    channel.close();
                } catch (IOException e) {


                    e.printStackTrace();
                }
            }
            if(channel1!=null){


                try {


                    channel1.close();
                } catch (IOException e) {


                    e.printStackTrace();
                }
            }
        }
通过以上的案例联系,你是否掌握了缓冲区和通道的使用了呢?如果你仔细写了代码,就会发现,他们是很灵活的,光获取方式就有好几种,你应该知道,读取数据的数据,拿非直接缓冲区来说,如果我们要发送消息,或者或往通道中写入数据,我们应该怎么做呢?第一步,将数据写入字节数据;第二部,将字节数组的数据写入缓冲区中,即通过put()方法,第三步,将缓冲区放到通道中,当我们读取数据时,道理一样。此外,还应该注意缓冲区读写模式的交换。
字符集
有个老师说(我不懂,这锅我不背):编码指字符串->字节编码;解码指字节数组->字符串
Charset charset = Charset.forName("GBK");//获取指定字符集
CharsetEncoder encoder = charset.newEncoder();//获取编码器
CharsetDecoder decoder = charset.newDecoder();//获取解码器
CharBuffer sourceCharBuffer = CharBuffer.allocate(1024);
sourceCharBuffer.put("乐乐乐");
sourceCharBuffer.flip();
//编码
ByteBuffer byteBuffer = encoder.encode(sourceCharBuffer);
printInfo(byteBuffer);
for (int i = 0; i < byteBuffer.limit(); i++) {


	System.out.println(byteBuffer.get());
}
printInfo(byteBuffer);
byteBuffer.flip();
//解码
CharBuffer destinationCharBuffer = decoder.decode(byteBuffer);
System.out.println(destinationCharBuffer.toString());
byteBuffer.flip();
printInfo(byteBuffer);
Charset utfCharSet = Charset.forName("UTF-8");
CharBuffer str = utfCharSet.decode(byteBuffer);
System.out.println(str.toString());

public static void printInfo(ByteBuffer byteBuffer){


	System.out.println(byteBuffer.position());
	System.out.println(byteBuffer.limit());
	System.out.println(byteBuffer.capacity());
}
选择器
功能
能够检测多个注册的通道上是否有事件发生(多个Channel以事件的方式可以注册到同一个Selector)
常用方法
public static Selector open();//得到一选择器对象
public int select(long timeout);//监控所有注册的通道,当其中有IO操作可以进行时,将对应的SelectionKey加入到内部集合中并返回,参数用来设置超时事件,其重载方法无参数,为阻塞方法
public Set<SelectionKey> selectedKeys();//从内部集合中得到所有的SelectionKey
public abstract Selector wakeup();//唤醒selector
public abstract int selectNow();//不阻塞,立马返回
使用过程
- 当客户端连接时,会通过ServerSocketChannel得到SocketChannel
- 通过register(Selector selector,int ops)方法将SocketChannel注册到Selector上,一个Selector可以注册多个SocketChannel
- 注册后返回一个SelectionKey,会和该Selector关联
- Selector监听select方法,返回有事件发生的通道的个数
- 进一步得到各个有事件发生的selectedKeys集合
- 通过迭代器遍历selectedKeys中的每一个key,逆向得到SocketChannel
- 通过得到的SocketChannel完成读写操作
案例演示
//Server
import java.io.IOException;
import java.net.InetSocketAddress;
import java.nio.ByteBuffer;
import java.nio.channels.*;
import java.util.Iterator;
import java.util.Set;

public class NIOServer {


    public static void main(String[] args) throws IOException {


        ServerSocketChannel server = ServerSocketChannel.open();
        server.bind(new InetSocketAddress(8888));
        Selector selector = Selector.open();
        server.configureBlocking(false);//设置为非阻塞
        server.register(selector, SelectionKey.OP_ACCEPT);//把ServerSocketChannel注册到Selector
        while (true) {


            if (selector.select(1000) == 0) {


                System.out.println("服务器等待了1秒,无连接");
                continue;
            }
            Set<SelectionKey> selectionKeys = selector.selectedKeys();
            Iterator<SelectionKey> keyIterator = selectionKeys.iterator();
            while (keyIterator.hasNext()) {


                SelectionKey key = keyIterator.next();
                if (key.isAcceptable()) {


                    SocketChannel socket = server.accept();
                    //将socketChannel注册到Selector,关联一个Buffer
                    System.out.println("客户端连接成功 生成了一个SocketChannel "+socket);
                    socket.configureBlocking(false);
                    socket.register(selector, SelectionKey.OP_READ, ByteBuffer.allocate(1024));
                } else if (key.isReadable()) {


                    SocketChannel channel = (SocketChannel) key.channel();//通过key获取Channel
                    //获取到该Channel关联的Buffer
                    ByteBuffer buffer = (ByteBuffer) key.attachment();
                    channel.read(buffer);
                    System.out.println("from 客户端 " + new String(buffer.array()));
                }
                //手动从集合中移除当前的SelectionKey,防止重复操作
                keyIterator.remove();
            }
        }
    }
}
import java.io.IOException;
import java.net.InetSocketAddress;
import java.nio.ByteBuffer;
import java.nio.channels.SocketChannel;

public class NIOClient {


    public static void main(String[] args) throws IOException {


        SocketChannel socket = SocketChannel.open();
        socket.configureBlocking(false);
        if (!socket.connect(new InetSocketAddress("127.0.0.1", 8888))){


            while (!socket.finishConnect()){


                System.out.println("因为连接需要事件,客户端不会阻塞,可以做其他工作...");
            }
        }
        String str = "Hello,NIO";
        ByteBuffer buffer = ByteBuffer.wrap(str.getBytes());//根据字节数组的大小创建缓冲区
        socket.write(buffer);
        System.in.read();
    }
}
connect方法和finishConnect方法刨析
public boolean connect(SocketAddress remote)
使底层Socket建立远程连接,当SocketChannel处于非阻塞模式时,如果立即连接成功,该方法返回true,如果不能立即连接成功,该方法返回false,程序过会儿必须调用finishConnect()方法来完成连接,当SocketChannel处于阻塞模式,如果立即连接成功,该方法返回true,如果不能立即连接成功,将进入阻塞状态,出现I/O异常
public boolean finishConnect
试图完成连接远程服务器的操作,在非阻塞模式下,建立连接从重调用SocketChannel的connect方法开始,到调用finishConnect()方法结束,如果finishConnect方法顺利完成连接,则finishConnect方法立即返回true,如果连接操作还没有完成,则立即返回false,如果连接操作中遇到异常而失败,则抛出相应的I/O异常
百炼成钢
下面,我们用传统的IO和NIO分别来写一个Socket小程序,实现文件的传输功能,写以前呢,得先明白一点,到目前为止,我们大概上学习了两种项目结构,一种是普通的src文件目录结构,另一种是maven项目的目录结构,到后面的学习中,难免会对一些文件进行操作,所以学习访问文件的方式就显得尤为重要,为此,我们先去百度一探究竟,这点很重要,它会使得在接下的所要的写的Socket小程序中,一切都得心应手。
- 注意点一:对于maven项目来说,当我们在test目录下使用
System.getProperty("user.dir")来获取当前所在的位置时,获取的是项目下模块的根路径,但是在main文件下获取当前所在位置时,获取的是项目所在的根路径。 - 第一种可以理解为绝对路径,那相对路径呢?当包的层级很多的时候,你还要通过判断当前文件和目标文件的位置关系,不友好
- 我们可以将文件放置到src目录下,然后使用反射来获取,既可以获取绝对路径,又可以直接该文件的绝对路径,注意的是,这个获取是动态的,不会因不同计算机而异。
        //首先将666.png文件放置到resources目录下,如果是普通的java项目,放到src目录下即可
        URL url = Demo.class.getClassLoader().getResource("666.png");
        String path = url.getPath();//直接获取绝对路径
        System.out.println(path);

        //当我们需要流时
        InputStream is = Demo.class.getClassLoader().getResourceAsStream("666.png");
        System.out.println(is == null);
文件传输
传统IO
public class Client {


    public static void main(String[] args) {


        Socket socket = null;
        InputStream is = null;//输入流
        try {


            socket = new Socket("127.0.0.1", 8888);
            is = Client.class.getClassLoader().getResourceAsStream("water.jpg");
            int len = 0;
            byte[] buf = new byte[1024];
            while ((len = is.read(buf)) != -1) {


                socket.getOutputStream().write(buf, 0, len);
                System.out.println("正在发送数据。。。");
            }
            socket.shutdownOutput();//告诉服务器文件传送完毕

            System.out.println("数据发送完毕,正在等待服务器端响应。。。");

            while ((len = socket.getInputStream().read(buf)) != -1) {


                System.out.println(new String(buf, 0, len));
            }
        } catch (IOException e) {


            e.printStackTrace();
        } finally {


            if (is != null) {


                try {


                    is.close();
                } catch (IOException e) {


                    e.printStackTrace();
                }
            }
            if (socket != null) {


                try {


                    socket.close();
                } catch (IOException e) {


                    e.printStackTrace();
                }
            }
        }
    }
}
public class Server {


    public static void main(String[] args) {


        FileOutputStream fos = null;
        ServerSocket server = null;
        Socket socket = null;
        try {


            server = new ServerSocket(8888);
            System.out.println("服务器已经启动。。。");
            socket = server.accept();
            System.out.println("收到一个客户端连接。。。");
            fos = new FileOutputStream("888.jpg");
            int len = 0;
            byte[] buf = new byte[1024];
            while ((len = socket.getInputStream().read(buf)) != -1) {


                fos.write(buf, 0, len);
                System.out.println("正在接受客户端数据。。。"+len);
            }
            System.out.println("数据接受完毕,正在回复客户端信息");
            socket.getOutputStream().write("收到文件".getBytes());
            socket.getOutputStream().flush();
        } catch (IOException e) {


            e.printStackTrace();
        }finally {


            if(socket!=null){


                try {


                    socket.close();
                } catch (IOException e) {


                    e.printStackTrace();
                }
            }

            if(server!=null){


                try {


                    server.close();
                } catch (IOException e) {


                    e.printStackTrace();
                }
            }
            if(fos!=null){


                try {


                    fos.close();
                } catch (IOException e) {


                    e.printStackTrace();
                }
            }
        }
    }
}
NIO
public class Client {


    public static void main(String[] args) throws IOException, URISyntaxException {


        URL url = Client.class.getClassLoader().getResource("water.jpg");
        FileChannel fileChannel = FileChannel.open(Paths.get(url.toURI()), StandardOpenOption.READ);
        SocketChannel socket = SocketChannel.open(new InetSocketAddress("127.0.0.1", 8888));
        ByteBuffer buf = ByteBuffer.allocate(1024);
        while (fileChannel.read(buf) != -1) {


            buf.flip();
            socket.write(buf);
            buf.clear();
        }
        socket.shutdownOutput();
        while (socket.read(buf) != -1) {


            buf.flip();
            System.out.println(new String(buf.array(), 0, buf.limit()));
            buf.clear();
        }
        socket.close();
        fileChannel.close();
    }
}
public class Server {


    public static void main(String[] args) throws IOException {


        FileChannel fileChannel = FileChannel.open(Paths.get(System.getProperty("user.dir"),"/NIO","/water.jpg"), StandardOpenOption.CREATE,StandardOpenOption.WRITE);
        ServerSocketChannel server = ServerSocketChannel.open();
        server.bind(new InetSocketAddress(8888));
        SocketChannel socket = server.accept();
        ByteBuffer buf = ByteBuffer.allocate(1024);
        while (socket.read(buf)!=-1){


            buf.flip();
            fileChannel.write(buf);
            buf.clear();
        }

        buf.put("收到数据".getBytes());
        buf.flip();
        socket.write(buf);

        fileChannel.close();
        socket.close();
        server.close();
    }
}
package pers.lele.blog;

import org.junit.Test;

import java.io.IOException;
import java.net.InetSocketAddress;
import java.nio.ByteBuffer;
import java.nio.channels.*;
import java.util.Date;
import java.util.Iterator;

public class TestNonBlockingNIO {


    @Test
    public void client() throws IOException {


        //1.获取通道
        SocketChannel socket = SocketChannel.open(new InetSocketAddress("127.0.0.1", 8888));

        //2.切换非阻塞模式
        socket.configureBlocking(false);

        //3.分配指定大小的缓冲区
        ByteBuffer buf = ByteBuffer.allocate(1024);

        //4.发送数据给服务端
        buf.put(new Date().toString().getBytes());

        buf.flip();
        socket.write(buf);
        buf.clear();

        //5.关闭通道
        socket.close();
    }

    @Test
    public void server() throws IOException {


        //1.获取通道
        ServerSocketChannel server = ServerSocketChannel.open();

        //2.切换非阻塞模式
        server.configureBlocking(false);

        //3.绑定连接
        server.bind(new InetSocketAddress(8888));

        //4.获取选择器
        Selector selector = Selector.open();


        /*
        SelectionKey:表示SelectableChannel和Selector之间的注册关系
            SelectionKey.OP_READ
            SelectionKey.OP_WRITE
            SelectionKey.OP_CONNECT
            SelectionKey.OP_ACCEPT
         */
        //
        //5.将通道注册到选择器上,并且指定“监听事件”
        server.register(selector, SelectionKey.OP_ACCEPT);

        //轮询式的获取选择器上已经“准备就绪”的事件
        while (selector.select() > 0) {


            //获取当前选择器中所有注册的选择键(已就绪的监听事件)
            Iterator<SelectionKey> iterator = selector.selectedKeys().iterator();
            while (iterator.hasNext()) {


                //8.获取准备“就绪”的事件
                SelectionKey key = iterator.next();
                //9.判断具体是什么事件准备就绪
                if (key.isAcceptable()) {


                    //10.若“接受就绪”,获取客户端连接
                    SocketChannel socket = server.accept();
                    //11.切换“非阻塞”模式
                    socket.configureBlocking(false);
                    //12.将该通道注册到选择器上
                    socket.register(selector, SelectionKey.OP_READ);
                }
                if (key.isReadable()) {


                    //13.获取当前选择器上“读就绪”状态的通道
                    SocketChannel socketChannel = (SocketChannel) key.channel();

                    //14 读取数据
                    ByteBuffer buf = ByteBuffer.allocate(1024);
                    int len = 0;
                    /*
                        返回-1的情况:客户端主动关闭了channel,注意是主动关闭而不是异常关闭
                        大于0的情况,就是正常的读取数据的长度
                     */
                    while ((len = socketChannel.read(buf))>0) {


                        buf.flip();
                        System.out.println("len : "+len);
                        System.out.println("limit: "+buf.limit());
                        System.out.println(new String(buf.array(),0,len));
                        buf.clear();
                    }
                }
                //15.取消选择键SelectionKey
                iterator.remove();
            }
        }
    }
}
群聊简单实现
//Server
import java.io.IOException;
import java.net.InetSocketAddress;
import java.nio.ByteBuffer;
import java.nio.channels.*;
import java.util.Iterator;
import java.util.Set;

public class Server {


    private Selector selector;
    private ServerSocketChannel server;
    private static final int PORT = 8888;

    public Server() {


        try {


            selector = Selector.open();
            server = ServerSocketChannel.open();
            server.bind(new InetSocketAddress(PORT));
            server.configureBlocking(false);
            server.register(selector, SelectionKey.OP_ACCEPT);
        } catch (IOException e) {


            e.printStackTrace();
        }
    }

    public void listen() {


        try {


            while (true) {


                if (selector.select(1000) == 0) {


                    System.out.println("服务器运行中...");
                    continue;
                }
                Set<SelectionKey> selectionKeys = selector.selectedKeys();
                Iterator<SelectionKey> iterator = selectionKeys.iterator();
                while (iterator.hasNext()) {


                    SelectionKey key = iterator.next();
                    if (key.isAcceptable()) {


                        SocketChannel socket = server.accept();
                        socket.configureBlocking(false);
                        socket.register(selector, SelectionKey.OP_READ);
                        System.out.println(socket.getRemoteAddress() + " 上线了...");
                    }
                    if (key.isReadable()) {


                        ReceiveMsg(key);
                    }
                    iterator.remove();
                }
            }
        } catch (IOException e) {


            e.printStackTrace();
        }
    }

    private void ReceiveMsg(SelectionKey key) {


        SocketChannel socket = null;
        try {


            socket = (SocketChannel) key.channel();
            ByteBuffer buffer = ByteBuffer.allocate(1024);
            int len = socket.read(buffer);
            if (len > 0) {


                String msg = new String(buffer.array(), 0, len);
                System.out.println("客户端:" + msg);
                dispatchMsg(msg,socket);
            }
        } catch (IOException e) {


            try {


                System.out.println(socket.getRemoteAddress()+"离线了...");

                //取消注册
                key.cancel();
                //关闭通道
                socket.close();
            } catch (IOException ex) {


                ex.printStackTrace();
            }
        }
    }

    private void dispatchMsg(String msg, SocketChannel self) throws IOException {


        System.out.println("服务器转发消息中");
        for (SelectionKey key : selector.keys()) {


            Channel target = key.channel();
            if (target instanceof SocketChannel && target != self) {


                SocketChannel dest = (SocketChannel) target;
                ByteBuffer buffer = ByteBuffer.wrap(msg.getBytes());
                dest.write(buffer);
            }
        }
    }

    public static void main(String[] args) {


        Server server = new Server();
        server.listen();
    }
}
import java.io.IOException;
import java.net.InetSocketAddress;
import java.nio.ByteBuffer;
import java.nio.channels.SelectionKey;
import java.nio.channels.Selector;
import java.nio.channels.SocketChannel;
import java.util.Iterator;
import java.util.Scanner;
import java.util.Set;

public class Client {


    private static final String HOST = "127.0.0.1";
    private static final int PORT = 8888;
    private Selector selector;
    private SocketChannel socket;
    private String username;

    public Client() {


        try {


            selector = Selector.open();
            socket = SocketChannel.open(new InetSocketAddress(HOST, PORT));
            socket.configureBlocking(false);
            socket.register(selector, SelectionKey.OP_READ);
            username = socket.getLocalAddress().toString().substring(1);
            System.out.println(username + " is OK... ");
        } catch (IOException e) {


            e.printStackTrace();
        }
    }

    public void sendMsg(String msg) {


        msg = username + " 说: " + msg;
        try {


            socket.write(ByteBuffer.wrap(msg.getBytes()));
        } catch (IOException e) {


            e.printStackTrace();
        }
    }

    public void receiveMsg() {


        try {


            int count = selector.select();
            if (count > 0) {


                Set<SelectionKey> selectionKeys = selector.selectedKeys();
                Iterator<SelectionKey> iterator = selectionKeys.iterator();
                while (iterator.hasNext()) {


                    SelectionKey key = iterator.next();
                    if (key.isReadable()) {


                        SocketChannel channel = (SocketChannel) key.channel();
                        ByteBuffer buffer = ByteBuffer.allocate(1024);
                        int len = channel.read(buffer);
                        System.out.println(new String(buffer.array(), 0, len));
                    }
                    iterator.remove();
                }
            }
        } catch (IOException e) {


            e.printStackTrace();
        }
    }


    public static void main(String[] args) {


        Client client = new Client();
        new Thread(new Runnable() {


            @Override
            public void run() {


                try {


                    while (true) {


                        client.receiveMsg();
                        Thread.sleep(1000);
                    }
                }catch (InterruptedException e){


                    e.printStackTrace();
                }

            }
        }).start();

        Scanner in = new Scanner(System.in);
        while (in.hasNext()){


            String word = in.nextLine();
            client.sendMsg(word);
        }
    }
}
数据报
import java.io.IOException;
import java.net.InetSocketAddress;
import java.nio.ByteBuffer;
import java.nio.channels.DatagramChannel;
import java.nio.channels.SelectionKey;
import java.nio.channels.Selector;
import java.util.Iterator;

public class Receive {


    public static void main(String[] args) throws IOException {


        DatagramChannel channel = DatagramChannel.open();
        channel.configureBlocking(false);
        channel.bind(new InetSocketAddress( 8888));
        Selector selector = Selector.open();
        channel.register(selector, SelectionKey.OP_READ);
        while (selector.select()>0){


            Iterator<SelectionKey> iterator = selector.selectedKeys().iterator();
            while (iterator.hasNext()){


                SelectionKey key = iterator.next();
                iterator.remove();
                System.out.println("key.channel(): "+ key.channel());
                if(key.isReadable()){


                    ByteBuffer buffer = ByteBuffer.allocate(1024);
                    channel.receive(buffer);
                    System.out.println("channel:"+channel);
                    System.out.println(new String(buffer.array(),0,buffer.position()));
                    buffer.clear();
                }
            }
        }
    }
}
已经到达Netty大山的脚下!