7. 移植u-boot-2016.03修改代码支持DM9000网卡
从前面uboot的打印信息可知, 网卡打印的是CS8900,然后Jz2440开发板的网卡是DM9000网卡,u-boot-2016.03也带有DM9000网卡的驱动程序,我们需要把移植过来支持JZ2440开发板。

7.1 网卡初始化过程分析
通过之前uboot启动过程的分析,我们知道网卡的初始化在uboot初始化的第二阶段,通过board_init_r函数调用init_sequence_r函数指针数组里的initr_net进行网卡的初始化,initr_net的函数代码如下:
static int initr_net(void)
{


	puts("Net:   ");
	eth_initialize();
#if defined(CONFIG_RESET_PHY_R)   /*CONFIG_RESET_PHY_R未定义*/
	debug("Reset Ethernet PHY\n");
	reset_phy();
#endif
	return 0;
}
接着跳转到eth_initialize函数,代码如下:(在net/eth_legacy.c)
int eth_initialize(void)
{


	int num_devices = 0;

	eth_devices = NULL;
	eth_current = NULL;
	eth_common_init();
	/*
	 * If board-specific initialization exists, call it.
	 * If not, call a CPU-specific one
	 */
	if (board_eth_init != __def_eth_init) {


		if (board_eth_init(gd->bd) < 0)
			printf("Board Net Initialization Failed\n");
	} else if (cpu_eth_init != __def_eth_init) {


		if (cpu_eth_init(gd->bd) < 0)
			printf("CPU Net Initialization Failed\n");
	} else {


		printf("Net Initialization Skipped\n");
	}

	if (!eth_devices) {


		puts("No ethernet found.\n");
		bootstage_error(BOOTSTAGE_ID_NET_ETH_START);
	} else {


		struct eth_device *dev = eth_devices;
		char *ethprime = getenv("ethprime");

		bootstage_mark(BOOTSTAGE_ID_NET_ETH_INIT);
		do {


			if (dev->index)
				puts(", ");

			printf("%s", dev->name);

			if (ethprime && strcmp(dev->name, ethprime) == 0) {


				eth_current = dev;
				puts(" [PRIME]");
			}

			if (strchr(dev->name, ' '))
				puts("\nWarning: eth device name has a space!"
					"\n");

			eth_write_hwaddr(dev, "eth", dev->index);

			dev = dev->next;
			num_devices++;
		} while (dev != eth_devices);

		eth_current_changed();
		putc('\n');
	}

	return num_devices;
}
从上面的代码中,我们看到了board_eth_init函数,继续跳转,它的代码如下:(在board/samsung/jz2440/jz2440.c)
int board_eth_init(bd_t *bis)
{


	int rc = 0;
#ifdef CONFIG_CS8900
	rc = cs8900_initialize(0, CONFIG_CS8900_BASE);
#endif
	return rc;
}
从上面代码可知,board_eth_init函数只调用了cs8900_initialize函数。
7.2 修改代码支持DM9000网卡
(1) 在uboot顶层目录下搜索dm9000相关的文件,输入命令:find -name "dm9000*",搜索结果如下;可知dm9000网卡的驱动程序dm9000x.c在 drivers/net/ 下。

(2) 去drivers/net/目录下的Makefile搜索dm9000字符串,搜索结果如下:

从图中可知,定义了CONFIG_DRIVER_DM9000,dm9000x.c才会被编译进uboot里(同时去掉CONFIG_CS8900)
(3) 去到uboot的配置文件jz2440.h,找到下面的宏定义:
/*
 * Hardware drivers
 */
#define CONFIG_CS8900       /* we have a CS8900 on-board */
#define CONFIG_CS8900_BASE  0x19000300
#define CONFIG_CS8900_BUS16 /* the Linux driver does accesses as shorts */
这是cs8900网卡的定义,把它去掉,加上dm9000所需要的宏:
#ifdef 0
#define CONFIG_CS8900       /* we have a CS8900 on-board */
#define CONFIG_CS8900_BASE  0x19000300
#define CONFIG_CS8900_BUS16 /* the Linux driver does accesses as shorts */
#else
#define CONFIG_DRIVER_DM9000
#endif
(4) 修改board_eth_init函数为如下:
int board_eth_init(bd_t *bis)
{


	int rc = 0;
#ifdef CONFIG_CS8900
	rc = cs8900_initialize(0, CONFIG_CS8900_BASE);
#endif
#ifdef CONFIG_DRIVER_DM9000
	rc = dm9000_initialize(bis);
#endif
	return rc;
}
(5) 从前面的u-boot-2012.04.01移植笔记的第十节DM9000网卡移植科知道以下信息:① DM9000网卡的片选引脚是nGCS4,该管脚对应的基地址是0x20000000,即DM9000网卡的基地址是0x20000000;② DM9000网卡内的CMD引脚接LADDR2,也就是说当向0x20000000地址上读写数据时,此时CMD为低,则读写的便是DM9000C的地址;向0x20000000+4地址上读写数据时,此时CMD为高,则读写的便是DM9000C的数据。所以,关于DM9000网卡总体的配置如下:
#ifdef 0
#define CONFIG_CS8900       /* we have a CS8900 on-board */
#define CONFIG_CS8900_BASE  0x19000300
#define CONFIG_CS8900_BUS16 /* the Linux driver does accesses as shorts */
#else
#define CONFIG_DRIVER_DM9000
#define CONFIG_DM9000_BASE              0x20000000
#define DM9000_IO                       CONFIG_DM9000_BASE
#define DM9000_DATA                     (CONFIG_DM9000_BASE + 4)
#endif
(5) 修改BANK4控制寄存器:因为DM9000网卡的片选引脚是nGCS4,它对应的内存空间是Bank4,BANKCON4寄存器要设置正确,需要确保BANKCON4寄存器设置为0x00000740如下图所示,否则,有可能会在数据传是出错。

7.3 测试
(1) 重新编译uboot,把uboot烧写到开发板,重新启动,串口打印信息如下:

由上图可知,串口已经打印出dm9000网卡。
(2) 设置MAC地址、IP地址、ping测试
set ethaddr 00:0c:29:4d:e4:f4  //MAC可以随便设置
set ipaddr 192.168.0.200
ping 192.168.0.106
ping的打印结果如下:(注:ping一次可能不成功,需要多ping几次)
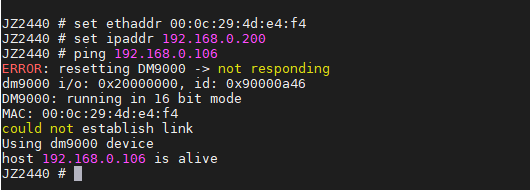
上图显示:host 192.168.0.103 is alive,说明已经ping成功。
(3) 下面我们试一下看看能不能用tftp下载。因为uboot没有集成TFTP工具,那么我们就用windows上的tftp工具进行下载内核:

由上图可知服务器的IP地址是:192.168.0.104
所以需要在开发板设置服务器IP地址:
set serverip 192.168.0.104
然后使用fttp命令从window下载内核:
tftp 30000000 uImage_4.3

启动内核:
bootm 30000000
打印信息如下,从图中可知,可以启动内核,同时也说明uboot支持了DM9000网卡。
