SpringBoot 使用cacahe 非常简单,只要把依赖导入,使用简单的注解就可以使用缓存机制了。
<dependency>
    <groupId>org.springframework.boot</groupId>
    <artifactId>spring-boot-starter-cache</artifactId>
</dependency>
常用的有三个 @Cacheble @CachePut @CacheEvict
要使这些注解生效,需要在启动类上加 @EnableCaching
SpringBoot帮我们做了什么呢?
找到CacheAutoConfiguration.class类:
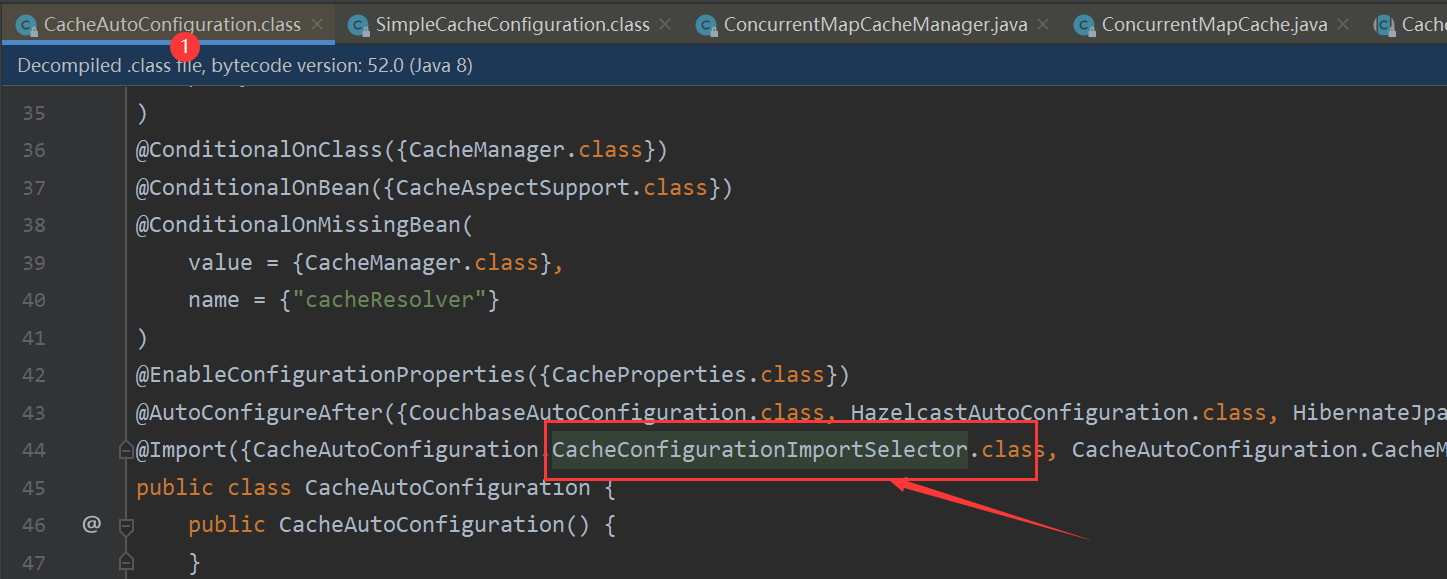
它导入了一个
CacheConfigurationImportSelector 类 点进去

可以看到 它给我们导入了一些CacheConfiguration类型的类,可以使用debug 查看一下。

从上图可知,给我们导入了很多的类,但是,我们用的是那一个CacheConfiguration呢。
可以在 application.yml 中 添加 debug, 它会自动打印debug报告。

从报告中发现。springboot默认使用的是SimpleCacheConfiguration

然后我们可以搜索 SimpleCacheConfiguration类 里面有一个ConcurrentMapManager ,点进去。

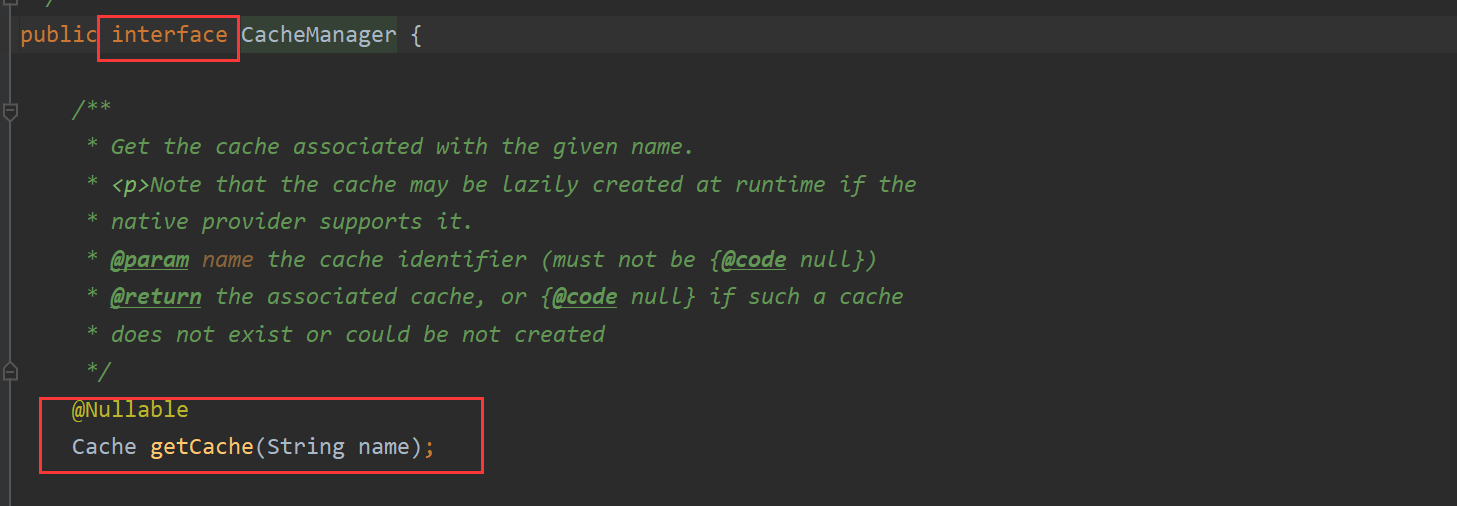
它实现了CacheManager ,再点进去。

这个CacheManager 接口 内有一个 getCache()方法。 所以 ConcurrentMapCacheManager 这个实现类 要有这个方法。
如下图所示:有一个参数 这个参数就是我们使用注解时,指定的, 下面有截图。
该方法会从cache 中 找 "name" , 找到了就方法结果。 没有找到就创建一个,调用的是createConcurrentMapCache()
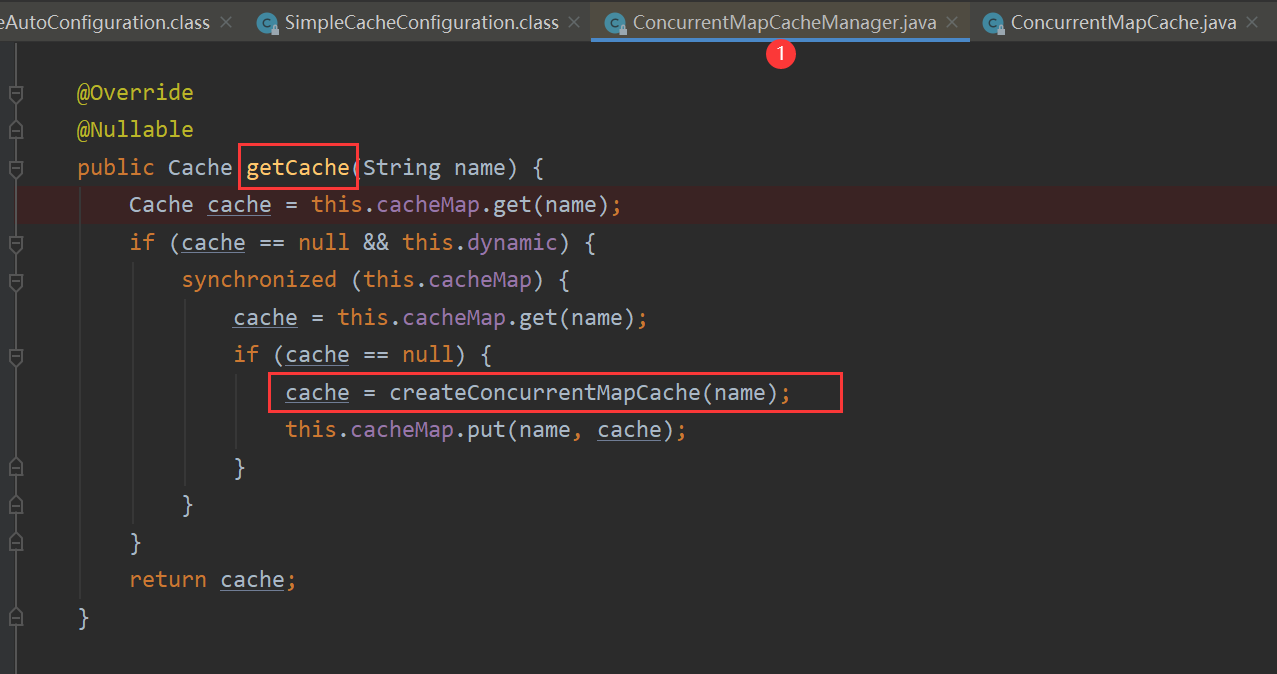
这个就是要传给getCache()方法的

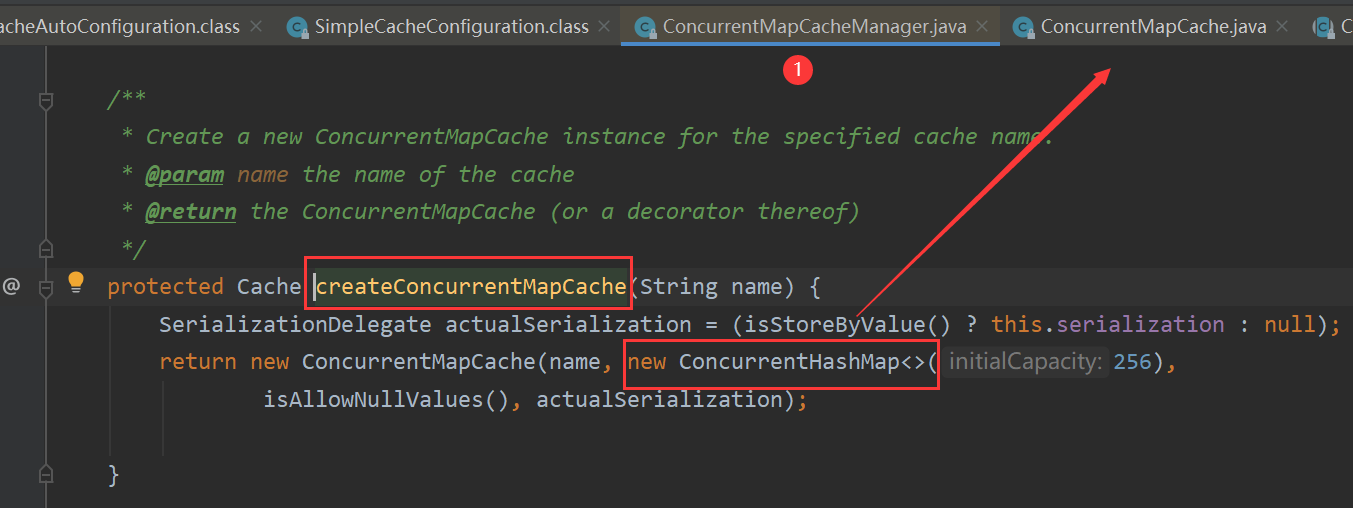
而这个createConcurrentMapCache()方法 , new ConcurrentHashMap<>
这个类 有一个lookup()方法,是从 store中获取key,(就是我们要查询的数据id) 这个key 是怎么来的呢,, 不要着急,,下面有介绍。
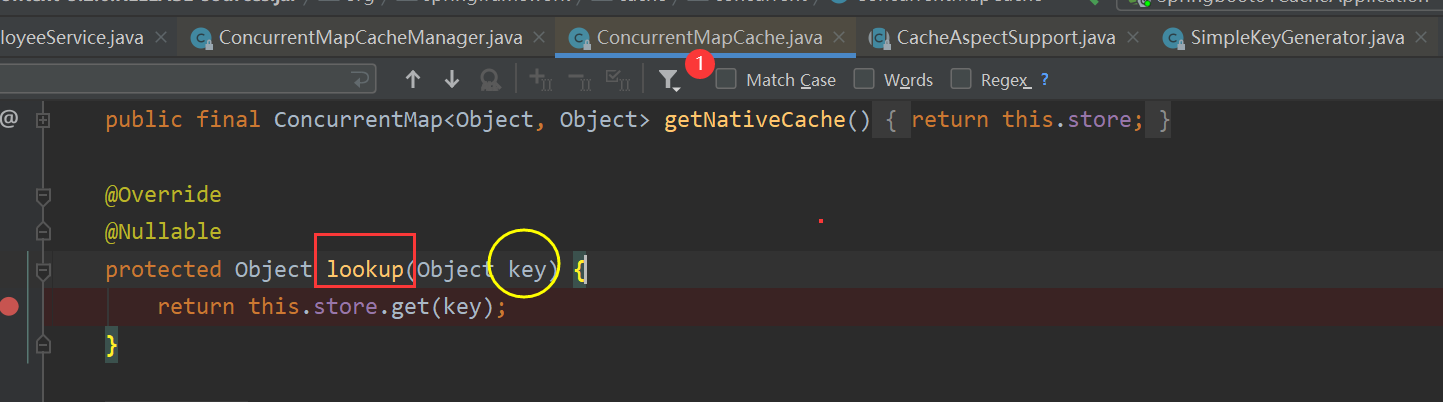
还有一个put()方法。是将key 和 service层方法返回的结果 存入store
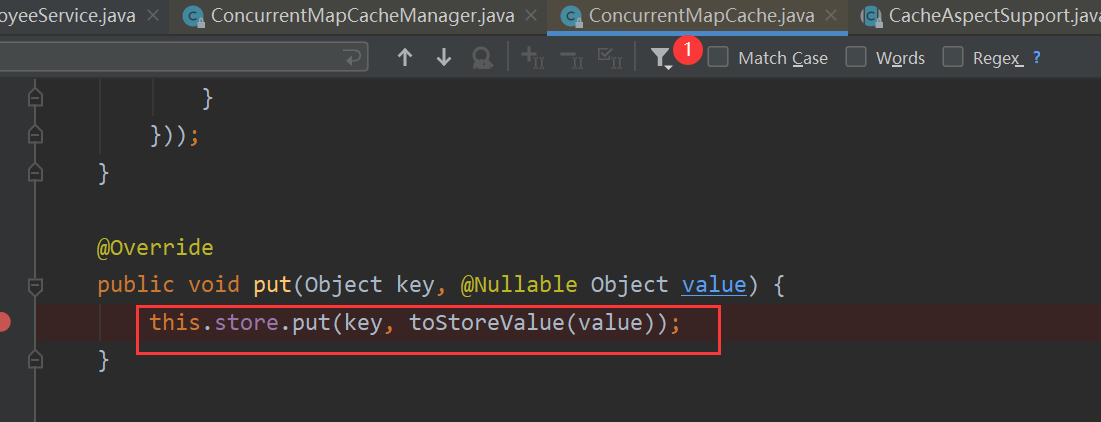
这个store 其实就是一个ConcurrentMap<>

=======================================================
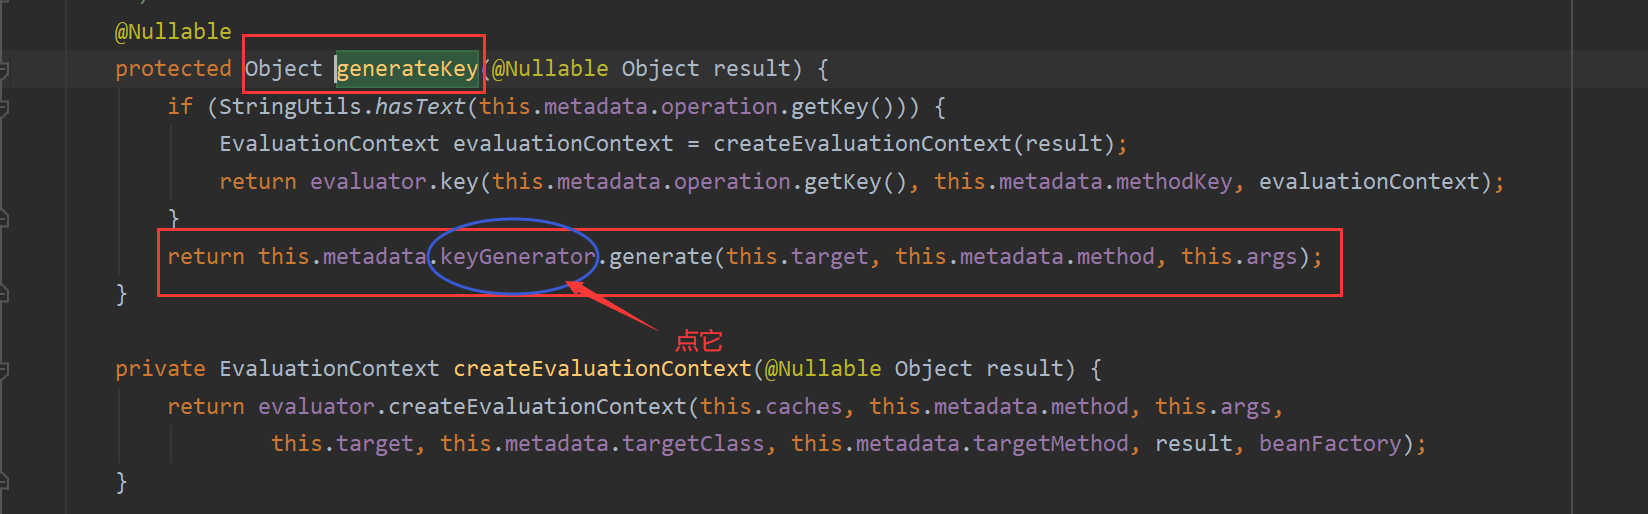
上面我们说过, 传入lookup()方法的 key 它是生成的 , 怎么生成的呢?
在CacheAsperctSupport类中,有这样一行代码,它调用了generateKey()方法。点它
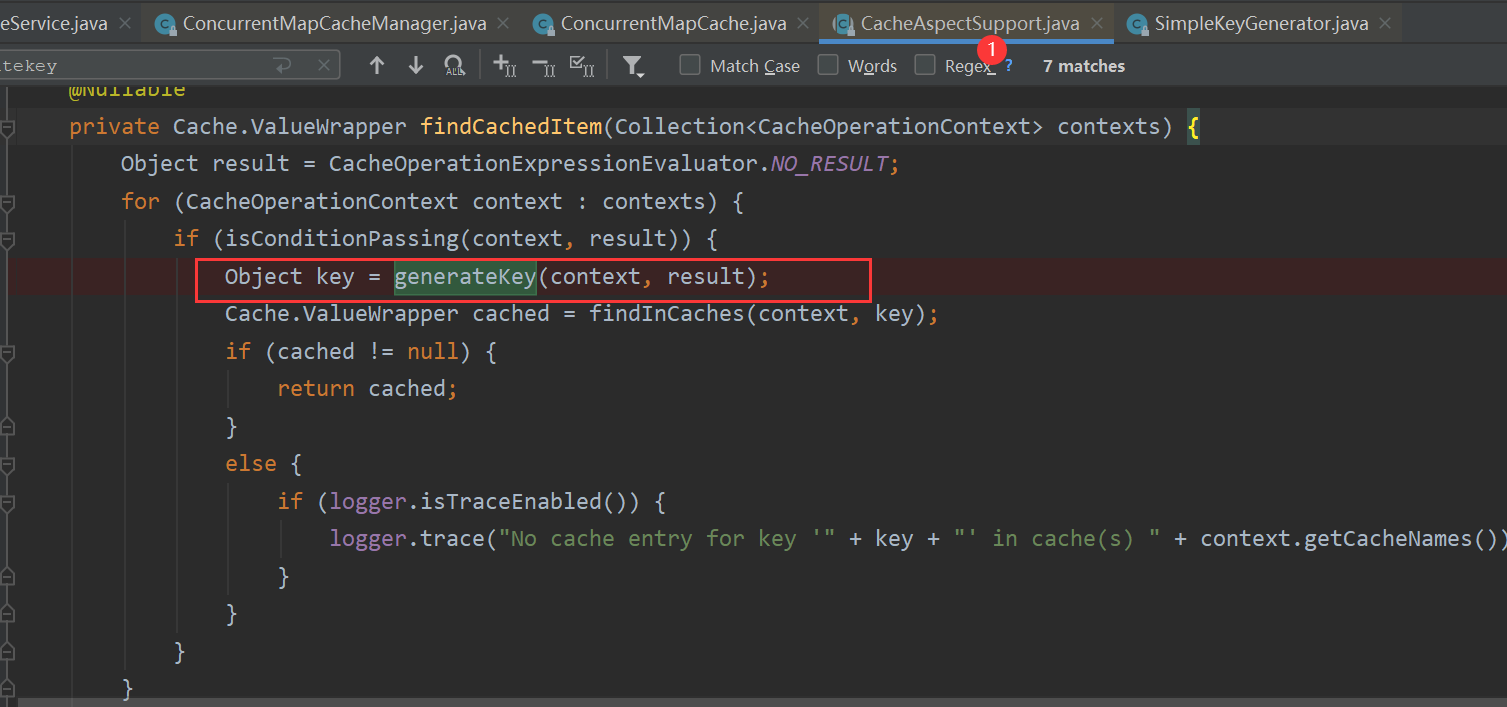
它又调用了context.generateKey()
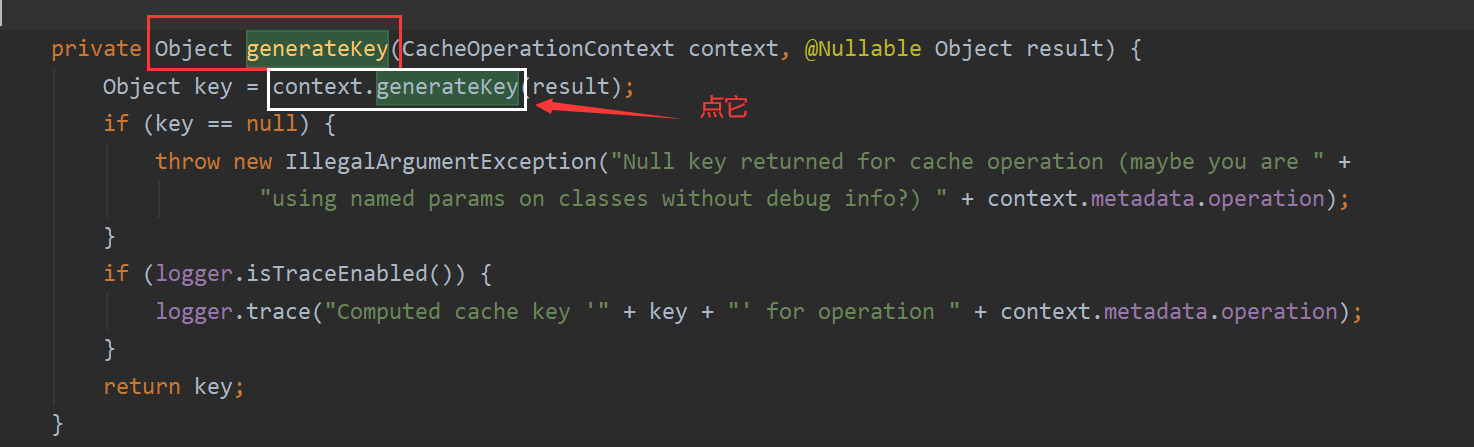
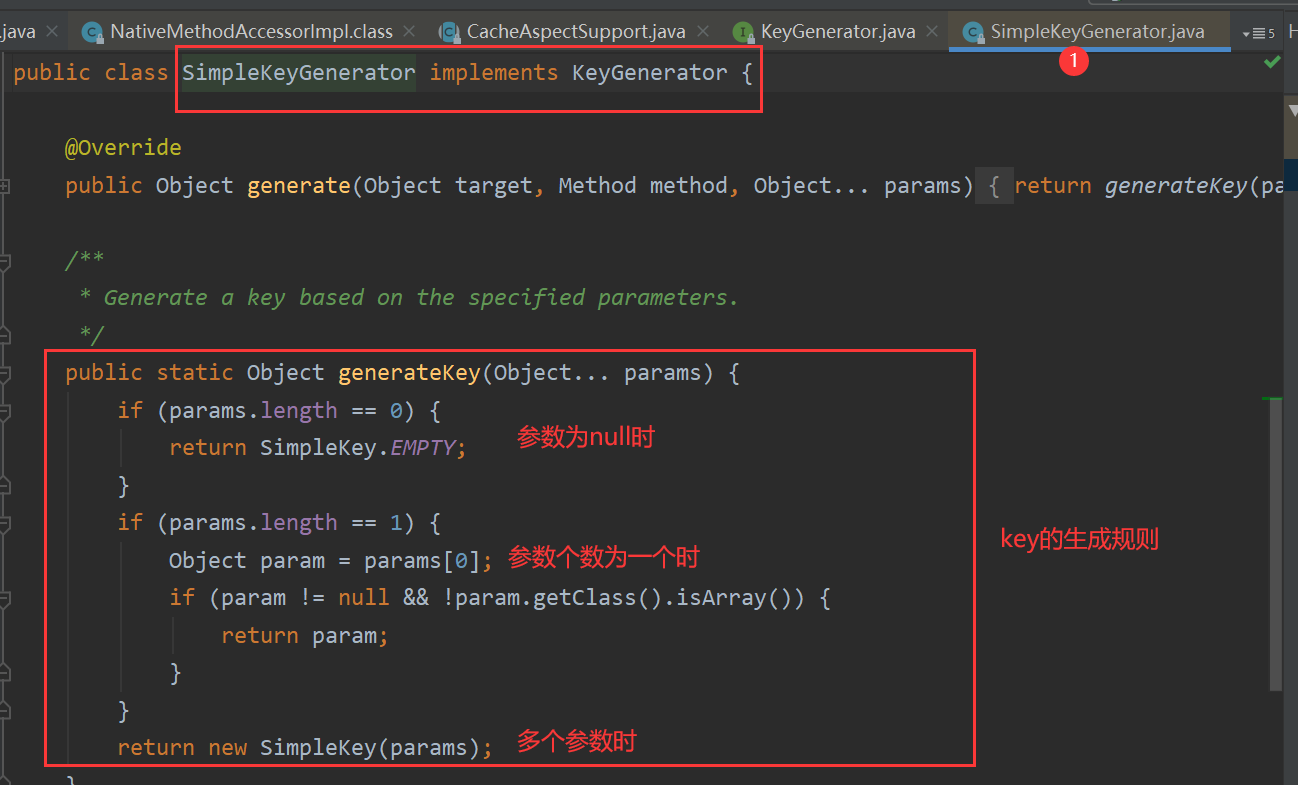
该方法返回了一个 KeyGenerator 它 是 一个 SimpleKeyGenerator 类型

点进去看看
打开这个接口的实现关系。

里面有key的生成规则。
如果没有参数;key=new SimpleKey();
如果有一个参数:key=参数的值
如果有多个参数:key=new SimpleKey(params);
这里的参数 ,就是 我们 service层传入的参数。(id),满足参数为一个的情况,,返回这个参数的值。

如果在cache 中 没有发现与之对应的,就执行service方法,最后将结果放到cache中,以便下次查询。

总结:
@Cacheable:
* 1、在方法运行之前,先去查询Cache(缓存组件),按照cacheNames指定的名字获取;
* (CacheManager先获取相应的缓存),第一次获取缓存如果没有Cache组件会自动创建。
* 2、去Cache中查找缓存的内容,使用一个key,(默认就是方法的参数);默认是使用* * * keyGenerator生成的,默认使用SimpleKeyGenerator生成key;
* SimpleKeyGenerator生成key的默认策略;
* 如果没有参数;key=new SimpleKey();
* 如果有一个参数:key=参数的值
* 如果有多个参数:key=new SimpleKey(params);
* 3、没有查到缓存就调用目标方法;
* 4、将目标方法返回的结果,放进缓存中
*  几个属性:
*      cacheNames/value:指定缓存组件的名字;将方法的返回结果放在哪个缓存中,是数组的方式,可以指定多个缓存;
*
*      key:缓存数据使用的key;可以用它来指定。默认是使用方法参数的值  1-方法的返回值
*              编写SpEL; #id;参数id的值   #a0  #p0  #root.args[0]
*              getEmp[2]
*
*      keyGenerator:key的生成器;可以自己指定key的生成器的组件id
*              key/keyGenerator:二选一使用;
*
*
*      cacheManager:指定缓存管理器;或者cacheResolver指定获取解析器
*
*      condition:指定符合条件的情况下才缓存;
*              ,condition = "#id>0"
*          condition = "#a0>1":第一个参数的值>1的时候才进行缓存
*
*      unless:否定缓存;当unless指定的条件为true,方法的返回值就不会被缓存;可以获取到结果进行判断
*              unless = "#result == null"
*              unless = "#a0==2":如果第一个参数的值是2,结果不缓存;
*      sync:是否使用异步模式
@CachePut:
* 既调用方法,又更新缓存数据;同步更新缓存
* 修改了数据库的某个数据,同时更新缓存;
* 运行时机:
* 1、先调用目标方法
* 2、将目标方法的结果缓存起来
注意 这个key 要和 @cacheable() 使用同一个key 否则不成功
@CacheEvict:
* 缓存清除
* key:指定要清除的数据
* allEntries = true:指定清除这个缓存中所有的数据
* beforeInvocation = false:缓存的清除是否在方法之前执行
* 默认代表缓存清除操作是在方法执行之后执行;如果出现异常缓存就不会清除
* beforeInvocation = true:
* 代表清除缓存操作是在方法运行之前执行,无论方法是否出现异常,缓存都清除
补充两个:
//抽取缓存的公共配置,放着类上
@CacheConfig(cacheNames="emp"/*,cacheManager = "employeeCacheManager"*/)


// @Caching 定义复杂的缓存规则  放在方法上
@Caching(
     cacheable = {
         @Cacheable(/*value="emp",*/key = "#lastName")
     },
     put = {
         @CachePut(/*value="emp",*/key = "#result.id"),
         @CachePut(/*value="emp",*/key = "#result.email")
     }
)
================================================
整合Redis:
添加依赖先:
<dependency>
    <groupId>org.springframework.boot</groupId>
    <artifactId>spring-boot-starter-data-redis</artifactId>
</dependency>
application.yml

直接可以用的有 RedisTemplate,StringTemplate
    @Autowired
    RedisTemplate redisTemplate;  //k-v都是对象的
    @Autowired
    StringRedisTemplate stringRedisTemplate; //操作k-v都是字符串的


    /**
     * Redis常见的五大数据类型
     *  String(字符串)、List(列表)、Set(集合)、Hash(散列)、ZSet(有序集合)
     *  stringRedisTemplate.opsForValue()[String(字符串)]
     *  stringRedisTemplate.opsForList()[List(列表)]
     *  stringRedisTemplate.opsForSet()[Set(集合)]
     *  stringRedisTemplate.opsForHash()[Hash(散列)]
     *  stringRedisTemplate.opsForZSet()[ZSet(有序集合)]
     */
    @Test
    public void test01(){
        //给redis中保存数据
        stringRedisTemplate.opsForValue().append("msg","hello");
		String msg = stringRedisTemplate.opsForValue().get("msg");
		System.out.println(msg);

		stringRedisTemplate.opsForList().leftPush("mylist","1");
     	stringRedisTemplate.opsForList().leftPush("mylist","2");
    }
我们也可以自定义RedisTemplate
    @Bean
    public RedisTemplate<Object, Object> myRedisTemplate(
            RedisConnectionFactory redisConnectionFactory)
            throws UnknownHostException {
        RedisTemplate<Object, Object> redisTemplate = new RedisTemplate<Object, Object>();
        redisTemplate.setConnectionFactory(redisConnectionFactory);

        Jackson2JsonRedisSerializer<Object> serializer= new Jackson2JsonRedisSerializer<Object>(Object.class);
        redisTemplate.setDefaultSerializer(serializer);
        return redisTemplate;
    }
//测试保存对象
@Autowired
EmployeeMapper employeeMapper;
//使用自定义的RedisTemplate
@Autowired
RedisTemplate<Object, Object> myRedisTemplate;
@Test
public void test02(){
Employee empById = employeeMapper.getEmpById(1);
//默认如果保存对象,使用jdk序列化机制,序列化后的数据保存到redis中
//redisTemplate.opsForValue().set("emp-01",empById);
//1、将数据以json的方式保存
//(1)自己将对象转为json
//(2)redisTemplate默认的序列化规则;改变默认的序列化规则;
myRedisTemplate.opsForValue().set("emp-01",empById);
}还可以自定义RedisCacheManager
    @Bean
    public RedisCacheManager myCacheManager3 (RedisConnectionFactory connectionFactory) {
        RedisCacheConfiguration cacheConfiguration = RedisCacheConfiguration.defaultCacheConfig()
                .entryTtl(Duration.ofMinutes(15))   // 设置缓存过期时间
                .disableCachingNullValues()     // 禁用缓存空值,不缓存null校验
               .serializeValuesWith(
                    RedisSerializationContext.SerializationPair.fromSerializer(
                        new  GenericJackson2JsonRedisSerializer()));
            /*设置CacheManager的值序列化方式为json序列化,可加入@Class属性*/


        // 使用RedisCacheConfiguration创建RedisCacheManager
        RedisCacheManager cm = RedisCacheManager.builder(connectionFactory)
                .cacheDefaults(cacheConfiguration).build();
        return cm;
    }
   @Autowired
    DepartmentMapper departmentMapper;

    /*当有多个RedisCacheManager时,需要指定哪一个是主要的*/
    @Qualifier("myCacheManager3")
    @Autowired
    RedisCacheManager myCacheManager3;
    @Cacheable(cacheNames = "dept",cacheManager = "myCacheManager3")

    // 使用缓存管理器得到缓存,进行api调用
    public Department getDeptById(Integer id){
        System.out.println("查询部门"+id);
        Department department = departmentMapper.getDeptById(id);

        //获取某个缓存,当没有时,会自动创建
        Cache dept = myCacheManager3.getCache("dept");
        //放入对象数据,此时可以在redis中找到数据
        dept.put("dept:1",department);

        return department;
    }
参考文章:
https://developer.mozilla.org/zh-CN/docs/Web/API/Cache/delete
https://www.cnblogs.com/coding-one/p/12403801.html
https://www.cnblogs.com/hcklqy/p/11355687.html