1.Ambari简介
Apache Ambari项目旨在通过开发用于配置,管理和监视Apache Hadoop集群的软件来简化Hadoop管理。Ambari通过其RESTful API提供了直观,易于使用的Hadoop管理Web UI。
Ambari使系统管理员可以:
-
设置Hadoop集群
- Ambari提供了用于在任意数量的主机上安装Hadoop服务的分步向导。
- Ambari处理群集的Hadoop服务的配置。
-
管理Hadoop集群
- Ambari提供了用于在整个集群中启动,停止和重新配置Hadoop服务的集中管理。
-
监控Hadoop集群
- Ambari提供了一个仪表板,用于监视Hadoop集群的运行状况和状态。
- Ambari利用Ambari Metrics System收集指标。
- Ambari利用Ambari Alert Framework进行系统警报,并在需要您关注时(例如,节点故障,剩余磁盘空间不足等)通知您。
Ambari使应用程序开发人员和系统集成商能够:
- 使用Ambari REST API轻松将Hadoop的配置,管理和监视功能集成到自己的应用程序中。
官方网站:http://ambari.apache.org/
2.Ambari架构

ambari-server
- 提供外部访问的API
- 接受Ambari-agent的心跳信息和管理Ambari-agent
- 元数据的管理和数据库的访问
ambari-agent
- 采集所在节点的信息并且汇总发心跳汇报给ambari-server
- 处理ambari-server的执行请求,安装、启动、停止服务等
ambari-web
- 提供可视化的操作界面
3.下载
Ambari所在的公司已经被Cloudera公司收购所以相关的文档都在clodera公司的官方网站:https://docs.cloudera.com/HDPDocuments/index.html
我们选择的安装方式是:Ambari+HDP+HDP-UTILS,因为Ambari本身只是一个大数据平台自动化部署和管理的工具,所以需要配合HDP(大数据软件安装包集合)一起使用。

选择合适的版本,我们这里选择的是2.7.0.0版本,然后就会有一个安装指南:https://docs.cloudera.com/HDPDocuments/Ambari-2.7.0.0/bk_ambari-installation/content/ambari_repositories.html
在这个安装指南中就会有安装包的下载链接

Ambari:http://public-repo-1.hortonworks.com/ambari/centos7/2.x/updates/2.7.0.0/ambari-2.7.0.0-centos7.tar.gz
HDP:http://public-repo-1.hortonworks.com/HDP/centos7/3.x/updates/3.0.0.0/HDP-3.0.0.0-centos7-rpm.tar.gz
HDP-UTILS:http://public-repo-1.hortonworks.com/HDP-UTILS-1.1.0.22/repos/centos7/HDP-UTILS-1.1.0.22-centos7.tar.gz
其实可以直接配置官网提供的yum源就可以安装,但是由于是国外的网站,速度比较慢,所以就使用离线本地yum源的安装方式
4.安装环境说明
使用VMWare/VirtualBox,虚拟至少三台虚拟机,配置如下:
| 主机 | 系统 | 网络 | 内存 | 磁盘 |
|---|---|---|---|---|
| hdp-1 | CentOS7 | 192.168.1.10(NAT/birdge) | 4G | 60G |
| hdp-2 | CentOS7 | 192.168.1.20(NAT/birdge) | 2G | 60G |
| hdp-3 | CentOS7 | 192.168.1.30(NAT/birdge) | 2G | 60G |
配置好虚拟机就可以安装了,安装的方式如下

5.基本环境配置
5.1修改主机名和配置主机到IP的映射(所有节点)
# 分别修改三台机器的主机名
hostnamectl set-hostname hdp-1
hostnamectl set-hostname hdp-2
hostnamectl set-hostname hdp-3
# 配置主机名到IP的映射
vi /etc/hosts
192.168.1.10 hdp-1
192.168.1.20 hdp-2
192.168.1.30 hdp-3
5.2关闭防火墙和关闭SELinux(所有节点)
# 关闭防火墙
systemctl stop firewalld && systemctl disable firewalld
# 关闭selinux
setenforce 0
vi /etc/selinux/config
SELINUX=disabled
5.3配置免密登录(所有节点)
# hpd-1
ssh-keygen
ssh-copy-id hdp-1
ssh-copy-id hdp-2
ssh-copy-id hdp-3
#hdp-2
ssh-keygen
ssh-copy-id hdp-1
ssh-copy-id hdp-2
ssh-copy-id hdp-3
#hdp-3
ssh-keygen
ssh-copy-id hdp-1
ssh-copy-id hdp-2
ssh-copy-id hdp-3
5.4.安装时间同步服务ntp
#hdp-1
yum install -y ntp
vi /etc/ntp.conf
server 127.127.1.0
fudge 127.127.1.0 stratum 10
systemctl start ntpd
systemctl enbale ntpd
#hdp-2
yum install -y ntpdate
ntpdate hdp-1
#hdp-3
yum install -y ntpdate
ntpdate hdp-1
5.5.安装http服务(hdp-1)
yum install -y httpd
yum start httpd
yum enable httpd
5.6关闭大页面压缩(所有节点)
echo never > /sys/kernel/mm/transparent_hugepage/enabled
echo never > /sys/kernel/mm/transparent_hugepage/defrag
5.7.配置yum源
虚拟机的网络模式是nat或者桥接的时候就可以连通外网,这样我们就可以不用配置CentOS的yum源了,但是Ambari和HDP的还需要我们配置,需要将Ambari和HDP以及HDP-UTILS的安装包通过SFTP工具上传到hdp-1上。
#创建文件夹
mkdir /var/www/html/{

    ambari,hdp,hdp_util}
# 解压安装包到HTTP的网页根目录
tar -zxvf HDP-UTILS-1.1.0.22-centos7.tar.gz -C /var/www/html/hdp-utils/
tar -zxvf ambari-2.7.0.0-centos7.tar.gz -C /var/www/html/ambari/
tar -zxvf HDP-3.0.0.0-centos7-rpm.tar.gz -C /var/www/html/hdp
这样就可以通过http的方式获取到相应的rpm文件和repodata文件来配置yum源了
# 配置ambari的yum源
vi /etc/yum.repos.d/ambari.repo
[ambari]
name=ambari
baseurl=http://192.168.1.10/ambari/ambari/centos7/2.7.0.0-897/
gpgcheck=0

#配置hdp和hdp-utils的yum源
vi /etc/yum.repos.d/hdp.repo
[HDP]
name=HDP
baseurl=http://192.168.1.10/hdp/HDP/centos7/3.0.0.0-1634/
gpgcheck=0
[HDP-UTILS]
name=HDP_UTILS
baseurl=http://192.168.1.10/hdp-utils/HDP-UTILS/centos7/1.1.0.22/
gpgcheck=0
# 验证
yum repolist
将yum文件使用scp发送到其它节点
scp /etc/yum.repos.d/ambari.repo hdp-2:/etc/yum.repos.d/
scp /etc/yum.repos.d/hdp.repo hdp-2:/etc/yum.repos.d/
5.8.安装配置JDK
将jdk的安装包上传到hdp-1
#解压
tar -zxvf jdk-8u171-linux-x64.tar.gz -C /opt/

# 配置环境变量
vi /etc/profile
export JAVA_HOME=/opt/jdk1.8.0_171/
export PATH=$PATH:$JAVA_HOME/bin
# 刷新环境变量
source /ect/profile
java
# 将jdk和环境变量发送到其它机器
scp -r /opt/  hdp-2:/opt/
scp -r /opt/  hdp-3:/opt/
scp  /etc/profile hdp-2:/etc/
scp  /etc/profile hdp-3:/etc/
# hdp-2 hdp-3
source /ect/profile
java
6.数据库配置(hdp-1)
数据库使用MariaDB作为元数据储存的库,在hdp-1上安装
# 安装
yum install -y mariadb-server
# 启动 开机自启
systemctl start mariadb && systemctl enable mariadb
# 初始化
mysql_secure_installation
[root@hdp-1 ~]# mysql_secure_installation

NOTE: RUNNING ALL PARTS OF THIS SCRIPT IS RECOMMENDED FOR ALL MariaDB
      SERVERS IN PRODUCTION USE!  PLEASE READ EACH STEP CAREFULLY!

In order to log into MariaDB to secure it, we'll need the current
password for the root user.  If you've just installed MariaDB, and
you haven't set the root password yet, the password will be blank,
so you should just press enter here.

Enter current password for root (enter for none):
OK, successfully used password, moving on...

Setting the root password ensures that nobody can log into the MariaDB
root user without the proper authorisation.

Set root password? [Y/n]
New password:
Re-enter new password:
Password updated successfully!
Reloading privilege tables..
 ... Success!


By default, a MariaDB installation has an anonymous user, allowing anyone
to log into MariaDB without having to have a user account created for
them.  This is intended only for testing, and to make the installation
go a bit smoother.  You should remove them before moving into a
production environment.

Remove anonymous users? [Y/n]
 ... Success!

Normally, root should only be allowed to connect from 'localhost'.  This
ensures that someone cannot guess at the root password from the network.

Disallow root login remotely? [Y/n] n
 ... skipping.

By default, MariaDB comes with a database named 'test' that anyone can
access.  This is also intended only for testing, and should be removed
before moving into a production environment.

Remove test database and access to it? [Y/n]
 - Dropping test database...
 ... Success!
 - Removing privileges on test database...
 ... Success!

Reloading the privilege tables will ensure that all changes made so far
will take effect immediately.

Reload privilege tables now? [Y/n]
 ... Success!

Cleaning up...

All done!  If you've completed all of the above steps, your MariaDB
installation should now be secure.

Thanks for using MariaDB!
7.安装和配置ambari-server(hdp-1)
7.1安装
# 安装
yum install -y ambari-server
7.2配置数据库
mysql -uroot -proot
# 创建amabri数据库
create database ambari;
#授权
grant all on ambari.* to ambari@'%' identified by 'bigdata';
grant all on ambari.* to ambari@localhost identified by 'bigdata';
# 使用ambari-server提供的sql脚本创建相关的表
use ambari;
source /var/lib/ambari-server/resources/Ambari-DDL-MySQL-CREATE.sql
7.3将JDBC驱动包复制到指定目录(/usr/share/java)
将jdbc的驱动包使用sftp工具上传到hdp-1
mkdir -p /usr/share/java
mv mysql-connector-java-*.jar /usr/share/java/mysql-connector-java.jar
7.4配置ambari-server
ambari-server setup
[root@hdp-1 ~]# ambari-server setup
Using python  /usr/bin/python
Setup ambari-server
Checking SELinux...
SELinux status is 'enabled'
SELinux mode is 'permissive'
WARNING: SELinux is set to 'permissive' mode and temporarily disabled.
OK to continue [y/n] (y)? y
Customize user account for ambari-server daemon [y/n] (n)? y
Enter user account for ambari-server daemon (root):
Adjusting ambari-server permissions and ownership...
Checking firewall status...
Checking JDK...
[1] Oracle JDK 1.8 + Java Cryptography Extension (JCE) Policy Files 8
[2] Custom JDK
==============================================================================
Enter choice (1): 2
WARNING: JDK must be installed on all hosts and JAVA_HOME must be valid on all hosts.
WARNING: JCE Policy files are required for configuring Kerberos security. If you plan to use Kerberos,please make sure JCE Unlimited Strength Jurisdiction Policy Files are valid on all hosts.
Path to JAVA_HOME: /opt/jdk1.8.0_171/
Validating JDK on Ambari Server...done.
Check JDK version for Ambari Server...
JDK version found: 8
Minimum JDK version is 8 for Ambari. Skipping to setup different JDK for Ambari Server.
Checking GPL software agreement...
GPL License for LZO: https://www.gnu.org/licenses/old-licenses/gpl-2.0.en.html
Enable Ambari Server to download and install GPL Licensed LZO packages [y/n] (n)?
Completing setup...
Configuring database...
Enter advanced database configuration [y/n] (n)? y
Configuring database...
==============================================================================
Choose one of the following options:
[1] - PostgreSQL (Embedded)
[2] - Oracle
[3] - MySQL / MariaDB
[4] - PostgreSQL
[5] - Microsoft SQL Server (Tech Preview)
[6] - SQL Anywhere
[7] - BDB
==============================================================================
Enter choice (1): 3
Hostname (localhost): hdp-1
Port (3306):
Database name (ambari):
Username (ambari):
Enter Database Password (bigdata):
Configuring ambari database...
Should ambari use existing default jdbc /usr/share/java/mysql-connector-java.jar [y/n] (y)?
Configuring remote database connection properties...
WARNING: Before starting Ambari Server, you must run the following DDL against the database to create the schema: /var/lib/ambari-server/resources/Ambari-DDL-MySQL-CREATE.sql
Proceed with configuring remote database connection properties [y/n] (y)?
Extracting system views...
ambari-admin-2.7.0.0.897.jar
....
Ambari repo file doesn't contain latest json url, skipping repoinfos modification
Adjusting ambari-server permissions and ownership...
Ambari Server 'setup' completed successfully.
7.5启动ambari-server
ambari-server start
可以访问ambari的web界面: http:192.168.1.10:8080
8.安装和配置ambari-agent(所有节点)
# 安装
yum install -y ambari-agent
# 配置
vi /etc/ambari-agent/conf/ambari-agent.ini
[server]
hostname=hdp-1
#启动
amabri-agent start
9.HDP部署
9.1登录
在浏览器中访问 http://192.168.1.10:8080
默认的用户名和密码都是admin

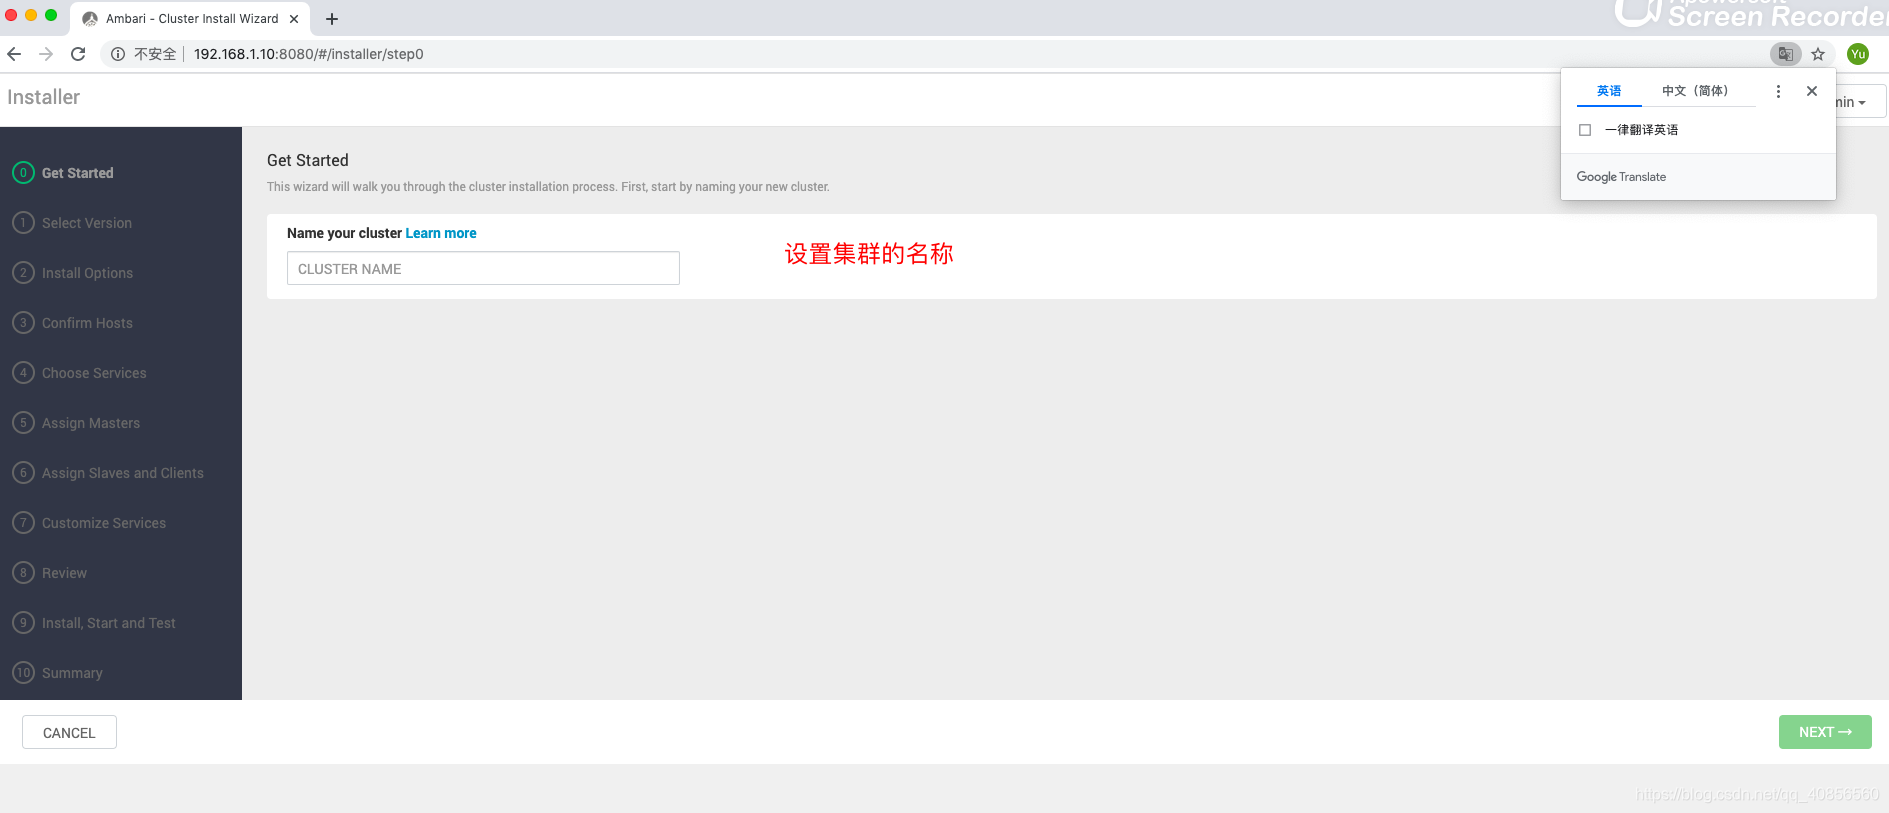
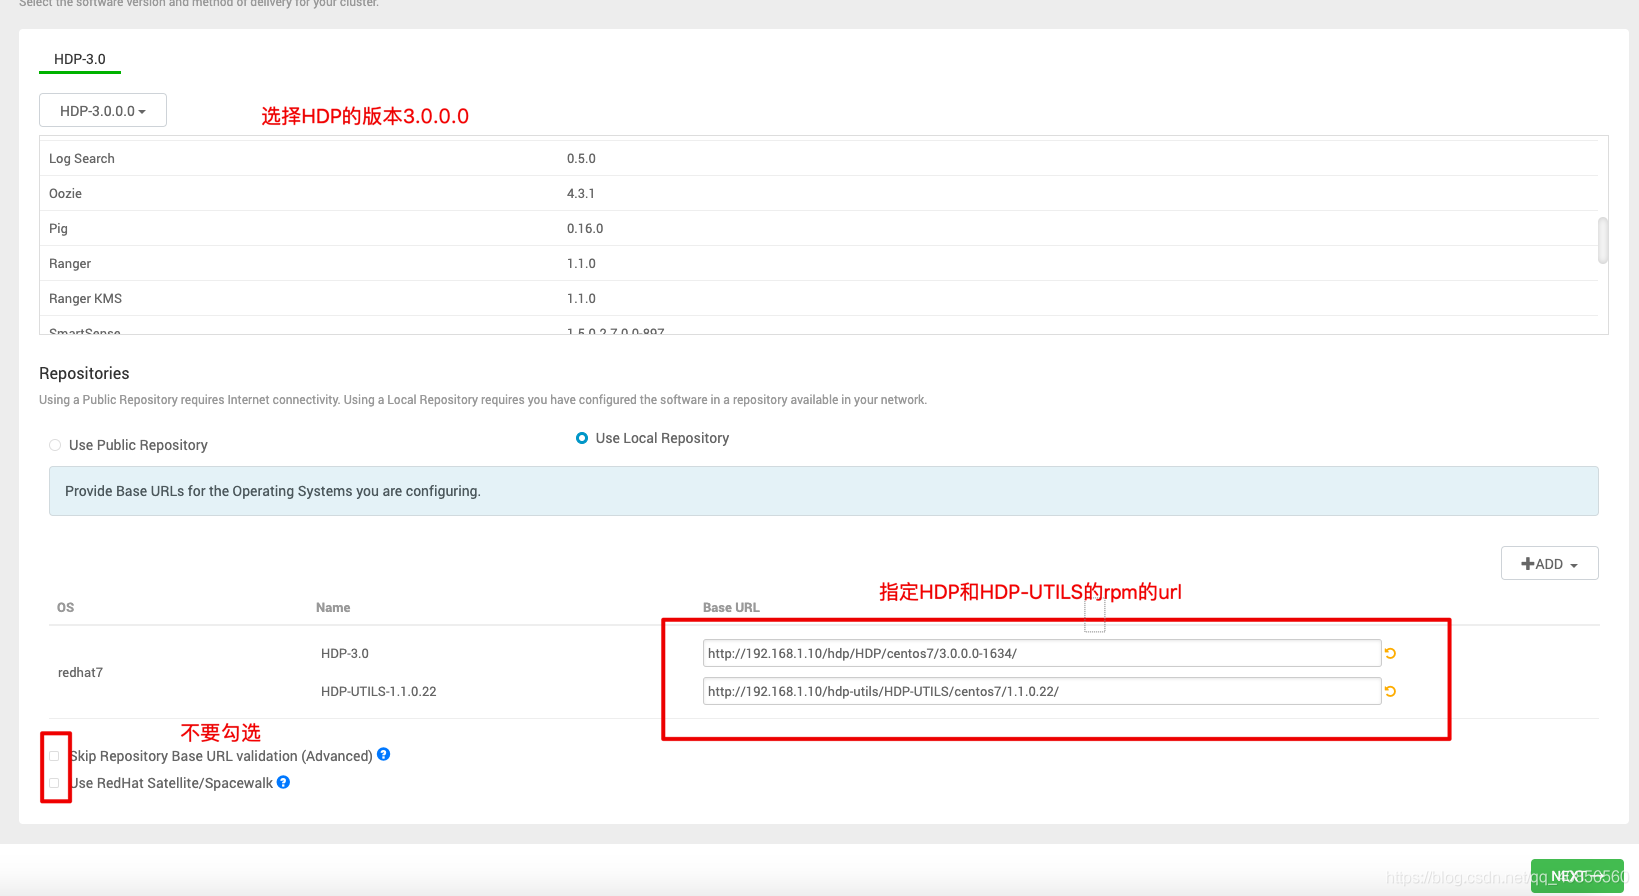
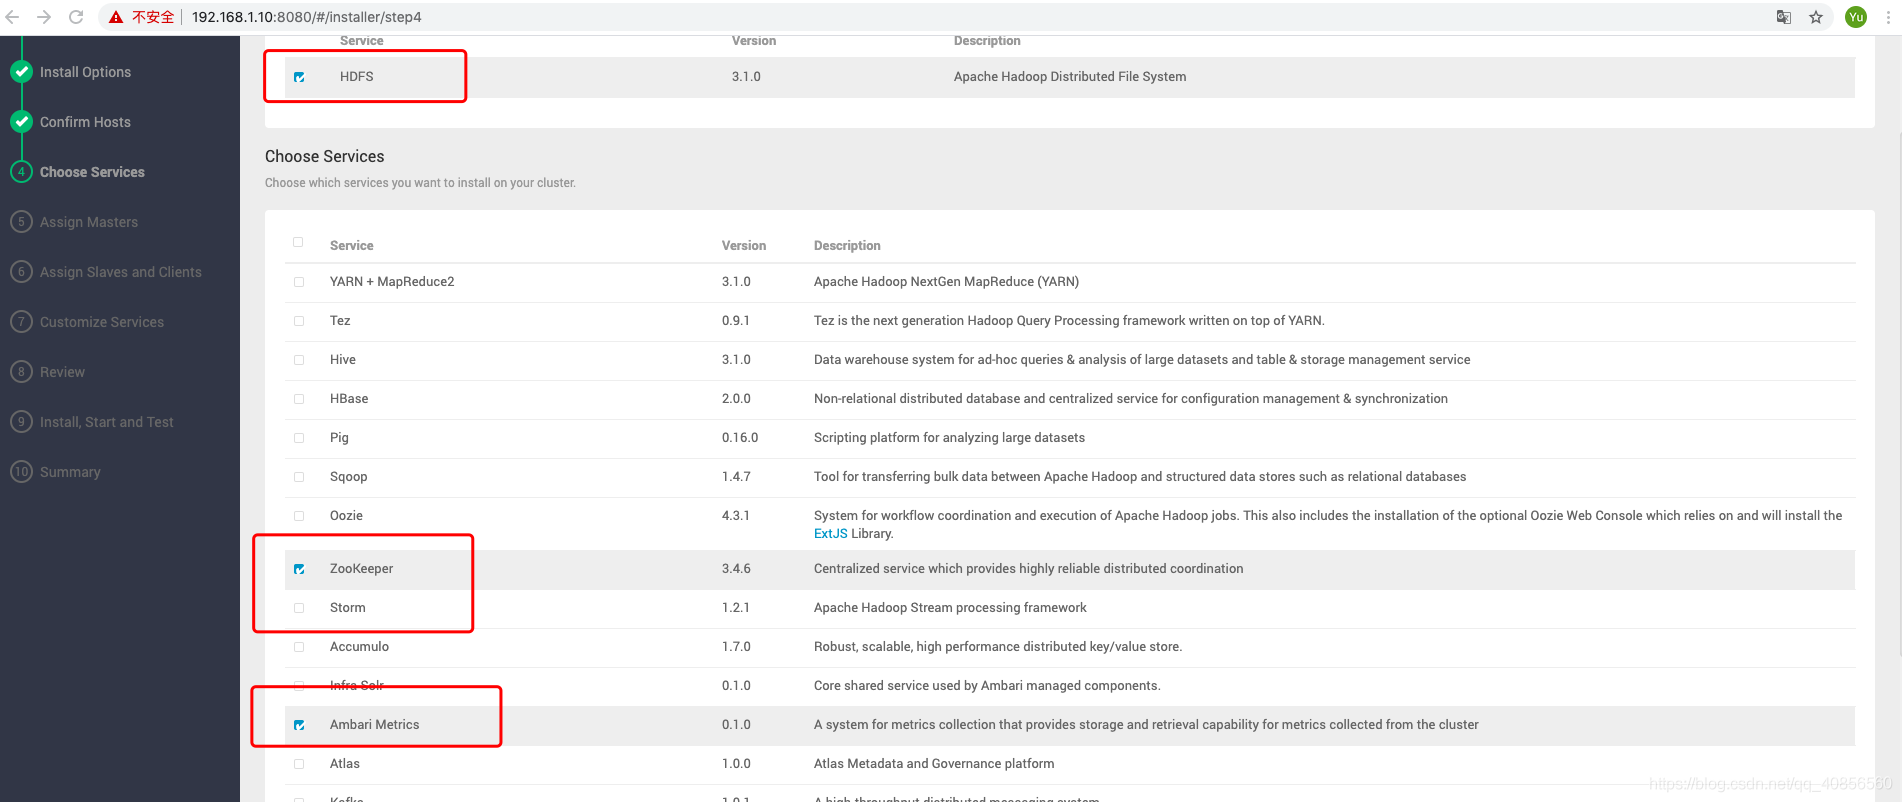
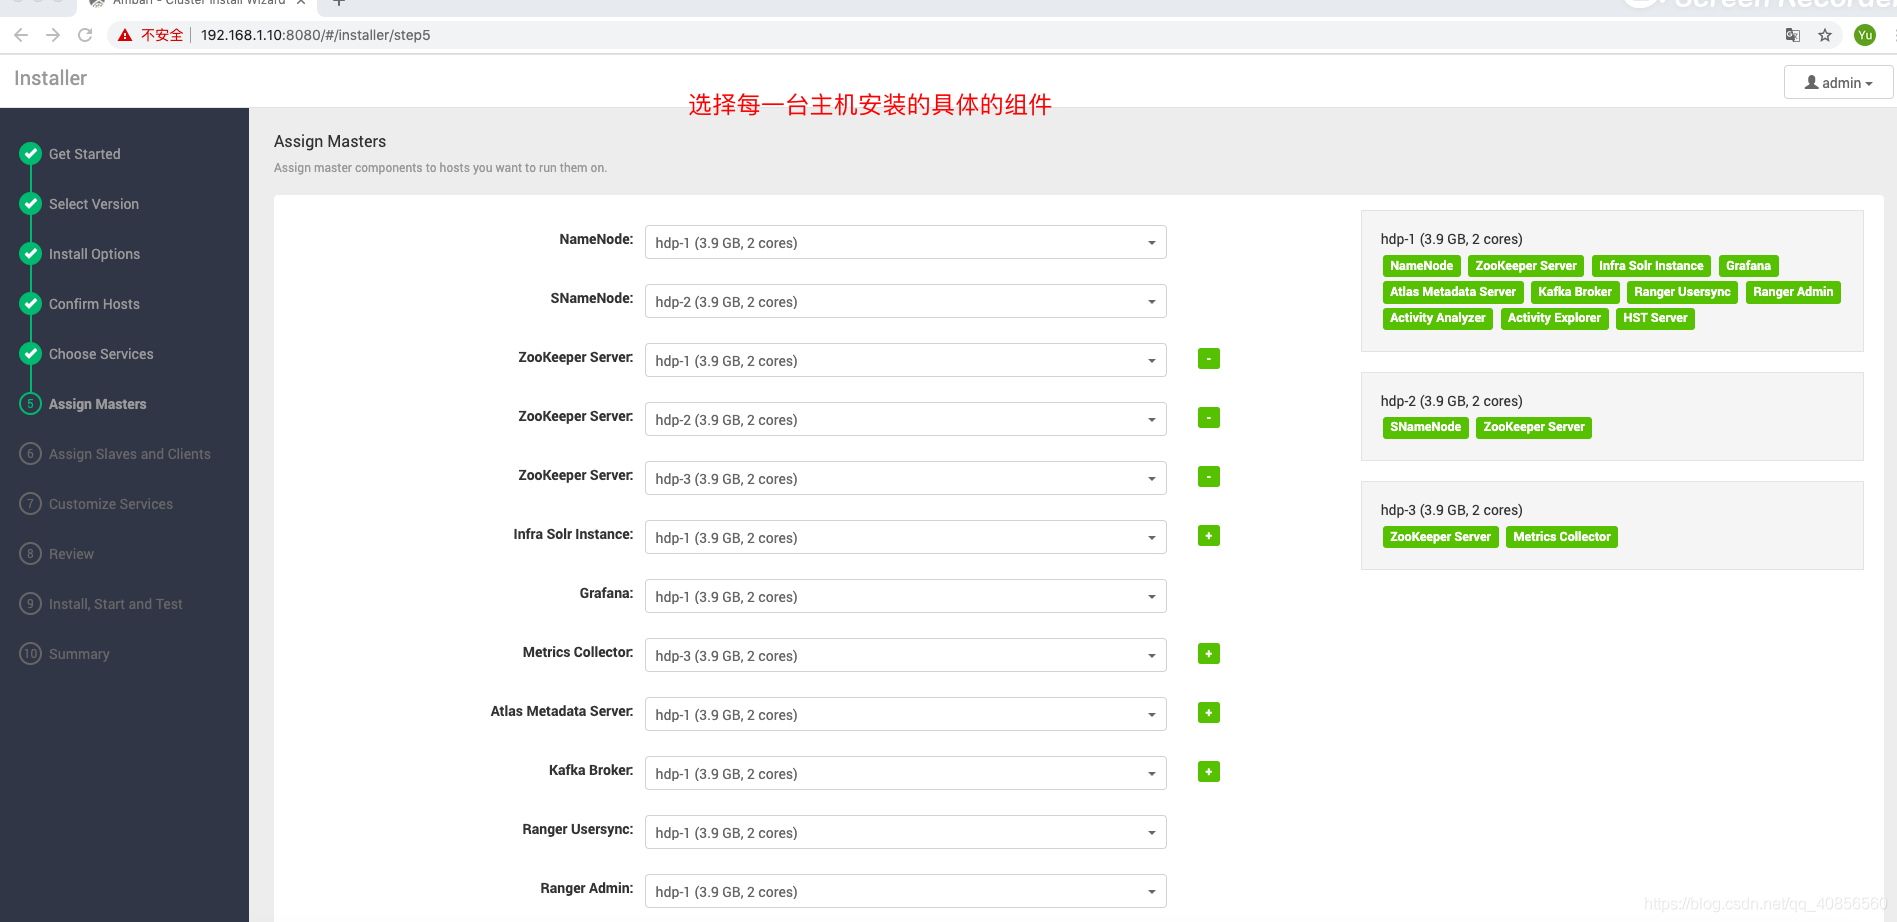
9.2配置集群


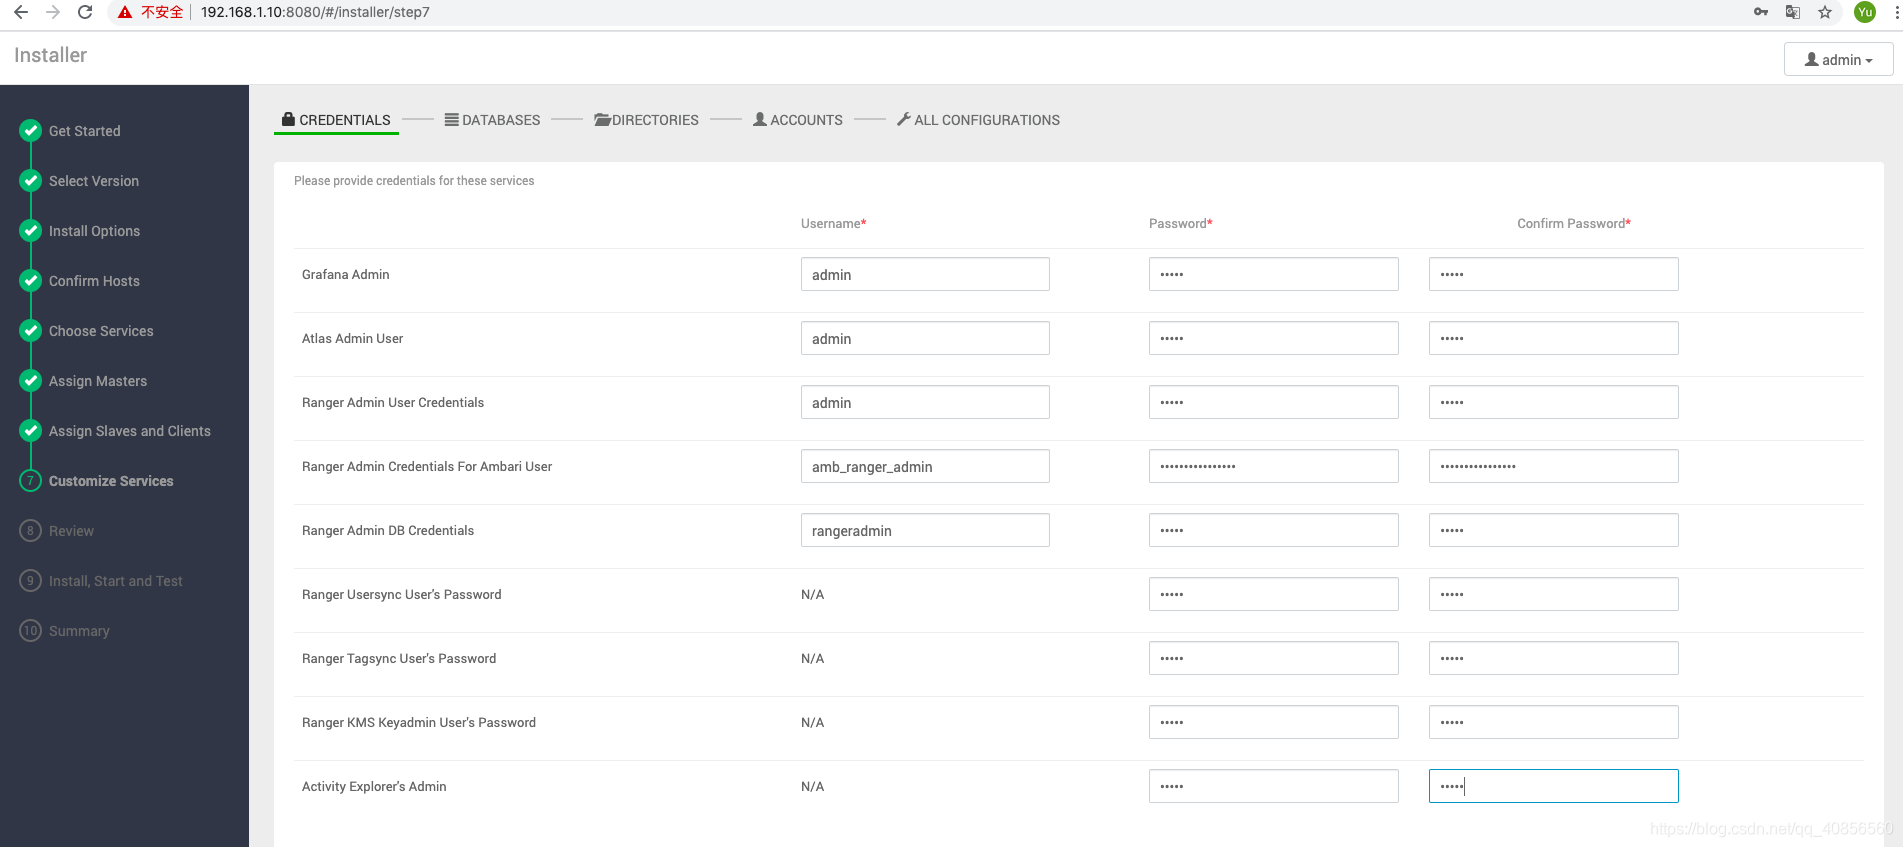
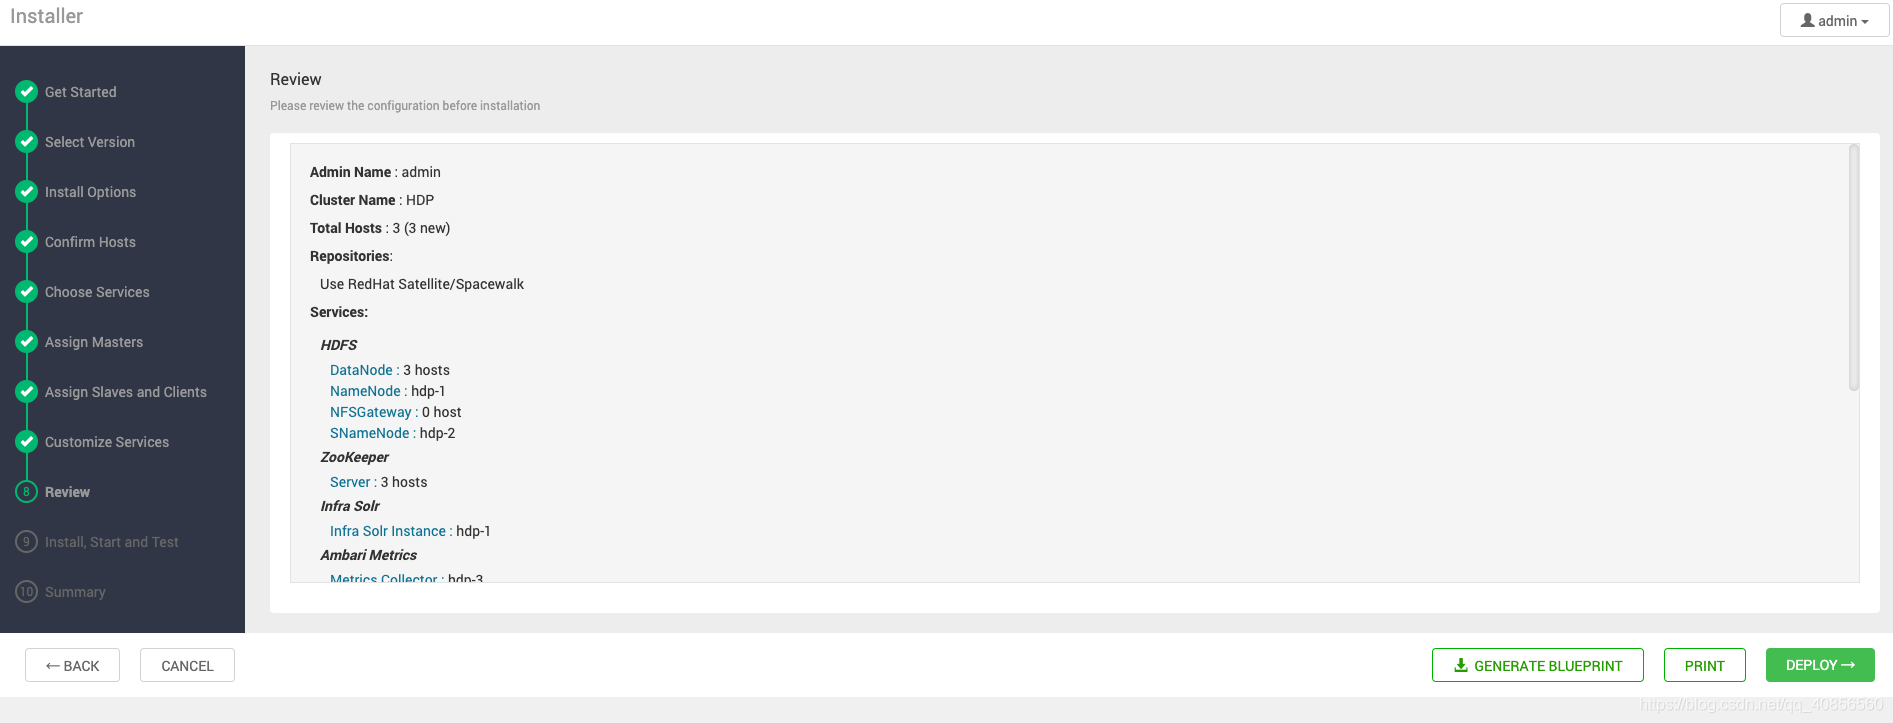
等待安装

安装完成


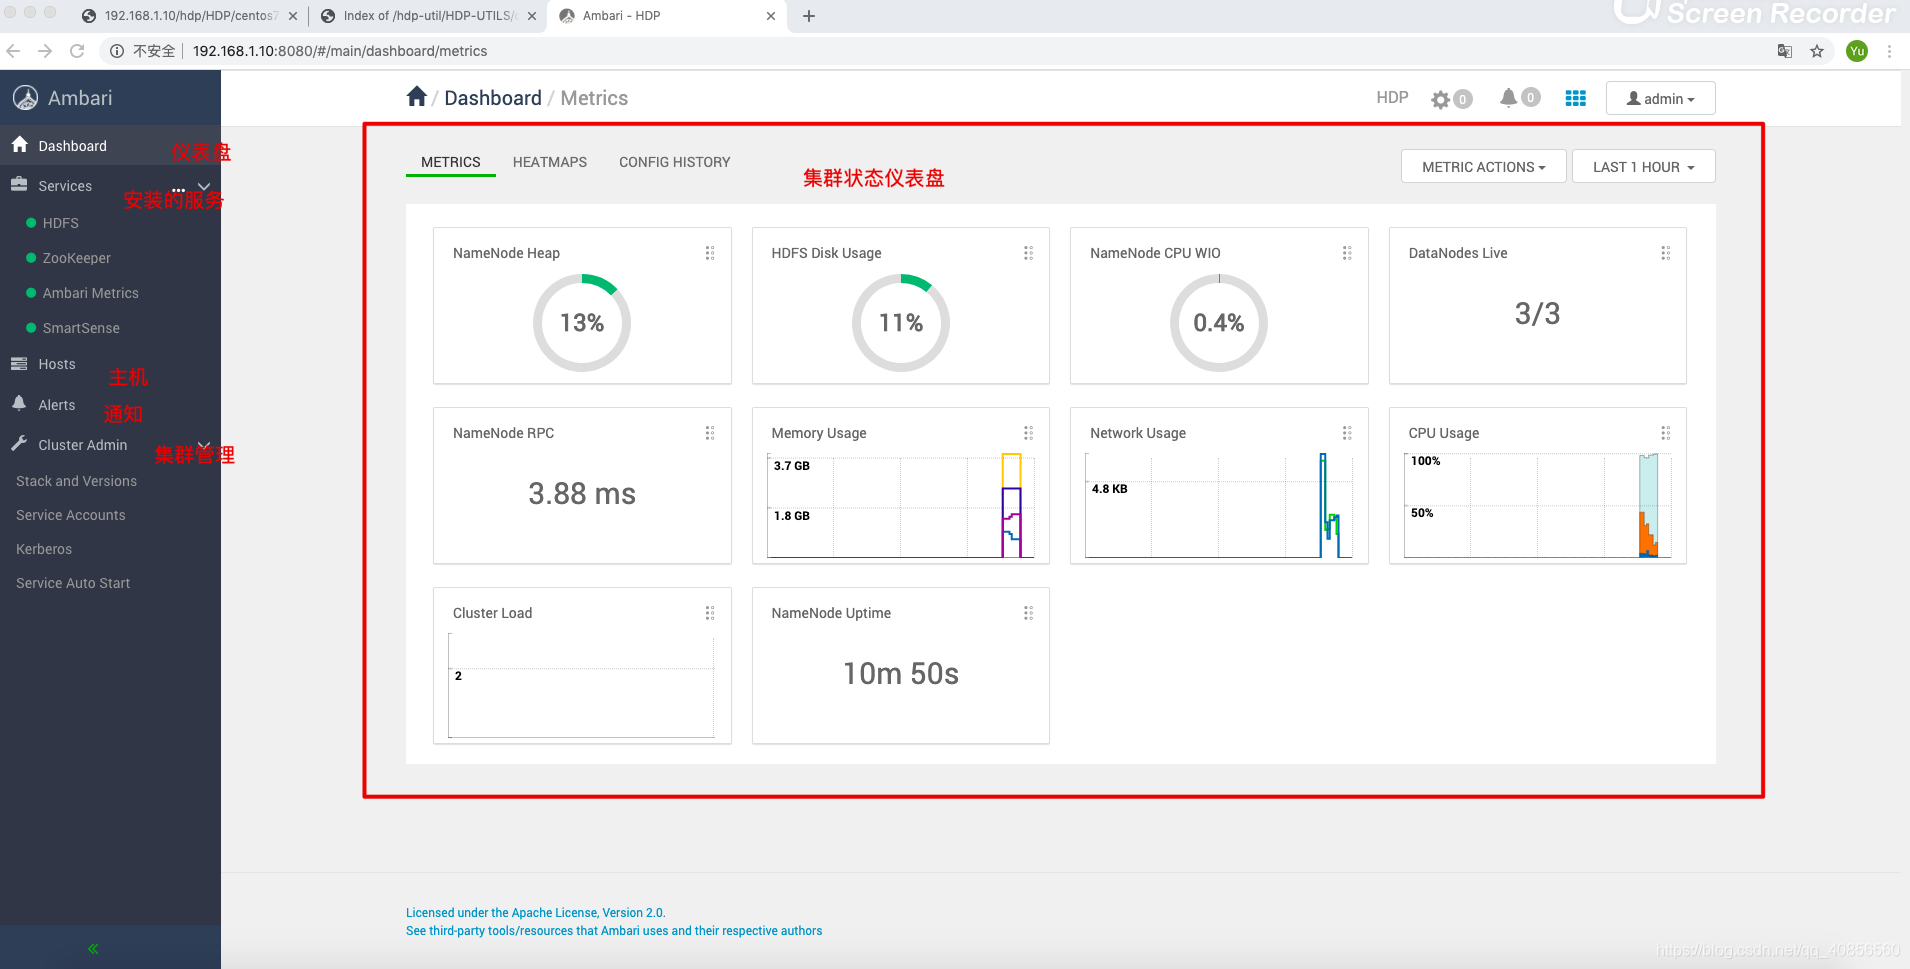
添加服务

主机状态监控
