前言
花了三天的时间查了大量的资料对SpringSecurity这个权限框架进行了简单的学习,主要还是工作中可能做单点权限控制,就对此学习了一下,以下是学习过程中产出的笔记。
笔记中的理论内容来自网络摘抄和个人拙见,若有不当之处望看博客的大佬指点一二!
1.SpringSecurity是什么?核心功能是什么?
SpringSecurity是Spring家族中的一个安全框架
核心功能:
Authentication:认证,用户登录的验证(解决你是谁的问题)
Authorization:授权,授权资源的访问权限(解决你能干什么的问题)
安全防护,防止跨站请求,session攻击等
2.快速上手
1.创建SpringBoot项目
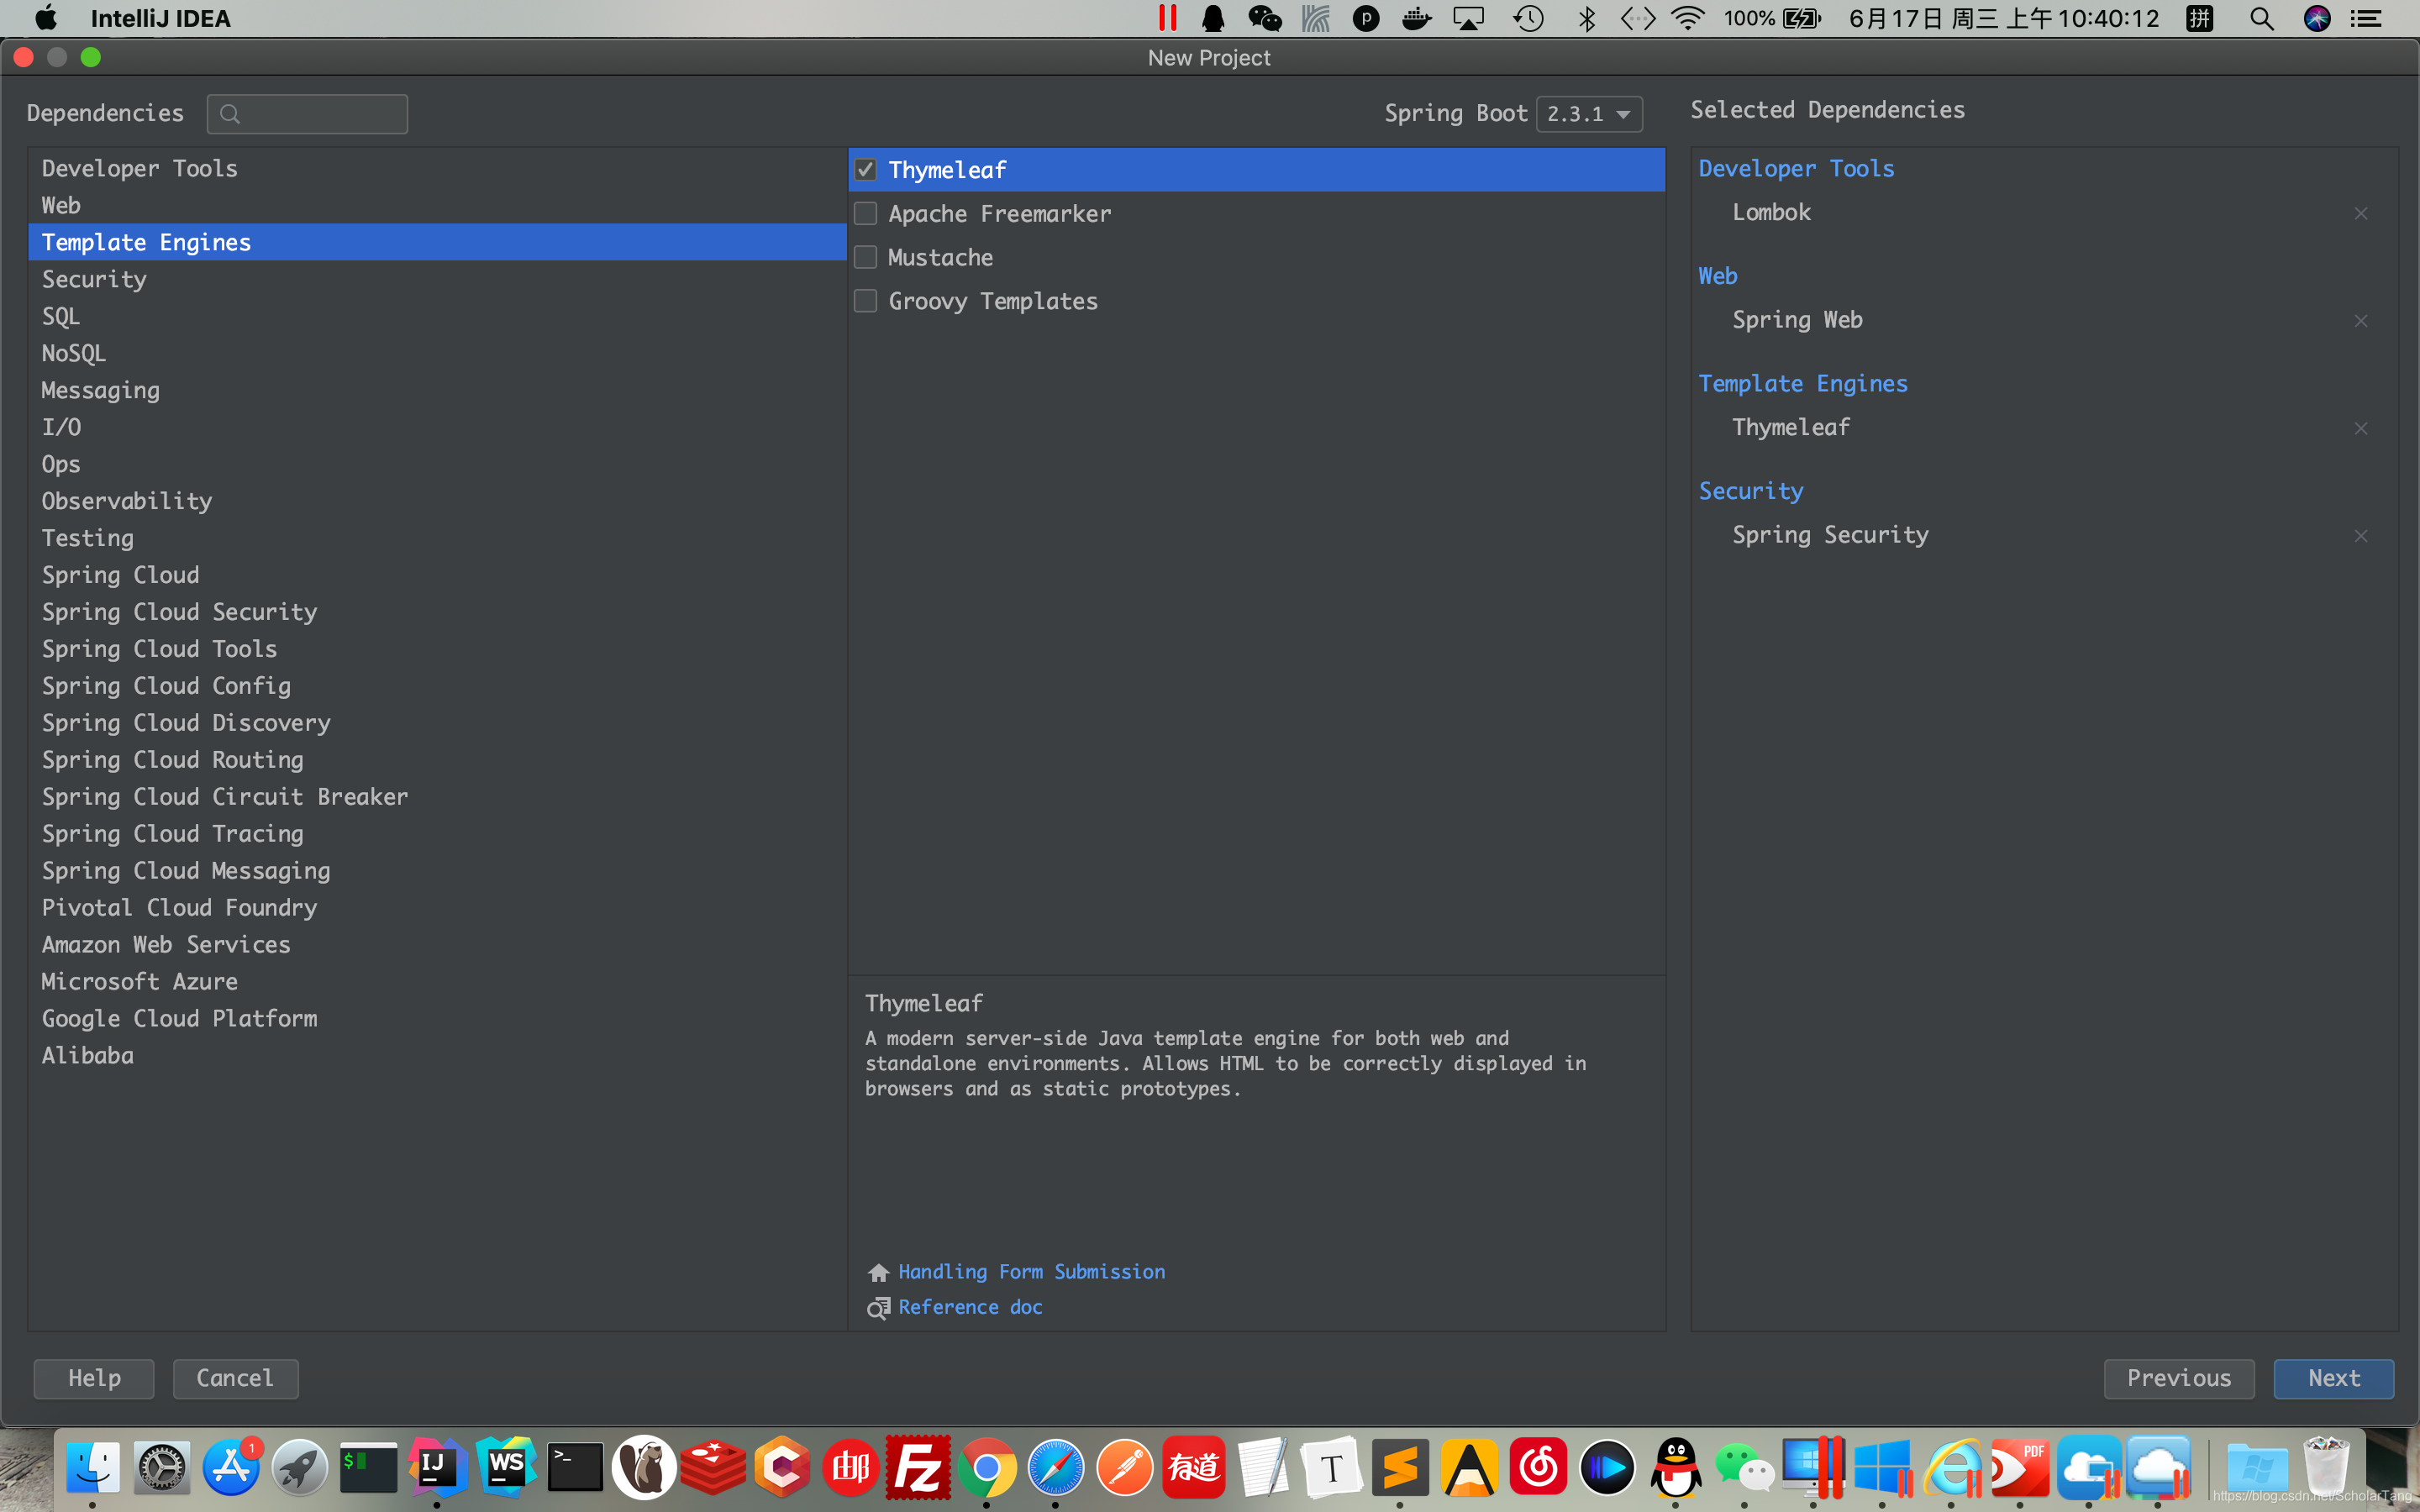
2.在项目的pom.xml文件中引入SpringSecurity相关依赖(如何像我上面那样创建项目的话就不需要再添加该依赖)
 		<dependency>
            <groupId>org.springframework.boot</groupId>
            <artifactId>spring-boot-starter-security</artifactId>
        </dependency>
只要加入依赖,项目的所有接口都会被自动保护起来
3.创建一个接口来感受一下
package com.scholartang.controller;

import org.springframework.stereotype.Controller;
import org.springframework.web.bind.annotation.GetMapping;

/**
 * @Author ScholarTang
 * @Date 2020/6/17 10:42 上午
 * @Desc SpringSecurity
 */

/**
 * 注意别在这使用@RestController
 * @RestController注解相当于@ResponseBody + @Controller合在一起的作用
 * @ResponseBody注解的作用是将controller中的所有接口的响应参数都转换成json格式
 * 比方访问/logInfo这个接口,本来是要响应一个页面的,但是经过@ResponseBody处理最终返回了一串字符串
 */
@Controller
public class HelloSecurityController {


    @GetMapping("/logInfo")
    public String logInfo(){


        return "logInfo";
    }
}
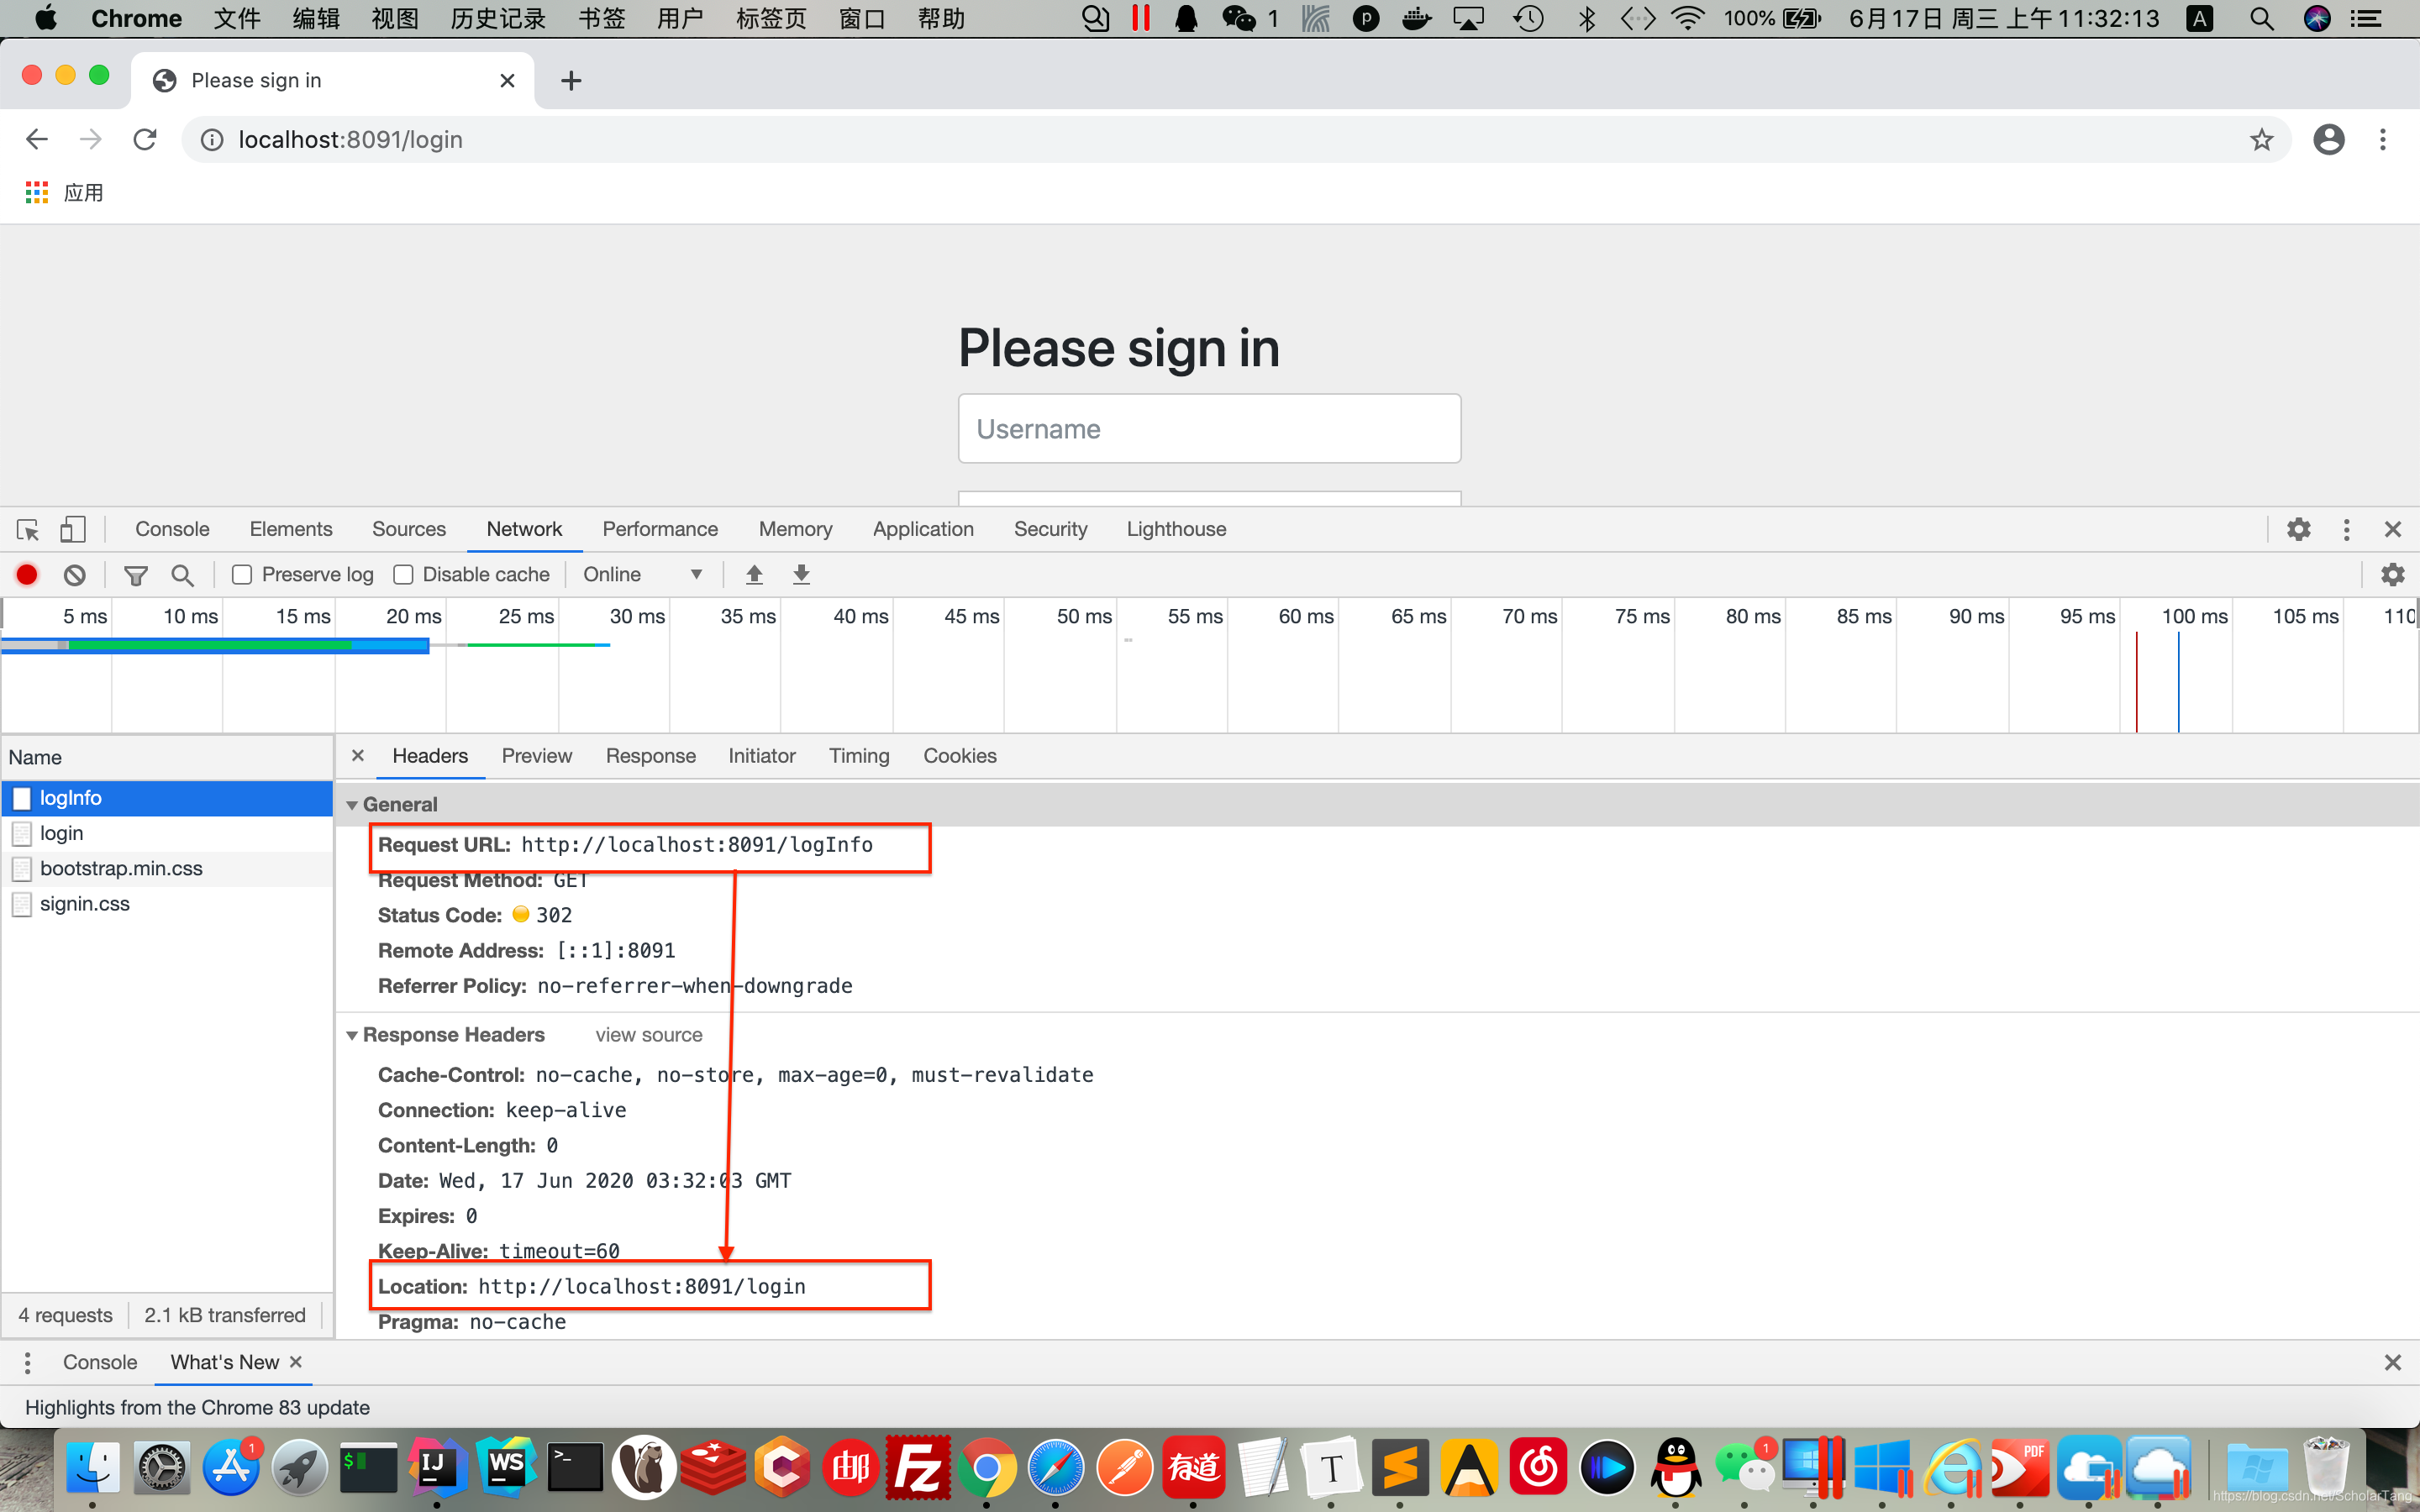
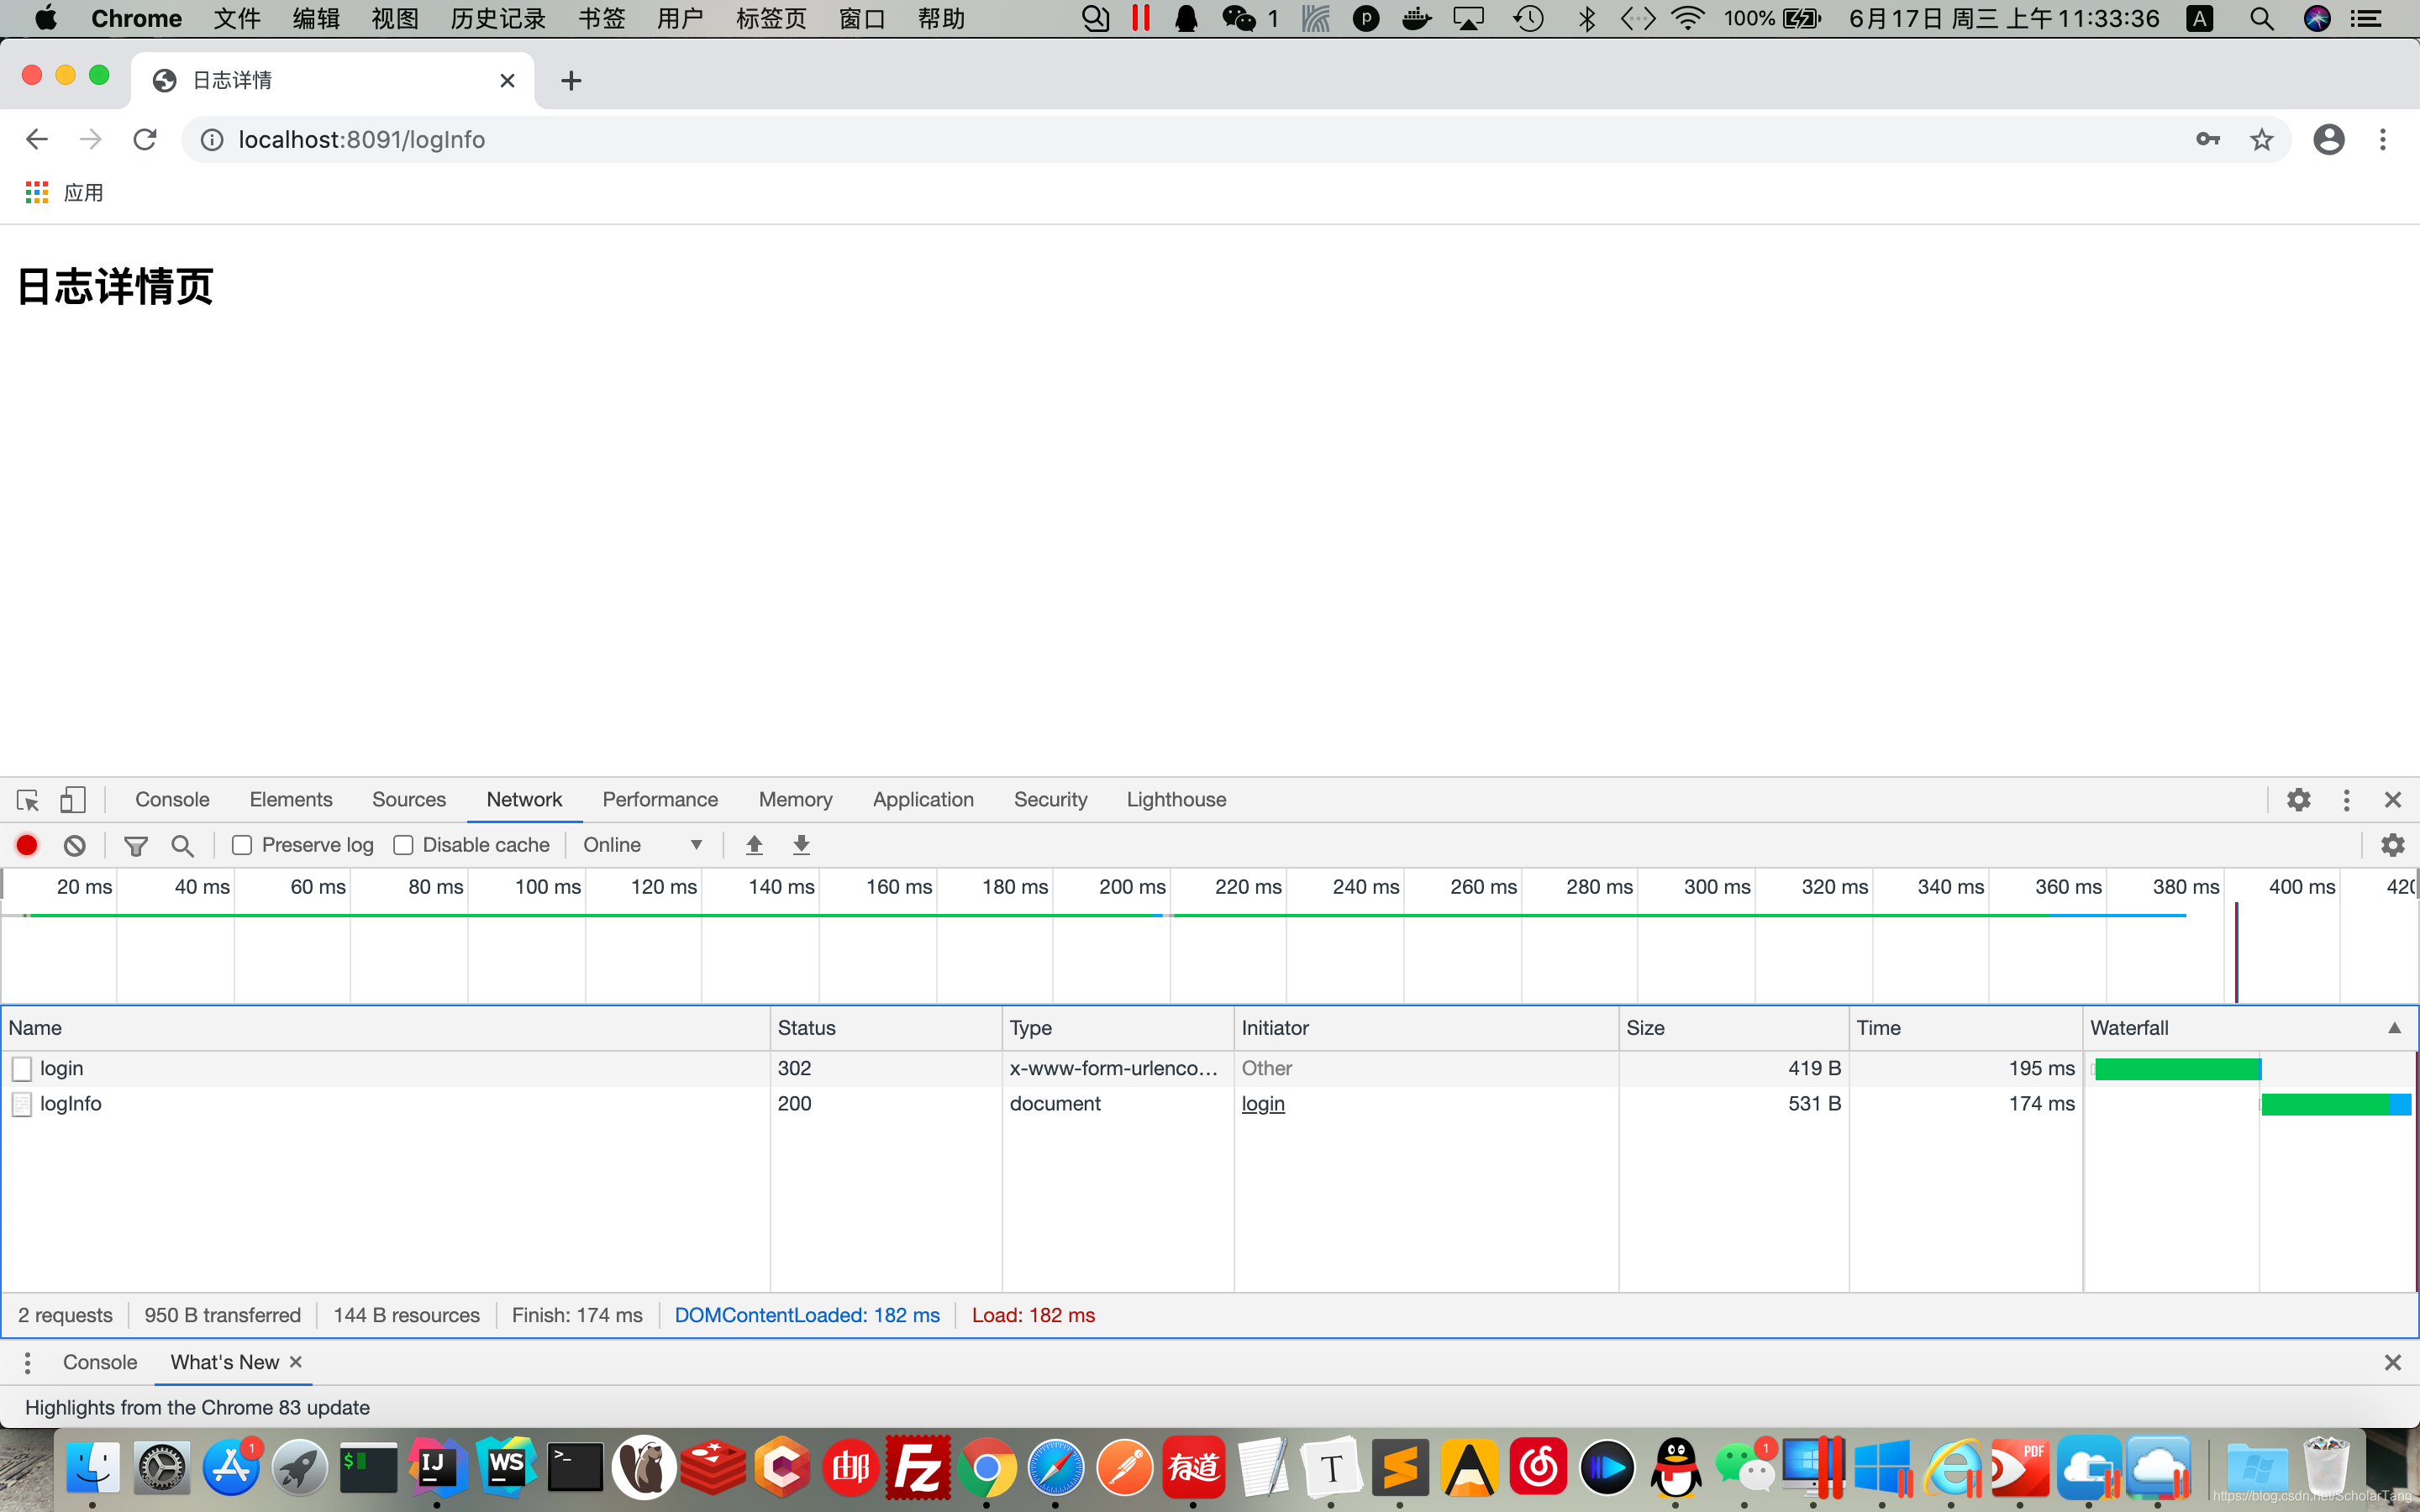
4.浏览器访问路径:localhost:8091/logInfo
当浏览器通过URL访问
/logInfo接口的时候,服务器端会返回302,并让客户端重定向到/login登录页面,客户端在/login页面登录,登录成功后跳转到/logInfo接口,做它该做的事情。在项目启动的时候会随机的生成字符串(这个字符串就是密码),可以在项目启动的控制台日志中找到默认的密码
可以看到这个字符串是由一个叫
UScholarTangerDetailsServiceAutoConfiguration的类打印出来的,可以使用按两下Shift全局搜索,搜索一下这个类,在类中有一个getOrDeducePassword方法,主要代码如下:
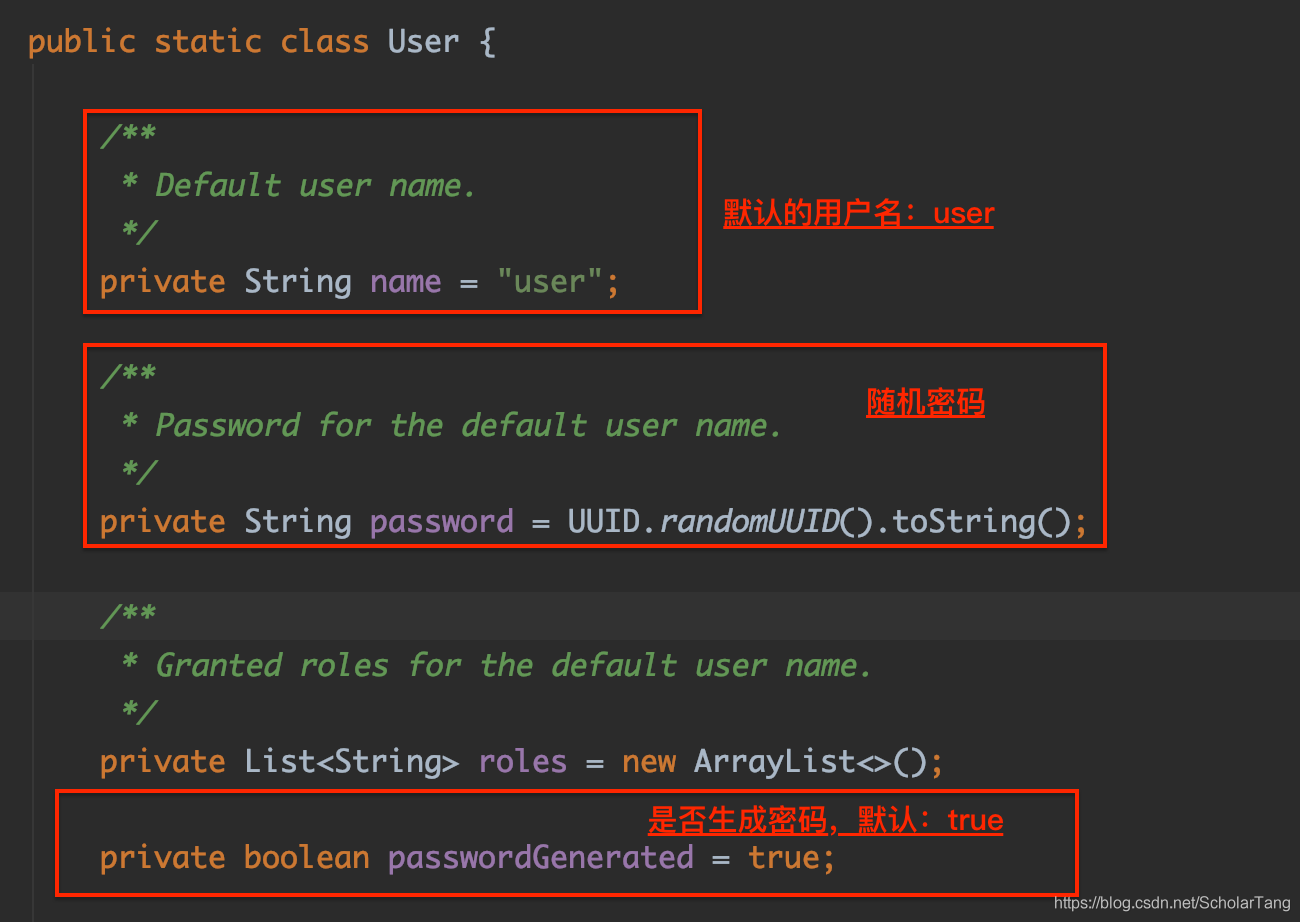
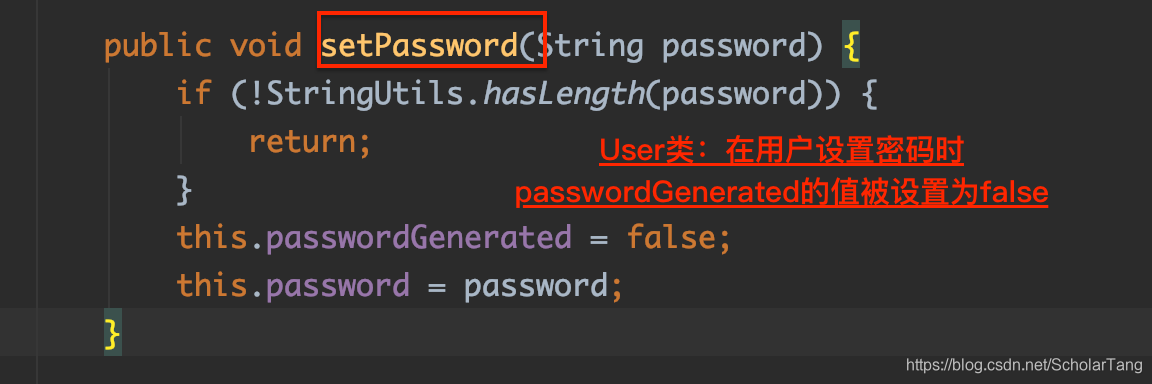
根据User类的信息可以看出来,默认的用户名name的默认值是user;密码是随机生成的密码,是否随机生成密码是由一个passwordGenerated的属性控制的,passwordGenerated属性的值为true,当用户设置的密码的的时候passwordGenerated的值被设置成false输入以知的用户名和密码登录访问接口
![[外链图片转存失败,源站可能有防盗链机制,建议将图片保存下来直接上传(img-ithms3ed-1592402334201)(/Users/jiangnan/Desktop/截屏2020-06-16 下午3.23.07.png)]](https://img-blog.csdnimg.cn/2020061722002760.png?x-oss-process=image/watermark,type_ZmFuZ3poZW5naGVpdGk,shadow_10,text_aHR0cHM6Ly9ibG9nLmNzZG4ubmV0L1NjaG9sYXJUYW5n,size_16,color_FFFFFF,t_70)
![[外链图片转存失败,源站可能有防盗链机制,建议将图片保存下来直接上传(img-0mXUZ3EG-1592402334202)(/Users/jiangnan/Desktop/截屏2020-06-16 下午3.26.16.png)]](https://img-blog.csdnimg.cn/20200617220038231.png?x-oss-process=image/watermark,type_ZmFuZ3poZW5naGVpdGk,shadow_10,text_aHR0cHM6Ly9ibG9nLmNzZG4ubmV0L1NjaG9sYXJUYW5n,size_16,color_FFFFFF,t_70)
3.配置
随机生成的密码,每次启动都会变,对登录的用户名/密码进行配置,有三种不同的方式
- 在application.properties/application.yml中进行配置
- 通过Java代码配置在内存中
- 通过Java从数据库中加载
1.配置文件配置用户名/密码
spring:
  security:
    user:
      name: jimmy
      password: 12345
2.Java配置用户名/密码
通过一个配置类来配置用户名/密码
创建一个配置类,该配置类继承WebSecurityConfigurerAdapter类
package com.scholartang.config;

import org.springframework.context.annotation.Bean;
import org.springframework.context.annotation.Configuration;
import org.springframework.security.config.annotation.authentication.builders.AuthenticationManagerBuilder;
import org.springframework.security.config.annotation.web.configuration.WebSecurityConfigurerAdapter;
import org.springframework.security.crypto.bcrypt.BCryptPasswordEncoder;
import org.springframework.security.crypto.password.PasswordEncoder;

/**
 * @Author ScholarTang
 * @Date 2020/6/17 10:46 上午
 * @Desc SpringSecurity配置类
 */

@Configuration
public class SecurityConfig extends WebSecurityConfigurerAdapter {


    @Override
    protected void configure(AuthenticationManagerBuilder auth) throws Exception {


        //在内存中配置一个用户
        auth.inMemoryAuthentication()
                .withUser("lucy")
                .roles("ADMIN")
                /**
                 * 在SpringSecurity5.x版本开始就强制要求密码必须是加密好的密文
                 * 当然也可以通过一个passwordEncoder实例来打破这个规则(不推荐,因为不安全)
                 */
//                .password("$2a$10$OR3VSksVAmCzc.7WeaRPR.t0wyCsIj24k0Bne8iKWV1o.V9wsP8Xe")
                .password(passwordEncoder().encode("123"));
    }
    @Bean
    public PasswordEncoder passwordEncoder(){


        return new BCryptPasswordEncoder();
    }
}
3.通过Java从数据库中加载
从数据库中加载用户信息实现动态权限认证,首先要知道两个接口**
UserDetails与UserDetailsService**在
UserDetailsService接口中有一个**loadUserByUsername**方法,这个方法是通过用户名加载用户,该方法的返回值就是UserDetails(本质上是一个实体类,Security会自动从里面取值进行对比)
1.先简单的准备三张表
1.用户表(sys_user)
# 用户表
create table `sys_user`(
 `id` int primary key AUTO_INCREMENT,
 `password` varchar(255) not null,
 `username` varchar(255) not null
);
INSERT INTO sys_user (id, password, username) VALUES(1, '$2a$10$f8TQ1IQkPOnYYmrM09kRKepYy8Zjvvar4tteu4RoakZLL1WJwL4wO', 'lucy');
2.角色表(sys_role)
# 角色表
create table `sys_role`(
 `id` int primary key AUTO_INCREMENT,
 `role_name` varchar(255) not null
);
INSERT INTO sys_role (id, role_name) VALUES(1, 'USER');
INSERT INTO sys_role (id, role_name) VALUES(2, 'ADMIN');
INSERT INTO sys_role (id, role_name) VALUES(3, 'SUPERADMIN');
3.用户与角色关系表(sys_user_role)
# 用户角色关系表
create table `sys_user_role`(
 `uid` int not null,
 `rid` int not null
);
INSERT INTO sys_user_role (uid, rid) VALUES(1, 1);
INSERT INTO sys_user_role (uid, rid) VALUES(1, 2);
INSERT INTO sys_user_role (uid, rid) VALUES(1, 3);
2.Demo目录结构
![[外链图片转存失败,源站可能有防盗链机制,建议将图片保存下来直接上传(img-4XUq1uLX-1592405894702)(/Users/jiangnan/Desktop/截屏2020-06-17 下午4.08.15.png)]](https://img-blog.csdnimg.cn/20200617225841831.png?x-oss-process=image/watermark,type_ZmFuZ3poZW5naGVpdGk,shadow_10,text_aHR0cHM6Ly9ibG9nLmNzZG4ubmV0L1NjaG9sYXJUYW5n,size_16,color_FFFFFF,t_70)
3.实现过程
1.创建用户表对应的实体对象
2.为对象提供数据层(mapper)服务层(service)支持
3.在数据层中提供两个方法
- 3.1.根据用户名查找对象
- 3.2.根据用户的唯一标示获取用户所有的角色
4.服务层
- 1.实现
UserDetailsService接口并重写loadUserByUsername方法- 2.注入数据层实例,
loadUserByUsername方法的参数类表会传入一个String username,每错这个就是用户名,在loadUserByUsername中先根据用户名获取用户信息,如果用户信息不为空的话在根据该用户的唯一标示获取对应的角色信息- 创建User对象(org.springframework.security.core.userdetails.User),封装数据返回结果
5.在控制层(controller)提供一个接口。因为SpringSecurity默认是对所有接口提供安全保护的,必须是要登录认证后才能访问。在浏览器中访问该接口,输入正确的认证信息(这些信息就是来自
数据库的表中)访问接口
代码部分:
auth.User.java
package com.scholartang.auth;

import com.baomidou.mybatisplus.annotation.IdType;
import com.baomidou.mybatisplus.annotation.TableField;
import com.baomidou.mybatisplus.annotation.TableId;
import com.baomidou.mybatisplus.annotation.TableName;
import lombok.AllArgsConstructor;
import lombok.Data;
import lombok.NoArgsConstructor;
import lombok.ToString;
import java.util.List;

/**
 * @Author ScholarTang
 * @Date 2020/6/17 11:57 上午
 * @Desc 用户表对应的实体类
 */

@Data
@AllArgsConstructor
@NoArgsConstructor
@ToString
@TableName("sys_user")
public class User {


    @TableId(value = "id", type = IdType.AUTO)
    private Integer id;

    @TableField(value = "username")
    private String username;

    @TableField(value = "password")
    private String password;

    @TableField(exist = false)
    private List<String> authorities;
}
mapper.UserMapper.java
package com.scholartang.mapper;

import com.baomidou.mybatisplus.core.mapper.BaseMapper;
import com.scholartang.auth.User;
import org.apache.ibatis.annotations.Param;
import org.apache.ibatis.annotations.Select;

import java.util.List;

public interface UserMapper extends BaseMapper<User> {


    /**
     * 根据用户名查询用户
     * @param userName
     * @return
     */
    @Select("select id,username,password from sys_user where username = #{userName}")
    User findUserByName(@Param("userName") String userName);

    /**
     * 根据用户ID查询角色
     * @param userId
     * @return
     */
    @Select("select role_name from sys_role where id in (select rid from sys_user_role where uid = #{userId})")
    List<String> findUserRoleByUserId(@Param("userId") int userId);
}
service.SecurityService.java
package com.scholartang.service;

import com.scholartang.auth.User;
import com.scholartang.mapper.UserMapper;
import lombok.extern.slf4j.Slf4j;
import org.springframework.beans.factory.annotation.Autowired;
import org.springframework.context.annotation.Bean;
import org.springframework.security.core.authority.AuthorityUtils;
import org.springframework.security.core.userdetails.UserDetails;
import org.springframework.security.core.userdetails.UserDetailsService;
import org.springframework.security.core.userdetails.UsernameNotFoundException;
import org.springframework.security.crypto.bcrypt.BCryptPasswordEncoder;
import org.springframework.security.crypto.password.PasswordEncoder;
import org.springframework.stereotype.Service;

import java.util.List;
import java.util.stream.Collectors;

/**
 * @Author ScholarTang
 * @Date 2020/6/17 1:59 下午
 * @Desc
 */

@Slf4j
@Service
public class SecurityService implements UserDetailsService {


    @Autowired
    private UserMapper mapper;

    @Override
    public UserDetails loadUserByUsername(String username) throws UsernameNotFoundException {


        //根据用户名获取用户
        User user = mapper.findUserByName(username);
        if (user == null){


            throw new UsernameNotFoundException("user is not exist!");
        }
        //根据用户ID获取权限
        List<String> userRoleList = mapper.findUserRoleByUserId(user.getId());
        //角色是一个特殊权限,也要添加到查出来的权限列表中,Security中必须有ROLE_前缀(规定标识)
        userRoleList = userRoleList.stream()
                .map(ur -> "ROLE_" + ur)
                .collect(Collectors.toList());
        //将角色信息添加到user中
        user.setAuthorities(userRoleList);
        /**
         * 创建User对象(org.springframework.security.core.userdetails.User)
         * 这个User对象实现了UserDetails接口,封装数据将这个对象返回
         */
        org.springframework.security.core.userdetails.User userDetails = new org.springframework.security.core.userdetails.User(user.getUsername(),user.getPassword(),AuthorityUtils.commaSeparatedStringToAuthorityList(String.join(",",user.getAuthorities())));
        log.info("userDetails ============>> userDetails:{}",user);
        return userDetails;
    }
}
config.SecurityConfig.java
package com.scholartang.config;

import com.scholartang.service.SecurityService;
import org.springframework.beans.factory.annotation.Autowired;
import org.springframework.context.annotation.Bean;
import org.springframework.context.annotation.Configuration;
import org.springframework.security.config.annotation.authentication.builders.AuthenticationManagerBuilder;
import org.springframework.security.config.annotation.web.builders.HttpSecurity;
import org.springframework.security.config.annotation.web.configuration.WebSecurityConfigurerAdapter;
import org.springframework.security.crypto.bcrypt.BCryptPasswordEncoder;
import org.springframework.security.crypto.password.PasswordEncoder;

/**
 * @Author ScholarTang
 * @Date 2020/6/17 10:46 上午
 * @Desc SpringSecurity配置类
 */

@Configuration
public class SecurityConfig extends WebSecurityConfigurerAdapter {


    @Autowired
    private SecurityService securityService;

    @Override
    protected void configure(AuthenticationManagerBuilder auth) throws Exception {


        //从数据库中动态加载用户信息与权限
        //把信息交给Security
      	/**
         * 注意:
         * 这里使用了BCryptPasswordEncoder进行加密解密,那么读取的数据表中存储的密码也必须是BCrypt加密后的数据
         */
        auth.userDetailsService(securityService).passwordEncoder(passwordEncoder());
    }
    @Bean
    public BCryptPasswordEncoder passwordEncoder(){


        return new BCryptPasswordEncoder();
    }
}
controller.HelloSecurityController.java
package com.scholartang.controller;

import org.springframework.stereotype.Controller;
import org.springframework.web.bind.annotation.GetMapping;

/**
 * @Author ScholarTang
 * @Date 2020/6/17 10:42 上午
 * @Desc SpringSecurity
 */

/**
 * 注意别在这使用@RestController
 * @RestController注解相当于@ResponseBody + @Controller合在一起的作用
 * @ResponseBody注解的作用是将controller中的所有接口的响应参数都转换成json格式
 * 比方访问/logInfo这个接口,本来是要响应一个页面的,但是经过@ResponseBody处理最终返回了一串字符串
 */
@Controller
public class HelloSecurityController {


    @GetMapping("/logInfo")
    public String logInfo(){


        return "logInfo";
    }
}
4.模式登录认证
认证模式都是在SecurityConfig配置类中配置的
1.httpBasic模式登录认证
描述内容来自网络摘抄HttpBasic登录验证模式是Spring Security实现登录验证最简单的一种方式,也可以说是最简陋的一种方式。它的目的并不是保障登录验证的绝对安全,而是提供一种“防君子不防小人”的登录验证。
就好像是小时候写日记,都买一个带小锁头的日记本,实际上这个小锁头有什么用呢?如果真正想看的人用一根钉子都能撬开。它的作用就是:某天你的父母想偷看你的日记,拿出来一看还带把锁,那就算了吧,怪麻烦的。
举一个我使用HttpBasic模式的进行登录验证的例子:我曾经在一个公司担任部门经理期间,开发了一套用于统计效率、分享知识、生成代码、导出报表的Http接口。纯粹是为了工作中提高效率,同时我又有一点点小私心,毕竟各部之间是有竞争的,所以我给这套接口加上了HttpBasic验证。公司里随便一个技术人员,最多只要给上一两个小时,就可以把这个验证破解了。说白了,这个工具的数据不那么重要,加一道锁的目的就是不让它成为公开数据。如果有心人破解了,真想看看这里面的数据,其实也无妨。这就是HttpBasic模式的典型应用场景。
@Override
protected void configure(HttpSecurity http) throws Exception {


  /**
         * httpBasic 模式
         * 安全性低,容易被破解
         */
  //所有的请求,都需要登录后才能被访问
  http.httpBasic()
    //and 后面接的是规则
    .and()
    .authorizeRequests().anyRequest()
    .authenticated();
}
原理:
1.首先HttpBasic模式要求传输的用户名密码使用Base64模式进行加密。如果用户名是"admin",密码是"admin",则将字符串"admin:admin"使用Base64编码算法加密,加密的结果是:“YWtaW46YWRtaW4=”
2.然后,在http请求中使用Authorization作为一个Header,"Basic YWtaW46YWRtaW4="作为Header的值,发送给服务器端(注意这里使用Basic+空格+加密串)
3.服务器在收到这样的请求时,到达BasicAuthenticationFilter过滤器,将提取Authentication的Header值,并使用于验证用户身份的相同算法进行Base64进行解密
4.解码结果于登录验证的用户名密码匹配,匹配成功则可以继续过滤器后续的访问
2.FormLogin认证模式
应用场景:
与SpringSecurity中的HttpBasic模式进行对比,该模式比较简单,只是进行了http的Header进行简单的登录验证,并没有定制的登录页面,所以使用场景比较窄。
对应一个完整的应用系统,与登录验证相关的页面都是高度定制化的,非常美观而且提供多种登录方式,这就需要使用到SpringSecurity中的formLogin模式进行登录认证
简单版,登录成功或失败跳转路径
@Override
protected void configure(HttpSecurity http) throws Exception {


  http.csrf().disable().formLogin()
    //登录页面
    .loginPage("/login.html")
    //处理登录的接口
    .loginProcessingUrl("/login")
    //登录成功跳转的路径
    .defaultSuccessUrl("/index")
    //登录失败跳转的路径
    .failureUrl("/error");
}
拓展版,登录成功或失败做一些相关的操作
@Override
protected void configure(HttpSecurity http) throws Exception {


  http.csrf().disable().formLogin()
    .loginPage("/login.html")
    .loginProcessingUrl("/login")
    .successHandler(new AuthenticationSuccessHandler() {


      @Override
      public void onAuthenticationSuccess(HttpServletRequest httpServletRequest, HttpServletResponse httpServletResponse, Authentication authentication) throws IOException, ServletException {


        //使用Redis实现session共享,做一个单点功能等等.......
      }
    })
    .failureHandler(new AuthenticationFailureHandler() {


      @Override
      public void onAuthenticationFailure(HttpServletRequest httpServletRequest, HttpServletResponse httpServletResponse, AuthenticationException e) throws IOException, ServletException {


			//.........
      }
    });
}
5.角色权限
如果项目中存在权限问题,比如说某些页面或者是接口只有拥有对应权限才能进行资源访问;在使用formLogin模式登录认证时我们可以这样配置
        http.csrf().disable().formLogin()
                //登录页面
                .loginPage("/login.html")
                //处理登录的接口
                .loginProcessingUrl("/login")
                //登录成功跳转的路径
                .defaultSuccessUrl("/index")
                //登录失败跳转的路径
                .failureUrl("/error")
                .and()
                .authorizeRequests()
                //不需要通过登录验证就可以被访问的资源路径
                .antMatchers("/login.html","/login").permitAll()
                //角色为USER、ADMIN、SUPERADMIN都可以访问
                .antMatchers("/index").access("hasRole('USER') or hasRole('ADMIN') or hasRole('SUPERADMIN')")
                //需要角色为ADMIN权限才能访问
                .antMatchers("/logInfo").hasRole("ADMIN");
- .antMatchers("/login.html","/login").permitAll(),地址 “/login.hrml” 和 “/login” 所有用户都可访问,permitAll 表示该请求任何人都可以访问;
- .antMatchers("/logInfo").hasRole(“ADMIN”);,地址 “/logInfo” 的请求地址,只有拥有 ADMIN 角色的用户才可以访问;
- .antMatchers("/index").access(“hasRole(‘USER’) or hasRole(‘ADMIN’) or hasRole(‘SUPERADMIN’)”),地址 为"/index" 的请求地址,可以给角色 USER、 ADMIN、SUPERADMIN 的用户来使用;
- antMatchers("/xxx").hasIpAddress(“192.168.xx.x”),只有固定 IP 地址的用户可以访问。
更多的权限控制方式参看下表:
方法名 解释 access(String) Spring EL 表达式结果为 true 时可访问 anonymous() 匿名可访问 denyAll() 用户不可以访问 fullyAuthenticated() 用户完全认证可访问(非 remember me 下自动登录) hasAnyAuthority(String…) 参数中任意权限的用户可访问 hasAnyRole(String…) 参数中任意角色的用户可访问 hasAuthority(String) 某一权限的用户可访问 hasRole(String) 某一角色的用户可访问 permitAll() 所有用户可访问 rememberMe() 允许通过 remember me 登录的用户访问 authenticated() 用户登录后可访问 hasIpAddress(String) 用户来自参数中的 IP 时可访问
6.方法级别的安全
我们可以通过请求路径来控制权限,也可以在方法上添加注解来限制控制访问权限
- @PreAuthorize
适用在进入方法前的权限验证,@PreAuthorize可以将登录用户的角色/权限参数传入到方法中
- @PostAuthorize(使用的并不多)
在方法执行后再进行权限验证
- @Secured
此注解用来定义业务方法的安全配置属性的列表,可以在需要安全[角色/权限等]的方法上指定**@Secured**注解,并且只有那些角色/权限的用户才可以调用该方法。如果有人不具备要求的角色或权限试图调用该方法,将会抛出AccessDenied 异常。
@PostAuthorize注解
注意:关于Spring Boot下Spring Security权限访问设置@PreAuthorize(“hasAuthority(‘ROLE_ADMIN’)”)没有用!!原因是没有设置开启prePostEnable=true;这个注解加在方法上是无效的,因为prePostEnable默认为false;
设置prePostEnable=true
@EnableGlobalMethodSecurity(prePostEnabled=true)
package com.scholartang.controller;

import com.scholartang.auth.User;
import com.scholartang.service.SecurityService;
import org.springframework.beans.factory.annotation.Autowired;
import org.springframework.http.ResponseEntity;
import org.springframework.security.access.prepost.PreAuthorize;
import org.springframework.security.config.annotation.method.configuration.EnableGlobalMethodSecurity;
import org.springframework.stereotype.Controller;
import org.springframework.web.bind.annotation.GetMapping;

import java.util.List;

/**
 * @Author ScholarTang
 * @Date 2020/6/17 10:42 上午
 * @Desc SpringSecurity
 */

@Controller
@EnableGlobalMethodSecurity(prePostEnabled=true)
public class HelloSecurityController {


    /**
     * 只要拥有角色 ROLE_ADMIN 的用户才可以访问此方法。
     * 这里角色前面加了一个ROLE_的原因是我上面将角色从数据库中查询出来的时候进行了一个处理,在每个角色前面都加了ROLE_,原因是角色是一个特殊权限,Security中必须有ROLE_前缀(规定标识)
     * @return
     */
    @PreAuthorize("hasAuthority('ROLE_ADMIN')")
    @GetMapping("/admin")
    public String admin(){


        return "admin";
    }
}
角色权限具备ADMIN的用户访问,可以正常的看到资源内容
角色不具备ADMIN权限的用户访问,服务器返回403
@Secured
@Secured注解的使用方式和@PostAuthorize注解差不多,只是使用配置不一样
开启注解
@EnableGlobalMethodSecurity(securedEnabled=true)
package com.scholartang.controller;

import com.scholartang.auth.User;
import com.scholartang.service.SecurityService;
import org.springframework.beans.factory.annotation.Autowired;
import org.springframework.security.access.annotation.Secured;
import org.springframework.security.access.prepost.PreAuthorize;
import org.springframework.security.config.annotation.method.configuration.EnableGlobalMethodSecurity;
import org.springframework.stereotype.Controller;
import org.springframework.web.bind.annotation.GetMapping;
import org.springframework.web.bind.annotation.ResponseBody;

import java.util.List;
/**
 * @Author ScholarTang
 * @Date 2020/6/17 10:42 上午
 * @Desc SpringSecurity
 */

@Controller
@EnableGlobalMethodSecurity(securedEnabled=true)
public class HelloSecurityController {


    @Secured({

    "ROLE_ADMIN"})
    @GetMapping("/admin")
    public String admin(){


        return "admin";
    }
}
7.忽略拦截
如果某哥请求地址不需要拦截的话,可以直接过滤该地址,即该地址不走SpringSecurity过滤器
例如:我不想拦截任何css文件
@Override
    public void init(WebSecurity web) throws Exception {


        web.ignoring().antMatchers("/css/**");
    }