Vue源码 深入响应式原理 (三)nextTick & 检测变化的注意事项
学习内容和文章内容来自 黄轶老师
黄轶老师的慕课网视频教程地址:《Vue.js2.0 源码揭秘》、
黄轶老师拉钩教育教程地址:《Vue.js 3.0 核心源码解析》
这里分析的源码是Runtime + Compiler 的 Vue.js
调试代码在:node_modules\vue\dist\vue.esm.js 里添加
vue版本:Vue.js 2.5.17-beta
你越是认真生活,你的生活就会越美好——弗兰克·劳埃德·莱特
《人生果实》经典语录
nextTick
nextTick 是 Vue 的一个核心实现,在介绍 Vue 的 nextTick 之前,为了方便大家理解,我先简单介绍一下 JS 的运行机制。
单步调试代码同
深入响应式原理 (二)依赖收集 & 派发更新
这里不重复贴
推荐阅读
这一次,彻底弄懂 JavaScript 执行机制(Event Loop)
JS 运行机制
JS 执行是单线程的,它是基于事件循环的。事件循环大致分为以下几个步骤:
(1)所有同步任务都在主线程上执行,形成一个执行栈(execution context stack)。
(2)主线程之外,还存在一个"任务队列"(task queue)。只要异步任务有了运行结果,就在"任务队列"之中放置一个事件。
(3)一旦"执行栈"中的所有同步任务执行完毕,系统就会读取"任务队列",看看里面有哪些事件。那些对应的异步任务,于是结束等待状态,进入执行栈,开始执行。
(4)主线程不断重复上面的第三步。
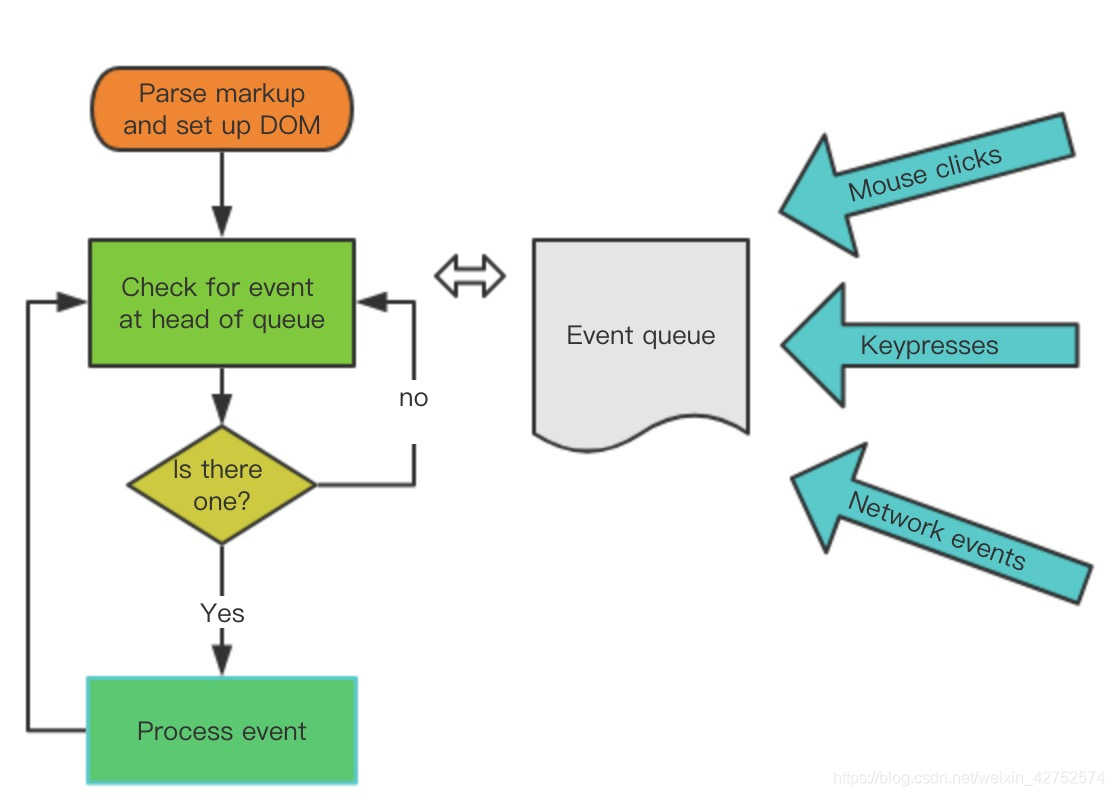
主线程的执行过程就是一个 tick,而所有的异步结果都是通过 “任务队列” 来调度。
消息队列中存放的是一个个的任务(task)。 规范中规定 task 分为两大类,分别是 macro task 和 micro task,并且每个 macro task 结束后,都要清空所有的 micro task。
关于 macro task 和 micro task 的概念,这里不会细讲,简单通过一段代码演示他们的执行顺序:
for (macroTask of macroTaskQueue) {


    // 1. Handle current MACRO-TASK
    handleMacroTask();

    // 2. Handle all MICRO-TASK
    for (microTask of microTaskQueue) {


        handleMicroTask(microTask);
    }
}
在浏览器环境中,
常见的 macro task 有 setTimeout、MessageChannel、postMessage、setImmediate;
常见的 micro task 有 MutationObsever 和 Promise.then。

推荐阅读
这一次,彻底弄懂 JavaScript 执行机制(Event Loop)
Vue 的实现
修改响应式数据,更新视图的过程会触发nextTick方法


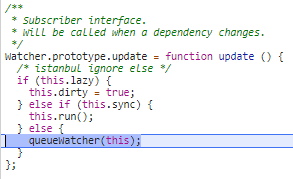

在 Vue 源码 2.5+ 后,nextTick 的实现单独有一个 JS 文件来维护它,它的源码并不多,总共也就 100 多行。接下来我们来看一下它的实现,在 src/core/util/next-tick.js 中:
import {

     noop } from 'shared/util'
import {

     handleError } from './error'
import {

     isIOS, isNative } from './env'

const callbacks = []
let pending = false

function flushCallbacks () {


  pending = false
  const copies = callbacks.slice(0)
  callbacks.length = 0
  for (let i = 0; i < copies.length; i++) {


    copies[i]()
  }
}

// Here we have async deferring wrappers using both microtasks and (macro) tasks.
// In < 2.4 we used microtasks everywhere, but there are some scenarios where
// microtasks have too high a priority and fire in between supposedly
// sequential events (e.g. #4521, #6690) or even between bubbling of the same
// event (#6566). However, using (macro) tasks everywhere also has subtle problems
// when state is changed right before repaint (e.g. #6813, out-in transitions).
// Here we use microtask by default, but expose a way to force (macro) task when
// needed (e.g. in event handlers attached by v-on).
let microTimerFunc
let macroTimerFunc
let useMacroTask = false

// Determine (macro) task defer implementation.
// Technically setImmediate should be the ideal choice, but it's only available
// in IE. The only polyfill that consistently queues the callback after all DOM
// events triggered in the same loop is by using MessageChannel.
/* istanbul ignore if */
if (typeof setImmediate !== 'undefined' && isNative(setImmediate)) {


  macroTimerFunc = () => {


    setImmediate(flushCallbacks)
  }
} else if (typeof MessageChannel !== 'undefined' && (
  isNative(MessageChannel) ||
  // PhantomJS
  MessageChannel.toString() === '[object MessageChannelConstructor]'
)) {


  const channel = new MessageChannel()
  const port = channel.port2
  channel.port1.onmessage = flushCallbacks
  macroTimerFunc = () => {


    port.postMessage(1)
  }
} else {


  /* istanbul ignore next */
  macroTimerFunc = () => {


    setTimeout(flushCallbacks, 0)
  }
}

// Determine microtask defer implementation.
/* istanbul ignore next, $flow-disable-line */
if (typeof Promise !== 'undefined' && isNative(Promise)) {


  const p = Promise.resolve()
  microTimerFunc = () => {


    p.then(flushCallbacks)
    // in problematic UIWebViews, Promise.then doesn't completely break, but
    // it can get stuck in a weird state where callbacks are pushed into the
    // microtask queue but the queue isn't being flushed, until the browser
    // needs to do some other work, e.g. handle a timer. Therefore we can
    // "force" the microtask queue to be flushed by adding an empty timer.
    if (isIOS) setTimeout(noop)
  }
} else {


  // fallback to macro
  microTimerFunc = macroTimerFunc
}

/**
 * Wrap a function so that if any code inside triggers state change,
 * the changes are queued using a (macro) task instead of a microtask.
 */
export function withMacroTask (fn: Function): Function {


  return fn._withTask || (fn._withTask = function () {


    useMacroTask = true
    const res = fn.apply(null, arguments)
    useMacroTask = false
    return res
  })
}

export function nextTick (cb?: Function, ctx?: Object) {


  let _resolve
  callbacks.push(() => {


    if (cb) {


      try {


        cb.call(ctx)
      } catch (e) {


        handleError(e, ctx, 'nextTick')
      }
    } else if (_resolve) {


      _resolve(ctx)
    }
  })
  if (!pending) {


    pending = true
    if (useMacroTask) {


      macroTimerFunc()
    } else {


      microTimerFunc()
    }
  }
  // $flow-disable-line
  if (!cb && typeof Promise !== 'undefined') {


    return new Promise(resolve => {


      _resolve = resolve
    })
  }
}

同一个tick过程,只会触发一次timerFunc();通过pending这个变量实现

后面执行flushCallbacks方法时才重新把pending赋值为false
next-tick.js 申明了 microTimerFunc 和 macroTimerFunc 2 个变量,它们分别对应的是 micro task 的函数和 macro task 的函数。
对于 macro task 的实现,优先检测是否支持原生 setImmediate,这是一个高版本 IE 和 Edge 才支持的特性,不支持的话再去检测是否支持原生的 MessageChannel,如果也不支持的话就会降级为 setTimeout 0;
而对于 micro task 的实现,则检测浏览器是否原生支持 Promise,不支持的话直接指向 macro task 的实现。
next-tick.js 对外暴露了 2 个函数,先来看 nextTick,这就是我们在上一节执行 nextTick(flushSchedulerQueue) 所用到的函数。
它的逻辑也很简单,把传入的回调函数 cb 压入 callbacks 数组,最后一次性地根据 useMacroTask 条件执行 macroTimerFunc 或者是 microTimerFunc,而它们都会在下一个 tick 执行 flushCallbacks,flushCallbacks 的逻辑非常简单,对 callbacks 遍历,然后执行相应的回调函数。
这里使用 callbacks 而不是直接在 nextTick 中执行回调函数的原因是保证在同一个 tick 内多次执行 nextTick,不会开启多个异步任务,而把这些异步任务都压成一个同步任务,在下一个 tick 执行完毕。
nextTick 函数最后还有一段逻辑:
 if (!cb && typeof Promise !== 'undefined') {


  return new Promise(resolve => {


    _resolve = resolve
  })
}
这是当 nextTick 不传 cb 参数的时候,提供一个 Promise 化的调用,比如:
nextTick().then(() => {

    })

当 _resolve 函数执行,就会跳到 then 的逻辑中。
next-tick.js 还对外暴露了 withMacroTask 函数,它是对函数做一层包装,确保函数执行过程中对数据任意的修改,触发变化执行 nextTick 的时候强制走 macroTimerFunc。
比如对于一些 DOM 交互事件,如 v-on 绑定的事件回调函数的处理,会强制走 macro task。
实例代码
src/App.vue
<template>
  <div id="app">
    <img alt="Vue logo" src="./assets/logo.png" />
    <div ref="msg">
      {

   {msg}}
    </div>
    <button @click="change">change msg</button>
    <!-- <HelloWorld msg="Welcome to Your Vue.js App"/> -->
  </div>
</template>

<script>

export default {


  name: "App",
  data() {


    return {


      msg: "hello Vue",
    };
  },
  methods: {


    change() {


      this.msg = `hello world`
      this.$nextTick(() => {


        console.log(`nextTick: ${

       this.$refs.msg.innerText}`)
      })
      this.$nextTick().then(() => {


        console.log(`nextTick with promise: ${

       this.$refs.msg.innerText}`)
      })
      console.log(`sync 同步 ${

       this.$refs.msg.innerText}`)
    },
  }
};
</script>
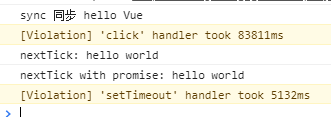
队列先进先执行
总结
通过这一节对 nextTick 的分析,并结合上一节的 setter 分析,我们了解到数据的变化到 DOM 的重新渲染是一个异步过程,发生在下一个 tick。
这就是我们平时在开发的过程中,比如从服务端接口去获取数据的时候,数据做了修改,如果我们的某些方法去依赖了数据修改后的 DOM 变化,我们就必须在 nextTick 后执行。
比如下面的伪代码:
getData(res).then(()=>{


  this.xxx = res.data
  this.$nextTick(() => {


    // 这里我们可以获取变化后的 DOM
  })
})
Vue.js 提供了 2 种调用 nextTick 的方式,
一种是全局 API Vue.nextTick,
一种是实例上的方法 vm.$nextTick,无论我们使用哪一种,最后都是调用 next-tick.js 中实现的 nextTick 方法。
检测变化的注意事项
通过前面几节的分析,我们对响应式数据对象以及它的 getter 和 setter 部分做了了解,但是对于一些特殊情况是需要注意的,接下来我们就从源码的角度来看Vue 是如何处理这些特殊情况的。
对象添加属性
对于使用 Object.defineProperty 实现响应式的对象,当我们去给这个对象添加一个新的属性的时候,是不能够触发它的 setter 的,比如:
var vm = new Vue({


  data:{


    a:1
  }
})
// vm.b 是非响应的
vm.b = 2
但是添加新属性的场景我们在平时开发中会经常遇到,那么Vue为了解决这个问题,定义了一个全局 API Vue.set 方法,它在 src/core/global-api/index.js 中初始化:
Vue.set = set
这个 set 方法的定义在 src/core/observer/index.js 中:
/**
 * Set a property on an object. Adds the new property and
 * triggers change notification if the property doesn't
 * already exist.
 */
export function set (target: Array<any> | Object, key: any, val: any): any {


  if (process.env.NODE_ENV !== 'production' &&
    (isUndef(target) || isPrimitive(target))
  ) {


    warn(`Cannot set reactive property on undefined, null, or primitive value: ${

      (target: any)}`)
  }
  if (Array.isArray(target) && isValidArrayIndex(key)) {


    target.length = Math.max(target.length, key)
    target.splice(key, 1, val)
    return val
  }
  if (key in target && !(key in Object.prototype)) {


    target[key] = val
    return val
  }
  const ob = (target: any).__ob__
  if (target._isVue || (ob && ob.vmCount)) {


    process.env.NODE_ENV !== 'production' && warn(
      'Avoid adding reactive properties to a Vue instance or its root $data ' +
      'at runtime - declare it upfront in the data option.'
    )
    return val
  }
  if (!ob) {


    target[key] = val
    return val
  }
  defineReactive(ob.value, key, val)
  ob.dep.notify()
  return val
}
set 方法接收 3个参数,
target可能是数组或者是普通对象,key代表的是数组的下标或者是对象的键值,val代表添加的值。
首先判断如果 target 是数组且 key 是一个合法的下标,则之前通过 splice 去添加进数组然后返回,这里的 splice 其实已经不仅仅是原生数组的 splice 了,稍后我会详细介绍数组的逻辑。
接着又判断 key 已经存在于 target 中,则直接赋值返回,因为这样的变化是可以观测到了。
接着再获取到 target.__ob__ 并赋值给 ob,之前分析过它是在 Observer 的构造函数执行的时候初始化的,表示 Observer 的一个实例,如果它不存在,则说明 target 不是一个响应式的对象,则直接赋值并返回。
最后通过 defineReactive(ob.value, key, val) 把新添加的属性变成响应式对象,然后再通过 ob.dep.notify() 手动的触发依赖通知,还记得我们在给对象添加getter的时候有这么一段逻辑:
export function defineReactive (
  obj: Object,
  key: string,
  val: any,
  customSetter?: ?Function,
  shallow?: boolean
) {


  // ...
  let childOb = !shallow && observe(val)
  Object.defineProperty(obj, key, {


    enumerable: true,
    configurable: true,
    get: function reactiveGetter () {


      const value = getter ? getter.call(obj) : val
      if (Dep.target) {


        dep.depend()
        if (childOb) {


          childOb.dep.depend()
          if (Array.isArray(value)) {


            dependArray(value)
          }
        }
      }
      return value
    },
    // ...
  })
}
在getter过程中判断了 childOb,并调用了 childOb.dep.depend() 收集了依赖,这就是为什么执行 Vue.set 的时候通过 ob.dep.notify() 能够通知到 watcher,从而让添加新的属性到对象也可以检测到变化。
这里如果 value 是个数组,那么就通过 dependArray 把数组每个元素也去做依赖收集。
数组
接着说一下数组的情况,Vue 也是不能检测到以下变动的数组:
1.当你利用索引直接设置一个项时,例如:vm.items[indexOfItem] = newValue
2.当你修改数组的长度时,例如:vm.items.length = newLength
对于第一种情况,可以使用:Vue.set(example1.items, indexOfItem, newValue);
而对于第二种情况,可以使用 vm.items.splice(newLength)。
我们刚才也分析到,对于 Vue.set 的实现,当 target 是数组的时候,也是通过 target.splice(key, 1, val) 来添加的,那么这里的 splice 到底有什么黑魔法,能让添加的对象变成响应式的呢。
其实之前我们也分析过,在通过 observe 方法去观察对象的时候会实例化 Observer,在它的构造函数中是专门对数组做了处理,它的定义在 src/core/observer/index.js 中。
export class Observer {


  constructor (value: any) {


    this.value = value
    this.dep = new Dep()
    this.vmCount = 0
    def(value, '__ob__', this)
    if (Array.isArray(value)) {


      const augment = hasProto
        ? protoAugment
        : copyAugment
      augment(value, arrayMethods, arrayKeys)
      this.observeArray(value)
    } else {


      // ...
    }
  }
}
这里我们只需要关注 value 是 Array 的情况,首先获取 augment,这里的 hasProto 实际上就是判断对象中是否存在 __proto__,如果存在则 augment 指向 protoAugment, 否则指向 copyAugment,来看一下这两个函数的定义:
/**
 * Augment an target Object or Array by intercepting
 * the prototype chain using __proto__
 */
function protoAugment (target, src: Object, keys: any) {


  /* eslint-disable no-proto */
  target.__proto__ = src
  /* eslint-enable no-proto */
}

/**
 * Augment an target Object or Array by defining
 * hidden properties.
 */
/* istanbul ignore next */
function copyAugment (target: Object, src: Object, keys: Array<string>) {


  for (let i = 0, l = keys.length; i < l; i++) {


    const key = keys[i]
    def(target, key, src[key])
  }
}
protoAugment 方法是直接把 target.__proto__ 原型直接修改为 src,
而 copyAugment 方法是遍历 keys,通过 def,也就是 Object.defineProperty 去定义它自身的属性值。
对于大部分现代浏览器都会走到 protoAugment,那么它实际上就把 value 的原型指向了 arrayMethods,arrayMethods 的定义在 src/core/observer/array.js 中:
import {

     def } from '../util/index'

const arrayProto = Array.prototype
export const arrayMethods = Object.create(arrayProto)

const methodsToPatch = [
  'push',
  'pop',
  'shift',
  'unshift',
  'splice',
  'sort',
  'reverse'
]

/**
 * Intercept mutating methods and emit events
 */
methodsToPatch.forEach(function (method) {


  // cache original method
  const original = arrayProto[method]
  def(arrayMethods, method, function mutator (...args) {


    const result = original.apply(this, args)
    const ob = this.__ob__
    let inserted
    switch (method) {


      case 'push':
      case 'unshift':
        inserted = args
        break
      case 'splice':
        inserted = args.slice(2)
        break
    }
    if (inserted) ob.observeArray(inserted)
    // notify change
    ob.dep.notify()
    return result
  })
})

/**
 * Observe a list of Array items.
 */
Observer.prototype.observeArray = function observeArray (items) {


  for (var i = 0, l = items.length; i < l; i++) {


    observe(items[i]);
  }
};
可以看到,arrayMethods 首先继承了 Array,然后对数组中所有能改变数组自身的方法,如 push、pop 等这些方法进行重写。
重写后的方法会先执行它们本身原有的逻辑,并对能增加数组长度的 3 个方法 push、unshift、splice 方法做了判断,获取到插入的值,然后把新添加的值变成一个响应式对象,并且再调用 ob.dep.notify() 手动触发依赖通知,这就很好地解释了之前的示例中调用 vm.items.splice(newLength) 方法可以检测到变化。
案例代码
<template>
  <div id="app">
    <img alt="Vue logo" src="./assets/logo.png" />
    <div>
      {

    {

    msg}}
    </div>
    <ul>
      <li v-for="(item, index) in items" :key="index">{

    {

    item}}</li>
    </ul>
    <button @click="add">add</button>
    <button @click="change">change</button>
    <!-- <HelloWorld msg="Welcome to Your Vue.js App"/> -->
  </div>
</template>

<script>

export default {


  name: "App",
  data() {


    return {


      msg: {


        a: 'Hello'
      },
      items: [1, 2]
    };
  },
  methods: {


    change() {


      this.items[1] = 3
      console.log(this.items)
    },
    add () {


      this.msg.b = 'Vue',
      console.log(this.msg)
      this.items[2] = 4
      console.log(this.items)
    }
  }
};
</script>
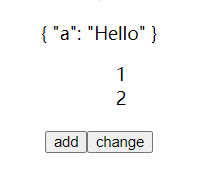
点击add或者change按钮时,会改变对应的变量值,但是视图没有更新
修改change和add方法
  methods: {


    change() {


      // this.items[1] = 3
      this.$set(this.items, 1, 3)
    },
    add () {


      // this.msg.b = 'Vue',
      this.$set(this.msg, 'b', 'Vue')
      // this.items[2] = 4
      this.items.push(4)
    }
  }
这时点击add或者change按钮时,会改变对应的变量值,同时视图会更新
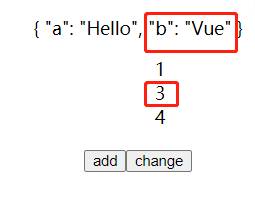
点击add时


总结
响应式数据中对于对象新增删除属性以及数组的下标访问修改和添加数据等的变化观测不到- 通过
Vue.set()以及数组的API可以解决这些问题,本质上它们内部手动做了依赖更新的派发
通过这一节的分析,我们对响应式对象又有了更全面的认识,如果在实际工作中遇到了这些特殊情况,我们就可以知道如何把它们也变成响应式的对象。
其实对于对象属性的删除也会用同样的问题,Vue 同样提供了 Vue.del 的全局 API,它的实现和 Vue.set 大同小异,甚至还要更简单一些,这里我就不去分析了,感兴趣的同学可以自行去了解。
Vue源码学习目录
组件化 (一) createComponent
组件化 (二) patch
组件化 (三) 合并配置
组件化 (四) 生命周期
组件化(五) 组件注册
深入响应式原理(一) 响应式对象
深入响应式原理 (二)依赖收集 & 派发更新
谢谢你阅读到了最后~
期待你关注、收藏、评论、点赞~
让我们一起 变得更强