写在前面
前端的CSS样式繁多,关联性又不大,让前端的小伙伴们头皮发麻,我也是其中之一,有空将用到的有趣又容易忘记的CSS样式做一个总结归纳,(其中很多是前辈的总结)方便自己以后查找用,当然如果能帮到各位一二,亦不胜荣幸
1.遮罩层.我用于做自定义弹窗,简单快速,再ajax传输也不影响原网页刷新,方法如下:
<div id="zhezhao">
	<div id="tanchuang"></div>
</div>
<style>
  #zhezhao {


    position: fixed;
    left: 0px;
    top: 0px;
    width: 100%;
    height: 100%;
    opacity: 0.95;
    z-index:20;
}

#tanchuang{


    position: relative;
    background: gray;
    width: 400px;
    height: 400px;
}
</style>
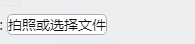
2. 默认样式修改.'未选择任何文件’字样自定义,代码如下,各种样式可以自己添加
<label for="myinput">
<span id="text1" style="border: 1px solid rgb(169, 169, 169);border-radius: 5px;cursor: pointer;background-color: white">拍照或选择文件</span>
<span id="show"></span>
<input type="file" id="myinput">
</label>
<style>
label{
position: relative;
}
#fileinp{
position: absolute;
left: 0;
top: 0;
opacity: 0;
width: 170px;
cursor: pointer;
}
#text{
color: red;
}
</style>
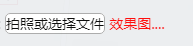
// js获取上传文件名字
<script>
$("#myinput").change(function () {
$("#show").html($("#myinput").val().split("\\").slice(-1) [0].slice(0,4)+'...');
})
</script>
效果图如下;显示完整路径加文件名,本人是根据需求截取文件名的部分显示
3. 文件上传,照片上传,移动端打开手机摄像
<input type="file" accept="image/*" />  //调用相机 ,图片或者相册 (两者都行)
加上了capture=camera"属性之后安卓手机就直接调用了相机,没有了图库的选项
<input type="file" accept="image/*;capture=camera"> //直接调用相机
4.div设置渐变色
<div class='mydiv'></div>
<style>
	.mydiv{


	    color: white;
		width:200px;
		height:200px;
		background: -webkit-gradient(linear, 0% 0%, 0% 100%, from(#033360), to(#006495));
	}
</style>
引用自前辈:
/更多类型的的input样式请查看
https://blog.csdn.net/yx_cos/article/details/82629719
///更多浏览器支持的渐变框样式,请查看
https://blog.csdn.net/TaoYuanKuangDao/article/details/89138551
人生就是在不断的失去和收获中循环
时光不仅仅给我们带来了岁月和皱纹
也让我们积累了珍贵的知识,经验,教训等无形的财富