文章目录
显示天气信息
解析天气数据
首先,天气信息的形式是JSON,借助GSON来对天气信息进行解析。
数据的大致形式如下:
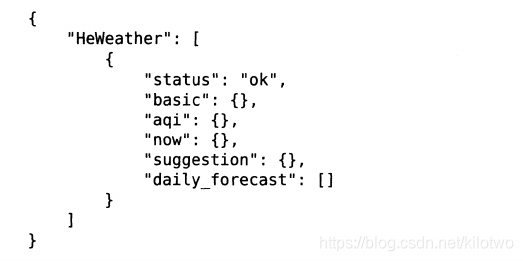
其中,除了状态status内容为字符串,其他5类中都再包含具体内容,故可以定义5个具体的类来描述他们。
basic

basic中,city表示城市名,id为城市对应的Weather_id,又包含一个update类,所以需要一个update类,里面包含一个字符串loc表示更新时间。按照此结构可以在gson下建立Basic类。

public class Basic  {


    //由于JSON中的一些字段可能不太适合直接作为Java字段来命名,因此这里使用了
    //@ SerializedName注解的方式来让JSON字段和Java字段之间建立映射关系
    @SerializedName("city")
    public String cityName;

    @SerializedName("id")
    public String weatherId;

    public Update update;
    public class Update{


        @SerializedName("loc")
        public String updateTime;
    }
}
aqi
其他几个类也类似
AQI表示空气质量

建立AQI类来对应JSON类:
public class AQI {


    public AQICity city;

    public class AQICity{


        public String aqi;
        public String pm25;
    }
}
now
now中包含当前温度和一个cond类来包含当前天气类别。
public class Now  {


    @SerializedName("tmp")
    public String tmp;
    @SerializedName("cond")
    public More More;
    public class More{


        @SerializedName("txt")
        public String info;

    }
}
suggestion

建议类中包含三个类,comf表示天气体感,cw表示洗车建议,sport表示运动建议
public class Suggestion {


    @SerializedName("comf")
    public Comfort comfort;
    @SerializedName("cw")
    public CarWash carWash;

    public Sport sport;
    public class Sport{


        @SerializedName("txt")
    public String info;

    }
    public class CarWash{


        @SerializedName("txt")
    public String info;
    }
    public class Comfort{


        @SerializedName("txt")
        public  String info;
    }
}
daily_forecast
这个类比较特殊,包含未来一周天气信息,由于每天的信息都是相同的,所以只需定义出单日的天气实体类即可,然后在使用时使用集合类封装即可。

/*
可以看到, daily forecast中包含的是一个数组,数组中的每一项都代表着未来一天的天
气信息。针对于这种情况,我们只需要定义出单日天气的实体类就可以了,然后在声明实体类引
用的时候使用集合类型来进行声明。

 */
public class Forecast {


        public String date;
        @SerializedName("cond")
        public More more;
        @SerializedName("tmp")
        public Temperature Temperature;
        public class Temperature{


            public String max;
            public String min;
        }
        public class More{


            @SerializedName("txt_d")
            public String info;
        }
}
weather
还需要一个总的实例类来将上面创建好的类整合起来。
/*
在 Weather类中,我们对 Basic、AQI、NoW、 Suggestion和 Forecast类进行了引用。其
中,由于 daily forecast中包含的是一个数组,因此这里使用了List集合来引用 Forecast类。

 */
public class Weather {


    /*
    另外,返回的天气数据中还会包含一项 status数据,成功返回ok,失败则会返回具体的原因,那
    么这里也需要添加一个对应的 status字段
    现在所有的GSON实体类都定义好了,接下来我们开始编写天气界面。
     */
    public String status;
    public Basic basic;
    public AQI aqi;
    public Now now;
    public Suggestion suggestion;

    @SerializedName("daily_forecast")
    public List<Forecast> mForecastList;
}
其中,由于daily_forecast中包含一个数组,因此使用了List集合来引用Forecast类。
编写天气界面
这部分没什么好总结的,接按照需要编写即可,注意的是由于界面比较复杂,所有可以分开编写xml文件然后汇总在界面中。
activity_weather.xml
<FrameLayout
    xmlns:android="http://schemas.android.com/apk/res/android"
    android:layout_width="match_parent"
    android:layout_height="match_parent"
    android:background="@color/colorPrimary"
    >


    <ImageView
        android:layout_width="match_parent"
        android:layout_height="match_parent"
        android:id="@+id/bing_pic_img"
        android:scaleType="centerCrop"/>

    <ScrollView
        android:id="@+id/weather_layout"
        android:layout_width="match_parent"
        android:layout_height="match_parent"
        android:scrollbars="none"
        android:overScrollMode="never">
        <LinearLayout
            android:layout_width="match_parent"
            android:layout_height="wrap_content"
            android:orientation="vertical"
            android:fitsSystemWindows="true">
            <include layout="@layout/title"/>
            <include layout="@layout/now"/>
            <include layout="@layout/forecast"/>
            <include layout="@layout/aqi"/>
            <include layout="@layout/suggestion"/>

        </LinearLayout>
    </ScrollView>

</FrameLayout>
将天气信息显示到界面上
首先需要添加一个工具类用于解析天气JSON数据
ublic static Weather handleWeatherResponse(String response){


    /*
  handleWeatherResponse()方法中先是通过jsonObject和jsonArray将天气
        数据中的主体内容解析出来
     */
    try {


        JSONObject jsonObject = new JSONObject(response);
        JSONArray jsonArray = jsonObject.getJSONArray("HeWeather");
        String weatherContent = jsonArray.getJSONObject(0).toString();
        return new Gson().fromJson(weatherContent,Weather.class);
    } catch (JSONException e) {


        e.printStackTrace();

    }
        return null;
}

接下来就是在活动中请求天气数据,解析数据,并将数据显示到界面上。
 protected void onCreate(@Nullable Bundle savedInstanceState) {


        super.onCreate(savedInstanceState);

        View decorView = getWindow().getDecorView();
        decorView.setSystemUiVisibility(View.SYSTEM_UI_FLAG_FULLSCREEN|View.SYSTEM_UI_FLAG_LAYOUT_STABLE);
        getWindow().setStatusBarColor(Color.TRANSPARENT);
        setContentView(R.layout.activity_weather);
        //初始化各控件
        mWeatherLayout = findViewById(R.id.weather_layout);
        mTitleCity = findViewById(R.id.title_city);
        mTitleUpdateTime = findViewById(R.id.title_update_time);
        mDegreeText = findViewById(R.id.degree_text);
        mWeatherInfoText = findViewById(R.id.weather_info_text);

        mForecast = findViewById(R.id.forecast_layout);
        mAqiText = findViewById(R.id.aqi_text);
        mPm25Text = findViewById(R.id.pm25_text);
        mComfortText = findViewById(R.id.comfort_text);
        mCarWashText = findViewById(R.id.car_wash_text);
        mSportText = findViewById(R.id.sport_text);

        bingPicImg = findViewById(R.id.bing_pic_img);
//在 on create()方法中仍然先是去获
//取一些控件的实例,然后会尝试从本地缓存中读取天气数据。那么第一次肯定是没有缓存的,因
//此就会从 Intent中取出天气id,并调用 requestWeather()方法来从服务器请求天气数据。注意,
//请求数据的时候先将 ScrollⅤview进行隐藏,不然空数据的界面看上去会很奇怪。
        SharedPreferences prefs = PreferenceManager.getDefaultSharedPreferences(this);
        String weatherString = prefs.getString("weather", null);
        if (weatherString != null){


            //有缓存直接解析天气数据
            Weather weather = Utility.handleWeatherResponse(weatherString);
            showWeatherInfo(weather);
        }else{


            //无缓存去服务器查询天气
            String weatherId = getIntent().getStringExtra("weather_id");
            mWeatherLayout.setVisibility(View.INVISIBLE);
            //请求天气
            requestWeather(weatherId);
        }
        String bingPic = prefs.getString("bing_pic", null);
        if (bingPic!=null){


            Glide.with(this).load(bingPic).into(bingPicImg);
        }else {


            loadBingPic();
        }


    }
requestWeather()用来请求具体城市天气信息。先是调用HttpUtil.sendOkHttpRequest传入拼接的Url,Url由api和天气id和申请的个人key组成,之后主要是处理回调中的onResponse。
   /*
    根据天气Id请求城市天气信息
    requestWeather()方法中先是使用了参数中传入的天气id和我们之前申请好的 API Key拼装
出一个接地址,接着调用Httputil.endokhttpreQuest()方法来向该地址发出请求,服务器
会将相应城市的天气信息以JSON格式返回。然后我们在 onResponse()回调中先调用 Utility
handleWeatherResponse()方法将返回的JSON数据转换成 Weather对象,再将当前线程切换到
主线程。然后进行判断,如果服务器返回的 status状态是ok并且转后的weather不为空,就说明请求天气成功了,此时将返
回的数据缓存到 SharedPreferences当中,并调用 showweatherinfo()方法来进行内容显示。

     */

    private void requestWeather(final String weatherId) {


        String weatherUrl = "http://guolin.tech/api/weather?cityid=" + weatherId +"&key=755a053d247341699ebbe941099d994f";
        HttpUtil.sendOkHttpRequest(weatherUrl, new Callback() {


            @Override
            public void onFailure(Call call, IOException e) {


                    runOnUiThread(new Runnable() {


                        @Override
                        public void run() {


                            Toast.makeText(WeatherActivity.this, "获取天气信息失败", Toast.LENGTH_SHORT).show();
                        }
                    });
            }

            @Override
            public void onResponse(Call call, Response response) throws IOException {


                final String responseText = response.body().string();
                final Weather weather = Utility.handleWeatherResponse(responseText);
                runOnUiThread(new Runnable() {


                    @Override
                    public void run() {


                        if (weather != null&&"ok".equals(weather.status)){


                            SharedPreferences.Editor editor = PreferenceManager.getDefaultSharedPreferences(WeatherActivity.this).edit();
                            editor.putString("weather",responseText);
                            editor.apply();
                            showWeatherInfo(weather);
                        }else {


                            Toast.makeText(WeatherActivity.this, "获取天气数据失败1", Toast.LENGTH_SHORT).show();

                        }
                    }
                });
            }
        });
            loadBingPic();
    }
showWeatherInfo()
   /*
    showweather Info()方法中的逻辑就比较简单了,其实就是从 Weather对象中获取数据
然后显示到相应的控件上。注意在未来几天天气预报的部分我们使用了一个for循环来处理每天
的天气信息,在循环中动态加载 forecast item.xml布局并设置相应的数据,然后添加到父布局当
中。设置完了所有数据之后,记得要将 Scrollview重新变成可见。
这样我们就将首次进入 WeatherActivity时的逻辑全部梳理完了,那么当下一次再进入
Weather Actiⅳvity时,由于缓存已经存在了,因此会直接解析并显示天气数据,而不会再次发起网
络请求了。

     */
    private void showWeatherInfo(Weather weather) {


        String cityName = weather.basic.cityName;
        String updateTime = weather.basic.update.updateTime.split(" ")[1];
        String degree =  weather.now.tmp+"°C";
        String weatherInfo = weather.now.More.info;
        mTitleCity.setText(cityName);
        mTitleUpdateTime.setText(updateTime);
        mDegreeText.setText(degree);
        mWeatherInfoText.setText(weatherInfo);
        mForecast.removeAllViews();
        for (Forecast forecast:weather.mForecastList){


            View view = LayoutInflater.from(this).inflate(R.layout.forecast_item,mForecast,false);
            TextView dateText = view.findViewById(R.id.date_text);
            TextView infoText = view.findViewById(R.id.info_text);
            TextView maxText = view.findViewById(R.id.max_text);
            TextView minText = view.findViewById(R.id.min_text);
            dateText.setText(forecast.date);
            infoText.setText(forecast.more.info);
            maxText.setText(forecast.Temperature.max);
            minText.setText(forecast.Temperature.min);
            mForecast.addView(view);
        }
        if (weather.aqi!=null){


            mAqiText.setText(weather.aqi.city.aqi);
            mPm25Text.setText(weather.aqi.city.pm25);
        }
        String comfort = "舒适度" + weather.suggestion.comfort.info;
        String carwash = "洗车指数" +weather.suggestion.carWash.info;
        String sport = "运动建议" + weather.suggestion.sport.info;
        mComfortText.setText(comfort);
        mCarWashText.setText(carwash);
        mSportText.setText(sport);
        mWeatherLayout.setVisibility(View.VISIBLE);
     }
点击地区跳转到具体天气信息界面
完善ListView.setOnItemClickListener
/*
列表点击事件
 */
mListView.setOnItemClickListener(new AdapterView.OnItemClickListener() {


    //可以看到,我们使用 setonItemClicklistener()方法为 Listview注册了一个监听器,当
    //用户点击了 Listview中的任何一个子项时,就会回调 onItemclick()方法。在这个方法中可以
    //通过 position参数判断出用户点击的是哪一个子项,然后获取到相应的类信息,并通过Toast显示
    @Override
    public void onItemClick(AdapterView<?> adapterView, View view, int pos, long idl) {


        //当你点击了某个item的时候会进入到 List view的 onItemclick()方法中,这个时候会根据当
        //前的级别来判断是去调用 querycities()方法还是 query Counties()方法, queryCities()方
        //法是去査询市级数据,而 queryCounties()方法是去查询县级数据,这两个方法内部的流程和
        //queryProvinces()方法基本相同
        if (currentLevel == LEVEL_PROVINCE){


            selectedProvince = provinceList.get(pos);
            queryCity();
        }else if (currentLevel == LEVEL_CITY){


            selectedCity = cityList.get(pos);
            queryCounty();
        }else if (currentLevel == LEVEL_COUNTY){


      //非常简单,这里在 onitemclick()方法中加入了一个if判断,如果当前级别是 LEVEL
      //COUNTY,就启动 WeatherActivity,并把当前选中县的天气i传递过去。
            String weatherId = countyList.get(pos).getWeatherId();
            Intent intent = new Intent(getActivity(),WeatherActivity.class);
            intent.putExtra("weather_id",weatherId);
            startActivity(intent);
            getActivity().finish();
        }
    }
});
在MainActivity中加入一个缓存数据判断,在启动程序时若发现已有缓存则跳转到天气页面。
public class MainActivity extends AppCompatActivity {


    @Override
    protected void onCreate(Bundle savedInstanceState) {


        super.onCreate(savedInstanceState);
        setContentView(R.layout.activity_main);
        //可以看到,这里在 oncreate()方法的一开始先从 Shared Preferences文件中读取缓存数据
        //如果不为nulL就说明之前已经请求过天气数据了,那么就没必要让用户再次选择城市,而是直
        //接跳转到 Weather Activity即可。
        SharedPreferences preferences = PreferenceManager.getDefaultSharedPreferences(this);
        if (preferences.getString("weather",null)!=null){


            Intent intent = new Intent(this,WeatherActivity.class);
            startActivity(intent);
            finish();
        }
    }
}
载入背景图
这里选用的是必应的每日一图进行更新背景,首先在布局中插入图片作为背景。
<FrameLayout
    xmlns:android="http://schemas.android.com/apk/res/android"
    android:layout_width="match_parent"
    android:layout_height="match_parent"
    android:background="@color/colorPrimary"
    >


    <ImageView
        android:layout_width="match_parent"
        android:layout_height="match_parent"
        android:id="@+id/bing_pic_img"
        android:scaleType="centerCrop"/>

    <ScrollView
                ...
这里我们在 FrameLayout中添加了一个 Image View,并且将它的宽和高都设置成mach
parent。由于 Framelayout默认情况下会将控件都放置在左上角,因此 Scrollview会完全覆盖住
mage View,从而 ImageView也就成为背景图片了。
接着在WeatherActivity中初始化控件,并且加载请求必应每日一图函数。
        bingPicImg = findViewById(R.id.bing_pic_img);
//先看看有没有图片链接缓存,若没有则请求获取图片链接,若已有则直接加载图片
			...
        String bingPic = prefs.getString("bing_pic", null);
        if (bingPic!=null){


            Glide.with(this).load(bingPic).into(bingPicImg);
        }else {


            loadBingPic();
        }
/*
loadBingPic()方法中的逻辑就非常简单了,先是调用了Httputil.sendokhttprequest()
方法获取到必应背景图的链接,然后将这个链接缓存到 SharedPreferences当中,再将当前线程切
换到主线程,最后使用 Glide来加载这张图片就可以了。另外需要注意,在 requestweather()
方法的最后也需要调用一下loadBingPic()方法,这样在每次请求天气信息的时候同时也会刷
新背景图片。

 */
    private void loadBingPic() {


            String requestBingPic = "http://guolin.tech/api/bing_pic";
            HttpUtil.sendOkHttpRequest(requestBingPic, new Callback() {


                @Override
                public void onFailure(Call call, IOException e) {


                    e.printStackTrace();
                }

                @Override
                public void onResponse(Call call, Response response) throws IOException {


                    final String bingPic = response.body().string();
                    SharedPreferences.Editor editor = PreferenceManager.getDefaultSharedPreferences(WeatherActivity.this).edit();
                    editor.putString("bing_pic",bingPic);
                    editor.apply();
                    //切换回主线程
                    runOnUiThread(new Runnable() {


                        @Override
                        public void run() {


                            Glide.with(WeatherActivity.this).load(bingPic).into(bingPicImg);
                        }
                    });
                }
            });
    }
测试
