Flutter对接第三方高德地图+百度地图基础定位实现
原创:@As.Kai
博客地址:https://blog.csdn.net/qq_42362997
如果以下内容对您有帮助,点赞点赞点赞~
高德地图:
首先导入高德地图定位功能依赖包:
#高德地图定位集成
amap_location: ^0.2.0
最新依赖包版本查看:
传送门
配置:
在app下build.gradle中添加配置
android {
    .... 你的代码
    defaultConfig {
        .....
        manifestPlaceholders = [
                AMAP_KEY : "你的key", /// 高德地图key
        ]
    }
    ...你的代码
    dependencies {
        /// 注意这里需要在主项目增加一条依赖,否则可能发生编译不通过的情况
        implementation 'com.amap.api:location:latest.integration'
        ...你的代码
    }
去高德开放平台申请一个key
百度有很多方法 不知道的可以去搜一下
这里就不细说了 直接来说说具体是怎么实现简单定位
如何使用:
创建一个初始化定位监听方法(异步)
void _initLocation() async {
  AMapLocationClient.startup(new AMapLocationOption(
      desiredAccuracy: CLLocationAccuracy.kCLLocationAccuracyHundredMeters));
  //监听坐标时时变换
  AMapLocationClient.onLocationUpate.listen((event) {
    if (!mounted) return;
    setState(() {
      lat = event.latitude.toString();
      long = event.longitude.toString();
      city = event.formattedAddress.toString();
      print('pro=${event.formattedAddress}');
    });
  });


  AMapLocationClient.startLocation();
}
在布局组件中创建一个按钮,利用点击事件来实现简单定位
child: new RaisedButton(
  onPressed: () {
    _initLocation();
    setState(() {
      textLocation = '高德地图定位集成';
    });
这样就已经完成了高德的第三方定位集成
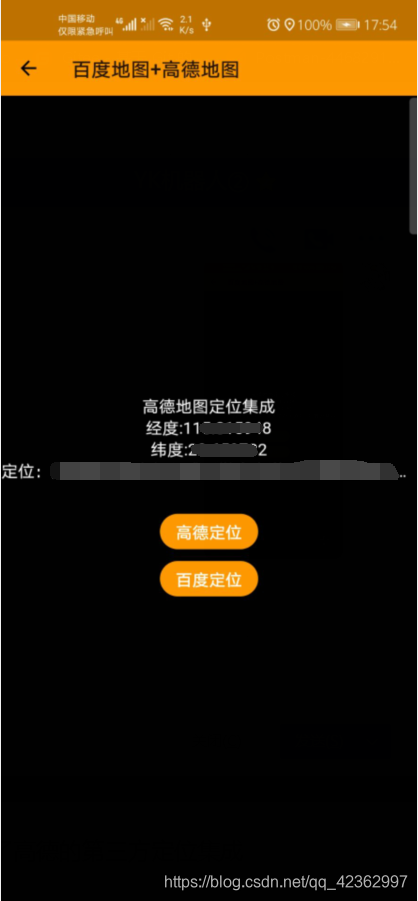
效果:
相关代码:
//高德地图
var lat = '';
var long = '';
var city = '';


//初始化定位监听
void _initLocation() async {
  AMapLocationClient.startup(new AMapLocationOption(
      desiredAccuracy: CLLocationAccuracy.kCLLocationAccuracyHundredMeters));
  //监听坐标时时变换
  AMapLocationClient.onLocationUpate.listen((event) {
    if (!mounted) return;
    setState(() {
      lat = event.latitude.toString();
      long = event.longitude.toString();
      city = event.formattedAddress.toString();
      print('pro=${event.formattedAddress}');
    });
  });


  AMapLocationClient.startLocation();
}
return new Container(
          child: new Column(
            mainAxisAlignment: MainAxisAlignment.center,
            children: [
              new Text(
                textLocation,
                style: TextStyle(color: Colors.white,fontSize: ScreenUtil().setSp(30.0)),
              ),
              new Text(
                '经度:$long',
                style: TextStyle(color: Colors.white,fontSize: ScreenUtil().setSp(30.0)),
              ),
              new Text(
                '纬度:$lat',
                style: TextStyle(color: Colors.white,fontSize: ScreenUtil().setSp(30.0)),
              ),
              new Text(
                '定位:${city}',
                overflow: TextOverflow.ellipsis,
                style: TextStyle(color: Colors.white,fontSize: ScreenUtil().setSp(30.0),),
                maxLines: 1,
              ),
              SizedBox(
                height: ScreenUtil().setHeight(40.0),
              ),
              new Center(
                child: new RaisedButton(
                  onPressed: () {
                    _initLocation();
                    setState(() {
                      textLocation = '高德地图定位集成';
                    });
                  },
                  color: Colors.orange,
                  shape: RoundedRectangleBorder(
                    borderRadius: BorderRadius.circular(20.0),
                  ),
                  child: new Text(
                    '高德定位',
                    style: TextStyle(
                        color: Colors.white,
                        fontSize: ScreenUtil().setSp(30.0)),
                  ),
                ),
              ),
            ],
          ),
        );
销毁:
AMapLocationClient.shutdown();
百度定位:
同样首先导入官方依赖:
#百度地图定位集成
flutter_bmflocation: ^1.0.3
最新版本的依赖包查看:
传送门
百度的官方文档写的很细致 你们不懂得可以多看看官方文档
我这边简单介绍一下
AndroidManifest中添加
扫描二维码关注公众号,回复:
12530166 查看本文章

<meta-data
        android:name="com.baidu.lbsapi.API_KEY"
        android:value="你的key"
/>
LocationFlutterPlugin _locationPlugin = new LocationFlutterPlugin();
BaiduLocationAndroidOption androidOption = new BaiduLocationAndroidOption();
//获取的地址信息
StreamSubscription<Map<String, Object>> _locationListener;


void initBaiduLocation() {
  print('进入百度定位');
  androidOption.setCoorType("bd09ll"); // 设置返回的位置坐标系类型
  androidOption.setIsNeedAltitude(false); // 设置是否需要返回海拔高度信息
  androidOption.setIsNeedAddres(true); // 设置是否需要返回地址信息
  androidOption.setIsNeedLocationPoiList(false); // 设置是否需要返回周边poi信息
  androidOption.setIsNeedNewVersionRgc(true); // 设置是否需要返回最新版本rgc信息
  androidOption.setIsNeedLocationDescribe(true); // 设置是否需要返回位置描述
  androidOption.setOpenGps(true); // 设置是否需要使用gps
  androidOption.setLocationMode(LocationMode.Hight_Accuracy); // 设置定位模式
  androidOption.setScanspan(5000); // 设置发起定位请求时间间隔
  Map androidMap = androidOption.getMap();


  //ios定位参数设置(用不上也要设置,按默认就可以了)
  BaiduLocationIOSOption iosOption = new BaiduLocationIOSOption();
  Map iosdMap = iosOption.getMap();


  _locationPlugin.prepareLoc(androidMap, iosdMap); //ios和安卓定位设置
  _locationPlugin.requestPermission(); //请求定位权限


  _locationPlugin.startLocation(); //开始定位


  //  获取定位结果
  _locationListener = _locationPlugin.onResultCallback().listen((Map<String, Object> event) {
    //event就是获取到的结果,是订阅模式的,需要一直监听
    print('event数据:${event.toString()}');
    print('百度地图定位地址:${event["address"]}'); //打印地址
    print('百度地图省份信息:${event["province"]}'); //省份
    setState(() {
      lat = event['latitude'].toString();
      long = event['longitude'].toString();
      city = event['address'].toString();
    });
  });
}
销毁:
if(_locationListener != null){
_locationListener.cancel();
}以上就是集成高德地图+百度地图的定位Demo实现
还有不懂的小伙伴可以私信或者评论联系我 我将Demo发给你们
别忘了点赞~
关注我,一起成长!
@As.Kai