轮廓检测
是基于图像边缘提取的基础,寻找对象轮廓的方法,所以边缘提取的阈值选定会影响最终轮廓的发现相关API
findContours 发现轮廓

drawContours绘制轮廓
操作步骤
1.转换图像为二值化图像:threshold方法或者canny边缘提取获取的都是二值化图像
2.通过二值化图像寻找轮廓:findContours
3.描绘轮廓:drawContours
相关知识补充
(一)findContours寻找轮廓
cv.findContours(binary,cv.RETR_TREE,cv.CHAIN_APPROX_SIMPLE) def findContours(image, mode, method, contours=None, hierarchy=None, offset=None): # real signature unknown; restored from __doc__1.image:输入图像,图像必须为8-bit单通道图像,图像中的非零像素将被视为1,0像素保留其像素值,故加载图像后会自动转换为二值图像。可以通过threshold和canny获取2.mode:轮廓检索模式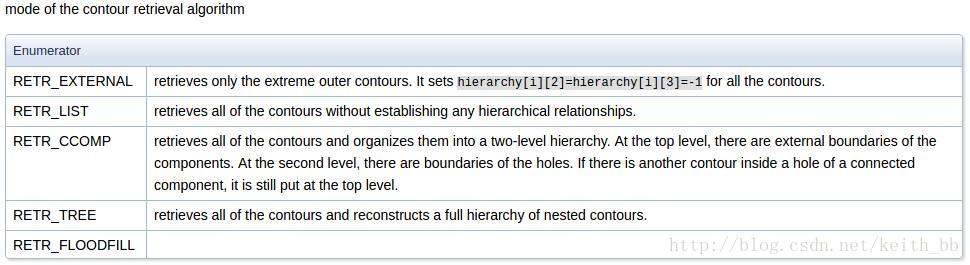
RETR_EXTERNAL:表示只检测最外层轮廓,对所有轮廓设置hierarchy[i][2]=hierarchy[i][3]=-1
RETR_LIST:提取所有轮廓,并放置在list中,检测的轮廓不建立等级关系
RETR_CCOMP:提取所有轮廓,并将轮廓组织成双层结构(two-level hierarchy),顶层为连通域的外围边界,次层位内层边界
RETR_TREE:提取所有轮廓并重新建立网状轮廓结构
RETR_FLOODFILL:官网没有介绍,应该是洪水填充法
3.method:轮廓近似方法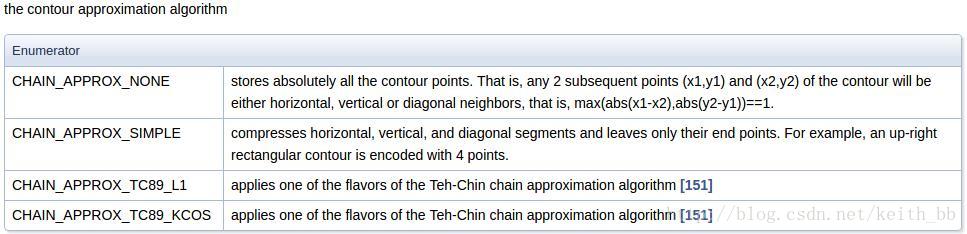
CHAIN_APPROX_NONE:获取每个轮廓的每个像素,相邻的两个点的像素位置差不超过1
CHAIN_APPROX_SIMPLE:压缩水平方向,垂直方向,对角线方向的元素,值保留该方向的重点坐标,如果一个矩形轮廓只需4个点来保存轮廓信息
CHAIN_APPROX_TC89_L1和CHAIN_APPROX_TC89_KCOS使用Teh-Chinl链逼近算法中的一种
(以上标红的字体,经常会搞错)
(二)drawContours绘制轮廓
cv.drawContours(image,contours,i,(0,0,255),2)
cv.drawContours(image,contours,i,(0,0,255),-1)
def drawContours(image, contours, contourIdx, color, thickness=None, lineType=None, hierarchy=None, maxLevel=None, offset=None): # real signature unknown; restored from __doc__1.image:输入输出图像,Mat类型即可
2.contours:使用findContours检测到的轮廓数据,每个轮廓以点向量的形式存储
3.contourIdx:绘制轮廓的只是变量,如果为负值则绘制所有输入轮廓
4.color:轮廓颜色
5.thickness:绘制轮廓所用线条粗细度,如果值为负值,则在轮廓内部绘制 实际例子:OpenCV中几何形状识别与测量
####################################################
#   作者:zhigang,
####################################################
import cv2 as cv
import numpy as np

class ShapeAnalysis:
    def __init__(self):
        self.shapes = {'triangle': 0, 'rectangle': 0, 'polygons': 0, 'circles': 0}

    def analysis(self, frame):
        h, w, ch = frame.shape
        result = np.zeros((h, w, ch), dtype=np.uint8)
        # 二值化图像
        print("start to detect lines...\n")
        gray = cv.cvtColor(frame, cv.COLOR_BGR2GRAY)
        ret, binary = cv.threshold(gray, 0, 255, cv.THRESH_BINARY_INV | cv.THRESH_OTSU)
        cv.imshow("input image", frame)

        out_binary, contours, hierarchy = cv.findContours(binary, cv.RETR_EXTERNAL, cv.CHAIN_APPROX_SIMPLE)
        for cnt in range(len(contours)):
            # 提取与绘制轮廓
            cv.drawContours(result, contours, cnt, (0, 255, 0), 2)

            # 轮廓逼近
            epsilon = 0.01 * cv.arcLength(contours[cnt], True)
            approx = cv.approxPolyDP(contours[cnt], epsilon, True)

            # 分析几何形状
            corners = len(approx)
            shape_type = ""
            if corners == 3:
                count = self.shapes['triangle']
                count = count+1
                self.shapes['triangle'] = count
                shape_type = "三角形"
            if corners == 4:
                count = self.shapes['rectangle']
                count = count + 1
                self.shapes['rectangle'] = count
                shape_type = "矩形"
            if corners >= 10:
                count = self.shapes['circles']
                count = count + 1
                self.shapes['circles'] = count
                shape_type = "圆形"
            if 4 < corners < 10:
                count = self.shapes['polygons']
                count = count + 1
                self.shapes['polygons'] = count
                shape_type = "多边形"

            # 求解中心位置
            mm = cv.moments(contours[cnt])
            cx = int(mm['m10'] / mm['m00'])
            cy = int(mm['m01'] / mm['m00'])
            cv.circle(result, (cx, cy), 3, (0, 0, 255), -1)

            # 颜色分析
            color = frame[cy][cx]
            color_str = "(" + str(color[0]) + ", " + str(color[1]) + ", " + str(color[2]) + ")"

            # 计算面积与周长
            p = cv.arcLength(contours[cnt], True)
            area = cv.contourArea(contours[cnt])
            print("周长: %.3f, 面积: %.3f 颜色: %s 形状: %s "% (p, area, color_str, shape_type))

        cv.imshow("Analysis Result", self.draw_text_info(result))
        cv.imwrite("D:/test-result.png", self.draw_text_info(result))
        return self.shapes

    def draw_text_info(self, image):
        c1 = self.shapes['triangle']
        c2 = self.shapes['rectangle']
        c3 = self.shapes['polygons']
        c4 = self.shapes['circles']
        cv.putText(image, "triangle: "+str(c1), (10, 20), cv.FONT_HERSHEY_PLAIN, 1.2, (255, 0, 0), 1)
        cv.putText(image, "rectangle: " + str(c2), (10, 40), cv.FONT_HERSHEY_PLAIN, 1.2, (255, 0, 0), 1)
        cv.putText(image, "polygons: " + str(c3), (10, 60), cv.FONT_HERSHEY_PLAIN, 1.2, (255, 0, 0), 1)
        cv.putText(image, "circles: " + str(c4), (10, 80), cv.FONT_HERSHEY_PLAIN, 1.2, (255, 0, 0), 1)
        return image

if __name__ == "__main__":
    src = cv.imread("D:/javaopencv/gem_test.png")
    ld = ShapeAnalysis()
    ld.analysis(src)
    cv.waitKey(0)
    cv.destroyAllWindows()
原图:

效果:

从:
https://blog.51cto.com/gloomyfish/2104134
https://www.cnblogs.com/ssyfj/p/9276443.html
整理