前言
本环境是基于 Centos 7.8 系统构建Redis学习环境
具体构建,请参考 Redis-5.0.9环境部署
Redis主从同步,解决了数据冗余的问题,但是在Redis多个节点中,当主节点挂了,Redis服务器集合,将瘫痪。需要通过Redis高可用方案来解决这个问题。
接下来,我将重点介绍Redis高可用解决方案–Redis哨兵
Redis高可用解决方案
- 主从复制(Replication-Sentinel模式)
- Redis集群(Redis-Cluster模式)
一、什么是哨兵
什么是哨兵
哨兵,英文名 Sentinel,是一个分布式系统,用于对主从结构中的每一台服务器进行监控,当主节点出现故障后通过投票机制来挑选新的主节点,并且将所有的从节点连接到新的主节点上。
Sentinel 哨兵是 redis 官方提供的高可用方案,可以用它来监控多个 Redis 服务实例的运行情况。
Redis Sentinel 是一个运行在特殊模式下的 Redis 服务器。Redis Sentinel 是在多个Sentinel 进程环境下互相协作工作的。
哨兵的作用
- 监控(Monitoring): 哨兵(sentinel) 会不断地检查你的Master和Slave是否运作正常。
- 提醒(Notification):当被监控的某个 Redis出现问题时, 哨兵(sentinel) 可以通过 API 向管理员或者其他应用程序发送通知。
- 自动故障迁移(Automatic failover):当一个Master不能正常工作时,哨兵(sentinel) 会开始一次自动故障迁移操作,它会将失效Master的其中一个Slave升级为新的Master, 并让失效Master的其他Slave改为复制新的Master; 当客户端试图连接失效的Master时,集群也会向客户端返回新Master的地址,使得集群可以使用Master代替失效Master。
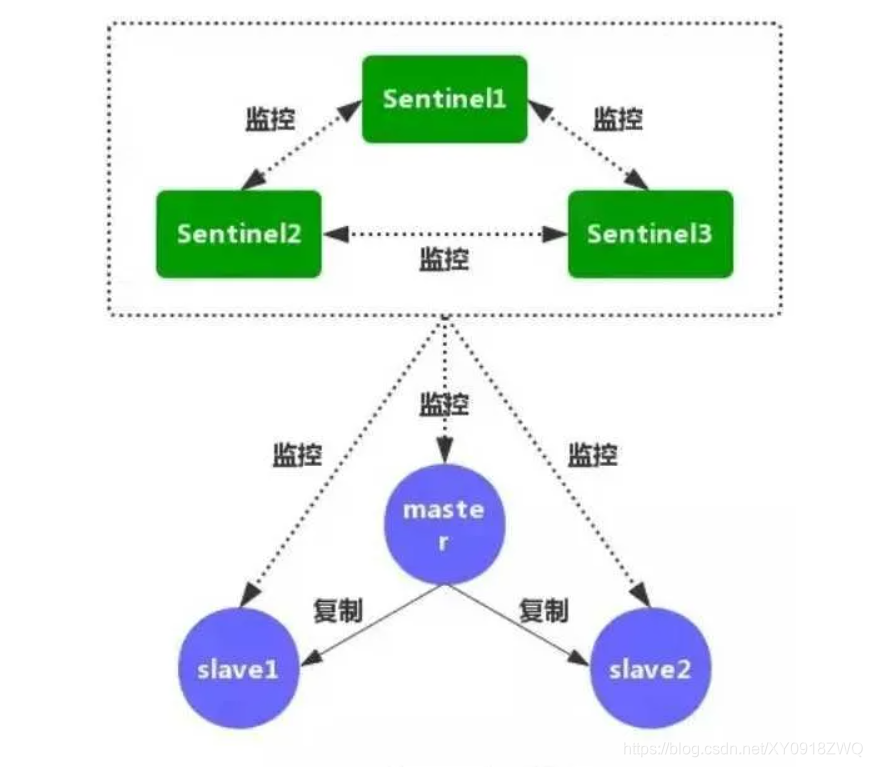
哨兵Sentine 架构

多个哨兵监控主
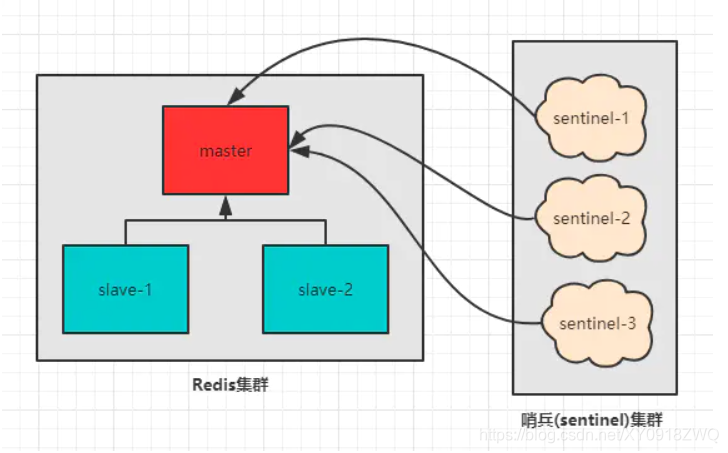
哨兵除了监控主,哨兵之间相互监控
二、哨兵的配置
哨兵的配置
哨兵作为对redis实例的监控,通过选举算法保证哨兵的鲁棒性和高可用,所以哨兵至少要部署3台,符合半数原则,需要5或者7,超过一半,不包含一半存活的时候,才能够选举出leader,才能进行主从的切换功能。
redis服务,至少需要存活一台,才能保证服务正常运行sentinel ,选择新 master 的原则是最近可用且数据最新且优先级最高且活跃最久
哨兵系统的搭建过程,有几点需要注意
- 哨兵系统中的主从节点,与普通的主从节点并没有什么区别,故障发现和转移是由哨兵来控制和完成的。
- 哨兵节点本质上是redis节点。
- 每个哨兵节点,只需要配置监控主节点,便可以自动发现其他的哨兵节点和从节点。
- 在哨兵节点启动和故障转移阶段,各个节点的配置文件会被重写(config rewrite)。
- 一个哨兵可以只监控了一个主节点;实际上,一个哨兵可以监控多个主节点,通过配置多条sentinel monitor即可实现。
环境准备
所有节点主从同步已经配置完毕且启用
| role | node | ip | Redis-Version |
|---|---|---|---|
| master | reids-yum | 192.168.5.11 | Redis-5.0.9 |
| slave1 | reids_source_code | 192.168.5.12 | Redis-5.0.9 |
| slave2 | redis-server | 192.168.5.13 | Redis-5.0.9 |
reids_source_code提供系统服务脚本
[root@reids_source_code ~]# vim /usr/lib/systemd/system/redis-sentinel.service
[Unit]
Description=Redis Sentinel
After=network.target

[Service]
ExecStart=/usr/local/redis/bin/redis-sentinel /etc/redis/sentinel.conf --supervised systemd
ExecStop=/usr/bin/kill `pidof redis-sentinel`
Type=notify
User=redis
Group=redis
RuntimeDirectory=redis
RuntimeDirectoryMode=0755

[Install]
WantedBy=multi-user.target
三个节点提供Sentine配置文件
[root@reids-yum ~]# vim /etc/sentinel.conf
[root@reids_source_code redis]# vim /etc/redis/sentinel.conf
[root@redis-server ~]# vim /etc/sentinel.conf
#是否为守护进程
daemonize yes
pidfile "/var/run/redis/redis-sentinel.pid"
logfile "/var/log/redis/redis-sentinel.log"
bind 192.168.5.13
port 26379
#工作目录
dir "/var/lib/redis"
#声明该哨兵的主库是mymaster,主库的ip和端口分别为127.0.0.1和6379
#最后一个2的含义是,在哨兵发生领导选举时,该哨兵需要获得2票才能成为leader
sentinel myid c0fc53842608bba5e5807226ce96d7c412bd069b
#在mymaster宕机30秒后进行主观下线
sentinel deny-scripts-reconfig yes
#指定在发生failover故障转移时最多可以有1个slave同时对新的master进行同步
sentinel monitor mymaster 192.168.5.11 6379 2
#设置故障转移超时时间为180秒
#这个参数的意义比较复杂,详细可以参考官方的注释说明
sentinel config-epoch mymaster 0
#发现两个从节点
sentinel leader-epoch mymaster 0
sentinel known-replica mymaster 192.168.5.13 6379
#epoch实现类似版本号的功能
sentinel known-replica mymaster 192.168.5.12 6379
# Generated by CONFIG REWRITE
protected-mode no
sentinel current-epoch 0
启动哨兵
[root@reids-yum ~]# systemctl start redis-sentinel
[root@reids_source_code ~]# systemctl start redis-sentinel
[root@redis-server ~]# systemctl start redis-sentinel

# 查看进程
[root@reids-yum ~]# netstat -lnutp | grep 6379
tcp        0      0 127.0.0.1:6379          0.0.0.0:*               LISTEN      8236/redis-server 1
tcp        0      0 192.168.5.11:6379       0.0.0.0:*               LISTEN      8236/redis-server 1
tcp        0      0 0.0.0.0:26379           0.0.0.0:*               LISTEN      8077/redis-sentinel
tcp6       0      0 :::26379                :::*                    LISTEN      8077/redis-sentinel

[root@reids_source_code ~]# netstat -lnutp | grep 6379
tcp        0      0 192.168.5.12:26379      0.0.0.0:*               LISTEN      3800/redis-sentinel
tcp        0      0 192.168.5.12:6379       0.0.0.0:*               LISTEN      3265/redis-server 1

[root@redis-server ~]# netstat -lnutp | grep 6379
tcp        0      0 127.0.0.1:6379          0.0.0.0:*               LISTEN      12404/redis-server
tcp        0      0 192.168.5.13:6379       0.0.0.0:*               LISTEN      12404/redis-server
tcp        0      0 0.0.0.0:26379           0.0.0.0:*               LISTEN      12326/redis-sentine
tcp6       0      0 :::26379                :::*                    LISTEN      12326/redis-sentine
哨兵配置成功!!!
测试
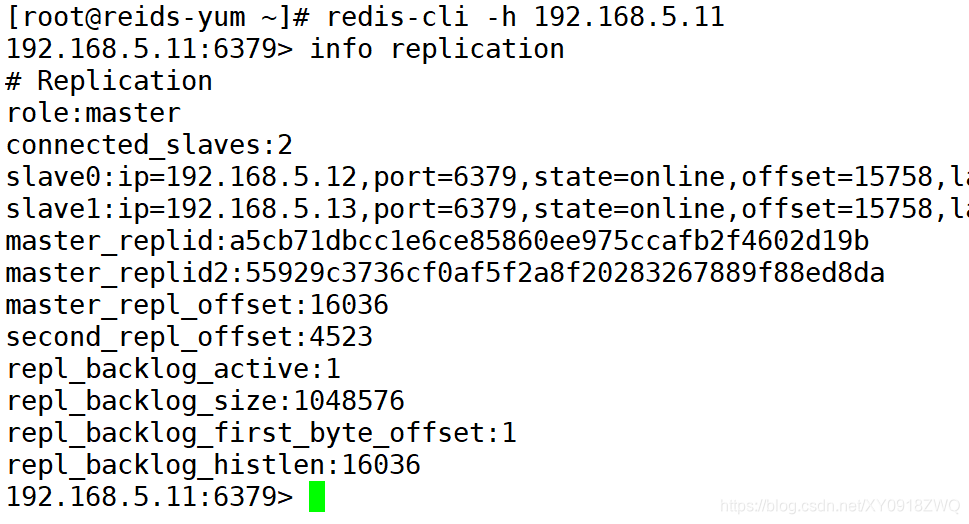
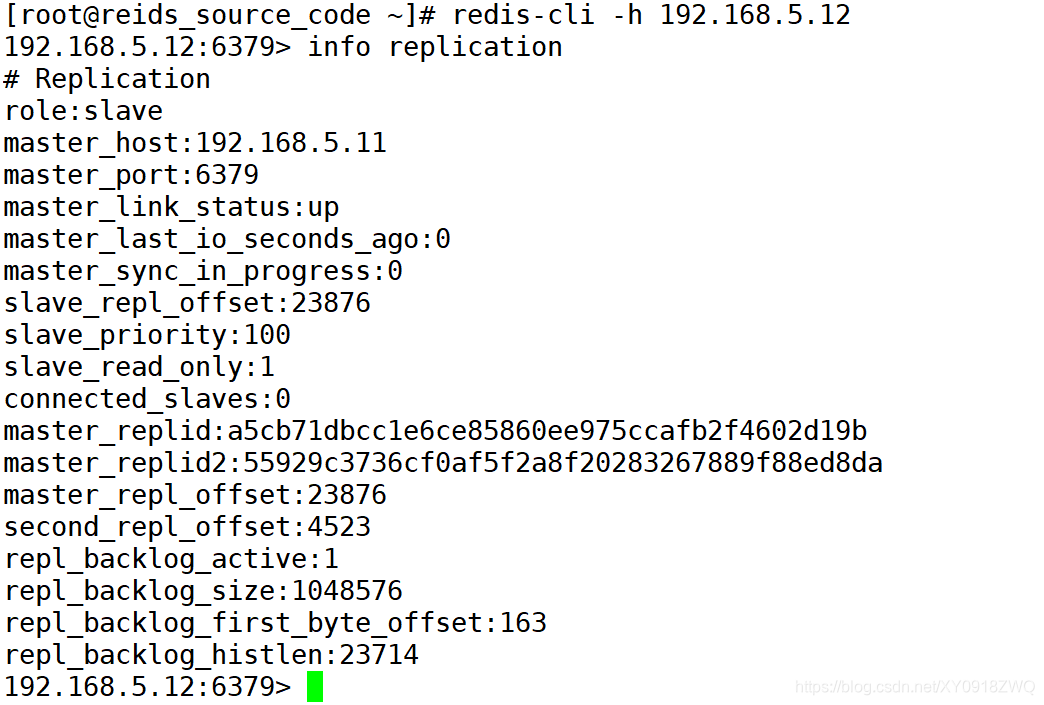
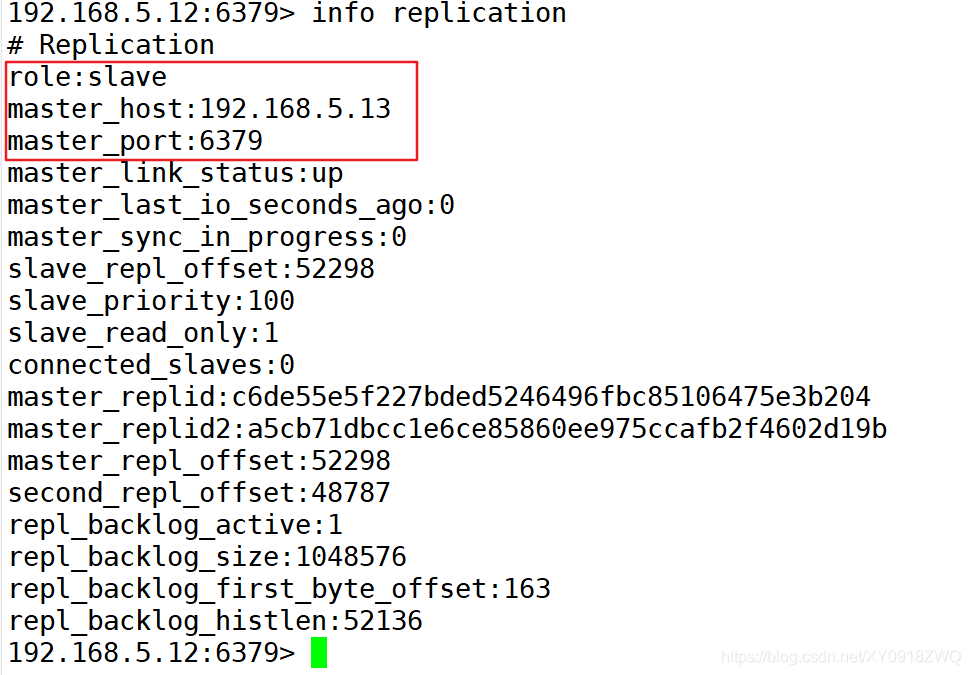
查看节点信息
主
slave1
slave2
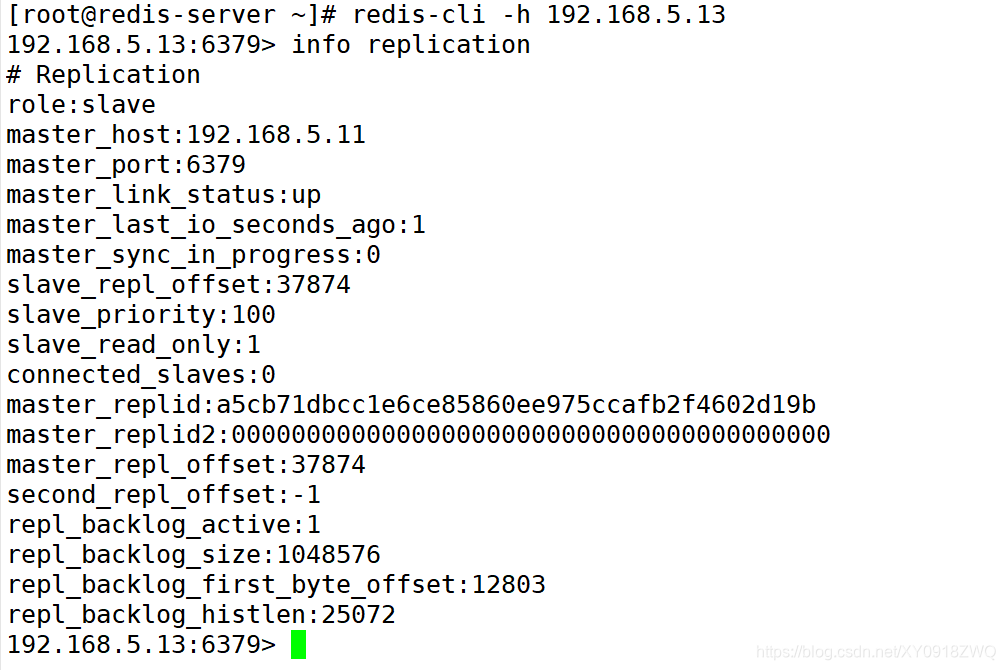
停止主库的redis服务
[root@reids-yum ~]# systemctl stop redis
[root@reids-yum ~]# netstat -lnutp | grep 6379
tcp        0      0 0.0.0.0:26379           0.0.0.0:*               LISTEN      9751/redis-sentinel
tcp6       0      0 :::26379
查看节点信息
slave1
slave2

redis哨兵已经成功实现=主从故障切换