使用IDEA的Docker插件一键部署SpringBoot项目,是打包运维变得非常便利,linux上安装docker->IDEA安装插件连接到Docker服务->项目打包->docker打包->linux运行docker服务。
配置文件:
<?xml version="1.0" encoding="UTF-8"?>
<project xmlns="http://maven.apache.org/POM/4.0.0" xmlns:xsi="http://www.w3.org/2001/XMLSchema-instance"
         xsi:schemaLocation="http://maven.apache.org/POM/4.0.0 https://maven.apache.org/xsd/maven-4.0.0.xsd">
    <modelVersion>4.0.0</modelVersion>
    <parent>
        <groupId>org.springframework.boot</groupId>
        <artifactId>spring-boot-starter-parent</artifactId>
        <version>2.4.2</version>
        <relativePath/> <!-- lookup parent from repository -->
    </parent>
    <groupId>com.docker.my.test</groupId>
    <artifactId>dtest</artifactId>
    <version>0.0.1-SNAPSHOT</version>
    <name>dtest</name>
    <description>Demo project for Spring Boot</description>
    <properties>
        <java.version>1.8</java.version>
    </properties>
    <dependencies>
        <dependency>
            <groupId>org.springframework.boot</groupId>
            <artifactId>spring-boot-starter-web</artifactId>
        </dependency>

        <dependency>
            <groupId>org.springframework.boot</groupId>
            <artifactId>spring-boot-starter-test</artifactId>
            <scope>test</scope>
        </dependency>
    </dependencies>

    <build>
        <!-- 引用我们的项目名字 -->
        <finalName>${project.artifactId}</finalName>

        <plugins>
            <plugin>
                <groupId>org.springframework.boot</groupId>
                <artifactId>spring-boot-maven-plugin</artifactId>
            </plugin>


            <!--使用docker-maven-plugin插件-->
            <plugin>
                <groupId>com.spotify</groupId>
                <artifactId>docker-maven-plugin</artifactId>
                <version>1.0.0</version>
                <!--将插件绑定在某个phase执行-->
                <executions>
                    <execution>
                        <id>build-image</id>
                        <!--用户只需执行mvn package ,就会自动执行mvn docker:build-->
                        <phase>package</phase>
                        <goals>
                            <goal>build</goal>
                        </goals>
                    </execution>
                </executions>

                <configuration>
                    <!--指定生成的镜像名,这里是我们的作者名+项目名-->
                    <imageName>ww/${project.artifactId}</imageName>

                    <!--指定标签 这里指定的是镜像的版本,我们默认版本是latest-->
                    <imageTags>
                        <imageTag>latest</imageTag>
                    </imageTags>

                    <!--指定基础镜像jdk1.8-->
                    <baseImage>java</baseImage>
                    <!--
                    镜像制作人本人信息
                    <maintainer>[email protected]</maintainer>
                    -->
                    <!--切换到ROOT目录-->
                    <workdir>/ROOT</workdir>

                    <!--查看我们的java版本-->
                    <cmd>["java", "-version"]</cmd>

                    <!--${project.build.finalName}.jar是打包后生成的jar包的名字-->
                    <entryPoint>["java", "-jar", "/${project.build.finalName}.jar"]</entryPoint>

                    <!--指定远程 docker api地址-->
                    <dockerHost>http://xxxxxx:2375</dockerHost>

                    <!-- 这里是复制 jar 包到 docker 容器指定目录配置 -->
                    <resources>
                        <resource>
                            <targetPath>/</targetPath>
                            <!--jar 包所在的路径  此处配置的 即对应 target 目录-->
                            <directory>${project.build.directory}</directory>
                            <!--用于指定需要复制的文件 需要包含的 jar包 ,这里对应的是 Dockerfile中添加的文件名 -->
                            <include>${project.build.finalName}.jar</include>
                        </resource>
                    </resources>
                </configuration>
            </plugin>
        </plugins>
    </build>
</project>

Docker插件配置:

先打包项目

target下面出现
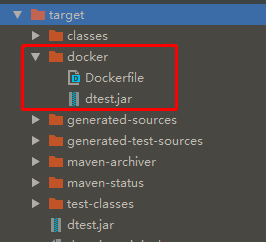
双击docker-build

镜像完成
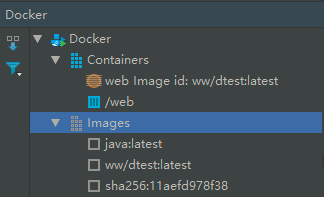
Docker运行,注意-p为端口映射:
[root@localhost ~]# docker run --name web -d -p 8080:8080 ww/dtest:latest
65bb7f9434c0b09fbada4885ab15268b411cbcfcdd2c40077bb52938a7756d9d
返回的这个字符串就是这个进程ID,查看日志需要
Docker日志查看:
[root@localhost ~]# docker logs 65bb7f9434
. ____ _ __ _ _
/\\ / ___'_ __ _ _(_)_ __ __ _ \ \ \ \
( ( )\___ | '_ | '_| | '_ \/ _` | \ \ \ \
\\/ ___)| |_)| | | | | || (_| | ) ) ) )
' |____| .__|_| |_|_| |_\__, | / / / /
=========|_|==============|___/=/_/_/_/
:: Spring Boot :: (v2.4.2)
2021-02-04 06:10:30.420 INFO 1 --- [ main] c.docker.my.test.dtest.DtestApplication : Starting DtestApplication v0.0.1-SNAPSHOT using Java 1.8.0_111 on 65bb7f9434c0 with PID 1 (/dtest.jar started by root in /ROOT)
2021-02-04 06:10:30.462 INFO 1 --- [ main] c.docker.my.test.dtest.DtestApplication : No active profile set, falling back to default profiles: default
2021-02-04 06:10:34.517 INFO 1 --- [ main] o.s.b.w.embedded.tomcat.TomcatWebServer : Tomcat initialized with port(s): 8080 (http)
2021-02-04 06:10:34.702 INFO 1 --- [ main] o.apache.catalina.core.StandardService : Starting service [Tomcat]
2021-02-04 06:10:34.703 INFO 1 --- [ main] org.apache.catalina.core.StandardEngine : Starting Servlet engine: [Apache Tomcat/9.0.41]
2021-02-04 06:10:35.168 INFO 1 --- [ main] o.a.c.c.C.[Tomcat].[localhost].[/] : Initializing Spring embedded WebApplicationContext
2021-02-04 06:10:35.168 INFO 1 --- [ main] w.s.c.ServletWebServerApplicationContext : Root WebApplicationContext: initialization completed in 4483 ms
2021-02-04 06:10:36.691 INFO 1 --- [ main] o.s.s.concurrent.ThreadPoolTaskExecutor : Initializing ExecutorService 'applicationTaskExecutor'
2021-02-04 06:10:37.398 INFO 1 --- [ main] o.s.b.w.embedded.tomcat.TomcatWebServer : Tomcat started on port(s): 8080 (http) with context path ''
2021-02-04 06:10:37.456 INFO 1 --- [ main] c.docker.my.test.dtest.DtestApplication : Started DtestApplication in 8.711 seconds (JVM running for 10.272)
2021-02-04 06:10:37.877 INFO 1 --- [nio-8080-exec-1] o.a.c.c.C.[Tomcat].[localhost].[/] : Initializing Spring DispatcherServlet 'dispatcherServlet'
2021-02-04 06:10:37.877 INFO 1 --- [nio-8080-exec-1] o.s.web.servlet.DispatcherServlet : Initializing Servlet 'dispatcherServlet'
2021-02-04 06:10:37.878 INFO 1 --- [nio-8080-exec-1] o.s.web.servlet.DispatcherServlet : Completed initialization in 1 ms
call .............
call .............
call .............
call .............
浏览器查看,注意是服务器地址:
