微信小程序自定义标签组件component封装、组件生命周期,组件通信
本文来说下小程序的自定义标签组件封装。
相比于vue,react的非路由组件,微信小程序的component组件要麻烦些,而且生命周期,数据接收传递方式也和路由组件不同!
假设你已经创建好了微信小程序项目!
新建component组件
本文以封装一个可用于关闭,添加,删除的按钮组件为例。
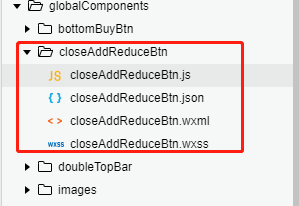
首先找到项目里面pages文件夹,鼠标右键pages文件夹,选择新建目录,输入名字globalComponents,该文件夹用于存放component组件。鼠标右键globalComponents文件夹,选择新建目录,输入名字closeAddReduceBtn,再右键closeAddReduceBtn文件夹,选择新建Component,输入名字closeAddReduceBtn。现在一个名为closeAddReduceBtn的component组件就创建好了。

component组件配置
创建好closeAddReduceBtn组件后,到pages下面的index文件夹,找到index.json文件,加上component组件配置,即usingComponents配置项。
index.json文件代码:
{


  "usingComponents": {


   "Radios": "../../globalComponents/Radios/closeAddReduceBtn"
  }
}
此行: “Radios”: “…/…/globalComponents/closeAddReduceBtn/closeAddReduceBtn”,closeAddReduceBtn是自定义的标签名,后面是组件相对路径
引入标签组件
配置好后,到index.wxml文件中,写上自定义标签组件即可

component组件关键生命周期
这里只说关键,重要的生命周期
打开closeAddReduceBtn.js,我们可以看到,里面的内容,不同玉路由组件,component组件是由Component构造函数渲染的,onLoad,onShow什么的都没了。
// globalComponents/closeAddReduceBtn/closeAddReduceBtn.js
Component({


  /**
   * 组件的属性列表
   */
  properties: {


  },

  /**
   * 组件的初始数据
   */
  data: {


  },

  /**
   * 组件的方法列表
   */
  methods: {


  }
})
properties 是属性列表,通常用于接收父组件传递的值
data 用于存放组件本身的值
methods 用于存放自定义的函数,类似vue的methods,在component里面,你直接像在路由组件里面写方法是不能生效的,方法必须写在methods里面。
组件加载执行的函数是attached() {},需要我们手动加上,
组件页面初始化完成执行的函数是ready(){},手动给加上后,组件代码
// globalComponents/closeAddReduceBtn/closeAddReduceBtn.js
Component({


  /**
   * 组件的属性列表
   */
  properties: {


  },

  /**
   * 组件的初始数据
   */
  data: {


  },
  /**
  *组件加载执行
  */
  attached() {


  },
   /**
  *组件初始化完成执行
  */
  ready(){


  },
  /**
   * 组件的方法列表
   */
  methods: {


  }
})
closeAddReduceBtn组件页面构建
下面我们将closeAddReduceBtn组件页面写完
closeAddReduceBtn.wxml
<view
   class="closeAddReduceBox"
   style="width:{

    {boxSize}}rpx;height:{

    {boxSize}}rpx;background-color:{

    {boxBackgroundColor}};border-width:{

    {boxBorderWidth}}rpx; transform: rotate({

    {rotate}});border-color:{

    {boxBorderColor}}"
   bindtap="clickBtn"
   >
  <text style="background-color:{

    {childBackgroundColor}};width:{

    {firstChildWidth}}rpx;height:{

    {firstChildHeight}}rpx"></text>
  <text wx:if="{

    {!isSingle}}" style="background-color:{

    {childBackgroundColor}};width:{

    {lastChildWidth}}rpx;height:{

    {lastChildHeight}}rpx"></text>
</view>
closeAddReduceBtn.wxss
.closeAddReduceBox{


  position: relative;
  border-radius: 50%;
  border-style: solid;
}
.closeAddReduceBox text{


  position: absolute;
  left:50%;
  top:50%;
  transform: translate(-50%,-50%)
}
需要重点说的是closeAddReduceBtn.js
首先在properties中定义需要父组件传递的数据,定义数据为对象,其中type属性是定义接收的数据类型,value是默认值,如果需要默认值,可以在value里面定义。observer是定义传递值有变化时的监听函数,不过注意observer的值是函数名字符串,然后需要到methods中定义该函数
属性示例:
boxSize:{
type:Number,
value: 32,
observer:“getBoxSize”
},//按钮尺寸
Component({


  /**
   * 组件的属性列表
   */
  properties: {


    boxSize:{


      type:Number,
      value: 32,
      observer:"getBoxSize"
    },//按钮尺寸
    boxBackgroundColor:{


      type:String
    },//背景颜色
    boxBorderWidth:{


      type:Number
    },//边框宽度
    boxBorderColor:{


      type: String
    },//边框颜色
    rotate:{


      type:String
    },//选择角度
    childBackgroundColor:{


      type:String,
      value:'#ffffff'
    },//按钮里面横线颜色,即加减图标颜色
    childSize:{


      type:Number,
      value:0
    },//按钮里面横线尺寸,即加减图标尺寸
    isSingle:{


      type:Boolean,
      value:false
    },//是否只有一条线,即删除按钮,或者减号按钮
    bold:{


      type:Boolean,
      value:false
    }//是否加粗边框
  },

  /**
   * 组件的初始数据
   */
  data: {


    firstChildWidth:0,//第一根横线宽度
    firstChildHeight:0,//第一根横线高度
    lastChildWidth:0,//第二根横线宽度
    lastChildHeight:0,//第二根横线高度
  },
    /**
  *组件加载执行
  */
  attached() {


    let {

     boxSize, boxBorderWidth, boxBorderColor, childSize, childHeight, rotate, onPressFun, bold } = this.data
    if (boxSize !== 32) {


      ; !childSize && (childSize = (20 / 32) * boxSize)
      // console.log(boxSize)
        ; !childHeight && (childHeight = (2 / 20) * childSize)
    }

    ; !childSize && (childSize = 20)
      ; !childHeight && (childHeight = 2)
    childHeight = bold ? (childHeight + 2) : childHeight
    boxBorderColor && !boxBorderWidth && (boxBorderWidth = 2)
    // console.log(boxBorderWidth)
    this.setData({


      firstChildWidth:childSize,
      firstChildHeight: childHeight,
      lastChildWidth: childHeight,
      lastChildHeight: childSize,
      boxBorderWidth
    })
  },

  /**
   * 组件的方法列表
   */
  methods: {


  //a按钮点击事件
    clickBtn(){


    //组件按钮点击事件,若需要向父组件传递数据或者让父组件监听到相应的操作,通过this.triggerEnent向父组件传递,三个参数,第一个参数是父组件的监听事件名,第二个是传递给父组件的值,第三个参数是触发事件的选项
    let value='click'
    let eventOption={


		bubbles:false,//	默认false,事件是否冒泡
		composed:false,//	默认false,事件是否可以穿越组件边界,为false时,事件将只能在引用组件的节点树上触发,不进入其他任何组件内部
		capturePhase:false,//	默认false,事件是否拥有捕获阶段
    }
      this.triggerEvent('event',value,eventOption)
    },
    //尺寸监听
    getBoxSize(value){


    //value是监听到的值
    console.log(value)
    }
  }
})
父组件使用
接下来看父组件的使用
在index.wxml中
<closeAddReduceBtn class="closeAddReduceBtn" boxBackgroundColor="#999999" rotate="45deg" bindevent="delImg" data-index="{

    {index}}"/>
将需要的属性直接传递即可。
特别注意的是bindevent,这是bind和组件事件名event的组合,event就是组件里面this.triggerEvent(‘event’,value,eventOption)定义的event,假设我们在组件里面写成this.triggerEvent(‘getBtn’,value,eventOption),那么在父组件就要对应写成bingetBtn
下面看父级组件触发的事件,component组件向父级组件传递的数据,父级组件通过e.detail获取
// 删除图片
  delImg(e){


    let {

    index}=e.currentTarget.dataset
    let value=e.detail //value是component组件向父组件传递的数据
    console.log(value)
    let {

     showImgs}=this.data
    showImgs.splice(index,1)
    this.setData({


      showImgs
    })
  },
关键生命周期函数的其他写法以及其他类型生命周期
关键生命周期函数也可以用下面写法
lifetimes: {


  attached: function () {


    // 在组件实例进入页面节点树时执行

  },
  detached: function () {


    // 在组件实例被从页面节点树移除时执行
  },
},
即将函数都写在lifetimes中。
还有一些特殊的生命周期,它们并非与组件有很强的关联,但有时组件需要获知,以便组件内部处理。这样的生命周期称为“组件所在页面的生命周期”,在 pageLifetimes 定义段中定义
 pageLifetimes: {


  show: function() {


    // 页面被展示
  },
  hide: function() {


    // 页面被隐藏
  },
  resize: function(size) {


    // 页面尺寸变化
  }
}
在 behaviors 中也可以编写生命周期方法,同时不会与其他 behaviors 中的同名生命周期相互覆盖。但要注意,如果一个组件多次直接或间接引用同一个 behavior ,这个 behavior 中的生命周期函数在一个执行时机内只会执行一次。
behaviors :{


  	created(){


      },	//在组件实例刚刚被创建时执行
  	attached(){


  	},//在组件实例进入页面节点树时执行
  	ready(){


  	},//在组件在视图层布局完成后执行
  	moved(){


  	},//在组件实例被移动到节点树另一个位置时执行
  	detached(){


  	},//在组件实例被从页面节点树移除时执行
  	error(){


  	},//Object Error	每当组件方法抛出错误时执行
}
配置全局组件
有些组件,我们可能在很多页面都会使用,因此希望只做一次配置即可,只需要在app.json中添加usingComponents配置即可
app.json
{


"pages": [
  "pages/index/index",
  "pages/hmongb/hmongb"
],
"window": {


  "backgroundColor": "#633319",
  "backgroundTextStyle": "light",
  "navigationBarBackgroundColor": "#633319",
  "navigationBarTitleText": "苗文hmongb",
  "navigationBarTextStyle": "white"
},
"tabBar": {


  "selectedColor": "#633319",
  "color": "#898888",
  "list": [
    {


      "iconPath": "./images/index-gray.png",
      "selectedIconPath": "./images/index-active.png",
      "text": "查询",
      "backgroundColor": "#ffffff",
      "pagePath": "pages/index/index"
    },
    {


      "iconPath": "./images/hmongb-gray.png",
      "selectedIconPath": "./images/hmongb-active.png",
      "text": "我的",
      "backgroundColor": "#ffffff",
      "pagePath": "pages/hmongb/hmongb"
    }
  ]
},
  "subpackages": [
    {


      "name": "hmongbPage",
      "root": "hmongbPage",
      "pages": [
        "giveUsMsg/giveUsMsg"
      ]
    }
  ],
"sitemapLocation": "sitemap.json",
"style": "v2",
"usingComponents": {


  "Radios": "../../globalComponents/Radios/Radios",
   "doubleTopBar": "../../globalComponents/doubleTopBar/doubleTopBar",
  "leftScroll": "../../globalComponents/leftScroll/leftScroll",
  "searchTopBar": "../../globalComponents/searchTopBar/searchTopBar",
  "topTitleBar": "../../globalComponents/topTitleBar/topTitleBar"
}
}