主要研究 NIO与EPOLL
探讨深度 Java代码 -> HotSpot源码 -> linux函数
一. BIO
1 public static void main(String[] args) throws IOException {


2	ServerSocket serverSocket = new ServerSocket(9000);
3
4	while (true) {


5	    Socket socket = serverSocket.accept();
6	    byte[] buffer = new byte[1024];
7	    int read = socket.getInputStream().read(buffer);
8	    if (read != 0) {


9	        String data = new String(buffer, 0, read);
10	        System.out.println(data);
11	        OutputStream outputStream = socket.getOutputStream();
12
13	        outputStream.write(data.getBytes());
14	        outputStream.flush();
15	        socket.close();
	    }
	}
}
终端命令:

debug启动时, 会发现pc指针会在第5行阻塞, 我们启终端 telnet localhost 9000
指针会继续执行, 再次阻塞在第7行, 这时我们在终端 send bio test, pc会继续执行
期间终端再启一个控制台, 去telnet发现也是被阻塞的 后发送会等第一个执行完再执行后面的
idea console如下:

二. NIO
- 不使用多路复用, 单纯的非阻塞
public static void main(String[] args) throws IOException {


	List<SocketChannel> clientSocketList = new ArrayList<>(1024);
    ServerSocketChannel serverSocketChannel = ServerSocketChannel.open();
    serverSocketChannel.socket().bind(new InetSocketAddress(9000));
    serverSocketChannel.configureBlocking(false);

    while (true) {


        SocketChannel clientSocket = serverSocketChannel.accept();
        if (clientSocket != null) {


            clientSocket.configureBlocking(false);
            clientSocketList.add(clientSocket);
        }

        Iterator<SocketChannel> iterator = clientSocketList.iterator();

        while (iterator.hasNext()) {


            SocketChannel sc = iterator.next();
            ByteBuffer dst = ByteBuffer.allocate(1024);
            int len = sc.read(dst);

            if (len > 0) {


                System.out.println("接收到消息: " + new String(dst.array()));
            }
        }
    }
}
从上面代码我们就发现设置了一个很重要的参数configureBlocking(false), 设置为非阻塞, accept和read都不阻塞, 进来的socket都放到了一个容器了, 然后循环便利这个容器, 看是否有inputStream流数据, 有则输出, 继续下次循环.
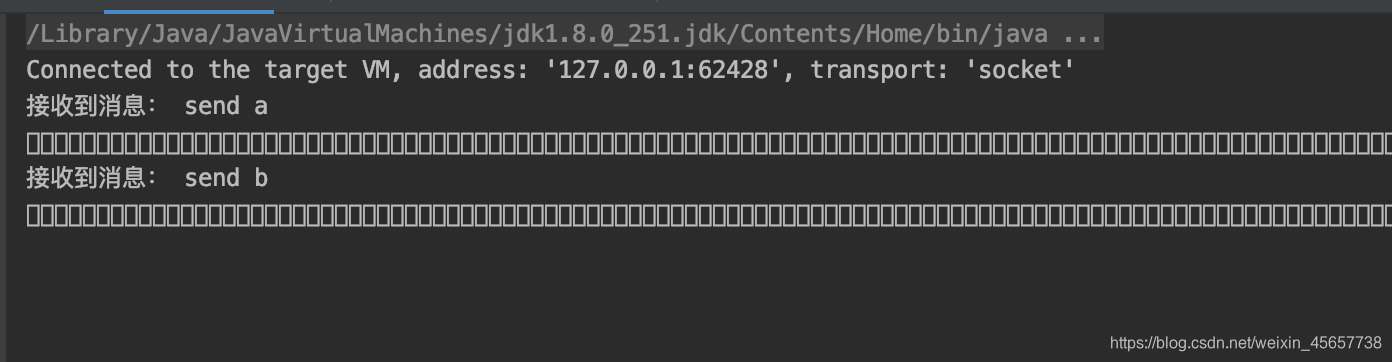
开启两个终端telnet localhost 9000
第一个send a
第二个send b
IDEA console如下:
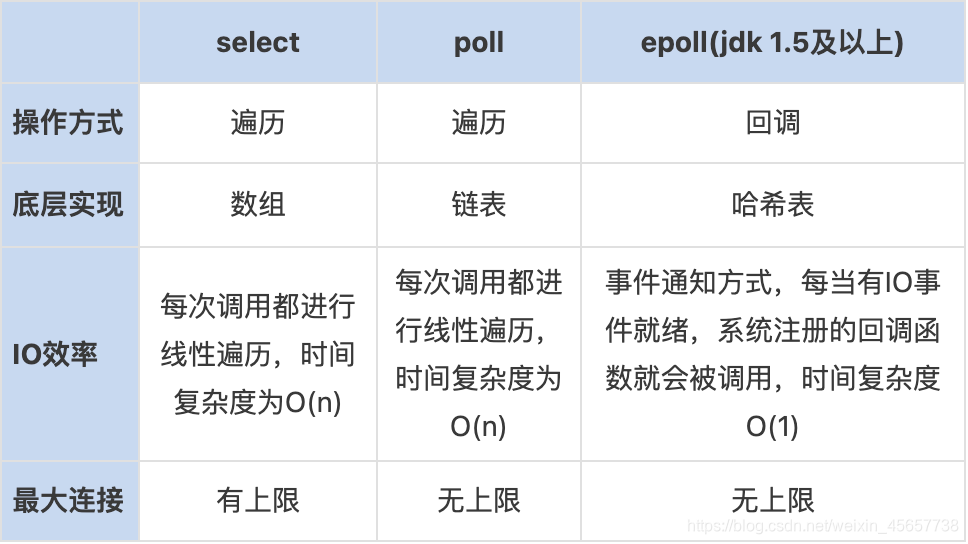
这段代码例子, (可以理解为)就是linux的select的工作原理, 而poll就是把clientSocketList容器的最大值设置为Integer.MAX_VALUE.
- 重点在这里!!!
重点在这里!!!
重点在这里!!!
重点在这里!!!
重点在这里!!!
使用多路复用Selector
public static void main(String[] args) throws IOException {


    ServerSocketChannel serverSocketChannel = ServerSocketChannel.open();
    serverSocketChannel.socket().bind(new InetSocketAddress(9000));
    serverSocketChannel.configureBlocking(false);
    // linux epoll_create
    Selector selector = Selector.open();
    // linux epoll_ctl
    serverSocketChannel.register(selector, SelectionKey.OP_ACCEPT);

    while (true) {


        // linux epoll_wait rdList epoll的就绪队列有事件 才会继续执行
        selector.select();

        Set<SelectionKey> selectionKeys = selector.selectedKeys();
        Iterator<SelectionKey> iterator = selectionKeys.iterator();


        while (iterator.hasNext()) {


            SelectionKey sk = iterator.next();

            if (sk.isAcceptable()) {


                ServerSocketChannel server = (ServerSocketChannel) sk.channel();
                SocketChannel sc = server.accept();
                sc.configureBlocking(false);
                sc.register(selector, SelectionKey.OP_READ);
                System.out.println("客户端连接成功");
            } else if (sk.isReadable()) {


                SocketChannel sc = (SocketChannel) sk.channel();
                ByteBuffer dst = ByteBuffer.allocate(1024);
                int len = sc.read(dst);

                if (len > 0) {


                    System.out.println("接收到消息: " + new String(dst.array()));
                }
            }
            iterator.remove();
        }
    }
}
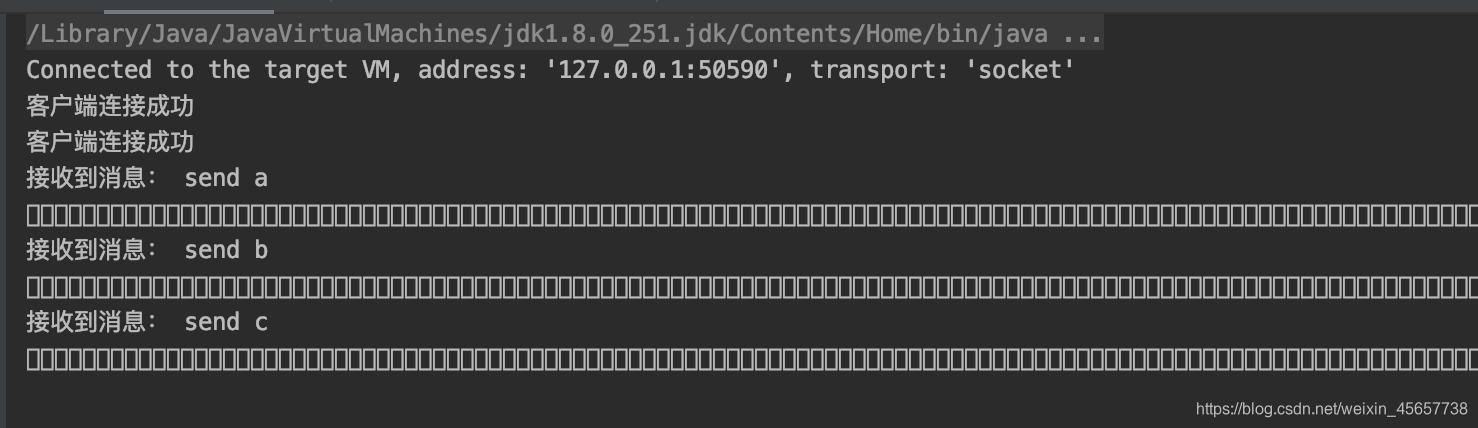
第一个终端 telnet localhost 9000
第二个终端 telnet localhost 9000
第一个终端 send a
第二个终端 seng b
第一个终端 send c
IDEA console如下:
!!! 这段代码, 主要引入了一个在linux运行jdk时候, 就是EPOLL的相关操作. 服务端和连接进来的socket分别注册了OPEN和READ事件, 没有事件时会阻塞在select()方法里, 当有相关事件就会进行接下来的代码逻辑执行.
接下来我们重点看Selector的 open, register, select三个方法, 到底做了什么东西.
// open方法 jdk源码
public static Selector open() throws IOException {


    return SelectorProvider.provider().openSelector();
}

public static SelectorProvider provider() {


    synchronized (lock) {


        if (provider != null)
            return provider;
        return AccessController.doPrivileged(
            new PrivilegedAction<SelectorProvider>() {


                public SelectorProvider run() {


                        if (loadProviderFromProperty())
                            return provider;
                        if (loadProviderAsService())
                            return provider;
                        // 重点create方法 这里直接点进去 会根据下载的jdk pc版本进入不同方法 我们直接去openjdk源码里看Epoll的实现
                        provider = sun.nio.ch.DefaultSelectorProvider.create();
                        return provider;
                    }
                });
    }
}
!!! 源码分析
// open jdk源码
public static SelectorProvider create() {


    String osname = AccessController
        .doPrivileged(new GetPropertyAction("os.name"));
    if (osname.equals("SunOS"))
        return createProvider("sun.nio.ch.DevPollSelectorProvider");
    if (osname.equals("Linux"))
        return createProvider("sun.nio.ch.EPollSelectorProvider");
    // 到这个类里去看
    return new sun.nio.ch.PollSelectorProvider();
}

public class EPollSelectorProvider
    extends SelectorProviderImpl
{


    public AbstractSelector openSelector() throws IOException {


    	// return了一个实现类
        return new EPollSelectorImpl(this);
    }

    public Channel inheritedChannel() throws IOException {


        return InheritedChannel.getChannel();
    }
}

EPollSelectorImpl(SelectorProvider sp) throws IOException {


    super(sp);
    long pipeFds = IOUtil.makePipe(false);
    fd0 = (int) (pipeFds >>> 32);
    fd1 = (int) pipeFds;
    try {


    	// new了一个EPollArrayWrapper
        pollWrapper = new EPollArrayWrapper();
        pollWrapper.initInterrupt(fd0, fd1);
        fdToKey = new HashMap<>();
    } catch (Throwable t) {


        try {


            FileDispatcherImpl.closeIntFD(fd0);
        } catch (IOException ioe0) {


            t.addSuppressed(ioe0);
        }
        try {


            FileDispatcherImpl.closeIntFD(fd1);
        } catch (IOException ioe1) {


            t.addSuppressed(ioe1);
        }
        throw t;
    }
}

// EPollArrayWrapper里
EPollArrayWrapper() throws IOException {


    // creates the epoll file descriptor
    // 我们都知道linux里 一切皆是文件 所以创建了一个epoll
    epfd = epollCreate();

    // the epoll_event array passed to epoll_wait
    int allocationSize = NUM_EPOLLEVENTS * SIZE_EPOLLEVENT;
    pollArray = new AllocatedNativeObject(allocationSize, true);
    pollArrayAddress = pollArray.address();

    // eventHigh needed when using file descriptors > 64k
    if (OPEN_MAX > MAX_UPDATE_ARRAY_SIZE)
        eventsHigh = new HashMap<>();
}

// 三个核心native方法
private native int epollCreate();
private native void epollCtl(int epfd, int opcode, int fd, int events);
private native int epollWait(long pollAddress, int numfds, long timeout, int epfd) throws IOException;

// 我们先拿epollCreate()举例, 我们要去看c语言如何实现这个方法, 那么拿类名加下划线和方法名,
// EPollArrayWrapper_epollCreate
JNIEXPORT jint JNICALL
Java_sun_nio_ch_EPollArrayWrapper_epollCreate(JNIEnv *env, jobject this)
{


    /*
     * epoll_create expects a size as a hint to the kernel about how to
     * dimension internal structures. We can't predict the size in advance.
     */
     // 就是这个epoll_create linux中的方法 C语言可以直接调用它
     // 在linux里用man命令可以查看相关方法的详细描述
    int epfd = epoll_create(256);
    if (epfd < 0) {


       JNU_ThrowIOExceptionWithLastError(env, "epoll_create failed");
    }
    return epfd;
}
以上就是selector的open分析 jdk源码 -> hotspot源码 -> linux语法概要
register 对应 epollCtl, epollCtl相当于注册一个事件
select 对应 epollWait, epollWait相当于绑定了这个事件 并且监听
三. AIO
public static void main(String[] args) throws IOException, InterruptedException {


    AsynchronousServerSocketChannel serverChannel = AsynchronousServerSocketChannel.open().bind(new InetSocketAddress(9000));

    serverChannel.accept(null, new CompletionHandler<AsynchronousSocketChannel, Object>() {


        @Override
        public void completed(AsynchronousSocketChannel socketChannel, Object attachment) {


            try {


                System.out.println("2--"+Thread.currentThread().getName());
                // 再此接收客户端连接,如果不写这行代码后面的客户端连接连不上服务端
                serverChannel.accept(attachment, this);
                System.out.println(socketChannel.getRemoteAddress());
                ByteBuffer buffer = ByteBuffer.allocate(1024);
                socketChannel.read(buffer, buffer, new CompletionHandler<Integer, ByteBuffer>() {


                    @Override
                    public void completed(Integer result, ByteBuffer buffer) {


                        System.out.println("3--"+Thread.currentThread().getName());
                        buffer.flip();
                        System.out.println(new String(buffer.array(), 0, result));
                        socketChannel.write(ByteBuffer.wrap("HelloClient".getBytes()));
                    }

                    @Override
                    public void failed(Throwable exc, ByteBuffer buffer) {


                        exc.printStackTrace();
                    }
                });
            } catch (IOException e) {


                e.printStackTrace();
            }
        }

        @Override
        public void failed(Throwable exc, Object attachment) {


            exc.printStackTrace();
        }
    });

    System.out.println("1--"+Thread.currentThread().getName());
    Thread.sleep(Integer.MAX_VALUE);
}
启动第一个终端执行 telnet localhost 9000和send a
启动第二个终端执行 telnet localhost 9000和send b
IDEA console如下:
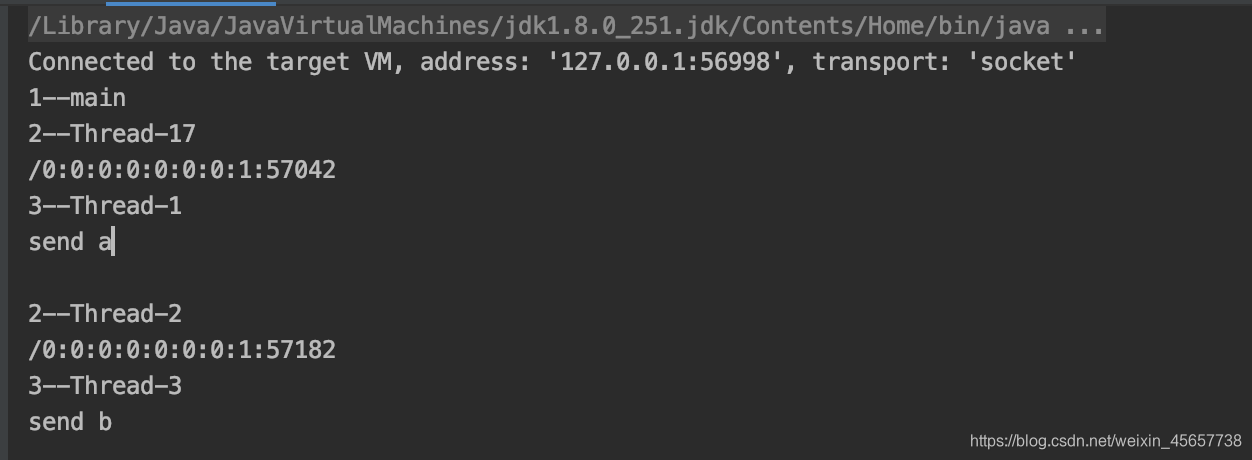
BIO, NIO在代码案例中, 都是main线程去执行的, 而这个AIO就是线程如此多.
四. 总结
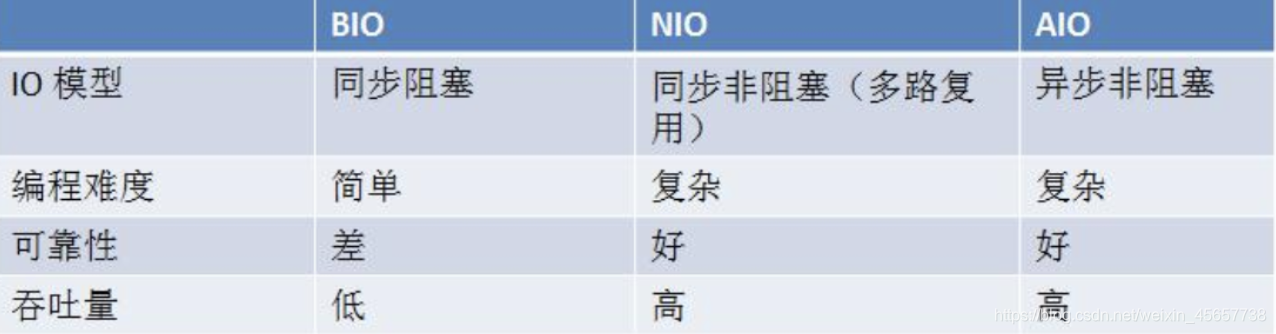
BIO, NIO, AIO主要的区别分为两个阻塞与非阻塞, 同步与非同步
从第一个和第二个例子, 我们可以理解出阻塞与非阻塞的区别.
从第三个和第四个例子, 我们可以看出同步与非同步的区别.
1.4之后出现NIO, 先是采用linux的 select 后采用poll
1.5及之后采用了epoll的IO多路复用架构