day15复习

Java-day16学习笔记
一、GUI
AWT(Abstract Window ToolKit)包括了很多类和接口,用来进行Java Application(Java应用)的GUI(Graphics User Interface)图形用户接口编程。

GUI包括了像按钮、文本框、下拉列表等都是由来实现的
AWT所包括的类和接口在java.awt包下
AWT包含的类中有两个核心的类:Component和Container
Component是awt中最基本的一个类,Component中有两个使用最多的类:Frame、Panel

Frame是一个窗体,是能自由停泊的顶级窗口(可以直接显示windows上)
Panel是一个容器,能装其它的Component组件(包括它自己)(不能直接显示在windows操作系统上)

注意:Panel不能直接显示在windows操作系统上,但是可以将Panel添加到Frame中,然后通过Frame显示出来
二、Frame窗体
是能自由停泊的顶级窗口(可以直接显示windows上)
2.1 构造方法
Frame()    				构造一个最初不可见的 Frame 新实例()
Frame(String title)     构造一个新的、最初不可见的、具有指定标题的 Frame 对象
2.2 常用方法
void setVisible(boolean b)				根据参数 b 的值显示或隐藏此 Window
void setTitle(String title)  			将此窗体的标题设置为指定的字符串
void setSize(int width,int height)   	调整组件的大小,使其宽度为 width,高度为 height

void setLocation(int x, int y)			将组件移到新位置
    参数:
    x - 父级坐标空间中新位置左上角的 x 坐标
	y - 父级坐标空间中新位置左上角的 y 坐标

public void setBounds(int x, int y, int width, int height)  移动组件并调整其大小
    参数:
    x - 组件的新 x 坐标
    y - 组件的新 y 坐标
    width - 组件的新 width
    height - 组件的新 height.

void setResizable(boolean resizable) 	设置此窗体是否可由用户调整大小

void setBackground(Color c)				设置组件的背景色
import java.awt.*;
public class Demo {
public static void main(String[] args) {
//无参构造
// Frame frame = new Frame();
// frame.setTitle("haha");
//带参构造
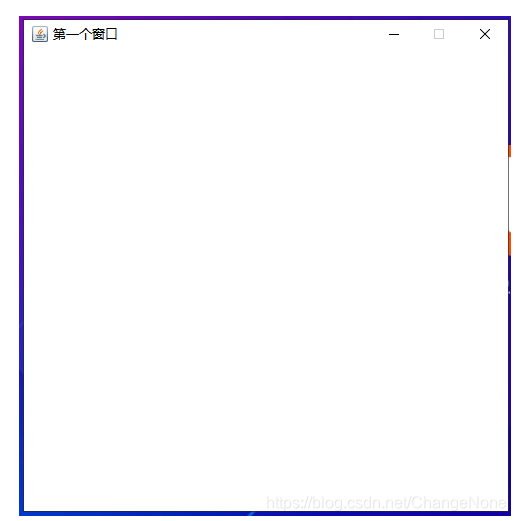
Frame frame = new Frame("第一个窗口");
// frame.setSize(400, 300);
// frame.setLocation(100, 200);
frame.setBounds(300, 300, 500, 500);
frame.setResizable(false);
frame.setVisible(true);
}
}
import java.awt.*;

class MyFrame extends Frame {


    static int i = 0;
    public MyFrame(int x, int y, int width, int height, Color color) {


        super("窗口" + (++i));

        setLocation(x, y);
        setSize(width, height);
        setBackground(color);

        setVisible(true);
    }

}

public class Test {


    public static void main(String[] args) {


        new MyFrame(200, 200, 300, 300, Color.BLUE);
        new MyFrame(500, 200, 300, 300, Color.RED);
        new MyFrame(200, 500, 300, 300, Color.GREEN);
        new MyFrame(500, 500, 300, 300, Color.PINK);
    }
}

三、Panel面板
Panel可以装其它Component组件,但是并不能直接显示
3.1 构造方法
Panel()       					使用默认的布局管理器创建新面板
Panel(LayoutManager layout) 	创建具有指定布局管理器的新面板
3.2 常见方法
add(Component comp) 将其它组件添加到Panel中
import java.awt.*;
public class Demo2 {
public static void main(String[] args) {
//1. 创建一个窗体
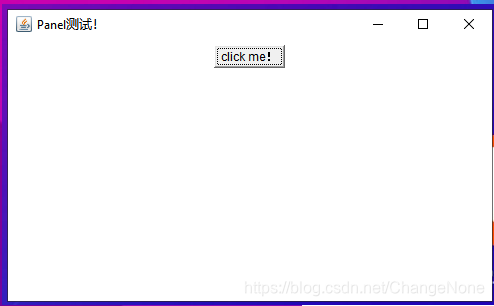
Frame frame = new Frame("Panel测试!");
//2. 创建一个Panel面板,用来装其它组件,比如按钮
Panel panel = new Panel();
Button button = new Button("click me!");
//3. 将创建好的按钮通过add方法添加到Panel面板中
panel.add(button);
//4. 将Panel面板添加到Frame窗体中
frame.add(panel);
//5. 设置窗体的位置及大小
frame.setBounds(300, 300, 500, 300);
//6. 显示
frame.setVisible(true);
}
}
四、布局管理
如果将坐标固定的话,页面经过拉伸后整体的布局就会被打乱。为了解决这种情况,Java给提供了布局管理。
设置布局的方法为:setLayout(LayoutManager lm)
扫描二维码关注公众号,回复: 12369192 查看本文章
Container下的所有类都有默认的布局管理。
常见的有:FlowLayout、BorderLayout、GridLayout
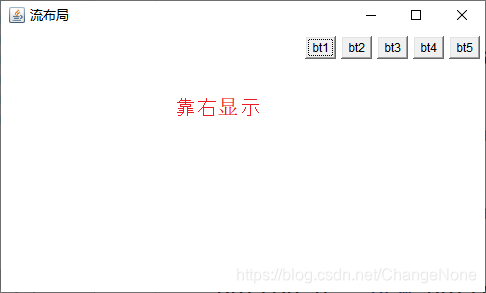
4.1 FlowLayout 流布局
如果一行能放下,那么就放在一行;如果一行放不下,那么就会转为下一行放置剩余的内容
FlowLayout为Panel的默认布局
常见设置值为:
FlowLayout.CENTER 居中
FlowLayout.LEFT 靠左
FlowLayout.RIGHT 靠右
构造方法
FlowLayout() 构造一个新的 FlowLayout,它是居中对齐的,默认的水平和垂直间隙是 5 个单位
FlowLayout(int align) 构造一个新的 FlowLayout,它具有指定的对齐方式,默认的水平和垂直间隙是 5 个单位
FlowLayout(int align, int hgap, int vgap) 创建一个新的流布局管理器,它具有指定的对齐方式以及指定的水平和垂直间隙
import java.awt.*;

public class Demo {


    public static void main(String[] args) {


        //1. 创建窗体,用来装Panel并展示
        Frame frame = new Frame("流布局");

        //2. 创建Panel,用来装内容,比如按钮
        Panel panel = new Panel();
        //3. 设置Panel的布局为靠左流布局
//        panel.setLayout(new FlowLayout(FlowLayout.CENTER));
        panel.setLayout(new FlowLayout(2));   //等效于FlowLayout.RIGHT;
//        panel.setLayout(new FlowLayout(FlowLayout.CENTER, 20, 30));

        Button b = new Button("bt1");
        Button b2 = new Button("bt2");
        Button b3 = new Button("bt3");
        Button b4 = new Button("bt4");
        Button b5 = new Button("bt5");

        //4. 将按钮添加到Panel中
        panel.add(b);
        panel.add(b2);
        panel.add(b3);
        panel.add(b4);
        panel.add(b5);

        //5. 将Panel添加到Frame中
        frame.add(panel);

        //6. 设置窗体的大小并展示
        frame.setBounds(200, 200, 500, 300);

        frame.setVisible(true);

    }
}

4.2 BorderLayout 边框布局
分为东、西、南、北、中五个方向
BorderLaout为Frame的默认布局
构造方法
BorderLayout() 						构造一个组件之间没有间距的新边框布局。
BorderLayout(int hgap, int vgap) 	构造一个具有指定组件间距的边框布局
import java.awt.*;

public class Demo2 {


    public static void main(String[] args) {


        //1. 创建窗体
        Frame frame = new Frame("边框布局");

        //2. 创建5个按钮
        Button b1 = new Button("bt1");
        Button b2 = new Button("bt2");
        Button b3 = new Button("bt3");
        Button b4 = new Button("bt4");
        Button b5 = new Button("bt5");

        //3. 将按钮添加到窗体中
//        frame.add(b1, "North");
//        frame.add(b2, "South");
//        frame.add(b3, "West");
//        frame.add(b4, "East");
//        frame.add(b5, "Center");

        frame.add(b1, BorderLayout.NORTH);
        frame.add(b2, BorderLayout.SOUTH);
        frame.add(b3, BorderLayout.WEST);
        frame.add(b4, BorderLayout.EAST);
        frame.add(b5, BorderLayout.CENTER);

        //4. 设置窗体大小并显示
        frame.setBounds(200, 200, 500, 500);
        frame.setVisible(true);

    }
}

4.3 GridLayout 表格布局
GridLayout() 						创建具有默认值的网格布局,即每个组件占据一行一列。
GridLayout(int rows, int cols)  	创建具有指定行数和列数的网格布局。
GridLayout(int rows, int cols, int hgap, int vgap)   创建具有指定行数和列数的网格布局
import java.awt.*;

public class Demo3 {


    public static void main(String[] args) {


        //1. 创建窗体
        Frame frame = new Frame("表格布局");

        //2. 创建5个按钮
        Button b1 = new Button("bt1");
        Button b2 = new Button("bt2");
        Button b3 = new Button("bt3");
        Button b4 = new Button("bt4");
        Button b5 = new Button("bt5");

        //3. 设置窗体的布局
        frame.setLayout(new GridLayout(2, 3));

        //4. 将按钮添加到窗体中
        frame.add(b1);
        frame.add(b2);
        frame.add(b3);
        frame.add(b4);
        frame.add(b5);

        //5. 设置窗体大小并显示
        frame.setBounds(200, 200, 300, 500);
        frame.setVisible(true);

    }
}

五、事件监听

注意:只有将监听器绑定到了监听源对象上,监听器才能监听事件源对象发送的事件信息,并进行相应的处理
5.1 鼠标事件监听
import java.awt.*;
import java.awt.event.ActionEvent;
import java.awt.event.ActionListener;

/*
    实现监听器对象
*/
class MyMonitor implements ActionListener {


    @Override
    public void actionPerformed(ActionEvent e) {


        System.out.println("你扒拉我干啥!");
    }
}

public class Demo {


    public static void main(String[] args) {


        //1. 创建窗体
        Frame frame = new Frame("鼠标事件监听");

        //2. 创建按钮
        Button button = new Button("click me!");
        //3. 将按钮添加到窗体上
        frame.add(button);

        //创建监听器对象
        MyMonitor monitor = new MyMonitor();

        //将监听器对象绑定到按钮上
        button.addActionListener(monitor);

        //4. 设置窗体大小并显示
        frame.setBounds(200, 200, 300, 300);
        frame.setVisible(true);

    }

}


5.2 窗口事件监听
关闭窗口
import java.awt.*;
import java.awt.event.WindowAdapter;
import java.awt.event.WindowEvent;
import java.awt.event.WindowListener;

public class Demo2 {


    public static void main(String[] args) {


        Frame frame = new Frame("窗体关闭");

        //关闭窗体
        frame.addWindowListener(new WindowAdapter() {


            @Override
            public void windowClosing(WindowEvent e) {


                System.exit(0);
            }
        });

        frame.setSize(100, 100);
        frame.setVisible(true);
    }
}