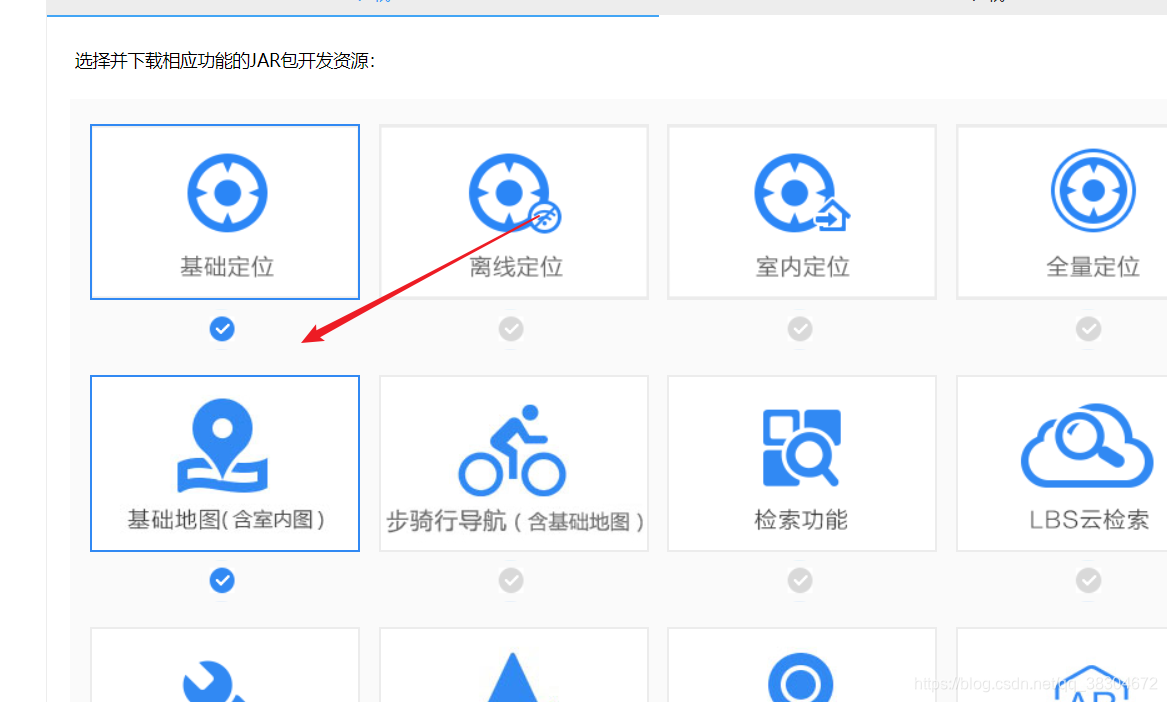
一. 开发者申请与SDK下载
二.解压后分别导包

三.权限与动态申请
- 清单文件
    <uses-permission android:name="android.permission.ACCESS_COARSE_LOCATION"/>
    <uses-permission android:name="android.permission.ACCESS_FINE_LOCATION"/>
    <uses-permission android:name="android.permission.ACCESS_WIFI_STATE"/>
    <uses-permission android:name="android.permission.ACCESS_NETWORK_STATE"/>
    <uses-permission android:name="android.permission.CHANGE_WIFI_STATE"/>
    <uses-permission android:name="android.permission.READ_PHONE_STATE"/>
    <uses-permission android:name="android.permission.WRITE_EXTERNAL_STORAGE"/>
    <uses-permission android:name="android.permission.INTERNET"/>
    <uses-permission android:name="android.permission.MOUNT_UNMOUNT_FILESYSTEMS" tools:ignore="ProtectedPermissions"/>
    <uses-permission android:name="android.permission.WAKE_LOCK"/>
- 建立权限数组,动态申请
四.代码
- 通过,先
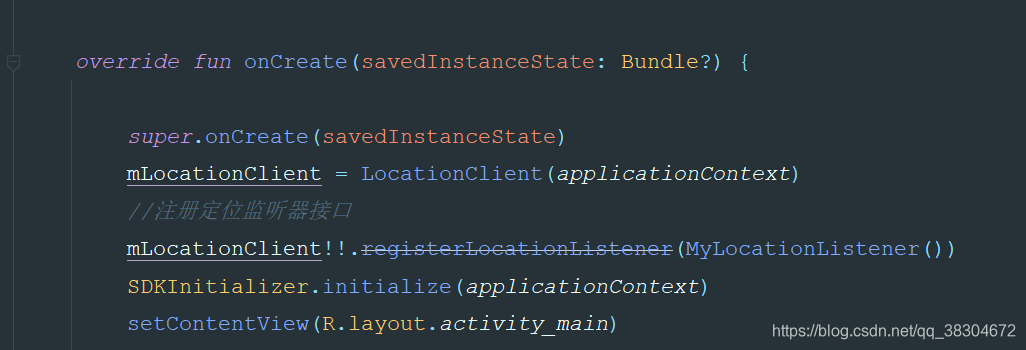
建立client对象内部类MyLocationListener实现接口BDLocationListener,并进行监听,后期通过start,进行默认情况调用LocationClient的start() 方法,只会定位一次 - SDKInitializer 初始化方法
class MainActivity : AppCompatActivity() {
var mLocationClient: LocationClient? = null
var positionText: TextView? = null
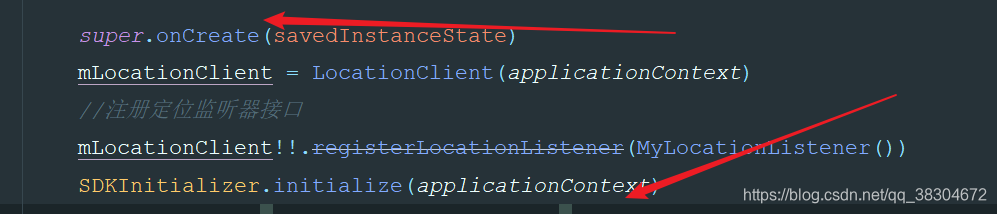
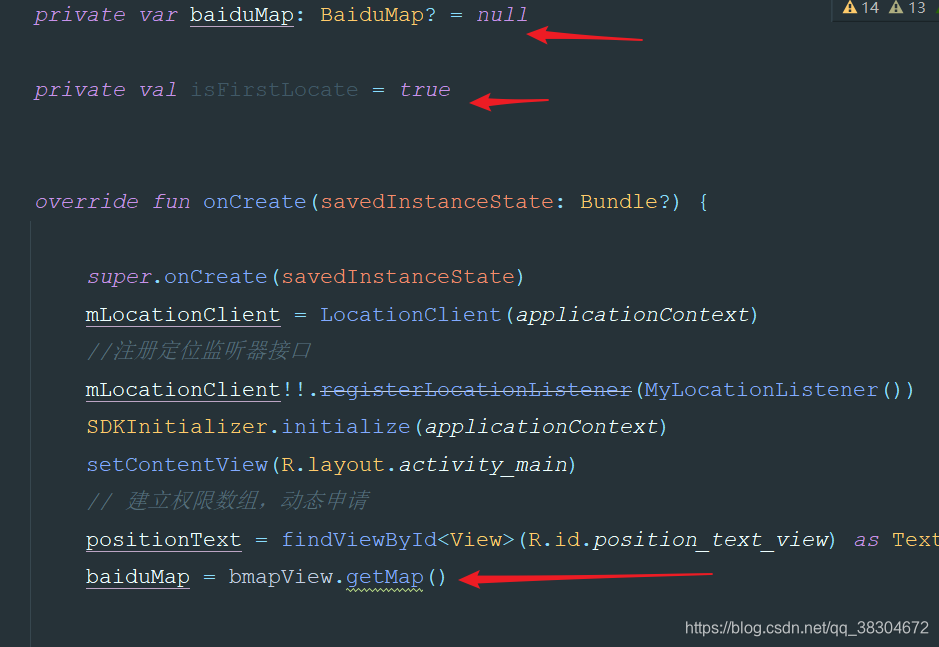
override fun onCreate(savedInstanceState: Bundle?) {
super.onCreate(savedInstanceState)
mLocationClient = LocationClient(applicationContext)
//注册定位监听器接口
mLocationClient!!.registerLocationListener(MyLocationListener())
setContentView(R.layout.activity_main)
// 建立权限数组,动态申请
positionText = findViewById<View>(R.id.position_text_view) as TextView
val permissionList: MutableList<String> = ArrayList()
if (ContextCompat.checkSelfPermission(
this@MainActivity,
Manifest.permission.ACCESS_FINE_LOCATION
) != PackageManager.PERMISSION_GRANTED
) {
permissionList.add(Manifest.permission.ACCESS_FINE_LOCATION)
}
if (ContextCompat.checkSelfPermission(
this@MainActivity,
Manifest.permission.READ_PHONE_STATE
) != PackageManager.PERMISSION_GRANTED
) {
permissionList.add(Manifest.permission.READ_PHONE_STATE)
}
if (ContextCompat.checkSelfPermission(
this@MainActivity,
Manifest.permission.WRITE_EXTERNAL_STORAGE
) != PackageManager.PERMISSION_GRANTED
) {
permissionList.add(Manifest.permission.WRITE_EXTERNAL_STORAGE)
}
if (!permissionList.isEmpty()) {
val permissions = permissionList.toTypedArray()
ActivityCompat.requestPermissions(this@MainActivity, permissions, 1)
} else {
requestLocation()
}
}
private fun requestLocation() {
mLocationClient!!.start()//有权限则进行定位
}
//处理回调
override fun onRequestPermissionsResult(requestCode: Int, permissions: Array<out String>, grantResults: IntArray) {
when (requestCode) {
1 -> if (grantResults.size > 0) {
for (result in grantResults) {
if (result != PackageManager.PERMISSION_GRANTED) {
Toast.makeText(
this, "必须同意所有权限才能使用本程序",
Toast.LENGTH_SHORT
).show()
finish()
return
}
}
requestLocation()
} else {
Toast.makeText(this, "发生未知错误", Toast.LENGTH_SHORT).show()
finish()
}
else -> {
}
}
}
inner class MyLocationListener : BDLocationListener {
override fun onReceiveLocation(p0: BDLocation?) {
runOnUiThread(Runnable {
val currentPosition = StringBuilder()
if (p0 != null) {
currentPosition.append("纬度: ").append(p0.getLatitude()).append("\n")
currentPosition.append("经线: ").append(p0.getLongitude()).append("\n")
currentPosition.append("定位方式: ")
if (p0.getLocType() === BDLocation.TypeGpsLocation) {
currentPosition.append("GPS")
} else if (p0.getLocType() ===
BDLocation.TypeNetWorkLocation
) {
currentPosition.append("网络")
}
}
positionText?.setText(currentPosition)
})
}
fun onConnectHotSpotMessage(s: String?, i: Int) {
}
}
}

- 持久化更新进度
1)添加服务进行定时观察
 <service android:name="com.baidu.location.f" android:enabled="true" android:process=":remote">
        </service>
2)在client进行start前,初始化一个clientoption,设定一个时间间隔即可
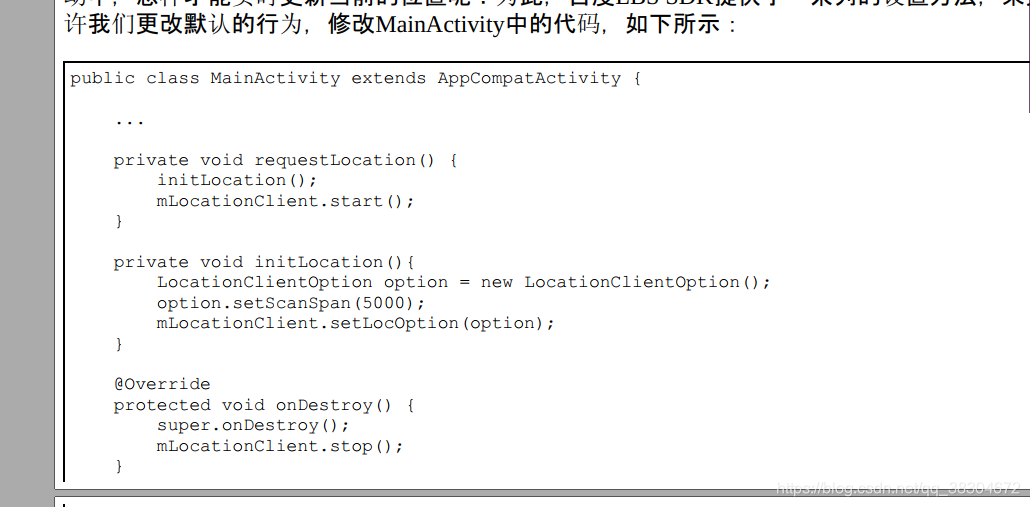
3)回调处打个断点,搞定,注意onDestory一定要关闭服务。。不然内存泄漏太高了。

5. 此外,option还可以设定定位的方式,一共有3种模式可选: Hight_Accuracy、 Battery_SavingDevice_Sensors。
1)Hight_Accuracy表示高精确度模式, 会在GPS信号正常的情况下优先使用GPS定
位, 在无法接收GPS信号的时候使用网络定位。
2)Battery_Saving表示节电模式, 只会使用网络行定位。
3)Device_Sensors表示传感器模式, 只会使用GPS进行定位。 其中, Hight_Accuracy是认的模式

6. 若单单是经纬度是看不懂的,需获取当前的详细地址信息
1)配置clientoption显示具体的
option.setIsNeedAddress(true)
2)在经纬度后追加新的数据即可,地理位置不截图了。
                    currentPosition.append("纬度: ").append(p0.getLatitude()).append("\n")
                    currentPosition.append("经线: ").append(p0.getLongitude()).append("\n")

                    currentPosition.append("国家:").append(p0.getCountry()).append("\n");
                    currentPosition.append("省:").append(p0.getProvince()).append("\n");
                    currentPosition.append("市:").append(p0.getCity()).append("\n");
                    currentPosition.append("区:").append(p0.getDistrict()).append("\n");
                    currentPosition.append("街道:").append(p0.getStreet()).append("\n");
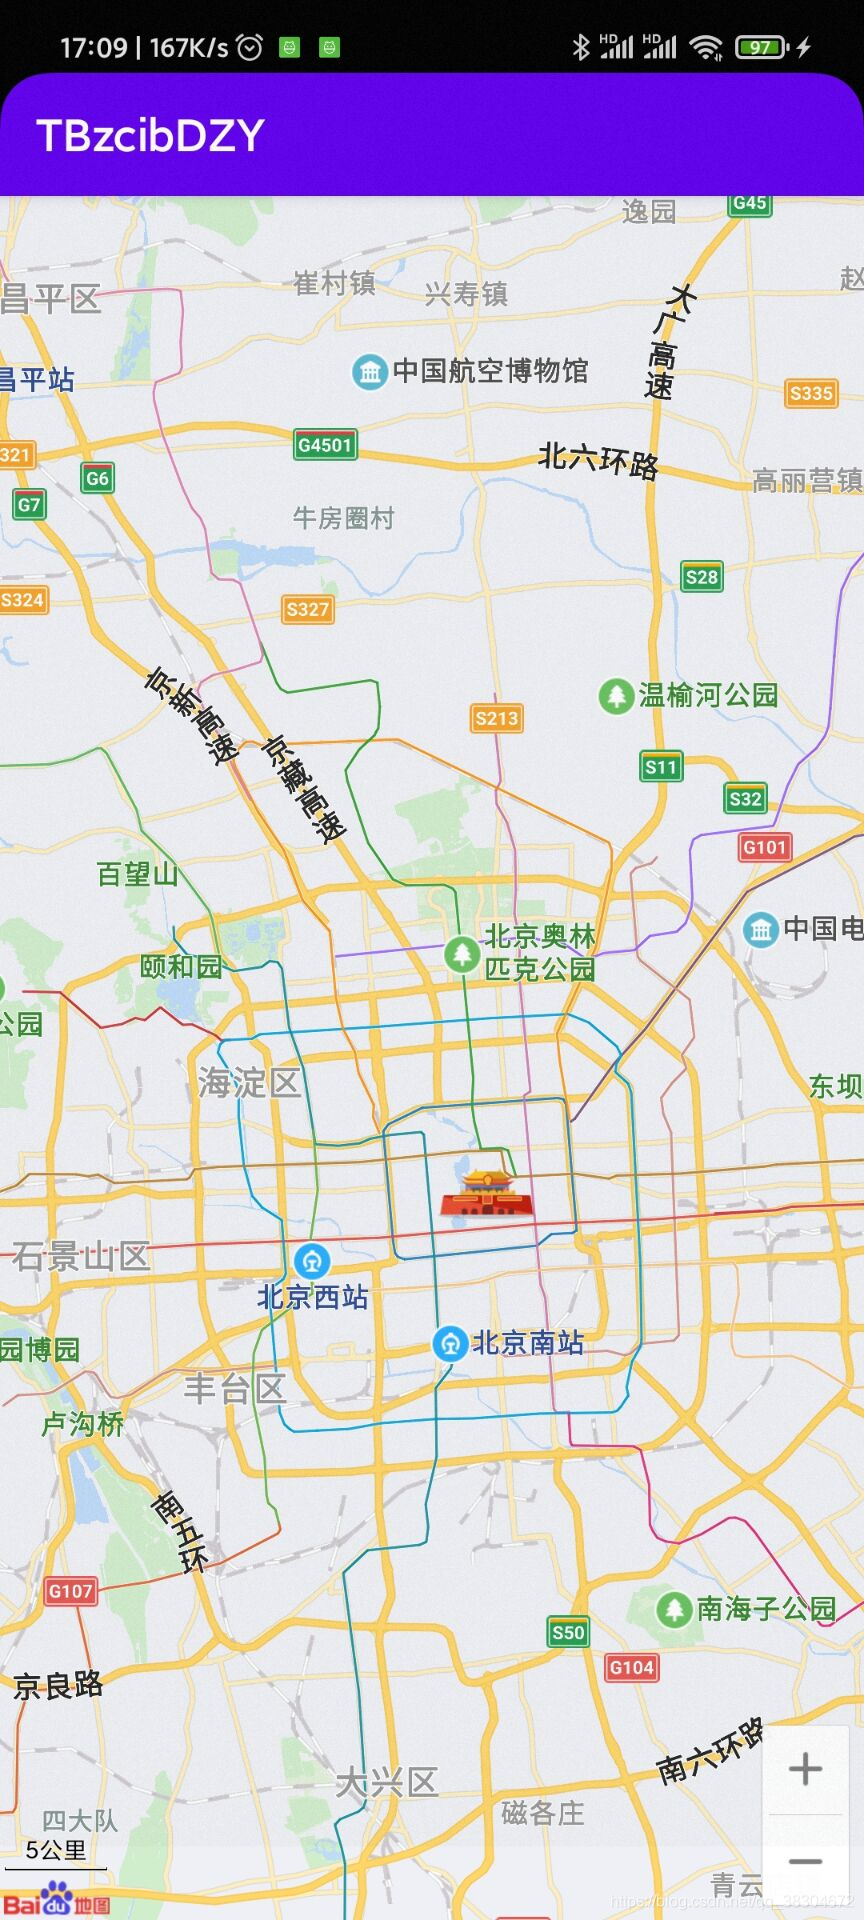
五.将地图显示出来
- 修改xml,将原xml忽略体积隐藏,载引入MapView
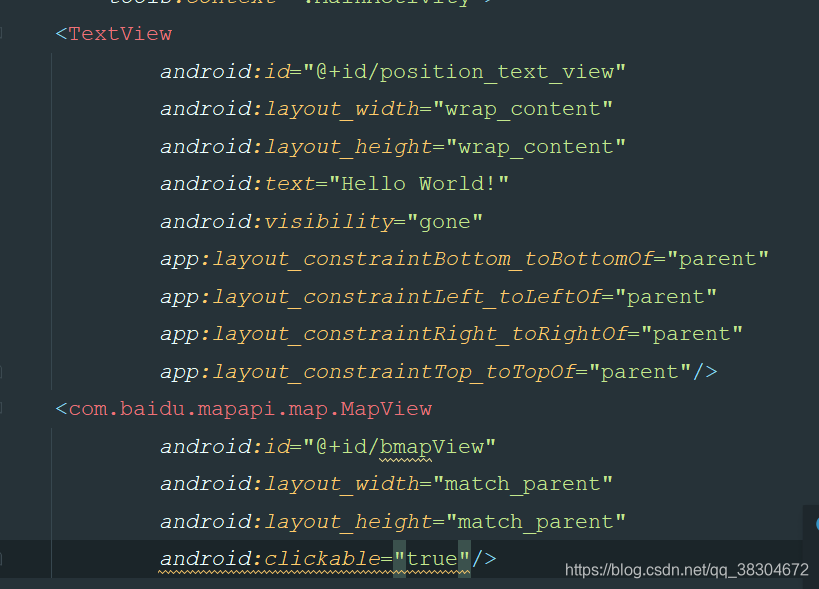
- 添加地图SDK初始化
- 同步三个方法的生命周期

- 运行 搞定,还贼流畅,注意初始化要放在布局之前
六.快速移动到自己位置
1. 前言
- 百度LBS SDK 的API提供了一个BaiduMap类,是地图的总控制器,通过MapView的实例getMap方法即可获取
- LatLng类存放经纬度,返回MapStatusUpadte对象,传入BaiduMap的animateMapStatus()方法中,即可将地图移动至指定经纬度
2.代码
- 新建并获取BaiduMap对象
- 将回调的显示数值代码改掉,调用一个封装方法
    inner class MyLocationListener : BDLocationListener {


        override fun onReceiveLocation(p0: BDLocation?) {


            if (p0 != null) {


                if (p0.getLocType() == BDLocation.TypeGpsLocation
                    || p0.getLocType() == BDLocation.TypeNetWorkLocation
                ) {


                    navigateTo(p0)
                }
            }

}
2.5 加入后测试成功(不截图了)
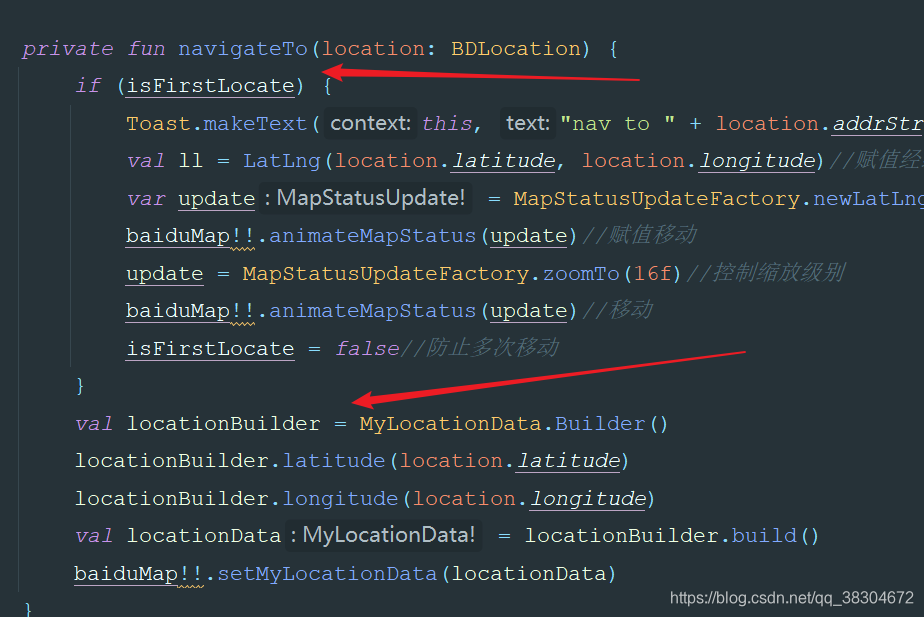
    private fun navigateTo(location: BDLocation) {


        if (isFirstLocate) {


            Toast.makeText(this, "nav to " + location.addrStr, Toast.LENGTH_SHORT).show()
            val ll = LatLng(location.latitude, location.longitude)//赋值经纬度
            var update = MapStatusUpdateFactory.newLatLng(ll)//获取该经纬度的MapStatusUpdate对象
            baiduMap!!.animateMapStatus(update)//赋值移动
            update = MapStatusUpdateFactory.zoomTo(16f)//控制缩放级别
            baiduMap!!.animateMapStatus(update)//移动
            isFirstLocate = false//防止多次移动
        }

    }
七.显示自己经纬度点的小光标
- baiduMap对象设置开启展现我们的具体位置(上面的声明改为惰性加载)

- 赋值移动到周边的方法中加入
MyLocationData.Builder类,封装当前位置
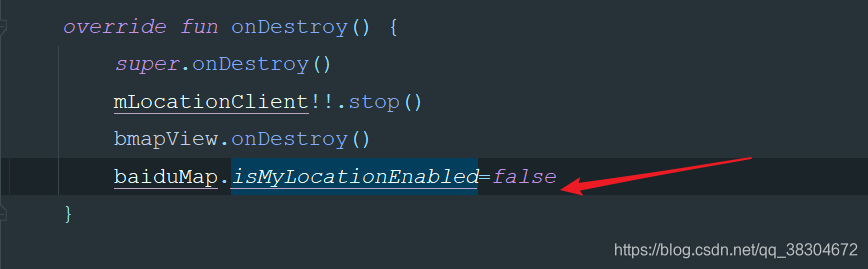
- ondesory时将其关闭,节约资源
- 点击运行成功,不截图了