前言
在上一篇博客中我们绘制了三维的立方体并且利用模型变换矩阵对立方体进行变换。在今天我们将会进行更加灵活的变换:用鼠标键盘来操控模型进行旋转缩放平移,此外,我们将通过阅读简单的OFF格式模型来获取更加生动的几何形状。
⚠
该部分的绘制代码基于上一篇博客:OpenGL学习(三)三维绘制与模型变换矩阵
博客内容因为篇幅关系,不会完整的列出所有的代码 完整代码会放在文章末尾
freeglut所提供的交互
freeglut,你坏事干净 ,提供了一套基础的交互函数,我们可以通过翻阅它的手册:http://freeglut.sourceforge.net/docs/api.php 来快速查阅。
与此同时,我在互联网上搜索到了两位大佬的博客,记载非常详细:
感谢两位大佬 Orz 。。。因为上面的三个链接对 freeglut 的 API 有了详细的描述,所以我就不介绍了(逃
准备工作
在开始之前,我们将 init 函数中,我们创建的着色器程序对象 program 设为全局变量,因为我们要在 display 函数中,实时地传输我们的模型变换矩阵。
此外,我们设置几个全局变量,表示模型变换矩阵的缩放,旋转,平移。最后是我们的窗口尺寸,因为我们需要利用鼠标在窗口的位置来进行操控。下面是设置的全局变量:
GLuint program; // 着色器程序对象
glm::vec3 scaleControl(1,1,1);  // 缩放控制
glm::vec3 rotateControl(0, 0, 0);   // 旋转控制
glm::vec3 translateControl(0, 0, 0);    // 平移控制

int windowWidth = 512;  // 窗口宽
int windowHeight = 512; // 窗口高
然后我们将 init 函数中,模型变换矩阵的计算代码,挪动到 display 函数中。这意味着我们的模型变换矩阵是实时地计算的:
display函数开头......

// 构造模型变换矩阵
glm::mat4 unit(    // 单位矩阵
    glm::vec4(1, 0, 0, 0),
    glm::vec4(0, 1, 0, 0),
    glm::vec4(0, 0, 1, 0),
    glm::vec4(0, 0, 0, 1)
);
glm::mat4 scale = glm::scale(unit, scaleControl);    // xyz缩放
glm::mat4 translate = glm::translate(unit, translateControl);   // 平移
glm::mat4 rotate = unit;    // 旋转
rotate = glm::rotate(rotate, glm::radians(rotateControl.x), glm::vec3(1, 0, 0));   // 绕x轴转
rotate = glm::rotate(rotate, glm::radians(rotateControl.y), glm::vec3(0, 1, 0));   // 绕y轴转
rotate = glm::rotate(rotate, glm::radians(rotateControl.z), glm::vec3(0, 0, 1));   // 绕z轴转
glm::mat4 model = translate * rotate * scale;   // 变换级联 -- 生成模型变换矩阵

// 传递uniform变量
GLuint mlocation = glGetUniformLocation(program, "model");    // 名为model的uniform变量的位置索引
glUniformMatrix4fv(mlocation, 1, GL_FALSE, glm::value_ptr(model));   // 列优先矩阵

绘制......
鼠标交互调整旋转
我们开始编写第一个交互效果:我们希望通过鼠标拖动我们的模型进行旋转变换!注意到 glutMotionFunc 函数为我们提供了良好的平台。
我们通过 glutMotionFunc 函数绑定一个鼠标回调函数 mouse(函数名称不一定叫 mouse),每当我们按下鼠标左键并且鼠标发生移动的时候,就会调用被我们绑定的 mouse 函数。
原型:
void glutMotionFunc(void (GLUTCALLBACK *func)(int x, int y))
glutMotionFunc 的原型要求我们定义一个函数,具有形参 x 和 y,他们代表当前调用时,鼠标指针在屏幕上的像素坐标。
于是我们可以开始编写鼠标移动回调函数 mouse:
// 鼠标运动函数
void mouse(int x, int y)
{


    // 调整旋转
    rotateControl.y = -100 * (x - float(windowWidth) / 2.0) / windowWidth;
    rotateControl.x = -100 * (y - float(windowHeight) / 2.0) / windowHeight;

    glutPostRedisplay();    // 重绘
}
首先我们根据鼠标位置(x,y)计算出它在屏幕上的百分比位置,范围 [-1, 1] 。然后我们根据鼠标的位置,调整旋转角度。
注意到 glutPostRedisplay 函数,它表示刷新我们的窗口,否则我们虽然绘制了,GPU 也确切的执行了工作,但是窗口不刷新,我们看不到变化。
我们在 main 函数中,调用 glutMotionFunc 以绑定 mouse :
glutMotionFunc(mouse); // 左键按下并且移动
随后重新加载程序:

好耶
鼠标滚轮控制缩放
和鼠标按下的函数类似,鼠标滚轮也具有回调函数 glutMouseWheelFunc。
和上面的代码类似,通过 glutMouseWheelFunc 可以指定当鼠标滚轮滚动时要执行的函数。glutMouseWheelFunc 的原型为:
void glutMouseWheelFunc ( void( *callback )( int wheel, int direction, int x, int y ));
要求我们定义一个函数,有四个输入,其中 wheel 是滚轮 id,鼠标的话默认 0 。唔。。。direction 为鼠标滚轮滚动方向,向前为 1 向后为 -1 。此外,x 和 y 则是触发函数时,鼠标的位置。至此,我们能够轻易的写出鼠标滚轮缩放的函数:
// 鼠标滚轮函数
void mouseWheel(int wheel, int direction, int x, int y)
{


    scaleControl += 1 * direction * 0.1;
    glutPostRedisplay();    // 重绘
}
别忘了 glutPostRedisplay 重新绘制!然后我们在 main 函数中调用 glutMouseWheelFunc 以绑定我们的滚轮函数:
glutMouseWheelFunc(mouseWheel); // 滚轮缩放
重新加载程序:

好耶
键盘控制平移
在开始之前,我们将会引入一些现代的键盘解决方案,我们设置全局变量,记录每一个按键的状态:
// 键盘状态数组 keyboardState[x]==true 表示按下x键
bool keyboardState[1024];
有了键盘状态表,我们只需要干两件事:
- 键盘按下某个键的时候,将 keyboardState[x] 设为 true
- 键盘松开某个键的时候,将 keyboardState[x] 设为 false
然后我们将通过 w a s d,像传统的游戏一般控制我们方块的平移。我们编写一个函数,专门根据上述四个键位来修改我们的平移控制变量:
// 根据键盘状态判断移动
void move()
{


    if (keyboardState['w']) translateControl.y += 0.0005;
    if (keyboardState['s']) translateControl.y -= 0.0005;
    if (keyboardState['a']) translateControl.x -= 0.0005;
    if (keyboardState['d']) translateControl.x += 0.0005;
    glutPostRedisplay();    // 重绘
}
我们需要在 display 函数中,计算模型变化矩阵之前,调用一次 move 函数以完成我们的移动。
好了,现在的工作就剩下这两个了
- 键盘按下某个键的时候,将 keyboardState[x] 设为 true
- 键盘松开某个键的时候,将 keyboardState[x] 设为 false
和刚刚的鼠标交互一样,freeglut 的交互都是通过绑定对应的回调函数来完成的。我们通过
glutKeyboardFunc
glutKeyboardUpFunc
来绑定对应的函数,其中 glutKeyboardFunc 是绑定键盘按下时的回调函数,而 glutKeyboardUpFunc 是绑定键盘松开时的回调函数,他们的原型如下:
glutKeyboardFunc(void (GLUTCALLBACK *func)(unsigned char key, int x, int y))
void glutKeyboardUpFunc(void (*func)(unsigned char key, int x, int y))
我们编写对应的回调函数即可:
// 键盘回调函数
void keyboardDown(unsigned char key, int x, int y)
{


    keyboardState[key] = true;
}
void keyboardUp(unsigned char key, int x, int y)
{


    keyboardState[key] = false;
}
最后在 main 函数中,完成回调函数的绑定:
// 绑定键盘函数
glutKeyboardFunc(keyboardDown);
glutKeyboardUpFunc(keyboardUp);
重新加载程序:

好耶
读取OFF文件
三维的立方体我们画吐了,我们需要绘制更加漂亮的模型!今天接触一种基于顶点和面片的模型格式 ---- OFF
OFF 格式的模型非常直球,你要啥它提供啥。回想上一篇博客中我们如何生成立方体?
首先我们确定立方体 8 个顶点的位置,其次我们确定立方体 6 个面共 12 个三角面片的顶点的下标,最后我们生成顶点。OFF格式的模型恰好提供了这些数据。
OFF 模型的第一行是 OFF 字符串。之后会有三个整数,代表模型顶点数 vertexNum,三角面片数 faceNum,边数 edgeNum,其中我们只关心前两个数字。
之后的 vertexNum 行,是模型三维顶点的位置坐标,分别是 x,y,z 坐标。
紧接着 faceNum 行给出了每个三角面片的顶点下标。其中第一个数字是 3,表示该面片有 3 个顶点(一般都是 3 所以我们忽略他),之后的三个整数表示了该面片的顶点位置坐标,等于上面给出的顶点集合的第 i 个元素。
下面的图片描述了 OFF 文件的格式:

知道了格式细节之后,我们就开始编写读取 OFF 格式的函数了。我们将生成的顶点和顶点颜色放到传入的容器中:
// 读取off文件并且生成最终传递给顶点着色器的 顶点位置/顶点颜色
void readOff(std::string filepath, std::vector<glm::vec3>& points, std::vector<glm::vec3>& colors)
{


    std::string line;
    std::ifstream fin(filepath);
    if (!fin.is_open())
    {


        std::cout << "文件 " << filepath << " 打开失败" << std::endl;
        exit(-1);
    }

    std::vector<glm::vec3> vertexPosition, vertexColor; // off模型顶点位置和颜色
    fin >> line;    // OFF字符串
    // 读取顶点位置
    int vertexNum, faceNum, edgeNum;
    fin >> vertexNum >> faceNum >> edgeNum;
    for (int i = 0; i < vertexNum; i++)
    {


        float p1, p2, p3;
        fin >> p1 >> p2 >> p3;
        vertexPosition.push_back(glm::vec3(p1, p2, p3));
        vertexColor.push_back(glm::vec3(p1 + 0.5, p2 + 0.5, p3 + 0.5)); // 用位置做颜色
    }
    // 根据面信息生成实际顶点
    points.clear();
    colors.clear();
    for (int i = 0; i < faceNum; i++)
    {


        int n, index1, index2, index3;
        fin >> n >> index1 >> index2 >> index3;
        points.push_back(vertexPosition[index1]);
        points.push_back(vertexPosition[index2]);
        points.push_back(vertexPosition[index3]);
        colors.push_back(vertexColor[index1]);
        colors.push_back(vertexColor[index2]);
        colors.push_back(vertexColor[index3]);
    }
}
然后在 init 函数中,我们就不必大费周章地生成立方体的顶点了,我们直接读取 OFF 格式的模型,这里我们读取一个皮卡丘:
将 init 中的

// 由面片信息生成三角形面片顶点
for (int i = 0; i < faces.size(); i++)
{


    // 取得第 i 个三角面片的三个顶点的下标
    int index1 = faces[i].x;
    int index2 = faces[i].y;
    int index3 = faces[i].z;
    // 生成顶点
    points.push_back(vertexPosition[index1]);
    points.push_back(vertexPosition[index2]);
    points.push_back(vertexPosition[index3]);
    // 生成顶点颜色
    colors.push_back(vertexColor[index1]);
    colors.push_back(vertexColor[index2]);
    colors.push_back(vertexColor[index3]);
}

改为:

// 读取off模型并且生成顶点和顶点颜色
readOff("models/Pikachu.off", points, colors);
重新加载程序:
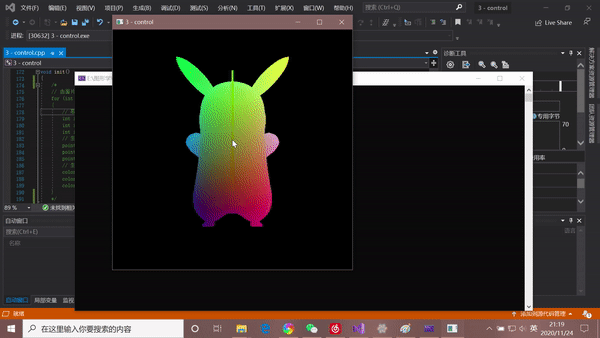
好耶
完整代码
c++
#include <iostream>
#include <string>
#include <fstream>
#include <vector>

#include <GL/glew.h>
#include <GL/freeglut.h>
#include <glm/glm.hpp>
#include <glm/gtc/matrix_transform.hpp>
#include <glm/gtc/type_ptr.hpp>

// 正方形的8个顶点位置坐标
std::vector<glm::vec3> vertexPosition = {


    glm::vec3(-0.5, -0.5, -0.5),
    glm::vec3(0.5, -0.5, -0.5),
    glm::vec3(-0.5,  0.5, -0.5),
    glm::vec3(0.5,  0.5, -0.5),
    glm::vec3(-0.5, -0.5,  0.5),
    glm::vec3(0.5, -0.5,  0.5),
    glm::vec3(-0.5,  0.5,  0.5),
    glm::vec3(0.5,  0.5,  0.5)
};
// 正方形的8个顶点的颜色
std::vector<glm::vec3> vertexColor = {


    glm::vec3(1.0, 1.0, 1.0),	// White
    glm::vec3(1.0, 1.0, 0.0),	// Yellow
    glm::vec3(0.0, 1.0, 0.0),	// Green
    glm::vec3(0.0, 1.0, 1.0),	// Cyan
    glm::vec3(1.0, 0.0, 1.0),	// Magenta
    glm::vec3(1.0, 0.0, 0.0),	// Red
    glm::vec3(0.5, 0.5, 0.5),	// Gray
    glm::vec3(0.0, 0.0, 1.0)	// Blue
};
// 正方形由6个面 -- 12个三角形面片组成 faces存储顶点在vertexPosition中的下标
std::vector<glm::vec3> faces = {


    glm::vec3(0,2,1),
    glm::vec3(1,2,3),
    glm::vec3(1,3,7),
    glm::vec3(7,5,1),
    glm::vec3(0,1,5),
    glm::vec3(5,4,0),
    glm::vec3(0,4,2),
    glm::vec3(4,6,2),
    glm::vec3(4,5,7),
    glm::vec3(7,6,4),
    glm::vec3(6,7,3),
    glm::vec3(3,2,6)
};
// 顶点坐标 / 颜色
std::vector<glm::vec3> points, colors;

GLuint program; // 着色器程序对象
glm::vec3 scaleControl(1,1,1);  // 缩放控制
glm::vec3 rotateControl(0, 0, 0);   // 旋转控制
glm::vec3 translateControl(0, 0, 0);    // 平移控制

int windowWidth = 512;  // 窗口宽
int windowHeight = 512; // 窗口高

bool keyboardState[1024];   // 键盘状态数组 keyboardState[x]==true 表示按下x键

// --------------- end of global variable definition --------------- //

// 读取文件并且返回一个长字符串表示文件内容
std::string readShaderFile(std::string filepath)
{


    std::string res, line;
    std::ifstream fin(filepath);
    if (!fin.is_open())
    {


        std::cout << "文件 " << filepath << " 打开失败" << std::endl;
        exit(-1);
    }
    while (std::getline(fin, line))
    {


        res += line + '\n';
    }
    fin.close();
    return res;
}

// 获取着色器对象
GLuint getShaderProgram(std::string fshader, std::string vshader)
{


    // 读取shader源文件
    std::string vSource = readShaderFile(vshader);
    std::string fSource = readShaderFile(fshader);
    const char* vpointer = vSource.c_str();
    const char* fpointer = fSource.c_str();

    // 容错
    GLint success;
    GLchar infoLog[512];

    // 创建并编译顶点着色器
    GLuint vertexShader = glCreateShader(GL_VERTEX_SHADER);
    glShaderSource(vertexShader, 1, (const GLchar**)(&vpointer), NULL);
    glCompileShader(vertexShader);
    glGetShaderiv(vertexShader, GL_COMPILE_STATUS, &success);   // 错误检测
    if (!success)
    {


        glGetShaderInfoLog(vertexShader, 512, NULL, infoLog);
        std::cout << "顶点着色器编译错误\n" << infoLog << std::endl;
        exit(-1);
    }

    // 创建并且编译片段着色器
    GLuint fragmentShader = glCreateShader(GL_FRAGMENT_SHADER);
    glShaderSource(fragmentShader, 1, (const GLchar**)(&fpointer), NULL);
    glCompileShader(fragmentShader);
    glGetShaderiv(fragmentShader, GL_COMPILE_STATUS, &success);   // 错误检测
    if (!success)
    {


        glGetShaderInfoLog(fragmentShader, 512, NULL, infoLog);
        std::cout << "片段着色器编译错误\n" << infoLog << std::endl;
        exit(-1);
    }

    // 链接两个着色器到program对象
    GLuint shaderProgram = glCreateProgram();
    glAttachShader(shaderProgram, vertexShader);
    glAttachShader(shaderProgram, fragmentShader);
    glLinkProgram(shaderProgram);

    // 删除着色器对象
    glDeleteShader(vertexShader);
    glDeleteShader(fragmentShader);

    return shaderProgram;
}

// 读取off文件并且生成最终传递给顶点着色器的 顶点位置/顶点颜色
void readOff(std::string filepath, std::vector<glm::vec3>& points, std::vector<glm::vec3>& colors)
{


    std::string line;
    std::ifstream fin(filepath);
    if (!fin.is_open())
    {


        std::cout << "文件 " << filepath << " 打开失败" << std::endl;
        exit(-1);
    }

    std::vector<glm::vec3> vertexPosition, vertexColor; // off模型顶点位置和颜色
    fin >> line;    // OFF字符串
    // 读取顶点位置
    int vertexNum, faceNum, edgeNum;
    fin >> vertexNum >> faceNum >> edgeNum;
    for (int i = 0; i < vertexNum; i++)
    {


        float p1, p2, p3;
        fin >> p1 >> p2 >> p3;
        vertexPosition.push_back(glm::vec3(p1, p2, p3));
        vertexColor.push_back(glm::vec3(p1 + 0.5, p2 + 0.5, p3 + 0.5)); // 用位置做颜色
    }
    // 根据面信息生成实际顶点
    points.clear();
    colors.clear();
    for (int i = 0; i < faceNum; i++)
    {


        int n, index1, index2, index3;
        fin >> n >> index1 >> index2 >> index3;
        points.push_back(vertexPosition[index1]);
        points.push_back(vertexPosition[index2]);
        points.push_back(vertexPosition[index3]);
        colors.push_back(vertexColor[index1]);
        colors.push_back(vertexColor[index2]);
        colors.push_back(vertexColor[index3]);
    }
}

// 初始化
void init()
{


    /*
    // 由面片信息生成三角形面片顶点
    for (int i = 0; i < faces.size(); i++)
    {
        // 取得第 i 个三角面片的三个顶点的下标
        int index1 = faces[i].x;
        int index2 = faces[i].y;
        int index3 = faces[i].z;
        // 生成顶点
        points.push_back(vertexPosition[index1]);
        points.push_back(vertexPosition[index2]);
        points.push_back(vertexPosition[index3]);
        // 生成顶点颜色
        colors.push_back(vertexColor[index1]);
        colors.push_back(vertexColor[index2]);
        colors.push_back(vertexColor[index3]);
    }
    */

    // 读取off模型并且生成顶点和顶点颜色
    readOff("models/Pikachu.off", points, colors);


    // 生成vbo对象并且绑定vbo
    GLuint vbo;
    glGenBuffers(1, &vbo);
    glBindBuffer(GL_ARRAY_BUFFER, vbo);
    // 先确定vbo的总数据大小(画饼???) 传NULL指针表示我们暂时不传数据
    glBufferData(GL_ARRAY_BUFFER, sizeof(glm::vec3) * (points.size() + colors.size()), NULL, GL_STATIC_DRAW);

    // 传送数据到vbo 分别传递 顶点位置 和 顶点颜色
    GLuint pointDataOffset = 0;
    GLuint colorDataOffset = sizeof(glm::vec3) * points.size();
    glBufferSubData(GL_ARRAY_BUFFER, pointDataOffset, sizeof(glm::vec3) * points.size(), &points[0]);
    glBufferSubData(GL_ARRAY_BUFFER, colorDataOffset, sizeof(glm::vec3) * colors.size(), &colors[0]);

    // 生成vao对象并且绑定vao
    GLuint vao;
    glGenVertexArrays(1, &vao);
    glBindVertexArray(vao);

    // 生成着色器程序对象
    std::string fshaderPath = "shaders/fshader.fsh";
    std::string vshaderPath = "shaders/vshader.vsh";
    program = getShaderProgram(fshaderPath, vshaderPath);
    glUseProgram(program);  // 使用着色器

    // 建立顶点变量vPosition在着色器中的索引 同时指定vPosition变量的数据解析格式
    GLuint vlocation = glGetAttribLocation(program, "vPosition");    // vPosition变量的位置索引
    glEnableVertexAttribArray(vlocation);
    glVertexAttribPointer(vlocation, 3, GL_FLOAT, GL_FALSE, 0, (GLvoid*)0);  // vao指定vPosition变量的数据解析格式

    // 建立颜色变量vColor在着色器中的索引 同时指定vColor变量的数据解析格式
    GLuint clocation = glGetAttribLocation(program, "vColor");    // vColor变量的位置索引
    glEnableVertexAttribArray(clocation);
    glVertexAttribPointer(clocation, 3, GL_FLOAT, GL_FALSE, 0, (GLvoid*)(sizeof(glm::vec3) * points.size()));  // 注意指定offset参数

    glEnable(GL_DEPTH_TEST);  // 开启深度测试

    glClearColor(0.0, 0.0, 0.0, 1.0);   // 背景颜色 -- 黑
}

// 鼠标滚轮函数
void mouseWheel(int wheel, int direction, int x, int y)
{


    scaleControl += 1 * direction * 0.1;
    glutPostRedisplay();    // 重绘
}

// 鼠标运动函数
void mouse(int x, int y)
{


    // 调整旋转
    rotateControl.y = -100 * (x - float(windowWidth) / 2.0) / windowWidth;
    rotateControl.x = -100 * (y - float(windowHeight) / 2.0) / windowHeight;

    glutPostRedisplay();    // 重绘
}

// 键盘回调函数
void keyboardDown(unsigned char key, int x, int y)
{


    keyboardState[key] = true;
}
void keyboardUp(unsigned char key, int x, int y)
{


    keyboardState[key] = false;
}
// 根据键盘状态判断移动
void move()
{


    if (keyboardState['w']) translateControl.y += 0.0005;
    if (keyboardState['s']) translateControl.y -= 0.0005;
    if (keyboardState['a']) translateControl.x -= 0.0005;
    if (keyboardState['d']) translateControl.x += 0.0005;
    glutPostRedisplay();    // 重绘
}

// 显示回调函数
void display()
{


    glClear(GL_COLOR_BUFFER_BIT | GL_DEPTH_BUFFER_BIT);       // 清空窗口颜色缓存

    move(); // 移动控制

    // 构造模型变换矩阵
    glm::mat4 unit(    // 单位矩阵
        glm::vec4(1, 0, 0, 0),
        glm::vec4(0, 1, 0, 0),
        glm::vec4(0, 0, 1, 0),
        glm::vec4(0, 0, 0, 1)
    );
    glm::mat4 scale = glm::scale(unit, scaleControl);    // xyz缩放
    glm::mat4 translate = glm::translate(unit, translateControl);   // 平移
    glm::mat4 rotate = unit;    // 旋转
    rotate = glm::rotate(rotate, glm::radians(rotateControl.x), glm::vec3(1, 0, 0));   // 绕x轴转
    rotate = glm::rotate(rotate, glm::radians(rotateControl.y), glm::vec3(0, 1, 0));   // 绕y轴转
    rotate = glm::rotate(rotate, glm::radians(rotateControl.z), glm::vec3(0, 0, 1));   // 绕z轴转
    glm::mat4 model = translate * rotate * scale;   // 变换级联 -- 生成模型变换矩阵

    // 传递uniform变量
    GLuint mlocation = glGetUniformLocation(program, "model");    // 名为model的uniform变量的位置索引
    glUniformMatrix4fv(mlocation, 1, GL_FALSE, glm::value_ptr(model));   // 列优先矩阵

    glDrawArrays(GL_TRIANGLES, 0, points.size());   // 绘制n个点

    glutSwapBuffers();                  // 交换缓冲区
}

int main(int argc, char** argv)
{


    glutInit(&argc, argv);              // glut初始化
    glutInitDisplayMode(GLUT_RGBA | GLUT_DEPTH);
    glutInitWindowSize(windowWidth, windowHeight);// 窗口大小
    glutCreateWindow("3 - control"); // 创建OpenGL上下文

#ifdef __APPLE__
#else
    glewInit();
#endif

    init();

    // 绑定鼠标移动函数 --
    glutMotionFunc(mouse);  // 左键按下并且移动
    glutMouseWheelFunc(mouseWheel); // 滚轮缩放

    // 绑定键盘函数
    glutKeyboardFunc(keyboardDown);
    glutKeyboardUpFunc(keyboardUp);

    glutDisplayFunc(display);           // 设置显示回调函数 -- 每帧执行
    glutMainLoop();                     // 进入主循环

    return 0;
}
着色器
顶点
#version 330 core

in vec3 vPosition;  // cpu传入的顶点坐标
in vec3 vColor;     // cpu传入的顶点颜色

out vec3 vColorOut; // 向片元着色器传递顶点颜色

uniform mat4 model; // 模型变换矩阵

void main()
{


    gl_Position = model * vec4(vPosition, 1.0); // 指定ndc坐标
    vColorOut = vColor; // 这个颜色经过线性插值生成片元颜色
}
片元
#version 330 core

in vec3 vColorOut;  // 顶点着色器传递的颜色
out vec4 fColor;    // 片元输出像素的颜色

void main()
{


    fColor = vec4(vColorOut, 1.0);
}
总结
今天的内容比较简单,毕竟 freeglut 帮我们写好了操作的接口,我们调用就行了。此外,OFF 模型的读取需要花一些心思去掌握其格式规范。
注意到我们的皮卡丘是花色的,因为我们直接输出顶点的坐标当作颜色,在后面的章节中我们将会利用光照系统和shadowMapping技术,为皮卡丘增添动态的光照,使其更加真实。
这里先 画个饼 放一下我图形学的作业。。。