一、使用gomonkey stub(打桩)
在测试包中创建一个模拟方法,用于替换生成代码中的方法。
1、stub函数
gomonkey.ApplyFunc(target,double)
其中target是被mock的目标函数,double是用户重写的函数。注意点:重写的函数要和原函数入参和出参保持一致,否则会报错。

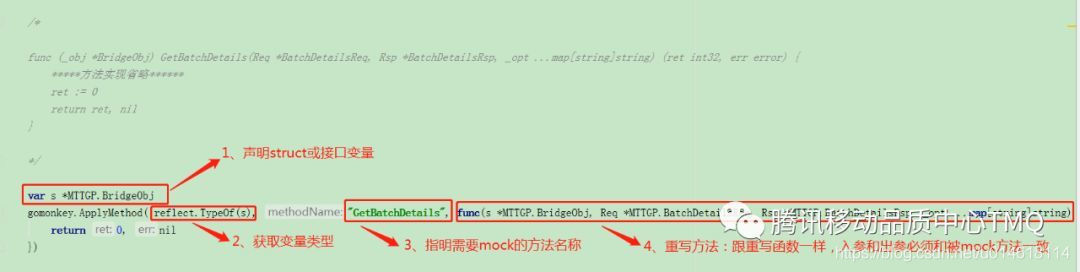
2、stub方法
gomonkey.ApplyMethod(reflect.TypeOf(s), “target”,double {//mock方法实现})
s为目标变量,target为目标变量方法名,double为mock方法;同理double方法入参和出参需要和target方法保持一致。如下图示例:
// GetUserGiftNum 获取用户拥有的道具礼物数目,map[int]int key为礼物id, value为数目
func (g *GiftData) GetUserGiftNum(uid int64) (map[int]int, error) {


	key := library.UserGiftAccount(strconv.FormatInt(uid, 10))
	giftRecord, err := g.rankRedisRD.HGetAll(key)
	if err == redis.ErrNil {


		return map[int]int{

    }, nil
	}
	if err != nil {


		return map[int]int{

    }, err
	}
	ret := make(map[int]int)
	now := library.UnixNow()
	for record, numStr := range giftRecord {


		hasNum, err := strconv.Atoi(numStr)
		if err != nil || hasNum < 0 {


			continue
		}
		detail := strings.Split(record, ":")
		if len(detail) != 2 {


			continue
		}
		itemExpire, err := strconv.ParseInt(detail[1], 10, 64)
		if err != nil {


			continue
		}
		//过期道具跳过
		if itemExpire != 0 && now > itemExpire {


			continue
		}
		//统计可用道具数目
		giftId, err := strconv.Atoi(detail[0])
		if err != nil {


			continue
		}
		if _, ok := ret[giftId]; !ok {


			ret[giftId] = hasNum
		} else {


			ret[giftId] += hasNum
		}
	}
	return ret, nil
}
import (
      "testing"
      "github.com/smartystreets/goconvey/convey"
      "github.com/bouk/monkey"
)
func TestGetUserGiftNum_CorrectRet(t *testing.T) {


	giftRecord := map[string]string{


		"1:1000": "10",
		"1:2001": "100",
		"1:999":  "20",
		"2":      "200",
		"a":      "30",
		"2:1001": "20",
		"2:999":  "200",
	}

	expectRet := map[int]int{


		1: 110,
		2: 20,
	}

	patchesNow := gomonkey.ApplyFunc(library.UnixNow, func() int64 {


		return int64(1000)
	})
	defer patchesNow.Reset()

	var s *redis.RedisHelper
	patches := gomonkey.ApplyMethod(reflect.TypeOf(s), "HGetAll", func(_ *redis.RedisHelper, _ string)(map[string]string, error) {


		return giftRecord, nil
	})
	defer patches.Reset()

	p := &GiftData{

    rankRedisRD:new(redis.RedisConn)}
	userGiftNum, err := p.GetUserGiftNum(10000)

	assert.Nil(t, err)
	assert.JSONEq(t, Calorie.StructToString(expectRet), Calorie.StructToString(userGiftNum))

}
二、使用gomock 模拟外部依赖行为
- 网络依赖——函数执行依赖于网络请求,比如第三方http-api,rpc服务,消息队列等等
- 数据库依赖
- I/O依赖
当然,还有可能是依赖还未开发完成的功能模块。但是处理方法都是大同小异的——抽象成接口,通过mock和stub进行模拟测试。
其中GoMock包完成对桩对象生命周期的管理。mockgen工具用来生成interface对应的Mock类源文件。
1、使用mockgen工具生成mock类文件mockgen -source={/path/file_name}.go > {/path/mock_file_name}.go
//源文件
package db

type Repository interface {


    Create(key string, value []byte) error
    Retrieve(key string) ([]byte, error)
    Update(key string, value []byte) error
    Delete(key string) error
}
2、在/path/路径下找到生成的mock_file_name.go文件
// Automatically generated by MockGen. DO NOT EDIT!
// Source: infra/db (interfaces: Repository)

package mock_db

import (
    gomock "github.com/golang/mock/gomock"
)

// MockRepository is a mock of Repository interface
type MockRepository struct {


    ctrl     *gomock.Controller
    recorder *MockRepositoryMockRecorder
}

// MockRepositoryMockRecorder is the mock recorder for MockRepository
type MockRepositoryMockRecorder struct {


    mock *MockRepository
}

// NewMockRepository creates a new mock instance
func NewMockRepository(ctrl *gomock.Controller) *MockRepository {


    mock := &MockRepository{

    ctrl: ctrl}
    mock.recorder = &MockRepositoryMockRecorder{

    mock}
    return mock
}

// EXPECT returns an object that allows the caller to indicate expected use
func (_m *MockRepository) EXPECT() *MockRepositoryMockRecorder {


    return _m.recorder
}

// Create mocks base method
func (_m *MockRepository) Create(_param0 string, _param1 []byte) error {


    ret := _m.ctrl.Call(_m, "Create", _param0, _param1)
    ret0, _ := ret[0].(error)
    return ret0
}

// Create indicates an expected call of Create
func (_mr *MockRepositoryMockRecorder) Create(arg0, arg1 interface{

    }) *gomock.Call {


    return _mr.mock.ctrl.RecordCall(_mr.mock, "Create", arg0, arg1)
}
...
3、使用mock对象进行打桩测试。mock类源文件生成后,就可以写测试用例了。
//导入mock相关的包, mock相关的包包括testing,gmock和mock_db
import (
	. "github.com/golang/mock/gomock"
	"test/mock_repository"
	"testing"
)
//mock控制器通过NewController接口生成,是mock生态系统的顶层控制,它定义了mock对象的作用域和生命周期,以及它们的期望。多个协程同时调用控制器的方法是安全的。当用例结束后,控制器会检查所有剩余期望的调用是否满足条件。
// 初始化控制器
ctrl := NewController(t)
defer ctrl.Finish()
// 创建mock对象, mock对象创建时需要注入控制器,如果有多个mock对象则注入同一个控制器
mockRepo := mock_repository.NewMockRepository(ctrl)
//mock对象的行为注入,对于mock对象的行为注入,控制器是通过map来维护的,一个方法对应map的一项。因为一个方法在一个用例中可能调用多次,所以map的值类型是数组切片。当mock对象进行行为注入时,控制器会将行为Add。当该方法被调用时,控制器会将该行为Remove。
mockRepo.EXPECT().Retrieve(Any()).Return(nil, ErrAny)
mockRepo.EXPECT().Create(Any(), Any()).Return(nil)
mockRepo.EXPECT().Retrieve(Any()).Return(objBytes, nil)
三、goconvey单元测试框架的使用
使用 GoConvey 书写单元测试,每个测试用例需要使用 Convey 函数包裹起来。它接受的第一个参数为 string 类型的描述;第二个参数一般为 *testing.T,即本例中的变量 t;第三个参数为不接收任何参数也不返回任何值的函数(习惯以闭包的形式书写)。
Convey 语句同样可以无限嵌套,以体现各个测试用例之间的关系,例如 TestDivision 函数就采用了嵌套的方式体现它们之间的关系。需要注意的是,只有最外层的 Convey 需要传入变量 t,内层的嵌套均不需要传入。最后,需要使用 So 语句来对条件进行判断。
源代码:
package goconvey

import (
    "errors"
)

func Add(a, b int) int {


    return a + b
}

func Subtract(a, b int) int {


    return a - b
}

func Multiply(a, b int) int {


    return a * b
}

func Division(a, b int) (int, error) {


    if b == 0 {


        return 0, errors.New("被除数不能为 0")
    }
    return a / b, nil
测试代码:子Convey 的执行策略是并行的,因此前面的子Convey 执行失败,不会影响后面的Convey 执行。但是一个Convey 下的子 So,执行是串行的。
package goconvey

import (
    "testing"
//使用官方推荐的方式导入 GoConvey 的辅助包以减少冗余的代码:. "github.com/smartystreets/goconvey/convey"
    . "github.com/smartystreets/goconvey/convey"
)
//每个单元测试的名称需要以 Test 开头,例如:TestAdd,并需要接受一个类型为 *testing.T 的参数。
func TestAdd(t *testing.T) {


    //每个测试用例需要使用 Convey 函数包裹起来。它接受的第一个参数为 string 类型的描述;
    // 第二个参数一般为 *testing.T,即本例中的变量 t;
    // 第三个参数为不接收任何参数也不返回任何值的函数(习惯以闭包的形式书写)。
    Convey("将两数相加", t, func() {


        //断言So 参数的理解,总共有三个参数:actual: 输入\assert:断言\expected:期望值
        So(Add(1, 2), ShouldEqual, 3)
    })
}

func TestSubtract(t *testing.T) {


    Convey("将两数相减", t, func() {


        So(Subtract(1, 2), ShouldEqual, -1)
    })
}

func TestMultiply(t *testing.T) {


    Convey("将两数相乘", t, func() {


        So(Multiply(3, 2), ShouldEqual, 6)
    })
}

func TestDivision(t *testing.T) {


    Convey("将两数相除", t, func() {


	//Convey 语句同样可以无限嵌套,以体现各个测试用例之间的关系
        Convey("除以非 0 数", func() {


            num, err := Division(10, 2)
            So(err, ShouldBeNil)
            So(num, ShouldEqual, 5)
        })

        Convey("除以 0", func() {


            _, err := Division(10, 0)
            So(err, ShouldNotBeNil)
        })
    })
}