Spring Cloud 之 消息驱动组件Spring Cloud Stream
1、Spring Cloud Stream
Spring Cloud Stream是一个基于消息中间件进行构建高度可扩展、具备消息驱动能力微服务的框架。它可以基于Spring Boot独立的、可用于生产的Spring应用程序。Spring Cloud Stream支持与多种消息中间件整合,比如:Kafka、RabbitMQ等,通过使用Spring Integration提供与消息代理之间的连接,为应用程序的消息发布和消费提供了一个平台中立的接口,简化了研发人员对消息中间件使用上的复杂度。
Spring Cloud Stream框架提供了一套类似于Spring编程习惯的编程模型,并且引入了发布-订阅、消费组以及消息分区这三个核心概念。
2、Spring Cloud Stream消息模型框架图
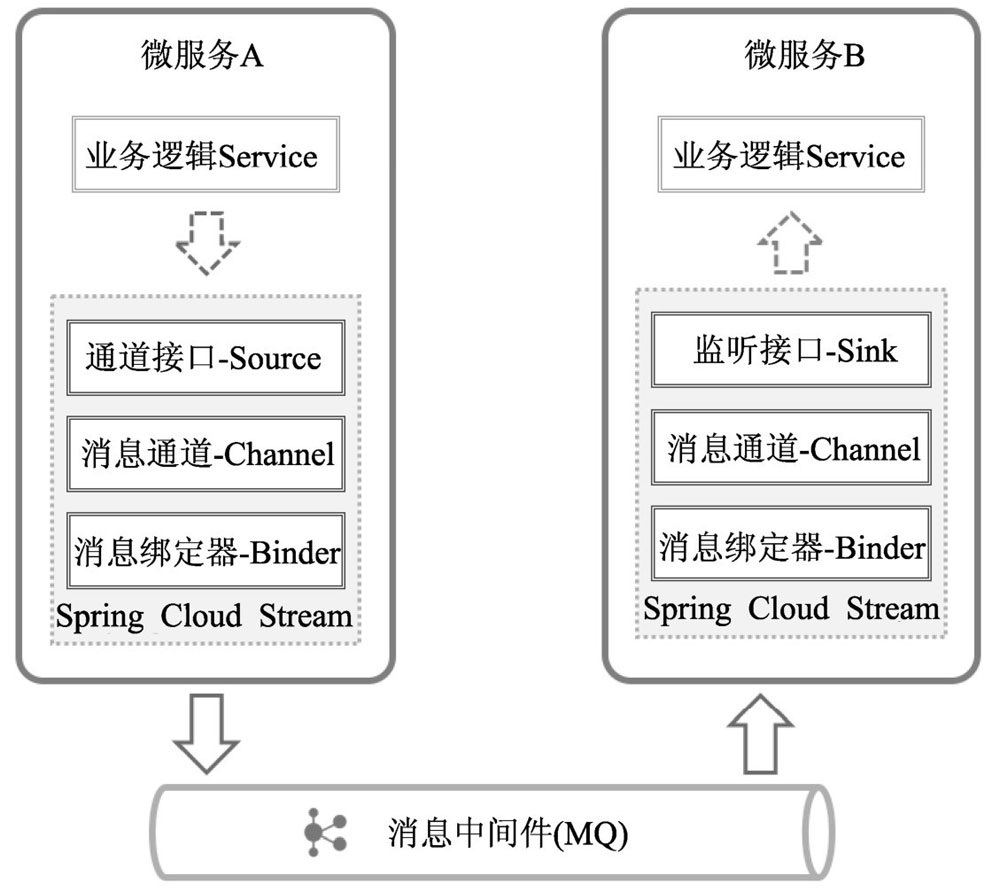
从上图我们可以知道,在Spring Cloud Stream发送和接收消息的过程中,涉及到了如下角色:
- 消息发送者,即上图中的微服务A的业务逻辑。主要是根据业务需求,进行消息的发送。
- 消息发送通道接口-Source,主要是Spring Cloud Stream提供给消息发送者进行消息的发送,同时会与特定的消息通道进行绑定。该接口可以实现消息的序列化工作。
- 消息通道Channel,消息通道是对消息队列的一种抽象,用来存放消息发送者发布的消息或者消费者所要消费的消息。消息通道Channel具体发送到那个消息队列,是需要在配置文件中进行配置。
- 消息绑定器Binder,主要是用来和具体的消息中间件进行交互,同时也隔离了消息中间件的实现细节。Spring Cloud Stream默认提供了对RabbitMQ和Apache Kafka等中间件的绑定器在应用中开发者只需要引入相应的绑定器就可以实现与RabbitMQ或者Kafka的对接,从而进行消息的发送与监听。
- 消息中间件(MQ),可选的消息中间件有很多,比如:RabbitMQ、Apache Kafka等。
- 消息监听通道接口Sink,与Source类似,消息监听通道接口Sink主要实现了与消息消费者的交互,通水实现了消息数据的反序列化。该消息监听通道也是通过配置进行与特定的队列和主题进行绑定。
3、 消息模型的具体实现
Spring Cloud Stream提供了很多开箱即用的接口声明及注解,用来声明约束消息发送和监听通道,进而实现简化开发的同时,也让开发者更多的专注于业务逻辑的实现,而非消息中间件的使用上。我们现在通过实现消息生产和消息消费(消息监听)两个服务,来学习Spring Cloud Stream的应用。
3.1、消费者实现(stream-consumer)
首先,修改pom文件,增加stream相关依赖,如下所示:
<dependency>
    <groupId>org.springframework.cloud</groupId>
    <artifactId>spring-cloud-starter-stream-rabbit</artifactId>
</dependency>
然后,修改application.properties配置文件,如下所示:
spring.application.name=stream-consumer
server.port=8120

#rabbitmq 配置
#spring.rabbitmq.host=192.168.1.9
#spring.rabbitmq.port=5672
#spring.rabbitmq.username=admin
#spring.rabbitmq.password=admin

spring.cloud.stream.binders.defaultRabbit.type=rabbit
spring.cloud.stream.binders.defaultRabbit.environment.spring.rabbitmq.host=192.168.1.9
spring.cloud.stream.binders.defaultRabbit.environment.spring.rabbitmq.username=admin
spring.cloud.stream.binders.defaultRabbit.environment.spring.rabbitmq.password=admin
spring.cloud.stream.binders.defaultRabbit.environment.spring.rabbitmq.virtual-host=/
#通道,类似kafka中的Topic
spring.cloud.stream.bindings.input.destination=TopicA
#分组,一个分组内只有一个消息者消费消息
spring.cloud.stream.bindings.input.group=groupA
#spring.cloud.stream.bindings.input.content-type=application/json
其中,
- spring.cloud.stream.binders.defaultRabbit.* 主要配置了链接rabbitMq的相关信息,如果是本地默认的,可以省略。
- spring.cloud.stream.bindings.input.destination=TopicA,指输入通道对应的主题名
- spring.cloud.stream.bindings.input.group=groupA,指定消费分组,一个分组内只有一个消息者消费消息
再,创建消费者类ConsumerController,这是一个消息监听器。
@EnableBinding(Sink.class)
public class ConsumerController {

    Logger logger = Logger.getLogger(ConsumerController.class);

    @StreamListener(Sink.INPUT)
    public void consumer(Object payload) {
        logger.info("consumer: " + payload);
    }
}
上面代码中,
-
@EnableBinding注解,用来指定一个或多个定义了@Input或@Output注解的接口,以此实现对消息通道(Channel)的绑定。这里实现了@Input接口的通道的绑定。
-
Sink接口,在该接口中,通过@Input注解绑定了一个名为input的通道
-
@StreamListener注解,将被修饰的方法注册为消息中间件上数据流的事件监听器,注解中的属性值对应了监听的消息通道名。这里监听默认的通道“input”。
最后,创建一个SpringBoot启动类,然后启动应用,控制台打印如下日志,可以看到其中通道绑定的主题信息和分组等信息。这个时候消费者就算创建成功了。
2020-11-21 18:23:52.743  INFO 10264 --- [           main] o.s.c.s.m.DirectWithAttributesChannel    : Channel 'application-1.input' has 1 subscriber(s).
2020-11-21 18:23:52.744  INFO 10264 --- [           main] o.s.i.endpoint.EventDrivenConsumer       : Adding {logging-channel-adapter:_org.springframework.integration.errorLogger} as a subscriber to the 'errorChannel' channel
2020-11-21 18:23:52.744  INFO 10264 --- [           main] o.s.i.channel.PublishSubscribeChannel    : Channel 'application-1.errorChannel' has 1 subscriber(s).
2020-11-21 18:23:52.744  INFO 10264 --- [           main] o.s.i.endpoint.EventDrivenConsumer       : started bean '_org.springframework.integration.errorLogger'
2020-11-21 18:23:52.745  INFO 10264 --- [           main] o.s.c.s.binder.DefaultBinderFactory      : Creating binder: defaultRabbit
2020-11-21 18:24:02.988  INFO 10264 --- [           main] o.s.c.s.binder.DefaultBinderFactory      : Caching the binder: defaultRabbit
2020-11-21 18:24:02.988  INFO 10264 --- [           main] o.s.c.s.binder.DefaultBinderFactory      : Retrieving cached binder: defaultRabbit
2020-11-21 18:24:03.086  INFO 10264 --- [           main] c.s.b.r.p.RabbitExchangeQueueProvisioner : declaring queue for inbound: TopicA.groupA, bound to: TopicA
2020-11-21 18:24:03.088  INFO 10264 --- [           main] o.s.a.r.c.CachingConnectionFactory       : Attempting to connect to: [192.168.1.9:5672]
2020-11-21 18:24:03.121  INFO 10264 --- [           main] o.s.a.r.c.CachingConnectionFactory       : Created new connection: rabbitConnectionFactory#3d64c581:0/SimpleConnection@119b0892 [delegate=amqp://[email protected]:5672/, localPort= 56470]
2020-11-21 18:24:03.178  INFO 10264 --- [           main] o.s.c.stream.binder.BinderErrorChannel   : Channel 'TopicA.groupA.errors' has 1 subscriber(s).
2020-11-21 18:24:03.178  INFO 10264 --- [           main] o.s.c.stream.binder.BinderErrorChannel   : Channel 'TopicA.groupA.errors' has 2 subscriber(s).
2020-11-21 18:24:03.198  INFO 10264 --- [           main] o.s.i.a.i.AmqpInboundChannelAdapter      : started bean 'inbound.TopicA.groupA'
3.2、生成实现(stream-provider)
首先,添加依赖,和消费类似,因为需要使用api接口,所以额外添加了web相关依赖。如下:
<dependency>
    <groupId>org.springframework.boot</groupId>
    <artifactId>spring-boot-starter-web</artifactId>
</dependency>

<dependency>
    <groupId>org.springframework.cloud</groupId>
    <artifactId>spring-cloud-starter-stream-rabbit</artifactId>
</dependency>
然后,修改application.properties配置文件,如下所示:
spring.application.name=stream-provider
server.port=8121

#rabbitmq 配置
spring.cloud.stream.binders.defaultRabbit.type=rabbit
spring.cloud.stream.binders.defaultRabbit.environment.spring.rabbitmq.host=192.168.1.9
spring.cloud.stream.binders.defaultRabbit.environment.spring.rabbitmq.username=admin
spring.cloud.stream.binders.defaultRabbit.environment.spring.rabbitmq.password=admin
spring.cloud.stream.binders.defaultRabbit.environment.spring.rabbitmq.virtual-host=/

spring.cloud.stream.bindings.output.destination=TopicA
#spring.cloud.stream.bindings.input.content-type=application/json
其中,spring.cloud.stream.bindings.output.destination用来指定输出通道的主题名称,需要注意和输入通道配置的差别。
创建消息发送类SendMsgService,其中通过构造函数注入MessageChannel实例,用来发送消息。
@EnableBinding(Source.class)
@Component
public class SendMsgService {

    private MessageChannel output;

    @Autowired
    public SendMsgService(MessageChannel output){
        this.output = output;
    }

    public void sendMsg(String name){
        output.send(MessageBuilder.withPayload(name).build());
    }
}
再提供一个ProviderController类用来定义测试的API接口。
@Controller
public class ProviderController {

    Logger logger = Logger.getLogger(ProviderController.class);
    @Autowired
    private SendMsgService sendMsgService;

    @RequestMapping("/produce")
    @ResponseBody
    public String produce(String name){
        logger.info("调用服务提供者ProviderController的produce()方法!");
        sendMsgService.sendMsg(name == null ? "World!" : name);
        return "消息发送成功!";
    }
}
最后,创建SpringBoot启动类,启动应用。启动成功后,访问http://localhost:8121/produce?name=aaaa 地址,再看消费者控制台,可以看到有相关日志被打印,说明订阅-消费者的使用方法试验成功了。