本文主要介绍 DBLE 心跳检测模块,内容包括心跳检测作用及心跳检测模块源码解析两部分。
心跳检测作用DBLE 中心跳检测的作用有以下三点:1. 控制多个写节点高可用切换;2. 控制读操作的负载均衡,会根据最近一次的心跳状态,及主从延迟(如果配置了 slaveThreshold 主从延迟阈值的话)来控制读负载均衡;3. 控制空闲连接数大小,关闭多余空闲连接。这里发送的是 PING 包,需与 dataNodeIdleCheckPeriod 参数配合,超过此参数的空闲连接会通过发送 PING 包来检查。总的来讲,就是判断 MySQL 实例的状态。本文中主要讲解前两点涉及到的心跳检测内容,第 3 点更适合在连接管理中讲,本文暂不涉及。
心跳模块源码解析心跳检测定时任务开始入口在 Scheduler#init 方法中,以 dataNodeHeartbeatPeriod 间隔定期进行心跳检测,默认值为 10 秒:
scheduler.scheduleAtFixedRate(dataSourceHeartbeat(), 0L, system.getDataNodeHeartbeatPeriod(), TimeUnit.MILLISECONDS);
Scheduler#dataSourceHeartbeat 方法返回 Runnable 任务:
private Runnable dataSourceHeartbeat() { return new Runnable() { @Override public void run() { timerExecutor.execute(new Runnable() { @Override public void run() { //这里有个判断,如果读写节点都没有,自然不需要心跳检测了 if (!DbleServer.getInstance().getConfig().isDataHostWithoutWR()) { Map<String, AbstractPhysicalDBPool> hosts = DbleServer.getInstance().getConfig().getDataHosts(); for (AbstractPhysicalDBPool host : hosts.values()) { //调用了AbstractPhysicalDBPool的doHeartbeat()方法 host.doHeartbeat(); } } } }); } }; }
AbstractPhysicalDBPool#doHeartbeat 为抽象方法,有两个实现分别在类 PhysicalDNPoolSingleWH 和 PhysicalDBPool 中,这两个类的区别从名字就可以看出来,一个是只有一个 WriteHost,另一个则有多个 WriteHost,会根据你们的 schema.xml 中的具体配置决定初始化哪一个。对于心跳检测来说,基本实现都一样,所以看哪一个类并不影响。我们就来看下 PhysicalDNPoolSingleWH#doHeartbeat 方法吧:
public void doHeartbeat() { for (PhysicalDatasource source : allSourceMap.values()) { if (source != null) { source.doHeartbeat(); } else { LOGGER.warn(hostName + " current dataSource is null!"); } } }
上述方法其实就是循环遍历所有数据源,然后对每个数据源进行心跳检测了。继续来看 PhysicalDatasource#doHeartbeat 方法,补充说明一下, PhysicalDatasource 也是抽象类,但在 DBLE 中只有 MySQLDatasource 一个实现,因为 DBLE 后端只支持 MySQL 嘛, MySQLDatasource#doHeartbeat 方法也是直接继承了抽象类的实现:
public void doHeartbeat() { if (TimeUtil.currentTimeMillis() < heartbeatRecoveryTime) { return; } if (!heartbeat.isStop()) { //这里直接调用了MySQLHeartbeat#heartbeat方法 heartbeat.heartbeat(); } }
再继续看 MySQLHeartbeat#heartbeat 方法前,先来看下 MySQLDatasource和 MySQLHeartbeat 类之间的关系: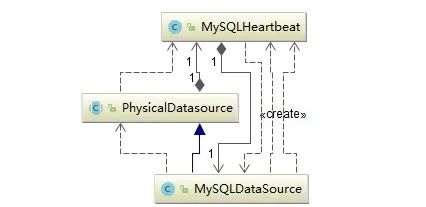 它们之间的关系很简单,就是
 MySQLDatasource 会创建 MySQLHeartbeat,并且它们之间有一对一的关联关系。简单来说就是一个 MySQLDatasource 对象就有一个 MySQLHeartbeat 对象来负责它的心跳检测。进一步来看 MySQLHeartbeat#heartbeat 方法:
public void heartbeat() { final ReentrantLock reentrantLock = this.lock; reentrantLock.lock(); try { if (isChecking.compareAndSet(false, true)) { if (detector == null || detector.isQuit()) { try { detector = new MySQLDetector(this); detector.heartbeat(); } catch (Exception e) { LOGGER.info(source.getConfig().toString(), e); setResult(ERROR_STATUS); } } else { detector.heartbeat(); } } else { if (detector != null) { if (detector.isQuit()) { isChecking.compareAndSet(true, false); } else if (detector.isHeartbeatTimeout()) { setResult(TIMEOUT_STATUS); } } } } finally { reentrantLock.unlock(); } }
上述方法主要是调用了 MySQLDetector#heartbeat 方法,调用链真的挺深的……:
public void heartbeat() {if (con == null || con.isClosed()) {heartbeat.setResult(MySQLHeartbeat.ERROR_STATUS);return;}//设置了发送心跳检测的时间lastSendQryTime = System.currentTimeMillis();String[] fetchCols = {};if (heartbeat.getSource().getHostConfig().isShowSlaveSql()) {fetchCols = MYSQL_SLAVE_STATUS_COLS;} else if (heartbeat.getSource().getHostConfig().isShowClusterSql()) {fetchCols = MYSQL_CLUSTER_STATUS_COLS;} else if (heartbeat.getSource().getHostConfig().isSelectReadOnlySql()) {fetchCols = MYSQL_READ_ONLY_COLS;}if (LOGGER.isDebugEnabled()) {LOGGER.debug("do heartbeat,conn is " + con);}OneRawSQLQueryResultHandler resultHandler = new OneRawSQLQueryResultHandler(fetchCols, this);sqlJob = new HeartbeatSQLJob(heartbeat.getHeartbeatSQL(), con, resultHandler);//执行心跳检测任务sqlJob.execute();}
简单说下该方法,该方法会根据你配置的心跳语句,实际执行检测后端 MySQL 状态,并存储相应的数据,这里涉及到了异步调用,检测完成后将会回调 MySQLDetector#onResult 方法:
public void onResult(SQLQueryResult<Map<String, String>> result) { //设置心跳检测完成后的时间 lastReceivedQryTime = System.currentTimeMillis(); heartbeat.getRecorder().set((lastReceivedQryTime - lastSendQryTime)); if (result.isSuccess()) { PhysicalDatasource source = heartbeat.getSource(); Map<String, String> resultResult = result.getResult(); if (source.getHostConfig().isShowSlaveSql()) { setStatusBySlave(source, resultResult); } else if (source.getHostConfig().isShowClusterSql()) { setStatusByCluster(resultResult); } else if (source.getHostConfig().isSelectReadOnlySql()) { setStatusByReadOnly(source, resultResult); } else { setStatusForNormalHeartbeat(source); } } else { heartbeat.setResult(MySQLHeartbeat.ERROR_STATUS); } }
上述方法就是根据心跳检测结果,来设置 MySQLHeartbeat 类中表示心跳状态的各个变量了,比如 status变量, slaveBehindMaster 主从延迟时间变量。上述整个过程就完成了数据源的心跳检测,关于检测结果的使用主要通过 MySQLHeartbeat 类中的 getStatus 和 getSlaveBehindMaster 方法,通过这两个方法来判断心跳是否成功,以及主从延迟多少,进而影响数据源切换及读写分离逻辑,分别对应心跳检测作用的第 1、2 点。
总结本文主要讲解了 DBLE 心跳检测模块,包括心跳检测作用以及相应源码解析,希望本文能帮助大家进一步理解心跳检测模块。