一、Cookie概述
Cookie是由服务器端生成并储存在浏览器客户端上的数据。在javaweb开发中Cookie被当做java对象在web服务器端创建,并由web服务器发送给特定浏览器客户端,并且WEB服务器可以向同一个浏览器客户端上同时发送多个Cookie,每一个Cookie对象都由name和value组成,name和value只能是字符串类型,浏览器接收到来自服务器的Cookie数据之后默认将其保存在浏览器缓存中(如果浏览器关闭,缓存消失,Cookie数据消失),只要浏览器不关闭,当我们下一次发送“特定”请求的时候,浏览器负责将Cookie数据发送给WEB服务器。我们还可以使用特殊的方法,将Cookie保存在客户端的硬盘上,永久性保存。这样关闭浏览器Cookie还是存在的,不会消失,比如:实现十天内自动登录。
1、Cookie是什么? Cookie作用? Cookie保存在哪里?
- 翻译过来:曲奇饼干
- Cookie可以保存会话状态,但是这个会话状态是保留在客户端上。
- 只要Cookie清除,或者Cookie失效,这个会话状态就没有了。
- Cookie可以保存在浏览器的缓存中,浏览器关闭Cookie消失。
- Cookie也可以保存在客户端的硬盘文件中,浏览器关闭Cookie还在,除非Cookie失效。
2、Cookie只有在javaweb中有吗?
- Cookie不止是在javaweb中存在。
- 只要是web开发,只要是B/S架构的系统,只要是基于HTTP协议,就有Cookie的存在。
- Cookie这种机制是HTTP协议规定的。
3、 Cookie实现的功能,常见的有哪些?
- 保留购物车商品的状态在客户端上
- 十天内免登录
- 等等…
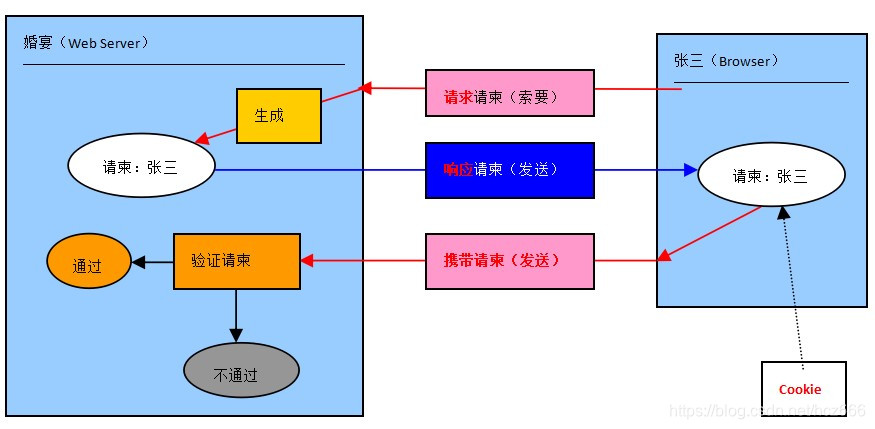
4、Cookie在现实生活中对应的场景图:
5、在java程序中怎么创建Cookie?
Cookie cookie = new Cookie(String cookieName,String cookieValue);6、Cookie在客户端的保存形式和有效时间
- 服务器端默认创建的Cookie,发送到浏览器之后,浏览器默认将其保存在缓存中,当浏览器关闭之后Cookie消失。
- 可以通过设置Cookie的有效时长,以保证Cookie保存在硬盘文件当中。但是这个有效时长必须是>0的。换句话说,只要设置Cookie的有效时长大于0,则该Cookie会被保存在客户端硬盘文件当中。有效时长过去之后,则硬盘文件当中的Cookie失效。
- 服务器创建Cookie对象之后,调用setMaxAge方法设置Cookie的有效时间。
cookie.setMaxAge(60 * 60 * 24 * 10); //10天内有效如果这个有效时间 >0,则该Cookie对象发送给浏览器之后浏览器将其保存到硬盘文件中。
如果这个有效时间 <0,则该Cookie对象也是被保存在浏览器缓存中,待浏览器关闭Cookie消失。
如果这个有效时间 =0,则该Cookie从服务器端发过来的时候就已经是一个已过时的Cookie。
7、在浏览器客户端无论是硬盘文件中还是缓存中保存的Cookie,什么时候会再次发送给服务器呢?
- 浏览器会不会提交发送这些Cookie给服务器,是和请求路径有关系的。
- 请求路径和Cookie是紧密关联的。
- 不同的请求路径会发送提交不同的Cookie
8、Cookie和请求路径之间的关系
- 每一个Cookie和请求路径是绑定在一起的,只有特定的路径才可以发送特定的Cookie。实际上浏览器是这样做的:浏览器在向web服务器发送请求的时候先去对应的请求路径下搜索是否有对应的Cookie,如果有Cookie,并且Cookie没有失效,则发送该Cookie或者多个Cookie到服务器端。请求路径和Cookie的关系是这样对应的:
- 假如获取Cookie时的路径是 :
http://127.0.0.1:8080/hcz/getCookie
- 这时浏览器请求服务器,服务器生成Cookie,并将Cookie发送给浏览器客户端。这个浏览器中的Cookie会默认和“hcz/”这个路径绑定在一起。也就是说,以后只要发送“hcz/”请求,Cookie一定会提交给服务器。
- 将来发送Cookie的路径包括如下路径 :
http://127.0.0.1:8080/hcz/getCookie(相同路径)
http://127.0.0.1:8080/hcz/xxxx(同目录)
http://127.0.0.1:8080/hcz/xxxx/xxxx/xxx(子目录)
- 假如获取Cookie时的路径是 :
http://127.0.0.1:8080/hcz/servlet/getCookie
- 这时浏览器请求服务器,服务器生成Cookie,并将Cookie发送给浏览器客户端。这个浏览器中的Cookie会默认和“servlet/”这个路径绑定在一起。也就是说,以后只要发送“servlet/”请求,Cookie一定会提交给服务器。
- 将来发送Cookie的路径包括如下路径 :
http://127.0.0.1:8080/hcz/servlet/getCookie(相同路径)
http://127.0.0.1:8080/hcz/servlet/xxxxx(同目录)
http://127.0.0.1:8080/hcz/servlet/xxxxx/xxxx(子目录)
- 其实路径是可以指定的,可以通过java程序进行设置,保证Cookie和某个特定的路径绑定在一起,例如:
cookie.setPath("/hcz/king");- 那么Cookie将和 “/hcz/king” 路径绑定在一起,只有发送 “http://127.0.0.1:8080/hcz/king” 请求路径,浏览器才会提交Cookie给服务器。
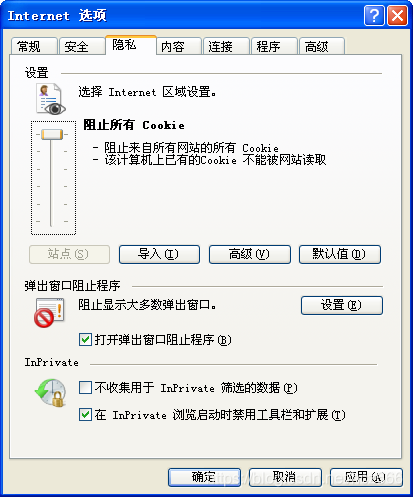
9、浏览器是可以禁用Cookie,什么意思?
- 当浏览器禁用Cookie之后,服务器还是仍然会将Cookie发送给浏览器,只不过这次浏览器选择了不接收。
10、浏览器提交Cookie给服务器,服务器怎么接收Cookie?
//从request对象中获取所有提交的Cookie
Cookie[] cookies = request.getCookies();
//遍历cookie数组取出所有的cookie对象
if(cookies != null){


    for(Cookie cookie : cookies){


        String cookieName = cookie.getName();
        String cookieValue = cookie.getValue();
        System.out.println(cookieName + "=" + cookieValue);
    }
}
二、利用Cookie机制实现十天内免登录功能
下图是用Cookie机制来实现十天内免登录功能的流程图:
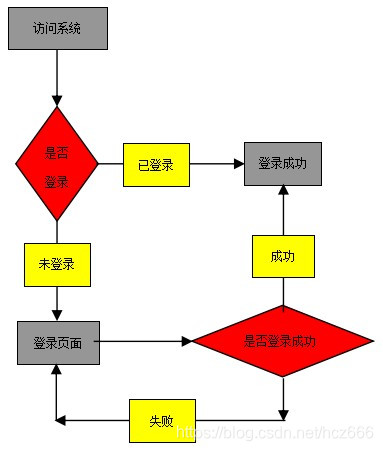
- 第一步:创建CheckLoginStatusServlet.java类判断是否已经登录,并将其设置为系统的欢迎页面。
<?xml version="1.0" encoding="UTF-8"?>
<web-app xmlns="http://xmlns.jcp.org/xml/ns/javaee"
         xmlns:xsi="http://www.w3.org/2001/XMLSchema-instance"
         xsi:schemaLocation="http://xmlns.jcp.org/xml/ns/javaee http://xmlns.jcp.org/xml/ns/javaee/web-app_4_0.xsd"
         version="4.0">
    <welcome-file-list>
        <welcome-file>isLogin</welcome-file>
    </welcome-file-list>

        <servlet-name>isLogin</servlet-name>
        <servlet-class>com.javaweb.servlet.CheckLoginStatusServlet</servlet-class>
    </servlet>
    <servlet-mapping>
        <servlet-name>isLogin</servlet-name>
        <url-pattern>/isLogin</url-pattern>
    </servlet-mapping>

    <servlet>
    	<servlet-name>login</servlet-name>
    	<servlet-class>com.javaweb.servlet.LoginServlet</servlet-class>
    </servlet>
    <servlet-mapping>
    	<servlet-name>login</servlet-name>
     	<url-pattern>/login</url-pattern>
    </servlet-mapping>
</web-app>- 在CheckLoginStatusServlet类中继承HttpServlet接口并重写doGet方法
@Override
public void doGet(HttpServletRequest request, HttpServletResponse response)
throws ServletException, IOException {


}- 从request中获取所有的Cookie并遍历Cookie数组
Cookie[] cookies = request.getCookies();
String username = null;
String password =null;
if (cookies!=null){


    for(Cookie cookie:cookies){


        String cookieName = cookie.getName();
        String cookieValue = cookie.getValue();
        if ("username".equals(cookieName)){


            username = cookieValue;
        }else if ("password".equals(cookieName)){


            password = cookieValue;
        }
    }
}- 第二步:若通过Cookie对象获取到的username和password不为空,JDBC连接数据库验证用户名和密码。如果验证正确则跳转到成功页面,如果Cookie获取到的username和password为空则跳转到登录页面。
if (username != null && password != null){


    //JDBC连接数据库验证用户名和密码
    Connection conn = null;
    PreparedStatement ps = null;
    ResultSet rs = null;
    boolean loginSuccess = false;
    String realName = null;
    try {


        Class.forName("com.mysql.jdbc.Driver");
        conn = DriverManager.getConnection("jdbc:mysql://localhost:3306/test","hcz","");
        String sql = "select id,username,password,realname from  t_user2 where username=? and password=?";
        ps = conn.prepareStatement(sql);
        ps.setString(1,username);//将username添加到第一个❓处
        ps.setString(2,password);//将password添加到第二个❓处
        rs = ps.executeQuery();
        if (rs.next()){


            loginSuccess = true;
            realName = rs.getString("realname");
        }
    } catch (Exception e) {


        e.printStackTrace();
    }finally{


        if(rs != null){


            try {


                rs.close();
            } catch (SQLException e) {


                e.printStackTrace();
            }
        }
        if(ps != null){


            try {


                ps.close();
            } catch (SQLException e) {


                e.printStackTrace();
            }
        }
        if(conn != null){


            try {


                conn.close();
            } catch (SQLException e) {


                e.printStackTrace();
            }
        }
    }
    //判断用户是否登陆成功
    if (loginSuccess){


        //登录成功跳转到成功页面
        response.setContentType("text/html;charset=UTF-8");
        PrintWriter out = response.getWriter();
        out.print("<html>");
        out.print("<head>");
        out.print("<title>欢迎页面</title>");
        out.print("</head>");
        out.print("<body>");
        out.print("欢迎");
        out.print(realName);
        out.print("访问");
        out.print("</body>");
        out.print("</html>");
    }else {


        //登录失败跳转到失败页面
        response.sendRedirect(request.getContextPath() + "/login_error.html");
    }
}else {


    //跳转到登陆页面
    response.sendRedirect(request.getContextPath()+"/login.html");
}- 第三步:这里的登录页面为login.html:
<!DOCTYPE html>
<html lang="en">
<head>
<meta charset="UTF-8">
<title>登录页面</title>
<link href="admin_login.css" rel="stylesheet" type="text/css" />
</head>
<body>
<div class="admin_login_wrap">
<h1 align="center">登录管理</h1>
<div class="adming_login_border">
<div class="admin_input">
<form action="/hcz20/login" method="post">
<ul class="admin_items">
<li>
<label for="user">用户名:</label>
<input type="text" name="username" id="user" size="40" class="admin_input_style" />
</li>
<li>
<label for="pwd">密码:</label>
<input type="password" name="password" id="pwd" size="40" class="admin_input_style" />
</li>
<li>
<input type="checkbox" name="tenDayAutoLoginFlag" value="ok">十天内免登录
</li>
<li>
<input type="submit" tabindex="3" value="登录" class="btn btn-primary" />
</li>
</ul>
</form>
</div>
</div>
<p class="admin_copyright"><a tabindex="5" href="#">返回首页</a> © 2020 Powered by <a href="http://jscss.me" target="_blank">有主机上线</a></p>
</div>
</body>
</html>
- 第四步:当点击登录按钮时则跳转到/hcz20/login路径指定下的LoginServlet.java类来判断是否登录成功,这个类同样继承HttpServlet接口,当因为登录页面method=“post”,所以要重写doPost方法:
@Override
protected void doPost(HttpServletRequest request, HttpServletResponse response) throws ServletException, IOException {


}
- 设置编码格式和获取用户名和密码
request.setCharacterEncoding("UTF-8");//是设置从request中取得的值或从数据库中取出的值
response.setContentType("text/html;charset=UTF-8");//是设置页面中为中文编码
String username = request.getParameter("username");
String password = request.getParameter("password");- JDBC连接数据库验证用户名和密码
Connection conn = null;
PreparedStatement ps = null;
ResultSet rs = null;
boolean loginSuccess = false;//登录成功的标记
String realName = null;

try {


    Class.forName("com.mysql.jdbc.Driver");
    conn = DriverManager.getConnection("jdbc:mysql://localhost:3306/test","hcz","");
    String sql = "select id,username,password,realname from  t_user2 where username=? and password=?";
    ps = conn.prepareStatement(sql);
    ps.setString(1,username);//将username添加到第一个❓处
    ps.setString(2,password);//将password添加到第二个❓处
    rs = ps.executeQuery();//把数据库响应的查询结果存放在ResultSet类对象中供使用
    if (rs.next()){


        loginSuccess = true;
        realName = rs.getString("realname");
    }
} catch (Exception e) {


    e.printStackTrace();
}finally{


    if(rs != null){


        try {


            rs.close();
        } catch (SQLException e) {


            e.printStackTrace();
        }
    }
    if(ps != null){


        try {


            ps.close();
        } catch (SQLException e) {


            e.printStackTrace();
        }
    }
    if(conn != null){


        try {


            conn.close();
        } catch (SQLException e) {


            e.printStackTrace();
        }
    }
}- 第五步:判断用户是否登录成功,若登录成功后,获取用户是否选择 了十天免登录选项。登录成功跳转到成功页面,登录失败跳转到失败页面。
String tenDayAutoLoginFlag = request.getParameter("tenDayAutoLoginFlag");
if ("ok".equals(tenDayAutoLoginFlag)){


    //创建Cookie对象
    Cookie cookie1 = new Cookie("username",username);
    Cookie cookie2 = new Cookie("password",password);
    //设置有效时间--->10天
    cookie1.setMaxAge(60 * 60 * 24 * 10);
    cookie2.setMaxAge(60 * 60 * 24 * 10);
    //设置关联路径
    cookie1.setPath(request.getContextPath());
    cookie2.setPath(request.getContextPath());
    //发送Cookie给浏览器
    response.addCookie(cookie1);
    response.addCookie(cookie2);
}- 第六步:这里登录失败页面为login _error.html,其中里面的超链接为返回到登录页面:
<body>
    登录失败,用户名不存在或者密码错误,请<a href="/hcz20/login.html">重新登录</a>
</body>
注意:十天内免登录完整代码可到个人博客资料下载里面下载
扫描二维码关注公众号,回复: 12236553 查看本文章