一、环境准备
操作系统 :CentOS 6.5 、7
数据库版本:MySQL 5.6.27
主机A:192.168.206.130 (Master)
主机B:192.168.206.131 (Slave)
主机C:192.168.206.128 (Slave)
这里强调的数据库的版本,是因为MySQL在5.6之前和之后的安装方式是不一样的。
在进行配置的时候,也遇到了这个坑,这里提前说明,希望大家不要采坑。
二、数据库安装
见:http://blog.csdn.net/fclwd/article/details/78196638
三、基本环境配置
首先,要保证防火墙对3306端口的开启,只是为了学习数据库的主从配置,可以使用service iptables stop 命令直接关闭防火墙
然后可以在两台机子和主机A之间进行 ping操作,并确保3306接口可以访问
四、主库(Master)配置
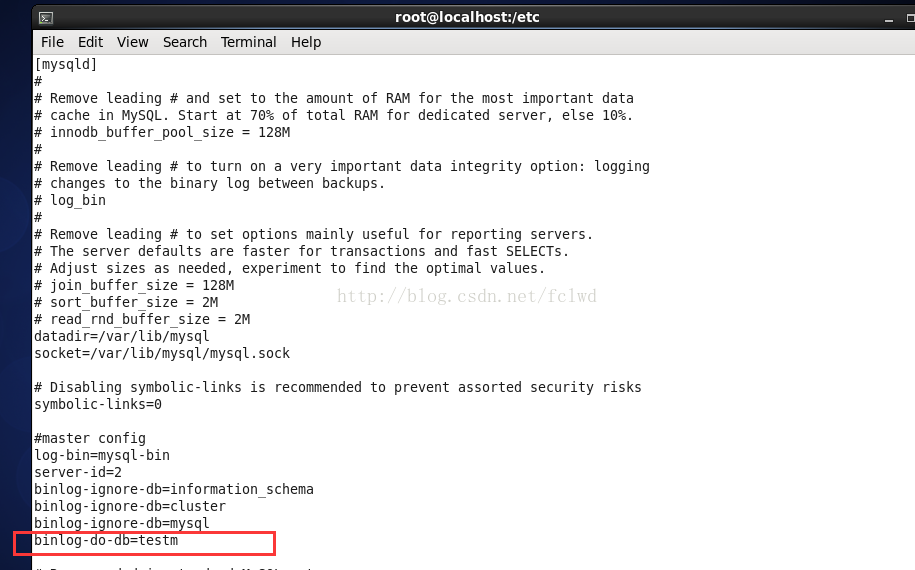
在Linux环境下MySQL的配置文件的位置是在 /etc/my.cnf ,在该文件下指定Master的配置如下:
log-bin=mysql-bin
server-id=2
binlog-ignore-db=information_schema
binlog-ignore-db=cluster
binlog-ignore-db=mysql
binlog-do-db=testm
这里的server-id用于标识唯一的数据库,这里设置为2,在设置从库的时候就需要设置为其他值。
binlog-ignore-db:表示同步的时候ignore的数据库
binlog-do-db:指定需要同步的数据库,这里实用testm数据库
配置截图:
1、然后重启mysql:service mysqld restart
2、进入mysql:[root@localhost ~]# mysql -u root -p 回车,输入mysql密码进入。
3、 赋予从库权限帐号,允许用户在主库上读取日志,赋予192.168.206.%也就是Slave机器有File权限,只赋予Slave机器有File权限还不行,
还要给它REPLICATION SLAVE的权限才可以。
在Master数据库命令行中输入:
GRANT FILE ON *.* TO 'root'@'192.168.206.%' IDENTIFIED BY 'mysql password';
GRANT REPLICATION SLAVE ON *.* TO 'root'@'%' IDENTIFIED BY 'mysql password';
FLUSH PRIVILEGES;
这里使用的仍是 root 用户作为同步的时候使用到的用户,可以自己设定。
4、重启mysql,登录mysql,显示主库信息
+------------------+----------+--------------+----------------------------------+-------------------+
| File | Position | Binlog_Do_DB | Binlog_Ignore_DB | Executed_Gtid_Set |
+------------------+----------+--------------+----------------------------------+-------------------+
| mysql-bin.000002 | 120 | testm | information_schema,cluster,mysql | |
+------------------+----------+--------------+----------------------------------+-------------------+
这里的 File 、Position 是在配置Salve的时候要使用到的,Binlog_Do_DB表示要同步的数据库,Binlog_Ignore_DB 表示Ignore的数据库,这些都是在配置的时候进行指定的。
另外:如果执行这个步骤始终为Empty set(0.00 sec),那说明前面的my.cnf没配置对。
五、从库(slave)配置
我们只说其中一台服务器
1、从库的配置,首先也是修改配置文件:/etc/my.cnf 如下:
log-bin=mysql-bin
server-id=3
binlog-ignore-db=information_schema
binlog-ignore-db=cluster
binlog-ignore-db=mysql
replicate-do-db=testm
replicate-ignore-db=mysql
log-slave-updates
slave-skip-errors=all
slave-net-timeout=60
2、这里可以看到,在MySQL5.6之后的版本中没有指定:
master-host=192.168.206.130 #Master的主机IP
master-user=root
master-password=mysql password #Master的MySQL密码
3、这也是在网上很多搜索的配置过程,他们也都指定了数据库的版本,但是并没有说出来新版本的配置这种方式是不适用的。
4、如果,你在MySQL5.6和之后的版本中配置从库的时候,设置到了上边的内容,即指定了master-host、master-user等信息的话,
重启MySQL的时候就回报错,错误信息如下:
[root@localhost bin]# service mysqld restart
Shutting down MySQL... SUCCESS!
Starting MySQL... ERROR! The server quit without updating PID file (/data/mysqldb/localhost.pid).
[root@localhost bin]#
此时,查看数据库的报错信息(数据库的目录, /data/mysqldb/localhost.err ),可以看到:
2016-05-06 13:12:04 13345 [Note] InnoDB: Waiting for purge to start
2016-05-06 13:12:04 13345 [Note] InnoDB: 5.6.27 started; log sequence number 2850211
2016-05-06 13:12:04 13345 [ERROR] /data/home/server/mysql-5.6.27/bin/mysqld: unknown variable 'master-host=192.168.206.130'
2016-05-06 13:12:04 13345 [ERROR] Aborting
可以看出master-host 被检测数是一个未知的变量,因此会出现错误。
5、在5.6以及后续版本的配置如下:
修改完/etc/my.cnf 文件之后,重启一下MySQL(service mysqld restart)
进入Slave mysql控制台,执行:
mysql> stop slave; #关闭Slave
mysql> change master to master_host='192.168.206.130',master_user='root',master_password='123456',master_log_file='mysql-bin.000002', master_log_pos=120;
mysql> start slave; #开启Slave
在这里指定Master的信息,master_log_file是在配置Master的时候的File选项, master_log_pos是在配置Master的Position 选项,这里要进行对应。
然后可以通过mysql> show slave status; 查看配置的信息:
ysql> show slave status \G;
*************************** 1. row ***************************
               Slave_IO_State: Waiting for master to send event
                  Master_Host: 192.168.206.130
                  Master_User: root
                  Master_Port: 3306
                Connect_Retry: 60
              Master_Log_File: mysql-bin.000005
          Read_Master_Log_Pos: 1751
               Relay_Log_File: mysqld-relay-bin.000010
                Relay_Log_Pos: 1914
        Relay_Master_Log_File: mysql-bin.000005
             Slave_IO_Running: Yes
            Slave_SQL_Running: Yes
              Replicate_Do_DB: testm
          Replicate_Ignore_DB: mysql
           Replicate_Do_Table:
       Replicate_Ignore_Table:
      Replicate_Wild_Do_Table:
  Replicate_Wild_Ignore_Table:
                   Last_Errno: 0
                   Last_Error:
                 Skip_Counter: 0
          Exec_Master_Log_Pos: 1751
              Relay_Log_Space: 2251
              Until_Condition: None
               Until_Log_File:
                Until_Log_Pos: 0
           Master_SSL_Allowed: No
           Master_SSL_CA_File:
           Master_SSL_CA_Path:
              Master_SSL_Cert:
            Master_SSL_Cipher:
               Master_SSL_Key:
        Seconds_Behind_Master: 0
Master_SSL_Verify_Server_Cert: No
                Last_IO_Errno: 0
                Last_IO_Error:
               Last_SQL_Errno: 0
               Last_SQL_Error:
  Replicate_Ignore_Server_Ids:
             Master_Server_Id: 2
                  Master_UUID: e7ee3bab-adb5-11e7-84ee-000c29a6926f
             Master_Info_File: /var/lib/mysql/master.info
                    SQL_Delay: 0
          SQL_Remaining_Delay: NULL
      Slave_SQL_Running_State: Slave has read all relay log; waiting for the slave I/O thread to update it
           Master_Retry_Count: 86400
                  Master_Bind:
      Last_IO_Error_Timestamp:
     Last_SQL_Error_Timestamp:
               Master_SSL_Crl:
           Master_SSL_Crlpath:
           Retrieved_Gtid_Set:
            Executed_Gtid_Set:
                Auto_Position: 0
六、测试
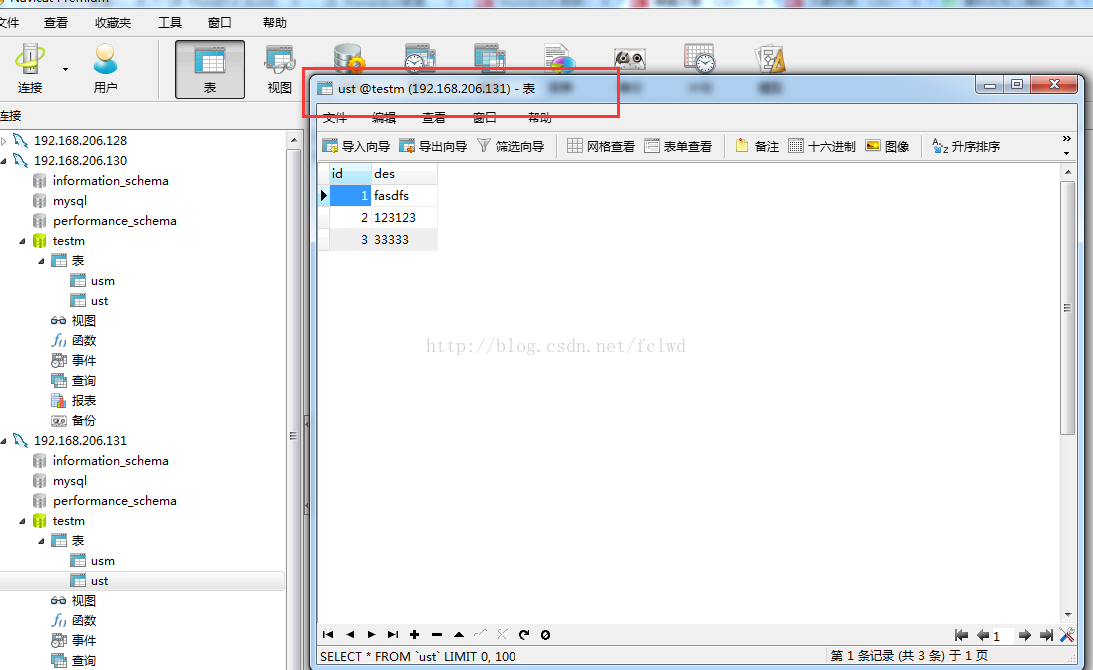
1、在主库和从库分别新建数据库,名称一致,然后再主库,新建表ust,并且新建数据。下为主库数据:
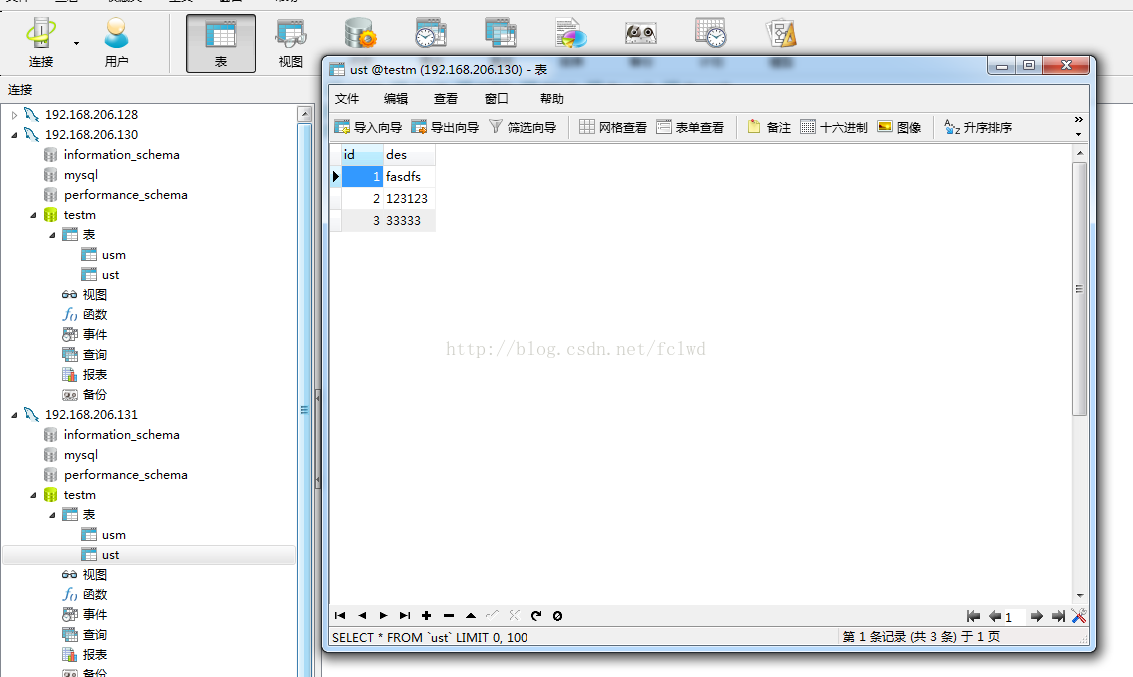
2、连接从库,查看testm数据库,能看到在主库新建的表和数据
配置过程,到此为止,希望能够帮助大家