针对SpringSecurity就不进行介绍了,功能强大,与shiro一样都能实现权限系统实现。
这里先介绍一下实验项目的背景:
一、Web项目系统实现前后端分离,前端页面上CRUD按钮,需要前端根据用户返回的权限属性实现按钮的可用或不可用(显示或不显示都可以)。
二、后端使用SpringSecurity实现接口API权限的判断,比如用户1请求了一个url:/hello 如果这个用户没有权限则后端系统直接返回json格式提醒权限不足。
三、用户的权限及菜单都是数据库中设置,系统动态判断权限。
项目采用SpringBoot2.3.3+SpringSecurity+Mbatis实现
先引入bom.xml
<?xml version="1.0" encoding="UTF-8"?>
<project xmlns="http://maven.apache.org/POM/4.0.0" xmlns:xsi="http://www.w3.org/2001/XMLSchema-instance"
         xsi:schemaLocation="http://maven.apache.org/POM/4.0.0 https://maven.apache.org/xsd/maven-4.0.0.xsd">
    <modelVersion>4.0.0</modelVersion>
    <parent>
        <groupId>org.springframework.boot</groupId>
        <artifactId>spring-boot-starter-parent</artifactId>
        <version>2.3.1.RELEASE</version>
        <relativePath/> <!-- lookup parent from repository -->
    </parent>
    <groupId>com.example</groupId>
    <artifactId>testsecurity</artifactId>
    <version>0.0.1-SNAPSHOT</version>
    <name>testsecurity</name>
    <description>Demo project for Spring Boot</description>

    <properties>
        <java.version>1.8</java.version>
    </properties>

    <dependencies>
        <dependency>
            <groupId>org.springframework.boot</groupId>
            <artifactId>spring-boot-starter-security</artifactId>
            <exclusions>
                <exclusion>
                    <artifactId>spring-boot-starter-logging</artifactId>
                    <groupId>org.springframework.boot</groupId>
                </exclusion>
            </exclusions>
        </dependency>
        <dependency>
            <groupId>org.springframework.boot</groupId>
            <artifactId>spring-boot-starter-thymeleaf</artifactId>
        </dependency>
        <!-- 需要单独添加thymeleaf的布局模块 -->
        <dependency>
            <groupId>nz.net.ultraq.thymeleaf</groupId>
            <artifactId>thymeleaf-layout-dialect</artifactId>
        </dependency>
        <dependency>
            <groupId>org.springframework.boot</groupId>
            <artifactId>spring-boot-starter-web</artifactId>
        </dependency>
        <dependency>
            <groupId>org.mybatis.spring.boot</groupId>
            <artifactId>mybatis-spring-boot-starter</artifactId>
            <version>2.1.3</version>
        </dependency>

        <dependency>
            <groupId>org.springframework.boot</groupId>
            <artifactId>spring-boot-devtools</artifactId>
            <scope>runtime</scope>
            <optional>true</optional>
        </dependency>
        <dependency>
            <groupId>mysql</groupId>
            <artifactId>mysql-connector-java</artifactId>
        </dependency>
        <dependency>
            <groupId>org.projectlombok</groupId>
            <artifactId>lombok</artifactId>
            <optional>true</optional>
        </dependency>
        <dependency>
            <groupId>org.springframework.boot</groupId>
            <artifactId>spring-boot-starter-test</artifactId>
            <scope>test</scope>
            <exclusions>
                <exclusion>
                    <groupId>org.junit.vintage</groupId>
                    <artifactId>junit-vintage-engine</artifactId>
                </exclusion>
            </exclusions>
        </dependency>
        <dependency>
            <groupId>org.springframework.security</groupId>
            <artifactId>spring-security-test</artifactId>
            <scope>test</scope>
        </dependency>
        <dependency>
            <groupId>org.springframework.boot</groupId>
            <artifactId>spring-boot-starter-log4j2</artifactId>
        </dependency>
        <dependency>
            <groupId>org.apache.commons</groupId>
            <artifactId>commons-lang3</artifactId>
            <version>3.10</version>
        </dependency>
        <dependency>
            <groupId>org.mybatis.generator</groupId>
            <artifactId>mybatis-generator-core</artifactId>
            <version>1.4.0</version>
        </dependency>
    </dependencies>

    <build>
        <plugins>
            <plugin>
                <groupId>org.springframework.boot</groupId>
                <artifactId>spring-boot-maven-plugin</artifactId>
            </plugin>
            <!--mybatis逆向工程maven插件-->
            <plugin>
                <groupId>org.mybatis.generator</groupId>
                <artifactId>mybatis-generator-maven-plugin</artifactId>
                <version>1.4.0</version>
                <configuration>
                    <!--允许移动生成的文件-->
                    <verbose>true</verbose>
                    <!--允许覆盖生成的文件-->
                    <overwrite>true</overwrite>
                    <!--配置文件的路径 默认resources目录下-->
                    <configurationFile>src/main/resources/generatorConfig.xml</configurationFile>
                </configuration>
                <!--插件依赖的jar包-->
                <dependencies>
                    <dependency>
                        <groupId>mysql</groupId>
                        <artifactId>mysql-connector-java</artifactId>
                        <version>8.0.20</version>
                    </dependency>
                </dependencies>
            </plugin>
        </plugins>
    </build>

</project>
通过依赖引入可以看出,我使用了log4j2替代springboot2默认的logback,记得自己添加log4j2的配置文件。
通过idea添加lombok插件及依赖中引入lombok,实现在类中使用lombok规则简化代码编写(@Slf4j等注解的使用),对lombok没有了解的朋友自行百度。
原理简介
先上一张权限模块数据库设计图,其中关键三张表用户、角色及菜单权限
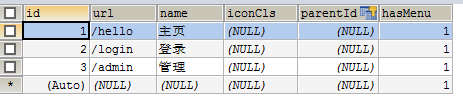
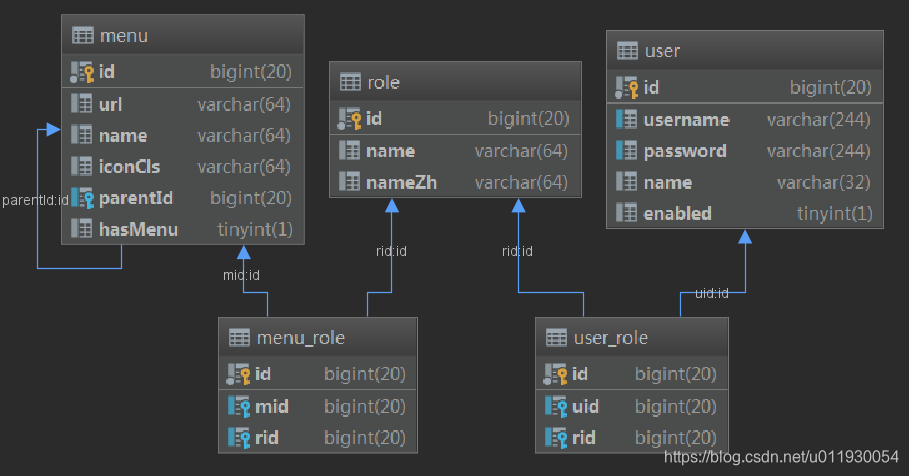 上图中menu菜单url属性代表菜单在项目中的ServletPath路径。比如访问地址:http://localhost:8080/hello与http://localhost:8080/hello?name=test的ServletPath路径都为/hello。下图为meun表中录入的测试数据
 role表是角色表,它与menu表有一个中间表menu_role进行关联。
这里需要强调一点,role表中name属性填写必须是ROLE_角色名的形式,由SpringSecurity的hasRole()源码中可以看出来,这里记住数据库中的角色总是要添加“ROLE”前缀,否则出错。
将数据库表进行业务实体的抽象,需要对应出三个实体类,分别是Role、User、Menu三个类,其中Menu类要有一个roles的集合用来封装当前菜单所属的所有角色实例。User类也要有一个roles的集合用来封装当前用户所拥有的所有角色集合。
SpringSecurity实现权限判断的原理就是在用户登录时,将用户所拥有的roles封装成用户拥有的GrantedAuthority资源(就是角色的名称)集合,所以用户类必须实现接口UserDetails,实现接口要求的方法。
当用户请求服务器API时,利用过滤器拦截请求路径,利用请求路径读取出对应的菜单,然后获取当前菜单所拥有的roles,将权限封装成GrantedAuthority资源(就是角色的名称)集合,然后将用户与请求菜单的GrantedAuthority资源进行对比,如果存在则放行,不存在则抛出异常。
上面原理中主要涉及到四个接口两个类:
其他涉及的接口及类将会在讲解下述内容是一点点引入。
接口
1、UserDetails
2、UserDetailsService
3、FilterInvocationSecurityMetadataSource
4、AccessDecisionManager
类
1、WebSecurityConfigurerAdapter
2、HttpSecurity
首先介绍UserDetails接口,源码为
```java
package org.springframework.security.core.userdetails;

import java.io.Serializable;
import java.util.Collection;
import org.springframework.security.core.GrantedAuthority;

public interface UserDetails extends Serializable {


    Collection<? extends GrantedAuthority> getAuthorities();

    String getPassword();

    String getUsername();
	//账户是否在有效期内,未过期返回true
    boolean isAccountNonExpired();
    //账户是否被锁,未锁返回true
    boolean isAccountNonLocked();
    //账户凭证是否过期,未过期直接返回true
    boolean isCredentialsNonExpired();
    //账户是否可用,可用返回true
    boolean isEnabled();
}
UserDetails接口需要用户类实现,用户的账户在String getUsername();方法中返回,用户的密码在String getPassword();方法中返回。账户所拥有的授权也就是当前用户所拥有的的角色名称需要包装成GrantedAuthority对象,然后在Collection<? extends GrantedAuthority> getAuthorities();方法中返回。
下面实现UserDetails接口的实现类User,User类与数据库user表对应:
public class User implements Serializable, UserDetails {


    private Long id;
    private String username;
    private String password;
    private String name;
    private Boolean enabled;
    //当前用户所拥有的的Role角色集合
    private List<Role> roles;
    public List<Role> getRoles() {


        return roles;
    }
    public void setRoles(List<Role> roles) {


        this.roles = roles;
    }
    private static final long serialVersionUID = 1L;
    public Long getId() {


        return id;
    }
    public void setId(Long id) {


        this.id = id;
    }
    public String getUsername() {


        return username;
    }
    @Override
    public boolean isAccountNonExpired() {


        return true;
    }
    @Override
    public boolean isAccountNonLocked() {


        return true;
    }
    @Override
    public boolean isCredentialsNonExpired() {


        return true;
    }
    @Override
    public boolean isEnabled() {


        return enabled;
    }
    public void setUsername(String username) {


        this.username = username == null ? null : username.trim();
    }
    //将当前账户的所属角色进行配置
    @Override
    public Collection<? extends GrantedAuthority> getAuthorities() {


        List<GrantedAuthority> list=new ArrayList<>();
        //将当前用户的配属角色填入集合
        Assert.notNull(roles,"角色集合为null");
        for (Role r:roles){


            //将当前账户拥有的role封装成GrantedAuthority集合
            //SimpleGrantedAuthority类是SpringSecurity给出的GrantedAuthority接口的简单实现。GrantedAuthority就是对Role角色名称进行封装
            list.add(new SimpleGrantedAuthority(r.getName()));
        }
        return list.size()>0?list:null;
    }
    public String getPassword() {


        return password;
    }
    public void setPassword(String password) {


        this.password = password == null ? null : password.trim();
    }
    public String getName() {


        return name;
    }
    public void setName(String name) {


        this.name = name == null ? null : name.trim();
    }
    public Boolean getEnabled() {


        return enabled;
    }
    public void setEnabled(Boolean enabled) {


        this.enabled = enabled;
    }

    @Override
    public String toString() {


        StringBuilder sb = new StringBuilder();
        sb.append(getClass().getSimpleName());
        sb.append(" [");
        sb.append("Hash = ").append(hashCode());
        sb.append(", id=").append(id);
        sb.append(", username=").append(username);
        sb.append(", password=").append(password);
        sb.append(", name=").append(name);
        sb.append(", enabled=").append(enabled);
        sb.append("]");
        return sb.toString();
    }
UserDetailsService接口作用顾名思义是处理UserDetails接口的
先看UserDetailsService接口源码
package org.springframework.security.core.userdetails;

public interface UserDetailsService {


    UserDetails loadUserByUsername(String username) throws UsernameNotFoundException;
}
通过源码可以看出UserDetailsService接口,只有一个方法loadUserByUsername,入参是用户名,返回值是UserDetails接口类型。
loadUserByUsername方法的作用就是通过传入的用户名从数据库中读取账户信息,如果账户不存在则抛出UsernameNotFoundException异常,存在则将账户信息包装成UserDetails返回,如果账户类实现UserDetails接口,可以直接返回。
另需要注意SpringSecurity针对UserDetails中密码的加密及验证是通过PasswordEncoder接口进行的,需要开发者提供PasswordEncoder接口的实现类。提供方式有两种在SpringBoot2.3以上直接在配置文件中用@Bean声明,spring容器自动加入管理。或者@Bean声明后,在WebSecurityConfigurerAdapter扩展配置类中用下面代码进行添加
        @Autowired
	    public void configureGlobal(AuthenticationManagerBuilder auth)
	      throws Exception {


	        auth.userDetailsService(UserDetailService)
                .passwordEncoder(new BCryptPasswordEncoder());
	    }
这个原理需要记住,后面贴系统实现代码时不做太多解释了。
注意:
loadUserByUsername方法中返回的UserDetails的密码是明文的系统会报错,需要使用PasswordEncoder接口实现类进行加密。
这里在回顾一下,一个账户类,需要实现UserDetails接口来约定如何获得授权资源。然后通过UserDetailsService接口的loadUserByUsername方法来从数据库中读取账户类,如果密码是明文的需要使用PasswordEncoder进行加密,然后返回UserDetails类型账户类。如果账户不存在则返回UsernameNotFoundException异常。
下面贴出UserDetailsService接口的实现类:
@Component
@Slf4j
public class UserDetailService implements UserDetailsService {


    @Autowired
    UserMapper customerMapper;
    @Override
    @Transactional("firstTransactionManager")
    public UserDetails loadUserByUsername(String username) throws UsernameNotFoundException {


        log.info("登录账号:{}",username);
        //数据库读取账户,如果查询出的账户密码时明文的需要用passwordEncoder进行加密,注入passwordEncoder,然后调用passwordEncoder.encode()加密
        User cust=customerMapper.selectByUserNameContainsRoles(username);
        if(cust==null)
            throw new UsernameNotFoundException("账户不存在");
        return cust;
    }
}
由于数据库中针对密码已经使用MD5加密了,在loadUserByUsername中就没有使用passwordEncoder.encode()加密。PasswordEncoder如何注入和实现放在WebSecurityConfigurerAdapter配置实现类处讲解。
至此,关于用户类的系统约定已经实现,但SpringSecurity要正常运作需要先进行配置。
下面先讲解WebSecurityConfigurerAdapter类的作用
新建WebSecutiryConfig 类扩展WebSecurityConfigurerAdapter类,实现web项目中SpringSecurity启用。并在新建的WebSecutiryConfig 类上增加注解:
@EnableWebSecurity//开启配置,该注解已经实现了@Configuration,所以类上无需再添加@Configuration注解
@EnableGlobalMethodSecurity(prePostEnabled = true)//开启Spring方法级安全作用可以自行百度
下面贴出WebSecutiryConfig 类代码
/**
 * @author MaLei
 * @description: 新建一个WebSecurityConfig类,使其继 承WebSecurityConfigurerAdapter
 * 在给WebSecutiryConfig类中加上@EnableWebSecurity 注解后,便会自动被 Spring发现并注册(查看
 * @EnableWebSecurity 即可看到@Configuration 注解已经存在
 * @create 2020/7/14
 */
@EnableWebSecurity
@EnableGlobalMethodSecurity(prePostEnabled = true)
public class WebSecutiryConfig extends WebSecurityConfigurerAdapter {


    @Autowired
    CustomMetadataSource metadataSource;
    @Autowired
    UrlAccessDecisionManager urlAccessDecisionManager;
    //认证管理器配置方法可以配置定定义的UserDetailService和passwordEncoder。无需配置springboot2.3会自动注入bean
   /* @Override
    protected void configure(AuthenticationManagerBuilder auth) throws Exception {
    //userDetailService需要注入
        auth.userDetailsService(userDetailService)
        //MD5PasswordEncoder是自己实现的PasswordEncoder
                .passwordEncoder(new MD5PasswordEncoder());
    }*/
    /*
    //也可以用此种方式注入相关的用户服务及密码验证器
       @Autowired
	    public void configureGlobal(AuthenticationManagerBuilder auth)
	      throws Exception {
	      //userDetailService需要注入
	        auth.userDetailsService(userDetailService)
	        //BCryptPasswordEncoder()系统给出的实现
                .passwordEncoder(new BCryptPasswordEncoder());
	    }
     */
    //核心过滤器配置方法
    //void configure(WebSecurity web)用来配置 WebSecurity。而 WebSecurity是基于 Servlet Filter用来配置 springSecurityFilterChain。而 springSecurityFilterChain又被委托给了 Spring Security 核心过滤器 Bean DelegatingFilterProxy。  相关逻辑你可以在 WebSecurityConfiguration中找到。一般不会过多来自定义 WebSecurity, 使用较多的使其ignoring()方法用来忽略Spring Security对静态资源的控制.对于静态资源的忽略尽量在此处设置,否则容易无限循环重新定向到登录页面
    @Override
    public void configure(WebSecurity web) throws Exception {


        web.ignoring().antMatchers("/static/**", "/mylogin.html", "/favicon.ico");
}

    //安全过滤器链配置方法
    //void configure(HttpSecurity http)这个是我们使用最多的,用来配置 HttpSecurity。 HttpSecurity用于构建一个安全过滤器链 SecurityFilterChain。SecurityFilterChain最终被注入核心过滤器 。 HttpSecurity有许多我们需要的配置。我们可以通过它来进行自定义安全访问策略
    @Override
    protected void configure(HttpSecurity http) throws Exception {


       // super.configure(http); 不能使用默认的验证方式
        //authorizeRequests()方法实际上返回了一个 URL 拦截注册器,我们可以调用它提供的
        //anyanyRequest()、antMatchers()和regexMatchers()等方法来匹配系统的URL,并为其指定安全策略
        //允许基于使用HttpServletRequest限制访问
       http.authorizeRequests()
       //表示任何请求只要验证之后都可以访问
                .anyRequest().authenticated()
       //设置后置处理程序对象,将metadataSource与urlAccessDecisionManager进行注册
                .withObjectPostProcessor(new ObjectPostProcessor<FilterSecurityInterceptor>(){


           @Override
           public <O extends FilterSecurityInterceptor> O postProcess(O o) {


               o.setSecurityMetadataSource(metadataSource);
               o.setAccessDecisionManager(urlAccessDecisionManager);
               return o;
           }
       })
                .and()
                //formLogin()方法和httpBasic()方法都声明了需要Spring Security提供的表单认证方式,分别返
                //使用登录界面进行登录
                .formLogin()
                //,formLogin().loginPage("/myLogin.html")指定自定义的登录
                //页myLogin.html,同时,Spring Security会用/myLogin.html注册一个POST路由,用于接收登录请求
               //loginProcessingUrl("/login")指定的/login必须与表单提交中指向的action一致
                   .loginPage("/mylogin.html").loginProcessingUrl("/logins").permitAll()
               //表单中用户名和密码对应参数设置(默认为username和password),如果是默认值则不用设置下面的参数对应.
               .usernameParameter("usernames").passwordParameter("passwords")
               //登录成功后跳转页面地址
               .successForwardUrl("/hello")
               //登录失败处理器
               .failureHandler(new AuthenticationFailureHandler() {


                   @Override
                   public void onAuthenticationFailure(HttpServletRequest httpServletRequest, HttpServletResponse httpServletResponse, AuthenticationException e) throws IOException, ServletException {


                       httpServletResponse.setContentType("application/json;charset=UTF-8");
                       httpServletResponse.setStatus(403);
                       String error=new String();
                       if (e instanceof BadCredentialsException ||
                               e instanceof UsernameNotFoundException) {


                           error="账户名或者密码输入错误!";
                       } else if (e instanceof LockedException) {


                           error="账户被锁定,请联系管理员!";
                       } else if (e instanceof CredentialsExpiredException) {


                           error="密码过期,请联系管理员!";
                       } else if (e instanceof AccountExpiredException) {


                           error="账户过期,请联系管理员!";
                       } else if (e instanceof DisabledException) {


                           error="账户被禁用,请联系管理员!";
                       } else {


                           error="登录失败!";
                       }
                       httpServletResponse.getWriter().write("{\"message\":\""+error+"\"}");
                   }
               })
               .and()
               //注销程序
               .logout()
               .logoutUrl("/logout")
               //注销成功处理程序
               .logoutSuccessHandler(new LogoutSuccessHandler() {


                   @Override
                   public void onLogoutSuccess(HttpServletRequest req, HttpServletResponse resp, Authentication authentication) throws IOException {


                       resp.setContentType("application/json;charset=utf-8");

                      @Cleanup PrintWriter out = resp.getWriter();
                       out.write("{\"msg\":\"注销成功!\"}");
                       out.flush();
                      // out.close();
                   }
               })
               .permitAll()
                .and()
                //csrf()方法是Spring Security提供的跨站请求伪造防护功能,当我们继承WebSecurityConfigurer
                //Adapter时会默认开启csrf()方法。此处关闭跨域攻击
                .csrf().disable()
               //只有确实的访问失败才会进入AccessDeniedHandler,如果是未登陆或者会话超时等,不会触发AccessDeniedHandler,而是会直接跳转到登陆页面
       .exceptionHandling().accessDeniedHandler(new AccessDeniedHandler() {


           @Override
           public void handle(HttpServletRequest httpServletRequest, HttpServletResponse httpServletResponse, AccessDeniedException e) throws IOException, ServletException {


               httpServletResponse.setStatus(HttpServletResponse.SC_FORBIDDEN);
               httpServletResponse.setContentType("application/json;charset=UTF-8");
               PrintWriter out = httpServletResponse.getWriter();
               out.write(new ObjectMapper().writeValueAsString("{\"message\":\"权限不足,请联系管理员!\"}"));
               out.flush();
               out.close();
           }
       });

    }
    /**
     * 增加密码加密器,一旦增加,在验证过程中security将使用密码加密器进行加密对比,数据库中如果存储明文密码,在
     * UserDetailsService接口实现方法中,先加密密码然后才能返回UserDetails
     * @return
     */
    @Bean
    PasswordEncoder passwordEncoder(){


      //  return new BCryptPasswordEncoder();
        return new MD5PasswordEncoder();
    }
}
在WebSecutiryConfig类的代码中可以看出,有三个重写的configure方法,这三个方法比较重要分别是:
1、 protected void configure(HttpSecurity http) throws Exception
安全过滤器链配置方法void configure(HttpSecurity http)这个是使用最多的,用来配置 HttpSecurity。 HttpSecurity用于构建一个安全过滤器链 SecurityFilterChain。SecurityFilterChain最终被注入核心过滤器 。 HttpSecurity有许多我们需要的配置。我们可以通过它来进行自定义安全访问策略。具体代码配置及含义请看代码中注释.
2、public void configure(WebSecurity web) throws Exception
核心过滤器配置方法void configure(WebSecurity web)用来配置 WebSecurity。而 WebSecurity是基于 Servlet Filter用来配置 springSecurityFilterChain。而 springSecurityFilterChain又被委托给了 Spring Security 核心过滤器 Bean DelegatingFilterProxy。 相关逻辑你可以在 WebSecurityConfiguration中找到。
一般不会过多来自定义 WebSecurity, 使用较多的使其ignoring()方法用来忽略Spring Security对静态资源的控制.对于静态资源的忽略尽量在此处设置,否则容易无限循环重新定向到登录页面。
代码web.ignoring().antMatchers("/static/**", "/mylogin.html", "/favicon.ico");就是实现对静态资源、登录页面及favicon.ico的请求进行忽视,无需进行权限认证。
3、protected void configure(AuthenticationManagerBuilder auth) throws Exception
用于配置获取用户信息、配置获取用户权限等等。此方法可以增加自定义的传入UserDetailsService及PasswordEncoder。但高版本的springboot回自己进行注入,将UserDetailsService实现类增加@Component将PasswordEncoder实现类在配置文件中用@Bean进行声明后,系统会自动注入,或者用下面代码写在配置文件中进行替代。
        @Autowired
	    public void configureGlobal(AuthenticationManagerBuilder auth)
	      throws Exception {


	        //userDetailService需要注入
	        auth.userDetailsService(userDetailService)
	        //BCryptPasswordEncoder()系统给出的实现
            .passwordEncoder(new BCryptPasswordEncoder());
	    }
接下来实现FilterInvocationSecurityMetadataSource接口及AccessDecisionManager接口。
两个接口的实现类的用处直接阅读代码中注释:
FilterInvocationSecurityMetadataSource接口实现类
/**
 * @author MaLei
 * @description: 通过URL地址获取相应权限然后在获取相应的角色集合
 * 配置securityMetadataSource,可以通过url来获取角色名称
 * 权限资源 SecurityMetadataSource
 *
 * 要实现动态的权限验证,当然要先有对应的访问权限资源了。Spring Security是通过SecurityMetadataSource来加载访问时所需要的具体权限,所以第一步需要实现SecurityMetadataSource。
 *
 * SecurityMetadataSource是一个接口,同时还有一个接口FilterInvocationSecurityMetadataSource继承于它,但FilterInvocationSecurityMetadataSource只是一个标识接口,对应于FilterInvocation,本身并无任何内容
 * 参考:https://www.ktanx.com/blog/p/4929
 * @create 2020/7/16
 */
@Component
@Transactional("firstTransactionManager")
public class CustomMetadataSource implements FilterInvocationSecurityMetadataSource {


    @Autowired
    MenuMapper menuService;
    //做uri匹配规则,它主要用来做类URLs字符串匹配;
    AntPathMatcher antPathMatcher = new AntPathMatcher();
    //获取某个受保护的安全对象object的所需要的权限信息,是一组ConfigAttribute对象的集合,如果该安全对象object不被当前SecurityMetadataSource对象支持,则抛出异常IllegalArgumentException。
    //该方法通常配合boolean supports(Class<?> clazz)一起使用,先使用boolean supports(Class<?> clazz)确保安全对象能被当前SecurityMetadataSource支持,然后再调用该方法。
    @Override
    public Collection<ConfigAttribute> getAttributes(Object o) {


        //通过Spring Security 封装,可以安全的拿到HttpServletRequest 和 HttpServletResponse对象
        String requestUrl = ((FilterInvocation) o).getRequest().getServletPath();
        //如果是登录页面则白名单放开
       /* if(StringUtils.equals(requestUrl,"/mylogin.html")){
            return null;
        }*/
       // List<Menu> allMenu = menuService.findAllMenu();
        Menu menu= menuService.selectByRequestUrl(requestUrl);
       // for (Menu menu : allMenu) {


            if (menu!=null&&antPathMatcher.match(menu.getUrl(), requestUrl)
                    &&menu.getRoles().size()>0) {


                List<Role> roles = menu.getRoles();
                int size = roles.size();
                String[] values = new String[size];
                for (int i = 0; i < size; i++) {


                    values[i] = roles.get(i).getName();
                }
                //这个SecurityConfig配置类就是为了保存 ConfigAttribute 而存在
                return SecurityConfig.createList(values);
            }
       // }
        //没有匹配上的资源,都是登录访问
        return SecurityConfig.createList("ROLE_LOGIN");
        //在上面的实现中如果没有匹配的url直接返回null,也就是没有配置权限的url默认都为白名单,想要换成默认是黑名单只要修改这里即可
        //return null;
    }
    //获取该SecurityMetadataSource对象中保存的针对所有安全对象的权限信息的集合。该方法的主要目的是被AbstractSecurityInterceptor用于启动时校验每个ConfigAttribute对象。
    @Override
    public Collection<ConfigAttribute> getAllConfigAttributes() {


        return null;
    }
    //这里clazz表示安全对象的类型,该方法用于告知调用者当前SecurityMetadataSource是否支持此类安全对象,只有支持的时候,才能对这类安全对象调用getAttributes方法。
    @Override
    public boolean supports(Class<?> aClass) {


        return FilterInvocation.class.isAssignableFrom(aClass);
    }
在上面的代码中可以看出来,主要实现了public Collection<ConfigAttribute> getAttributes(Object o)方法,该方法中负责根据请求路径来匹配所访问的请求菜单所具有的role权限。如果有匹配的权限直接返回,如果没有匹配的权限直接返回null的话,代表当前请求无需决策验证器进行验证直接可以访问,所以针对未授权的菜单访问权限不要直接返回null,而是虚设一个角色资源。
AccessDecisionManager接口实现类代码
**
 * @author MaLei
 * @description: 自定义配置决策器:roleAccessDecisionManager
 * 权限决策 AccessDecisionManager
 *
 * 有了权限资源CustomMetadataSource,知道了当前访问的url需要的具体权限,接下来就是决策当前的访问是否能通过权限验证了。
 *
 * 这需要通过实现自定义的AccessDecisionManager来实现
 * @create 2020/7/16
 */
@Component
public class UrlAccessDecisionManager implements AccessDecisionManager {


    //decide方法的三个参数中:
    //  authentication包含了当前的用户信息,包括拥有的权限。这里的权限来源就是前面登录时UserDetailsService中设置的authorities。
    //  object就是FilterInvocation对象,可以得到request等web资源。
    //  configAttributes是本次访问需要的权限。
    @Override
    public void decide(Authentication auth, Object o, Collection<ConfigAttribute> cas){


        Iterator<ConfigAttribute> iterator = cas.iterator();
        while (iterator.hasNext()) {


            if (auth == null) {


                throw new AccessDeniedException("当前访问没有权限");
            }
            ConfigAttribute ca = iterator.next();
            //当前请求需要的权限
            String needRole = ca.getAttribute();
            //当前用户所具有的权限
            Collection<? extends GrantedAuthority> authorities = auth.getAuthorities();
            for (GrantedAuthority authority : authorities) {


                if (authority.getAuthority().equals(needRole)) {


                    return;
                }
            }
        }
        throw new AccessDeniedException("权限不足!");
    }
    @Override
    public boolean supports(ConfigAttribute configAttribute) {


        return true;
    }
    @Override
    public boolean supports(Class<?> aClass) {


        return true;
    }
}
在方法public void decide(Authentication auth, Object o, Collection<ConfigAttribute> cas)中进行用户授权资源及求情路径所匹配的授权资源进行匹配,存在匹配则直接返回,不存在匹配代表认证失败,直接抛出异常。
最后将上述两个接口实现类,在配置类WebSecutiryConfig中的protected void configure(HttpSecurity http) throws Exception方法,使用后置处理器进行注册,代码如下:
代码片段,如需要请看上面WebSecutiryConfig配置类的代码。
protected void configure(HttpSecurity http) throws Exception {


       http.authorizeRequests()
                .anyRequest().authenticated() .withObjectPostProcessor(new ObjectPostProcessor<FilterSecurityInterceptor>(){


           @Override
           public <O extends FilterSecurityInterceptor> O postProcess(O o) {


               o.setSecurityMetadataSource(metadataSource);
               o.setAccessDecisionManager(urlAccessDecisionManager);
               return o;
           }
       })
                .and()
                ...
    }
配置类WebSecutiryConfig中使用@Bean引入的PasswordEncoder是使用的 MD5PasswordEncoder,这个类是自己实现的,也可以使用系统自带的BCryptPasswordEncoder,但是大多数系统都使用MD5加密码,这里贴出MD5PasswordEncoder的源代码。
/**
 * @author MaLei
 * @description: MD5加密
 * @create 2020/7/14
 */
public class MD5PasswordEncoder implements PasswordEncoder {


  //加密
    @Override
    public String encode(CharSequence charSequence) {


       //MD5Utils.getMD5方法是MD5加密
        return MD5Utils.getMD5(charSequence.toString());
    }
	//验证
    @Override
    public boolean matches(CharSequence charSequence, String s) {


        return !StringUtils.isNotEmpty(s)?false:StringUtils.equals(MD5Utils.getMD5(charSequence.toString()),s);
    }
}
至此一个SpringSecurity搭建的权限验证系统实现完毕。
下面说一下,当用户登录成功以后,如何获取用户登录账户;
public String hello(HttpSession session) {


        Object spring_security_context = session.getAttribute("SPRING_SECURITY_CONTEXT");
        SecurityContext securityContext = (SecurityContext) spring_security_context;
        //获得认证信息
        Authentication authentication = securityContext.getAuthentication();
        //获得用户详情
        Object principal = authentication.getPrincipal();
        User user = (User) principal;
        String username = user.getUsername()

        return username;
    }