基于上篇已安装好opencv库,现在开始创建第一个opencv工程,并编写显示图片的代码。
一、创建工程目录,并进入目录
$ mkdir example
$ cd example
从宏观来说,我们只要写两个文件,一项目源码文件,二编译文件。
源码文件:顾名思义,就是我们写 代码的cpp文件;
编译文件:用来编译整个工程,生成可执行文件。
二、创建cpp文件,编辑最简单示例代码
#include "opencv2/core.hpp"
#include "opencv2/imgproc.hpp"
#include "opencv2/highgui.hpp"
#include "opencv2/videoio.hpp"
#include <iostream>

using namespace cv;
using namespace std;


int main()
{
    cout << "Hello OpenCV " << CV_VERSION << endl;

    return 0;
}
三、创建CMakeLists.txt文件,编辑编译代码
1、首先看官方给出的CMakeLists.txt(上篇已提到这个文件),在opencv-3.4.0/samples/cpp/example_cmake路径下。
注释很详细,虽然这是编译opencv自带的一个例程,但具有很强的通用性,可作为教程使用。
# cmake needs this line
cmake_minimum_required(VERSION 2.8)

# Define project name
project(opencv_example_project)

# Find OpenCV, you may need to set OpenCV_DIR variable
# to the absolute path to the directory containing OpenCVConfig.cmake file
# via the command line or GUI
find_package(OpenCV REQUIRED)

# If the package has been found, several variables will
# be set, you can find the full list with descriptions
# in the OpenCVConfig.cmake file.
# Print some message showing some of them
message(STATUS "OpenCV library status:")
message(STATUS "    version: ${OpenCV_VERSION}")
message(STATUS "    libraries: ${OpenCV_LIBS}")
message(STATUS "    include path: ${OpenCV_INCLUDE_DIRS}")

if(CMAKE_VERSION VERSION_LESS "2.8.11")
  # Add OpenCV headers location to your include paths
  include_directories(${OpenCV_INCLUDE_DIRS})
endif()

# Declare the executable target built from your sources
add_executable(opencv_example example.cpp)

# Link your application with OpenCV libraries
target_link_libraries(opencv_example ${OpenCV_LIBS})
2、理解上面的代码,再取其精华,写成自己的CMakeLists.txt,就5行
# cmake needs this line 要求的最低版本
cmake_minimum_required(VERSION 2.8)

# Define project name 定义工程名
project(example_project)

# Find OpenCV, you may need to set OpenCV_DIR variable
# to the absolute path to the directory containing OpenCVConfig.cmake file
# via the command line or GUI 自动查找库
find_package(OpenCV REQUIRED)

# Declare the executable target built from your sources 声明可执行目标文件及源文件
add_executable(example example.cpp)	# 目标文件,源文件0,源文件1,...

# Link your application with OpenCV libraries 将目标文件与库链接
target_link_libraries(example ${OpenCV_LIBS})	# 目标文件,库路径
可能会有疑问:这个文件是什么鬼?
其实这个是cmake的编译文件,主要目的是生成Makefile,然后就可以用make来编译工程啦。
3、换行编译命令,生成Makefile
$ cmake .
编译成功,则会生成多个文件:
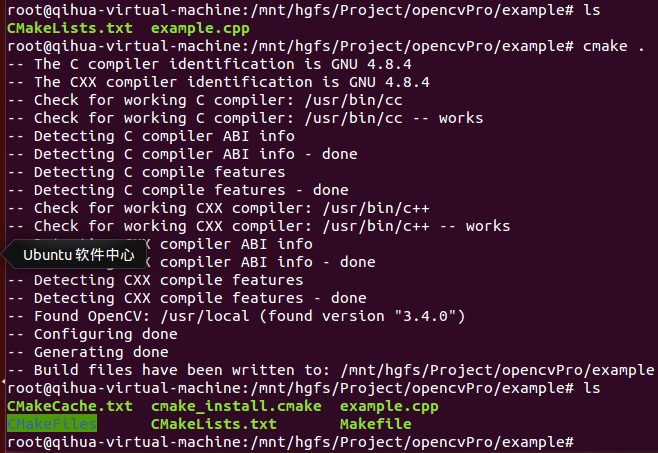
整个cmake过程如上,可以看到已经有了Makefile了,那么就可以make了。
四、编译工程,运行可执行文件
1、编译、运行
$ make
$ ./example

如上图,则意味着第一个opencv工程成功创建!
五、修改cpp文件代码,显示一张图片
1、编辑代码
#include "opencv2/core.hpp"
#include "opencv2/imgproc.hpp"
#include "opencv2/highgui.hpp"
#include <iostream>

using namespace cv;
using namespace std;


int main()
{
    cout << "Hello OpenCV " << CV_VERSION << endl;

	// 载入图像
	Mat myMat = imread("myImage.JPEG", 1);

	// 创建一个窗口
	namedWindow("Opencv Image", WINDOW_AUTOSIZE);

	// 显示图像
	imshow("Opencv Image", myMat);

	// 等待按键延时 ms
	waitKey(5000);

    return 0;
}
2、函数解析
载入图像函数原型
/**
 * Read an image
 *
 *  This function merely calls the actual implementation above and returns itself.
 *
 * @param[in] filename File to load
 * @param[in] flags Flags you wish to set.
*/
Mat imread( const String& filename, int flags )
第1个参数filename:图像路径名
第2个参数flags:标识flag
- flag > 0 : 返回一个3通道的彩色图像
- flag = 0: 返回灰度图像
- flag < 0 : 返回包含Alpha通道的加载的图像。
创建窗口函数原型
void cv::namedWindow( const String& winname, int flags )
第1个参数winname:窗口名称
第2个参数flags:标识符,填如下值
- WINDOW_NORMAL设置了这个值,用户便可以改变窗口的大小(没有限制)
- WINDOW_AUTOSIZE如果设置了这个值,窗口大小会自动调整以适应所显示的图像,并且不能手动改变窗口大小。
- WINDOW_OPENGL 如果设置了这个值的话,窗口创建的时候便会支持OpenGL。
显示图像函数
void cv::imshow( const String& winname, InputArray _img )
第1个参数winname:窗口名称
第2个参数_img:要显示的图像
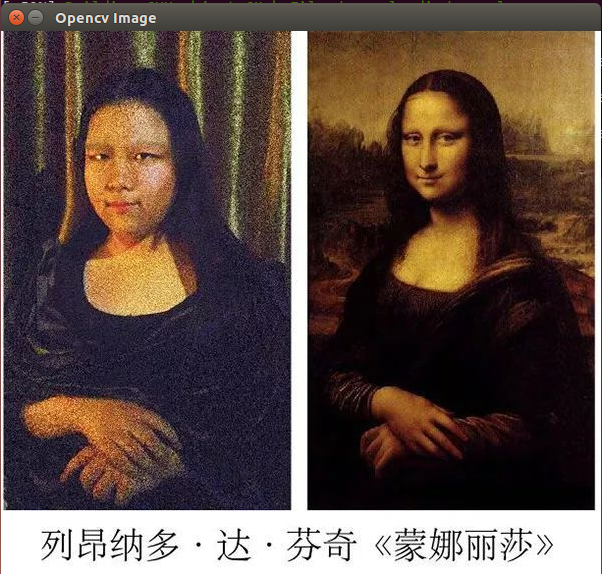
3、编译、运行
$ make
$ ./example
结果如下:成功! (PS:记得将图片放对位置)
至此,从创建一个opencv工程到显示图片,已顺利完成。