netty的客户端代码例子:
public Test connect(int port, String host, final String nickName) {
EventLoopGroup group = new NioEventLoopGroup();
try {
Bootstrap bootstrap = new Bootstrap();
bootstrap.group(group).channel(NioSocketChannel.class)
.option(ChannelOption.SO_KEEPALIVE, true)
.handler(new ChannelInitializer<SocketChannel>() {
@Override
protected void initChannel(SocketChannel ch) throws Exception {
}
});
//发起同步连接操作
ChannelFuture channelFuture = bootstrap
.connect(host, port)
.sync();
channelFuture.channel().closeFuture().sync();
} catch (InterruptedException e) {
e.printStackTrace();
} finally {
//关闭,释放线程资源
group.shutdownGracefully();
}
return this;
}
public static void main(String[] args) {
new Test().connect(8080, "localhost", "Tom");
}在channel中设置NioSocketChannel.class,会调用AbstractBootstrap下面方法
public B channel(Class<? extends C> channelClass) {
        return channelFactory(new ReflectiveChannelFactory<C>(
                ObjectUtil.checkNotNull(channelClass, "channelClass")
        ));
    }
而 ReflectiveChannelFactory 实现了 ChannelFactory 接口, 它提供了唯一的方法, 即 newChannel()方法, ChannelFactory, 顾名思义, 就是创建 Channel 的工厂类。进入到 ReflectiveChannelFactory 的 newChannel()方法中, 我们看到其实现代码如下:
public ReflectiveChannelFactory(Class<? extends T> clazz) {
ObjectUtil.checkNotNull(clazz, "clazz");
try {
this.constructor = clazz.getConstructor();
} catch (NoSuchMethodException e) {
throw new IllegalArgumentException("Class " + StringUtil.simpleClassName(clazz) +
" does not have a public non-arg constructor", e);
}
}
@Override
public T newChannel() {
try {
return constructor.newInstance();
} catch (Throwable t) {
throw new ChannelException("Unable to create Channel from class " + constructor.getDeclaringClass(), t);
}
}根据上面的代码可以得出:
1、Bootstrap 中的 ChannelFactory 实现类是 ReflectiveChannelFactory。
2、通过 channel()方法创建的 Channel 具体类型是 NioSocketChannel。
Channel 的实例化过程其实就是调用 ChannelFactory 的 newChannel()方法,而实例化的 Channel 具体类型又是和初 始化 Bootstrap 时传入的 channel()方法的参数相关。因此对于客户端的 Bootstrap 而言,创建的 Channel 实例就是 NioSocketChannel
客户端channel的初始化
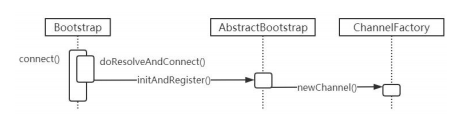
前面我们已经知道了如何设置一个 Channel 的类型,并且了解到 Channel 是通过 ChannelFactory 的 newChannel()方法来实例化的, 那么 ChannelFactory 的 newChannel()方法在哪里调用呢?继续跟踪, 我们发现其调用链如下:
![]()
在 AbstractBootstrap 的 initAndRegister()中调用了 ChannelFactory()的 newChannel()来创建一个 NioSocketChannel的实例,其源码如下:
final ChannelFuture initAndRegister() {
Channel channel = null;
try {
//调用的是channelFactory接口的实现类ReflectiveChannelFactory中的newChannel
channel = channelFactory.newChannel();
init(channel);
} catch (Throwable t) {
if (channel != null) {
// channel can be null if newChannel crashed (eg SocketException("too many open files"))
channel.unsafe().closeForcibly();
// as the Channel is not registered yet we need to force the usage of the GlobalEventExecutor
return new DefaultChannelPromise(channel, GlobalEventExecutor.INSTANCE).setFailure(t);
}
// as the Channel is not registered yet we need to force the usage of the GlobalEventExecutor
return new DefaultChannelPromise(new FailedChannel(), GlobalEventExecutor.INSTANCE).setFailure(t);
}
ChannelFuture regFuture = config().group().register(channel);
if (regFuture.cause() != null) {
if (channel.isRegistered()) {
channel.close();
} else {
channel.unsafe().closeForcibly();
}
}
return regFuture;
}在 newChannel()方法中,利用反射机制调用类对象的 newInstance()方法来创建一个新的 Channel 实例,相当于调用NioSocketChannel 的默认构造器。NioSocketChannel 的默认构造器代码如下:
public NioSocketChannel() {
this(DEFAULT_SELECTOR_PROVIDER);
}
public NioSocketChannel(SelectorProvider provider) {
this(newSocket(provider));
}
private static SocketChannel newSocket(SelectorProvider provider) {
try {
/**
* Use the {@link SelectorProvider} to open {@link SocketChannel} and so remove condition in
* {@link SelectorProvider#provider()} which is called by each SocketChannel.open() otherwise.
*
* See <a href="https://github.com/netty/netty/issues/2308">#2308</a>.
*/
return provider.openSocketChannel();
} catch (IOException e) {
throw new ChannelException("Failed to open a socket.", e);
}
}
这里的代码比较关键,我们看到,在这个构造器中会调用 newSocket()来打开一个新的 Java NIO SocketChannel:
接着会调用父类,即AbstractNioByteChannel的构造器:
public NioSocketChannel(SocketChannel socket) {
this(null, socket);
}
public NioSocketChannel(Channel parent, SocketChannel socket) {
super(parent, socket);
config = new NioSocketChannelConfig(this, socket.socket());
}并传入参数 parent 为 null, ch 为刚才调用 newSocket()创建的 Java NIO 的 SocketChannel 对象, 因此新创建的
NioSocketChannel 对象中 parent 暂时是 null。
 protected AbstractNioByteChannel(Channel parent, SelectableChannel ch) {
        super(parent, ch, SelectionKey.OP_READ);
  }
接着会继续调用父类 AbstractNioChannel 的构造器,并传入实际参数 readInterestOp =SelectionKey.OP_READ:
protected AbstractNioChannel(Channel parent, SelectableChannel ch, int readInterestOp) {
super(parent);
this.ch = ch;
this.readInterestOp = readInterestOp;
try {
ch.configureBlocking(false);
} catch (IOException e) {
try {
ch.close();
} catch (IOException e2) {
logger.warn(
"Failed to close a partially initialized socket.", e2);
}
throw new ChannelException("Failed to enter non-blocking mode.", e);
}
}然后继续调用父类 AbstractChannel 的构造器:
protected AbstractChannel(Channel parent) {
        this.parent = parent;
        id = newId();
        unsafe = newUnsafe();
        pipeline = newChannelPipeline();
    }
至此, NioSocketChannel 就初始化就完成了, 我们可以稍微总结一下 NioSocketChannel 初始化所做的工作内容:
1、调用 NioSocketChannel.newSocket(DEFAULT_SELECTOR_PROVIDER)打开一个新的 Java NIOSocketChannel。
2、AbstractChannel(Channel parent)中需要初始化的属性:
id:每个 Channel 都拥有一个唯一的 id。
parent:属性置为 null。
unsafe:通过 newUnsafe()实例化一个 unsafe 对象,它的类型是 AbstractNioByteChannel.NioByteUnsafe 内部类。
pipeline:是 new DefaultChannelPipeline(this)新创建的实例。
3、AbstractNioChannel 中的属性:
ch:赋值为 Java SocketChannel,即 NioSocketChannel 的 newSocket()方法返回的 Java NIO SocketChannel。
readInterestOp:赋值为 SelectionKey.OP_READ
ch:被配置为非阻塞,即调用 ch.configureBlocking(false)
4、NioSocketChannel 中的属性:
config = new NioSocketChannelConfig(this, socket.socket())
Unsafe 字段的初始化
我们简单地提到了,在实例化 NioSocketChannel 的过程中,会在父类 AbstractChannel 的构造方法中调用
newUnsafe()来获取一个 unsafe 实例。那么 unsafe 是怎么初始化的呢? 它的作用是什么?
其实 unsafe 特别关键,它封装了对 Java 底层 Socket 的操作,因此实际上是沟通 Netty 上层和 Java 底层的重要的桥梁。那么我们下面看一下 Unsafe 接口所提供的方法吧:
interface Unsafe {
    RecvByteBufAllocator.Handle recvBufAllocHandle();

    SocketAddress localAddress();

    SocketAddress remoteAddress();

    void register(EventLoop eventLoop, ChannelPromise promise);

    void bind(SocketAddress localAddress, ChannelPromise promise);

    void connect(SocketAddress remoteAddress, SocketAddress localAddress, ChannelPromise promise);

    void disconnect(ChannelPromise promise);

    void close(ChannelPromise promise);

    void closeForcibly();

    void deregister(ChannelPromise promise);

    void beginRead();

    void write(Object msg, ChannelPromise promise);

    void flush();

    ChannelPromise voidPromise();

    ChannelOutboundBuffer outboundBuffer();
}
从源码中可以看出, 这些方法其实都是对应到相关的 Java 底层的 Socket 的操作。 继续回到 AbstractChannel 的构造方法中,在这里调用了 newUnsafe()获取一个新的 unsafe 对象,而 newUnsafe()方法在 NioSocketChannel 中被重写了。来看代码
@Override
protected AbstractNioUnsafe newUnsafe() {
	return new NioSocketChannelUnsafe();
}
NioSocketChannel 的 newUnsafe()方法会返回一个 NioSocketChannelUnsafe 实例。从这里我们就可以确定了, 在实例化的 NioSocketChannel 中的 unsafe 字段,其实是一个 NioSocketChannelUnsafe 的实例。
Pipeline 的初始化
上面我们分析了 NioSocketChannel 的大体初始化过程, 但是我们漏掉了一个关键的部分,即 ChannelPipeline 的 初始化。在 Pipeline 的注释说明中写到“Each channel has its own pipeline and it is created automatically when a new channel is created.”,我们知道,在实例化一个 Channel 时,必然都要实例化一个 ChannelPipeline。而我们确实在 AbstractChannel 的构造器看到了 pipeline 字段被初始化为 DefaultChannelPipeline 的实例。那么我们就来看一下, DefaultChannelPipeline 构造器做了哪些工作
 protected DefaultChannelPipeline(Channel channel) {
        this.channel = ObjectUtil.checkNotNull(channel, "channel");
        succeededFuture = new SucceededChannelFuture(channel, null);
        voidPromise =  new VoidChannelPromise(channel, true);

        tail = new TailContext(this);
        head = new HeadContext(this);

        head.next = tail;
        tail.prev = head;
 }
DefaultChannelPipeline 的构造器需要传入一个 channel,而这个 channel 其实就是我们实例化的 NioSocketChannel, DefaultChannelPipeline 会将这个 NioSocketChannel 对象保存在 channel 字段中。DefaultChannelPipeline 中还有两 个特殊的字段,即 head 和 tail,这两个字段是双向链表的头和尾。其实在 DefaultChannelPipeline 中,维护了一个以 AbstractChannelHandlerContext 为节点元素的双向链表,这个链表是 Netty 实现 Pipeline 机制的关键。
链表中 head 是一个 ChannelOutboundHandler,而 tail 则是一个 ChannelInboundHandler。接着看HeadContext 的构造器:
HeadContext(DefaultChannelPipeline pipeline) {
            super(pipeline, null, HEAD_NAME, HeadContext.class);
            unsafe = pipeline.channel().unsafe();
            setAddComplete();
}
EventLoop 的初始化
回到最开始的 ChatClient 用户代码中,我们在一开始就实例化了一个 NioEventLoopGroup 对象,因此我们就从它的 构造器中追踪一下 EventLoop 的初始化过程。
NioEventLoop 有几个重载的构造器,不过内容都没有太大的区别,最终都是调用的父类 MultithreadEventLoopGroup 的构造器:
protected MultithreadEventLoopGroup(int nThreads, Executor executor, Object... args) {
        super(nThreads == 0 ? DEFAULT_EVENT_LOOP_THREADS : nThreads, executor, args);
}
其中有个有意思的地方是,如果我们传入的线程数 nThreads 是 0,那么 Netty 会为我们设置默认的线程数
DEFAULT_EVENT_LOOP_THREADS,而这个默认的线程数是怎么确定的呢?
其实很简单,在静态代码块中,会首先确定 DEFAULT_EVENT_LOOP_THREADS 的值:
static {
        DEFAULT_EVENT_LOOP_THREADS = Math.max(1, SystemPropertyUtil.getInt(
                "io.netty.eventLoopThreads", NettyRuntime.availableProcessors() * 2));

        if (logger.isDebugEnabled()) {
            logger.debug("-Dio.netty.eventLoopThreads: {}", DEFAULT_EVENT_LOOP_THREADS);
        }
    }
Netty 首先会从系统属性中获取"io.netty.eventLoopThreads"的值,如果我们没有设置的话,那么就返回默认值:即处理器核心数 * 2。回到 MultithreadEventLoopGroup 构造器中会继续调用父类 MultithreadEventExecutorGroup 的构造器:
protected MultithreadEventExecutorGroup(int nThreads, Executor executor,
EventExecutorChooserFactory chooserFactory, Object... args) {
if (nThreads <= 0) {
throw new IllegalArgumentException(String.format("nThreads: %d (expected: > 0)", nThreads));
}
if (executor == null) {
executor = new ThreadPerTaskExecutor(newDefaultThreadFactory());
}
//*
children = new EventExecutor[nThreads];
for (int i = 0; i < nThreads; i ++) {
boolean success = false;
try {
//上面是异常处理代码
//*
children[i] = newChild(executor, args);
success = true;
} catch (Exception e) {
// TODO: Think about if this is a good exception type
throw new IllegalStateException("failed to create a child event loop", e);
} finally {
if (!success) {
for (int j = 0; j < i; j ++) {
children[j].shutdownGracefully();
}
for (int j = 0; j < i; j ++) {
EventExecutor e = children[j];
try {
while (!e.isTerminated()) {
e.awaitTermination(Integer.MAX_VALUE, TimeUnit.SECONDS);
}
} catch (InterruptedException interrupted) {
// Let the caller handle the interruption.
Thread.currentThread().interrupt();
break;
}
}
}
}
}
//*
chooser = chooserFactory.newChooser(children);
//包装处理代码
final FutureListener<Object> terminationListener = new FutureListener<Object>() {
@Override
public void operationComplete(Future<Object> future) throws Exception {
if (terminatedChildren.incrementAndGet() == children.length) {
terminationFuture.setSuccess(null);
}
}
};
for (EventExecutor e: children) {
e.terminationFuture().addListener(terminationListener);
}
Set<EventExecutor> childrenSet = new LinkedHashSet<EventExecutor>(children.length);
Collections.addAll(childrenSet, children);
readonlyChildren = Collections.unmodifiableSet(childrenSet);
}
@Override
public EventExecutorChooser newChooser(EventExecutor[] executors) {
if (isPowerOfTwo(executors.length)) {
return new PowerOfTwoEventExecutorChooser(executors);
} else {
return new GenericEventExecutorChooser(executors);
}
}
private static boolean isPowerOfTwo(int val) {
return (val & -val) == val;
}
private static final class PowerOfTwoEventExecutorChooser implements EventExecutorChooser {
private final AtomicInteger idx = new AtomicInteger();
private final EventExecutor[] executors;
PowerOfTwoEventExecutorChooser(EventExecutor[] executors) {
this.executors = executors;
}
@Override
public EventExecutor next() {
return executors[idx.getAndIncrement() & executors.length - 1];
}
}
private static final class GenericEventExecutorChooser implements EventExecutorChooser {
// Use a 'long' counter to avoid non-round-robin behaviour at the 32-bit overflow boundary.
// The 64-bit long solves this by placing the overflow so far into the future, that no system
// will encounter this in practice.
private final AtomicLong idx = new AtomicLong();
private final EventExecutor[] executors;
GenericEventExecutorChooser(EventExecutor[] executors) {
this.executors = executors;
}
@Override
public EventExecutor next() {
return executors[(int) Math.abs(idx.getAndIncrement() % executors.length)];
}
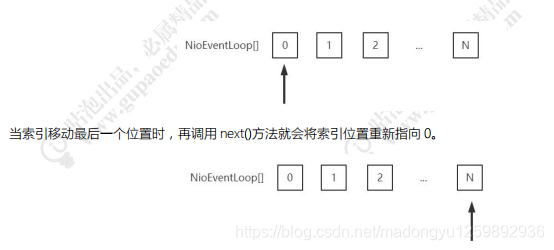
}上面的代码逻辑主要表达的意思是:即如果 nThreads 是 2 的幂,则使用 PowerOfTwoEventExecutorChooser,否则 使用 GenericEventExecutorChooser。这两个 Chooser 都重写 next()方法。next()方法的主要功能就是讲数组索引循环位移,如下图所示:
![]()
这个运算逻辑其实很简单,就是每次让索引自增后和数组长度取模:idx.getAndIncrement() % executors.length。但 是就连一个非常简单的数组索引运算,Netty 都帮我们做了优化。因为在计算机底层,&与比%运算效率更高。
好了,分析到这里我们应该已经非常清楚 MultithreadEventExecutorGroup 中的处理逻辑,简单做一个总结:
1、创建一个大小为 nThreads 的 SingleThreadEventExecutor 数组。
2、根据 nThreads 的大小,创建不同的 Chooser,即如果 nThreads 是 2 的幂,则使用
PowerOfTwoEventExecutorChooser,反之使用 GenericEventExecutorChooser。不论使用哪个 Chooser,它们的功 能都是一样的,即从 children 数组中选出一个合适的 EventExecutor 实例。
3、调用 newChhild()方法初始化 children 数组。
根据上面的代码,我们也能知道:MultithreadEventExecutorGroup 内部维护了一个 EventExecutor 数组,而 Netty 的 EventLoopGroup的实现机制其实就建立在MultithreadEventExecutorGroup之上。每当Netty需要一个EventLoop 时, 会调用 next()方法获取一个可用的 EventLoop。 上面代码的最后一部分是 newChild()方法,这个是一个抽象方法,它的任务是实例化 EventLoop 对象。我们跟踪一下 它的代码。可以发现。这个方法在 NioEventLoopGroup 类中有实现,其内容很简单:
@Override
    protected EventLoop newChild(Executor executor, Object... args) throws Exception {
        EventLoopTaskQueueFactory queueFactory = args.length == 4 ? (EventLoopTaskQueueFactory) args[3] : null;
        return new NioEventLoop(this, executor, (SelectorProvider) args[0],
            ((SelectStrategyFactory) args[1]).newSelectStrategy(), (RejectedExecutionHandler) args[2], queueFactory);
    }
其实逻辑很简单就是实例化一个 NioEventLoop 对象, 然后返回 NioEventLoop 对象。 最后总结一下整个 EventLoopGroup 的初始化过程:
1、EventLoopGroup(其实是 MultithreadEventExecutorGroup)内部维护一个类型为 EventExecutor children 数组,
其大小是 nThreads,这样就构成了一个线程池。
2、如果我们在实例化 NioEventLoopGroup 时,如果指定线程池大小,则 nThreads 就是指定的值,反之是处理
器核心数 * 2。
3、MultithreadEventExecutorGroup 中会调用 newChild()抽象方法来初始化 children 数组。
4、抽象方法 newChild()是在 NioEventLoopGroup 中实现的,它返回一个 NioEventLoop 实例。
5、NioEventLoop 属性赋值:
provider:在 NioEventLoopGroup 构造器中通过 SelectorProvider.provider()获取一个 SelectorProvider。
selector:在 NioEventLoop 构造器中通过调用通过 provider.openSelector()方法获取一个 selector 对象。
Channel 注册到 Selector
在前面的分析中,我们提到 Channel 会在 Bootstrap 的 initAndRegister()中进行初始化,但是这个方法还会将初始化好的 Channe 注册到 NioEventLoop 的 selector 中。接下来我们来分析一下 Channel 注册的过程。
再回顾一下 AbstractBootstrap 的 initAndRegister()方法:
final ChannelFuture initAndRegister() {
        Channel channel = null;
        try {
            channel = channelFactory.newChannel();
            init(channel);
        } catch (Throwable t) {
            if (channel != null) {
                // channel can be null if newChannel crashed (eg SocketException("too many open files"))
                channel.unsafe().closeForcibly();
                // as the Channel is not registered yet we need to force the usage of the GlobalEventExecutor
                return new DefaultChannelPromise(channel, GlobalEventExecutor.INSTANCE).setFailure(t);
            }
            // as the Channel is not registered yet we need to force the usage of the GlobalEventExecutor
            return new DefaultChannelPromise(new FailedChannel(), GlobalEventExecutor.INSTANCE).setFailure(t);
        }

        ChannelFuture regFuture = config().group().register(channel);
        if (regFuture.cause() != null) {
            if (channel.isRegistered()) {
                channel.close();
            } else {
                channel.unsafe().closeForcibly();
            }
        }
        return regFuture;
    }
当 Channel 初始化后,紧接着会调用 group().register()方法来向 selector 注册 Channel。我们继续跟踪的话,会
发现其调用链如下:

AbstractChannel$AbstractUnsafe.register()方法中到底做了什么?
@Override
        public final void register(EventLoop eventLoop, final ChannelPromise promise) {
            ObjectUtil.checkNotNull(eventLoop, "eventLoop");
            if (isRegistered()) {
                promise.setFailure(new IllegalStateException("registered to an event loop already"));
                return;
            }
            if (!isCompatible(eventLoop)) {
                promise.setFailure(
                        new IllegalStateException("incompatible event loop type: " + eventLoop.getClass().getName()));
                return;
            }

            AbstractChannel.this.eventLoop = eventLoop;

            if (eventLoop.inEventLoop()) {
                register0(promise);
            } else {
                try {
                    eventLoop.execute(new Runnable() {
                        @Override
                        public void run() {
                            register0(promise);
                        }
                    });
                } catch (Throwable t) {
                    logger.warn(
                            "Force-closing a channel whose registration task was not accepted by an event loop: {}",
                            AbstractChannel.this, t);
                    closeForcibly();
                    closeFuture.setClosed();
                    safeSetFailure(promise, t);
                }
            }
        }
首先,将 eventLoop 赋值给 Channel 的 eventLoop 属性,而我们知道这个 eventLoop 对象其实是
MultithreadEventLoopGroup 的 next()方法获取的,根据我们前面的分析,我们可以确定 next()方法返回的 eventLoop 对象是 NioEventLoop 实例。register()方法接着调用了 register0()方法:
private void register0(ChannelPromise promise) {
            try {
                // check if the channel is still open as it could be closed in the mean time when the register
                // call was outside of the eventLoop
                if (!promise.setUncancellable() || !ensureOpen(promise)) {
                    return;
                }
                boolean firstRegistration = neverRegistered;
                doRegister();
                neverRegistered = false;
                registered = true;

                // Ensure we call handlerAdded(...) before we actually notify the promise. This is needed as the
                // user may already fire events through the pipeline in the ChannelFutureListener.
                pipeline.invokeHandlerAddedIfNeeded();

                safeSetSuccess(promise);
                pipeline.fireChannelRegistered();
                // Only fire a channelActive if the channel has never been registered. This prevents firing
                // multiple channel actives if the channel is deregistered and re-registered.
                if (isActive()) {
                    if (firstRegistration) {
                        pipeline.fireChannelActive();
                    } else if (config().isAutoRead()) {
                        // This channel was registered before and autoRead() is set. This means we need to begin read
                        // again so that we process inbound data.
                        //
                        // See https://github.com/netty/netty/issues/4805
                        beginRead();
                    }
                }
            } catch (Throwable t) {
                // Close the channel directly to avoid FD leak.
                closeForcibly();
                closeFuture.setClosed();
                safeSetFailure(promise, t);
            }
        }
register0()方法又调用了 AbstractNioChannel 的 doRegister()方法
@Override
    protected void doRegister() throws Exception {
        boolean selected = false;
        for (;;) {
            try {
                selectionKey = javaChannel().register(eventLoop().unwrappedSelector(), 0, this);
                return;
            } catch (CancelledKeyException e) {
                if (!selected) {
                    // Force the Selector to select now as the "canceled" SelectionKey may still be
                    // cached and not removed because no Select.select(..) operation was called yet.
                    eventLoop().selectNow();
                    selected = true;
                } else {
                    // We forced a select operation on the selector before but the SelectionKey is still cached
                    // for whatever reason. JDK bug ?
                    throw e;
                }
            }
        }
    }
看到 javaChannel()这个方法在前面我们已经知道了,它返回的是一个 Java NIO 的 SocketChannel 对象,这里我
们将这个 SocketChannel 注册到与 eventLoop 关联的 selector 上了。
我们总结一下 Channel 的注册过程:
1、首先在 AbstractBootstrap 的 initAndRegister()方法中, 通过 group().register(channel),调用
MultithreadEventLoopGroup 的 register()方法。
2、在 MultithreadEventLoopGroup 的 register()中,调用 next()方法获取一个可用的 SingleThreadEventLoop, 然后调用它的 register()方法。
3、在 SingleThreadEventLoop 的 register()方法中,调用 channel.unsafe().register(this, promise)方法来获取
channel 的 unsafe()底层操作对象,然后调用 unsafe 的 register()。
4、在 AbstractUnsafe 的 register()方法中, 调用 register0()方法注册 Channel 对象。
5、在 AbstractUnsafe 的 register0()方法中,调用 AbstractNioChannel 的 doRegister()方法。
6、AbstractNioChannel 的 doRegister()方法通过 javaChannel().register(eventLoop().selector, 0, this)将 Channel 对应的 Java NIO 的 SocketChannel 注册到一个 eventLoop 的 selector 中,并且将当前 Channel 作为 attachment 与 SocketChannel 关联。
总的来说,Channel 注册过程所做的工作就是将 Channel 与对应的 EventLoop 关联,因此这也体现了,在 Netty
中,每个 Channel 都会关联一个特定的 EventLoop,并且这个 Channel 中的所有 IO 操作都是在这个 EventLoop 中执 行的;当关联好 Channel 和 EventLoop 后,会继续调用底层 Java NIO 的 SocketChannel 对象的 register()方法,将底 层 Java NIO 的 SocketChannel 注册到指定的 selector 中。通过这两步,就完成了 Netty 对 Channel 的注册过程。
Handler 的添加过程
Netty 有一个强大和灵活之处就是基于 Pipeline 的自定义 handler 机制。基于此,我们可以像添加插件一样自由组 合各种各样的 handler 来完成业务逻辑。例如我们需要处理 HTTP 数据,那么就可以在 pipeline 前添加一个针对 HTTP 编、解码的 Handler,然后接着添加我们自己的业务逻辑的 handler,这样网络上的数据流就向通过一个管道一样, 从 不同的 handler 中流过并进行编、解码,最终在到达我们自定义的 handler 中。
说到这里,有些小伙伴肯定会好奇,既然这个 pipeline 机制是这么的强大,那么它是怎么实现的呢? 在此我还不 打算详细讲解,本节内容中,我们从简单的入手,先体验一下自定义的 handler 是如何以及何时添加到 ChannelPipeline中的。首先我们看一下如下的用户代码片段:
ChannelInitializer<SocketChannel> initializer = new ChannelInitializer<SocketChannel>() {
            @Override
            protected void initChannel(SocketChannel ch) throws Exception {
                ChannelPipeline pipeline = ch.pipeline();
                //先添加websocket相关的编解码器和协议处理器
                pipeline.addLast("msgDecoder", new ProtocolDecoder());// 解码器
                pipeline.addLast("msgEncoder", new ProtocolEncoder());// 编码器
                pipeline.addLast("idleStateHandler", new IdleStateHandler(serverConfig.getAllIdleSecond(), 0, 0));// 定时器,秒
                pipeline.addLast("handler", new WebsocketRouterHandler());// 消息总处理器WebsocketRouterHandler

            }

        };
这个代码片段就是实现了 handler 的添加功能。我们看到,Bootstrap 的 handler()方法接收一个 ChannelHandler,而我们传的参数是一个派生于抽象类 ChannelInitializer 的匿名类,它当然也实现了 ChannelHandler 接口。我们来看一下,ChannelInitializer 类内到底有什么玄机:
public abstract class ChannelInitializer<C extends Channel> extends ChannelInboundHandlerAdapter {

    private static final InternalLogger logger = InternalLoggerFactory.getInstance(ChannelInitializer.class);
    // We use a Set as a ChannelInitializer is usually shared between all Channels in a Bootstrap /
    // ServerBootstrap. This way we can reduce the memory usage compared to use Attributes.
    private final Set<ChannelHandlerContext> initMap = Collections.newSetFromMap(
            new ConcurrentHashMap<ChannelHandlerContext, Boolean>());

    /**
     * This method will be called once the {@link Channel} was registered. After the method returns this instance
     * will be removed from the {@link ChannelPipeline} of the {@link Channel}.
     *
     * @param ch            the {@link Channel} which was registered.
     * @throws Exception    is thrown if an error occurs. In that case it will be handled by
     *                      {@link #exceptionCaught(ChannelHandlerContext, Throwable)} which will by default close
     *                      the {@link Channel}.
     */
    protected abstract void initChannel(C ch) throws Exception;

    @Override
    @SuppressWarnings("unchecked")
    public final void channelRegistered(ChannelHandlerContext ctx) throws Exception {
        // Normally this method will never be called as handlerAdded(...) should call initChannel(...) and remove
        // the handler.
        if (initChannel(ctx)) {
            // we called initChannel(...) so we need to call now pipeline.fireChannelRegistered() to ensure we not
            // miss an event.
            ctx.pipeline().fireChannelRegistered();

            // We are done with init the Channel, removing all the state for the Channel now.
            removeState(ctx);
        } else {
            // Called initChannel(...) before which is the expected behavior, so just forward the event.
            ctx.fireChannelRegistered();
        }
    }

    /**
     * Handle the {@link Throwable} by logging and closing the {@link Channel}. Sub-classes may override this.
     */
    @Override
    public void exceptionCaught(ChannelHandlerContext ctx, Throwable cause) throws Exception {
        if (logger.isWarnEnabled()) {
            logger.warn("Failed to initialize a channel. Closing: " + ctx.channel(), cause);
        }
        ctx.close();
    }

    /**
     * {@inheritDoc} If override this method ensure you call super!
     */
    @Override
    public void handlerAdded(ChannelHandlerContext ctx) throws Exception {
        if (ctx.channel().isRegistered()) {
            // This should always be true with our current DefaultChannelPipeline implementation.
            // The good thing about calling initChannel(...) in handlerAdded(...) is that there will be no ordering
            // surprises if a ChannelInitializer will add another ChannelInitializer. This is as all handlers
            // will be added in the expected order.
            if (initChannel(ctx)) {

                // We are done with init the Channel, removing the initializer now.
                removeState(ctx);
            }
        }
    }

    @Override
    public void handlerRemoved(ChannelHandlerContext ctx) throws Exception {
        initMap.remove(ctx);
    }

    @SuppressWarnings("unchecked")
    private boolean initChannel(ChannelHandlerContext ctx) throws Exception {
        if (initMap.add(ctx)) { // Guard against re-entrance.
            try {
                initChannel((C) ctx.channel());
            } catch (Throwable cause) {
                // Explicitly call exceptionCaught(...) as we removed the handler before calling initChannel(...).
                // We do so to prevent multiple calls to initChannel(...).
                exceptionCaught(ctx, cause);
            } finally {
                ChannelPipeline pipeline = ctx.pipeline();
                if (pipeline.context(this) != null) {
                    pipeline.remove(this);
                }
            }
            return true;
        }
        return false;
    }

    private void removeState(final ChannelHandlerContext ctx) {
        // The removal may happen in an async fashion if the EventExecutor we use does something funky.
        if (ctx.isRemoved()) {
            initMap.remove(ctx);
        } else {
            ctx.executor().execute(new Runnable() {
                @Override
                public void run() {
                    initMap.remove(ctx);
                }
            });
        }
    }
}
ChannelInitializer 是一个抽象类,它有一个抽象的方法 initChannel(),我们看到的匿名类正是实现了这个方法,
并在这个方法中添加的自定义的 handler 的。那么 initChannel()是哪里被调用的呢?其实是在 ChannelInitializer 的 channelRegistered()方法中。
接下来关注一下 channelRegistered()方法。从上面的源码中,我们可以看到,在 channelRegistered()方法中,会 调用 initChannel()方法,将自定义的 handler 添加到 ChannelPipeline 中,然后调用 ctx.pipeline().remove(this)方法将 自己从 ChannelPipeline 中删除。上面的分析过程,如下图片所示:
一开始,ChannelPipeline 中只有三个 handler,分别是:head、tail 和我们添加的 ChannelInitializer。

![]()
接着 initChannel()方法调用后,添加了自定义的 handler:

![]()

![]()