NioServerSocketChannel的创建
再看服务端代码,我们调用了 ServerBootstarap 的 channel(NioServerSocketChannel.class)方法,传的参数是 NioServerSocketChannel.class 对象。如此,按照客户端代码同样的流程,我们可以确定 NioServerSocketChannel 的 实例化也是通过 ReflectiveChannelFactory 工厂类来完成的,而 ReflectiveChannelFactory 中的 clazz 字段被赋值为NioServerSocketChannel.class,因此当调用 ReflectiveChannelFactory 的 newChannel()方法,就能获取到一个 NioServerSocketChannel 的实例。newChannel()方法的源代码如下:
public ReflectiveChannelFactory(Class<? extends T> clazz) {
ObjectUtil.checkNotNull(clazz, "clazz");
try {
this.constructor = clazz.getConstructor();
} catch (NoSuchMethodException e) {
throw new IllegalArgumentException("Class " + StringUtil.simpleClassName(clazz) +
" does not have a public non-arg constructor", e);
}
}
@Override
public T newChannel() {
try {
//通过反射调用下面代码
return constructor.newInstance();
} catch (Throwable t) {
throw new ChannelException("Unable to create Channel from class " + constructor.getDeclaringClass(), t);
}
}最后我们也来总结一下:
1、ServerBootstrap 中的 ChannelFactory 的实现类是 ReflectiveChannelFactory 类。
2、创建的 Channel 具体类型是 NioServerSocketChannel。
Channel 的实例化过程,其实就是调用 ChannelFactory 的 newChannel()方法,而实例化的 Channel 具体类型就是初 始化 ServerBootstrap 时传给 channel()方法的实参。因此,上面代码案例中的服务端 ServerBootstrap, 创建的 Channel 。实例就是 NioServerSocketChannel 的实例。
服务端 Channel 的初始化
我们来分析 NioServerSocketChannel 的实例化过程,先看一下 NioServerSocketChannel 的类层次结构图:

![]()
首先,我们来跟踪一下 NioServerSocketChannel 的默认构造,和 NioSocketChannel 类似,构造器都是调用 newSocket() 来打开一个 Java 的 NIO Socket。不过需要注意的是, 客户端的 newSocket()方法调用的是 openSocketChannel(),而服务端的 newSocket()调用的是 openServerSocketChannel()。顾名思义,一个是客户端的 Java SocketChannel,一个 是服务器端的 Java ServerSocketChannel,来看代码:
private static ServerSocketChannel newSocket(SelectorProvider provider) {
try {
/**
* Use the {@link SelectorProvider} to open {@link SocketChannel} and so remove condition in
* {@link SelectorProvider#provider()} which is called by each ServerSocketChannel.open() otherwise.
*
* See <a href="https://github.com/netty/netty/issues/2308">#2308</a>.
*/
return provider.openServerSocketChannel();
} catch (IOException e) {
throw new ChannelException(
"Failed to open a server socket.", e);
}
}
private final ServerSocketChannelConfig config;
/**
* Create a new instance,通过反射创建,调用构造
*/
public NioServerSocketChannel() {
this(newSocket(DEFAULT_SELECTOR_PROVIDER));
}接下来会调用重载构造方法:
 public NioServerSocketChannel(ServerSocketChannel channel) {
        super(null, channel, SelectionKey.OP_ACCEPT);
        config = new NioServerSocketChannelConfig(this, javaChannel().socket());
 }
这个构造方法中,调用父类构造方法时传入的参数是 SelectionKey.OP_ACCEPT。作为对比,我们回顾一下,在客户端的 Channel 初始化时,传入的参数是 SelectionKey.OP_READ。在服务启动后需要监听客户端的连接请求,因此在这里我们设置 SelectionKey.OP_ACCEPT,也就是通知 selector 我们对客户端的连接请求感兴趣
接着和客户端对比分析一下,会逐级地调用父类的构造器 NioServerSocketChannel -> AbstractNioMessageChannel -> AbstractNioChannel -> AbstractChannel。同样的,在 AbstractChannel 中实例化一个 unsafe 和 pipeline:
protected AbstractChannel(Channel parent) {
        this.parent = parent;
        id = newId();
        unsafe = newUnsafe();
        pipeline = newChannelPipeline();
 }
不过,在这里需要注意的是,客户端的 unsafe 是 AbstractNioByteChannel#NioByteUnsafe 的实例,而服务端的 unsafe 是 AbstractNioMessageChannel.AbstractNioUnsafe 的实例。因为 AbstractNioMessageChannel 重写了 newUnsafe() 方法,其源代码如下:
@Override
protected AbstractNioUnsafe newUnsafe() {
    return new NioMessageUnsafe();
}
最后总结一下, 在 NioServerSocketChannel 实例化过程中的执行逻辑:
1、调用 NioServerSocketChannel.newSocket(DEFAULT_SELECTOR_PROVIDER)方法打开一个新的 Java NIO
ServerSocketChannel
2、AbstractChannel 初始化被赋值是属性:
parent:设置为 null
unsafe:通过newUnsafe()实例化一个unsafe对象, 类型是AbstractNioMessageChannel#AbstractNioUnsafe
pipeline:创建实例 DefaultChannelPipeline 实例
3、AbstractNioChannel 中被赋值的属性:
ch:赋值为 Java NIO 的 ServerSocketChannel,调用 NioServerSocketChannel 的 newSocket()方法获取。
readInterestOp:默认赋值为 SelectionKey.OP_ACCEPT。
ch 设置为非阻塞,调用 ch.configureBlocking(false)方法。
4、NioServerSocketChannel 中被赋值的属性:
config = new NioServerSocketChannelConfig(this, javaChannel().socket())
ChannelPipeline 初始化
上面我们分析了 NioServerSocketChannel 的大体初始化过程, 但是我们漏掉了一个关键的部分,即 ChannelPipeline 的 初始化。在 Pipeline 的注释说明中写到“Each channel has its own pipeline and it is created automatically when a new channel is created.”,我们知道,在实例化一个 Channel 时,必然都要实例化一个 ChannelPipeline。而我们确实在 AbstractChannel 的构造器看到了 pipeline 字段被初始化为 DefaultChannelPipeline 的实例。那么我们就来看一下, DefaultChannelPipeline 构造器做了哪些工作
protected DefaultChannelPipeline(Channel channel) {
this.channel = ObjectUtil.checkNotNull(channel, "channel");
succeededFuture = new SucceededChannelFuture(channel, null);
voidPromise = new VoidChannelPromise(channel, true);
tail = new TailContext(this);
head = new HeadContext(this);
head.next = tail;
tail.prev = head;
}DefaultChannelPipeline 的构造器需要传入一个 channel,而这个 channel 其实就是我们实例化的 NioServerSocketChannel, DefaultChannelPipeline 会将这个 NioServerSocketChannel对象保存在 channel 字段中。DefaultChannelPipeline 中还有两 个特殊的字段,即 head 和 tail,这两个字段是双向链表的头和尾。其实在 DefaultChannelPipeline 中,维护了一个以 AbstractChannelHandlerContext 为节点元素的双向链表,这个链表是 Netty 实现 Pipeline 机制的关键。
链表中 head 是一个 ChannelOutboundHandler,而 tail 则是一个 ChannelInboundHandler。接着看HeadContext 的构造器:
HeadContext(DefaultChannelPipeline pipeline) {
            super(pipeline, null, HEAD_NAME, HeadContext.class);
            unsafe = pipeline.channel().unsafe();
            setAddComplete();
 }
服务端 Channel 注册到 Selector
我们总结一下 Channel 的注册过程:
1、首先在 AbstractBootstrap 的 initAndRegister()方法中, 通过 group().register(channel),调用
MultithreadEventLoopGroup 的 register()方法。
2、在 MultithreadEventLoopGroup 的 register()中,调用 next()方法获取一个可用的 SingleThreadEventLoop, 然后调用它的 register()方法。
3、在 SingleThreadEventLoop 的 register()方法中,调用 channel.unsafe().register(this, promise)方法来获取
channel 的 unsafe()底层操作对象,然后调用 unsafe 的 register()。
4、在 AbstractUnsafe 的 register()方法中, 调用 register0()方法注册 Channel 对象。
5、在 AbstractUnsafe 的 register0()方法中,调用 AbstractNioChannel 的 doRegister()方法。
6、AbstractNioChannel 的 doRegister()方法通过 javaChannel().register(eventLoop().selector, 0, this)将 Channel 对应的 Java NIO 的 SocketChannel 注册到一个 eventLoop 的 selector 中,并且将当前 Channel 作为 attachment 与 ServerSocketChannel关联。
总的来说,Channel 注册过程所做的工作就是将 Channel 与对应的 EventLoop 关联,因此这也体现了,在 Netty
中,每个 Channel 都会关联一个特定的 EventLoop,并且这个 Channel 中的所有 IO 操作都是在这个 EventLoop 中执 行的;当关联好 Channel 和 EventLoop 后,会继续调用底层 Java NIO 的 ServerSocketChannel对象的 register()方法,将底 层 Java NIO 的 ServerSocketChannel注册到指定的 selector 中。通过这两步,就完成了 Netty 对 Channel 的注册过程。
bossGroup 与 workerGroup
在客户端的时候,我们初始化了一个 EventLoopGroup 对象,而在服务端的初始化时,我们设置了两个
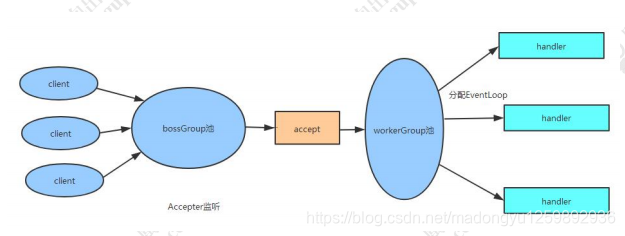
EventLoopGroup,一个是 bossGroup,另一个是 workerGroup。那么这两个 EventLoopGroup 都是干什么用的呢? 接 下来我们详细探究一下。其实,bossGroup 只用于服务端的 accept,也就是用于处理客户端新连接接入请求。我们可 以把 Netty 比作一个餐馆,bossGroup 就像一个大堂经理,当客户来到餐馆吃时,大堂经理就会引导顾客就坐,为顾 客端茶送水等。而 workerGroup 就是实际上干活的厨师,它们负责客户端连接通道的 IO 操作:当大堂经历接待顾客 后,顾客可以稍做休息, 而此时后厨里的厨师们(workerGroup)就开始忙碌地准备饭菜了。关于 bossGroup 与 workerGroup 的关系,我们可以用如下图来展示,前面的章节我们也分析过,这里再巩固一下:
![]()
首先,服务端的 bossGroup 不断地监听是否有客户端的连接,当发现有一个新的客户端连接到来时,bossGroup 就会 为此连接初始化各项资源,然后从 workerGroup 中选出一个 EventLoop 绑定到此客户端连接中。那么接下来的服务器 与客户端的交互过程就全部在此分配的 EventLoop 中完成。口说无凭,我们还是以源码说话吧。 首先在 ServerBootstrap 初始化时,调用了 b.group(bossGroup, workerGroup)设置了两个 EventLoopGroup,我们跟踪进去以后会看到:
public ServerBootstrap group(EventLoopGroup parentGroup, EventLoopGroup childGroup) {
        super.group(parentGroup);
        if (this.childGroup != null) {
            throw new IllegalStateException("childGroup set already");
        }
        this.childGroup = ObjectUtil.checkNotNull(childGroup, "childGroup");
        return this;
    }
bind()方法会触发如下调用链:
AbstractBootstrap.bind() -> AbstractBootstrap.doBind() -> AbstractBootstrap.initAndRegister()
源码看到到这里为止,我们发现 AbstractBootstrap 的 initAndRegister()方法已经是我们的老朋友了,我们在分析客户端程序时和它打过很多交道,现在再来回顾一下这个方法吧:
final ChannelFuture initAndRegister() {
        Channel channel = null;
        try {
            channel = channelFactory.newChannel();
            init(channel);
        } catch (Throwable t) {
            if (channel != null) {
                // channel can be null if newChannel crashed (eg SocketException("too many open files"))
                channel.unsafe().closeForcibly();
                // as the Channel is not registered yet we need to force the usage of the GlobalEventExecutor
                return new DefaultChannelPromise(channel, GlobalEventExecutor.INSTANCE).setFailure(t);
            }
            // as the Channel is not registered yet we need to force the usage of the GlobalEventExecutor
            return new DefaultChannelPromise(new FailedChannel(), GlobalEventExecutor.INSTANCE).setFailure(t);
        }
        //*
        ChannelFuture regFuture = config().group().register(channel);
        if (regFuture.cause() != null) {
            if (channel.isRegistered()) {
                channel.close();
            } else {
                channel.unsafe().closeForcibly();
            }
        }
        return regFuture;
    }
这里 group()方法返回的是上面我们提到的 bossGroup,而这里的 channel 其实就是 NioServerSocketChannel 的实例, 因此我们可以猜测 group().register(channel)将 bossGroup 和 NioServerSocketChannel 应该就关联起来了。那么 workerGroup 具体是在哪里与 NioServerSocketChannel 关联的呢?我们继续往下看 init(channel)方法:
@Override
    void init(Channel channel) {
        setChannelOptions(channel, newOptionsArray(), logger);
        setAttributes(channel, attrs0().entrySet().toArray(EMPTY_ATTRIBUTE_ARRAY));

        ChannelPipeline p = channel.pipeline();

        final EventLoopGroup currentChildGroup = childGroup;
        final ChannelHandler currentChildHandler = childHandler;
        final Entry<ChannelOption<?>, Object>[] currentChildOptions;
        synchronized (childOptions) {
            currentChildOptions = childOptions.entrySet().toArray(EMPTY_OPTION_ARRAY);
        }
        final Entry<AttributeKey<?>, Object>[] currentChildAttrs = childAttrs.entrySet().toArray(EMPTY_ATTRIBUTE_ARRAY);

        p.addLast(new ChannelInitializer<Channel>() {
            @Override
            public void initChannel(final Channel ch) {
                final ChannelPipeline pipeline = ch.pipeline();
                ChannelHandler handler = config.handler();
                if (handler != null) {
                    pipeline.addLast(handler);
                }

                ch.eventLoop().execute(new Runnable() {
                    @Override
                    public void run() {
                        pipeline.addLast(new ServerBootstrapAcceptor(
                                ch, currentChildGroup, currentChildHandler, currentChildOptions, currentChildAttrs));
                    }
                });
            }
        });
    }
实际上 init()方法在 ServerBootstrap 中被重写了,从上面的代码片段中我们看到,它为 pipeline 中添加了一个
ChannelInitializer,而这个 ChannelInitializer 中添加了一个非常关键的 ServerBootstrapAcceptor 的 handler。关于 handler 的添加与初始化的过程,我们留到之后的章节再详细分析。现在,我们来关注一下 ServerBootstrapAcceptor 类。在 ServerBootstrapAcceptor 中重写了 channelRead()方法,其主要代码如下:
@Override
        @SuppressWarnings("unchecked")
        public void channelRead(ChannelHandlerContext ctx, Object msg) {
            final Channel child = (Channel) msg;

            child.pipeline().addLast(childHandler);

            setChannelOptions(child, childOptions, logger);
            setAttributes(child, childAttrs);

            try {
                childGroup.register(child).addListener(new ChannelFutureListener() {
                    @Override
                    public void operationComplete(ChannelFuture future) throws Exception {
                        if (!future.isSuccess()) {
                            forceClose(child, future.cause());
                        }
                    }
                });
            } catch (Throwable t) {
                forceClose(child, t);
            }
        }
ServerBootstrapAcceptor 中的 childGroup 是构造此对象是传入的 currentChildGroup,也就是 workerGroup 对象。 而这里的 Channel 是 NioSocketChannel 的实例,因此这里的 childGroup 的 register()方法就是将 workerGroup 中的 某个 EventLoop 和 NioSocketChannel 关联上了。既然如此,那么现在的问题是 ServerBootstrapAcceptor 的 channelRead()方法是在哪里被调用的呢? 其实当一个 client 连接到 server 时,Java 底层 NIO 的 ServerSocketChannel 就会有一个 SelectionKey.OP_ACCEPT 的事件就绪,接着就会调用到 NioServerSocketChannel 的 doReadMessages() 方法:
protected AbstractChannel(Channel parent) {
        this.parent = parent;
        id = newId();
        //创建java的socket
        unsafe = newUnsafe();
        pipeline = newChannelPipeline();
 }

/**
     * @param
     * @return
     * @description: 创建的netty的服务端的socket
     * @author madongyu
     * @date 2020/10/29 15:36
     */
    @Override
    protected AbstractNioUnsafe newUnsafe() {
        return new NioMessageUnsafe();
    }

private final class NioMessageUnsafe extends AbstractNioUnsafe {

        private final List<Object> readBuf = new ArrayList<Object>();

        @Override
        public void read() {
            assert eventLoop().inEventLoop();
            final ChannelConfig config = config();
            final ChannelPipeline pipeline = pipeline();
            final RecvByteBufAllocator.Handle allocHandle = unsafe().recvBufAllocHandle();
            allocHandle.reset(config);

            boolean closed = false;
            Throwable exception = null;
            try {
                try {
                    do {
                        //*
                        int localRead = doReadMessages(readBuf);
                        if (localRead == 0) {
                            break;
                        }
                        if (localRead < 0) {
                            closed = true;
                            break;
                        }

                        allocHandle.incMessagesRead(localRead);
                    } while (allocHandle.continueReading());
                } catch (Throwable t) {
                    exception = t;
                }

                int size = readBuf.size();
                for (int i = 0; i < size; i++) {
                    readPending = false;
                    pipeline.fireChannelRead(readBuf.get(i));
                }
                readBuf.clear();
                allocHandle.readComplete();
                pipeline.fireChannelReadComplete();

                if (exception != null) {
                    closed = closeOnReadError(exception);

                    pipeline.fireExceptionCaught(exception);
                }

                if (closed) {
                    inputShutdown = true;
                    if (isOpen()) {
                        close(voidPromise());
                    }
                }
            } finally {
                // Check if there is a readPending which was not processed yet.
                // This could be for two reasons:
                // * The user called Channel.read() or ChannelHandlerContext.read() in channelRead(...) method
                // * The user called Channel.read() or ChannelHandlerContext.read() in channelReadComplete(...) method
                //
                // See https://github.com/netty/netty/issues/2254
                if (!readPending && !config.isAutoRead()) {
                    removeReadOp();
                }
            }
        }
    }


@Override
    protected int doReadMessages(List<Object> buf) throws Exception {
        SocketChannel ch = SocketUtils.accept(javaChannel());

        try {
            if (ch != null) {
                buf.add(new NioSocketChannel(this, ch));
                return 1;
            }
        } catch (Throwable t) {
            logger.warn("Failed to create a new channel from an accepted socket.", t);

            try {
                ch.close();
            } catch (Throwable t2) {
                logger.warn("Failed to close a socket.", t2);
            }
        }

        return 0;
    }
在 doReadMessages()方法中,通过调用 javaChannel().accept()方法获取到客户端新连接的 SocketChannel 对象,紧 接着就实例化一个 NioSocketChannel,并且传入 NioServerSocketChannel 对象(即 this)。由此可知,我们创建的这个 NioSocketChannel 的父类 Channel 就是 NioServerSocketChannel 实例。接下来就经由 Netty 的 ChannelPipeline 机 制,将读取事件逐级发送到各个 handler 中,于是就会触发前面我们提到的 ServerBootstrapAcceptor 的 channelRead() 方法。
服务端 Selector 事件轮询
再回到服务端 ServerBootStrap 的启动代码,是从 bind()方法开始的。ServerBootStrapt 的 bind()方法实际上就是其父 类 AbstractBootstrap 的 bind()方法,来看代码:
private static void doBind0(
            final ChannelFuture regFuture, final Channel channel,
            final SocketAddress localAddress, final ChannelPromise promise) {

        // This method is invoked before channelRegistered() is triggered.  Give user handlers a chance to set up
        // the pipeline in its channelRegistered() implementation.
        channel.eventLoop().execute(new Runnable() {
            @Override
            public void run() {
                if (regFuture.isSuccess()) {
                    channel.bind(localAddress, promise).addListener(ChannelFutureListener.CLOSE_ON_FAILURE);
                } else {
                    promise.setFailure(regFuture.cause());
                }
            }
        });
    }
在 doBind0()方法中,调用的是 EventLoop 的 execute()方法,我们继续跟进去:
SingleThreadEventExecutor
private void execute(Runnable task, boolean immediate) {
    boolean inEventLoop = inEventLoop();
    addTask(task);
    if (!inEventLoop) {
        startThread();
        if (isShutdown()) {
            boolean reject = false;
            try {
                if (removeTask(task)) {
                    reject = true;
                }
            } catch (UnsupportedOperationException e) {
                // The task queue does not support removal so the best thing we can do is to just move on and
                // hope we will be able to pick-up the task before its completely terminated.
                // In worst case we will log on termination.
            }
            if (reject) {
                reject();
            }
        }
    }

    if (!addTaskWakesUp && immediate) {
        wakeup(inEventLoop);
    }
}
在 execute()主要就是创建线程,将线程添加到 EventLoop 的无锁化串行任务队列。我们重点关注 startThread()方法, 继续看源代码:
private void startThread() {
        if (state == ST_NOT_STARTED) {
            if (STATE_UPDATER.compareAndSet(this, ST_NOT_STARTED, ST_STARTED)) {
                boolean success = false;
                try {
                    doStartThread();
                    success = true;
                } finally {
                    if (!success) {
                        STATE_UPDATER.compareAndSet(this, ST_STARTED, ST_NOT_STARTED);
                    }
                }
            }
        }
    }

private void doStartThread() {
        assert thread == null;
        executor.execute(new Runnable() {
            @Override
            public void run() {
                thread = Thread.currentThread();
                if (interrupted) {
                    thread.interrupt();
                }

                boolean success = false;
                updateLastExecutionTime();
                try {
                    //*
                    SingleThreadEventExecutor.this.run();
                    success = true;
                } catch (Throwable t) {
                    logger.warn("Unexpected exception from an event executor: ", t);
                } finally {
                    for (;;) {
                        int oldState = state;
                        if (oldState >= ST_SHUTTING_DOWN || STATE_UPDATER.compareAndSet(
                                SingleThreadEventExecutor.this, oldState, ST_SHUTTING_DOWN)) {
                            break;
                        }
                    }

                    // Check if confirmShutdown() was called at the end of the loop.
                    if (success && gracefulShutdownStartTime == 0) {
                        if (logger.isErrorEnabled()) {
                            logger.error("Buggy " + EventExecutor.class.getSimpleName() + " implementation; " +
                                    SingleThreadEventExecutor.class.getSimpleName() + ".confirmShutdown() must " +
                                    "be called before run() implementation terminates.");
                        }
                    }

                    try {
                        // Run all remaining tasks and shutdown hooks. At this point the event loop
                        // is in ST_SHUTTING_DOWN state still accepting tasks which is needed for
                        // graceful shutdown with quietPeriod.
                        for (;;) {
                            if (confirmShutdown()) {
                                break;
                            }
                        }

                        // Now we want to make sure no more tasks can be added from this point. This is
                        // achieved by switching the state. Any new tasks beyond this point will be rejected.
                        for (;;) {
                            int oldState = state;
                            if (oldState >= ST_SHUTDOWN || STATE_UPDATER.compareAndSet(
                                    SingleThreadEventExecutor.this, oldState, ST_SHUTDOWN)) {
                                break;
                            }
                        }

                        // We have the final set of tasks in the queue now, no more can be added, run all remaining.
                        // No need to loop here, this is the final pass.
                        confirmShutdown();
                    } finally {
                        try {
                            cleanup();
                        } finally {
                            // Lets remove all FastThreadLocals for the Thread as we are about to terminate and notify
                            // the future. The user may block on the future and once it unblocks the JVM may terminate
                            // and start unloading classes.
                            // See https://github.com/netty/netty/issues/6596.
                            FastThreadLocal.removeAll();

                            STATE_UPDATER.set(SingleThreadEventExecutor.this, ST_TERMINATED);
                            threadLock.countDown();
                            int numUserTasks = drainTasks();
                            if (numUserTasks > 0 && logger.isWarnEnabled()) {
                                logger.warn("An event executor terminated with " +
                                        "non-empty task queue (" + numUserTasks + ')');
                            }
                            terminationFuture.setSuccess(null);
                        }
                    }
                }
            }
        });
    }
我们发现 startThread()最终调用的是 SingleThreadEventExecutor.this.run()方法,这个 this 就是 NioEventLoop 对象:
@Override
    protected void run() {
        int selectCnt = 0;
        for (;;) {
            try {
                int strategy;
                try {
                    strategy = selectStrategy.calculateStrategy(selectNowSupplier, hasTasks());
                    switch (strategy) {
                    case SelectStrategy.CONTINUE:
                        continue;

                    case SelectStrategy.BUSY_WAIT:
                        // fall-through to SELECT since the busy-wait is not supported with NIO

                    case SelectStrategy.SELECT:
                        long curDeadlineNanos = nextScheduledTaskDeadlineNanos();
                        if (curDeadlineNanos == -1L) {
                            curDeadlineNanos = NONE; // nothing on the calendar
                        }
                        nextWakeupNanos.set(curDeadlineNanos);
                        try {
                            if (!hasTasks()) {
                                //*解决JDK空轮训的bug
                                strategy = select(curDeadlineNanos);
                            }
                        } finally {
                            // This update is just to help block unnecessary selector wakeups
                            // so use of lazySet is ok (no race condition)
                            nextWakeupNanos.lazySet(AWAKE);
                        }
                        // fall through
                    default:
                    }
                } catch (IOException e) {
                    // If we receive an IOException here its because the Selector is messed up. Let's rebuild
                    // the selector and retry. https://github.com/netty/netty/issues/8566
                    rebuildSelector0();
                    selectCnt = 0;
                    handleLoopException(e);
                    continue;
                }

                selectCnt++;
                cancelledKeys = 0;
                needsToSelectAgain = false;
                final int ioRatio = this.ioRatio;
                boolean ranTasks;
                if (ioRatio == 100) {
                    try {
                        if (strategy > 0) {
                            //针对不同的轮训事件进行处理
                            processSelectedKeys();
                        }
                    } finally {
                        // Ensure we always run tasks.
                        ranTasks = runAllTasks();
                    }
                } else if (strategy > 0) {
                    final long ioStartTime = System.nanoTime();
                    try {
                        processSelectedKeys();
                    } finally {
                        // Ensure we always run tasks.
                        final long ioTime = System.nanoTime() - ioStartTime;
                        ranTasks = runAllTasks(ioTime * (100 - ioRatio) / ioRatio);
                    }
                } else {
                    ranTasks = runAllTasks(0); // This will run the minimum number of tasks
                }

                if (ranTasks || strategy > 0) {
                    if (selectCnt > MIN_PREMATURE_SELECTOR_RETURNS && logger.isDebugEnabled()) {
                        logger.debug("Selector.select() returned prematurely {} times in a row for Selector {}.",
                                selectCnt - 1, selector);
                    }
                    selectCnt = 0;
                } else if (unexpectedSelectorWakeup(selectCnt)) { // Unexpected wakeup (unusual case)
                    selectCnt = 0;
                }
            } catch (CancelledKeyException e) {
                // Harmless exception - log anyway
                if (logger.isDebugEnabled()) {
                    logger.debug(CancelledKeyException.class.getSimpleName() + " raised by a Selector {} - JDK bug?",
                            selector, e);
                }
            } catch (Error e) {
                throw (Error) e;
            } catch (Throwable t) {
                handleLoopException(t);
            } finally {
                // Always handle shutdown even if the loop processing threw an exception.
                try {
                    if (isShuttingDown()) {
                        closeAll();
                        if (confirmShutdown()) {
                            return;
                        }
                    }
                } catch (Error e) {
                    throw (Error) e;
                } catch (Throwable t) {
                    handleLoopException(t);
                }
            }
        }
    }
终于看到似曾相识的代码。上面代码主要就是用一个死循环,在不断地轮询 SelectionKey。select()方法,主要用来解 决 JDK 空轮训 Bug,而 processSelectedKeys()就是针对不同的轮询事件进行处理。如果客户端有数据写入,最终也会 调用 AbstractNioMessageChannel 的 doReadMessages()方法。总结一下:
AbstractBootstrap.doBind0->SingleThreadEventExecutor.execute->SingleThreadEventExecutor.run->
NioEventLoop.run(不断轮训selectKeys)->AbstractNioChannel.read->AbstractNioMessageChannel.read->NioServerSocketChannel.doReadMessages
1、Netty 中 Selector 事件轮询是从 EventLoop 的 execute()方法开始的。
2、在 EventLoop 的 execute()方法中,会为每一个任务创建一个独立的线程,并保存到无锁化串行任务队列。
3、线程任务队列的每个任务实际调用的是 NioEventLoop 的 run()方法。
4、在 run 方法中调用 processSelectedKeys()处理轮询事件。
Handler 的添加过程
服务端 handler 的添加过程和客户端的有点区别,跟 EventLoopGroup 一样服务端的 handler 也有两个:一个是通过 handler()方法设置的 handler,另一个是通过 childHandler()方法设置的 childHandler。通过前面的 bossGroup 和 workerGroup 的分析,其实我们在这里可以大胆地猜测:handler 与 accept 过程有关。即 handler 负责处理客户端新 连接接入的请求;而 childHandler 就是负责和客户端连接的 IO 交互。那么实际上是不是这样的呢?我们继续用代码来证明。在前面章节我们已经了解 ServerBootstrap 重写了 init()方法,在这个方法中也添加了 handler:
@Override
    void init(Channel channel) {
        setChannelOptions(channel, newOptionsArray(), logger);
        setAttributes(channel, attrs0().entrySet().toArray(EMPTY_ATTRIBUTE_ARRAY));

        ChannelPipeline p = channel.pipeline();

        final EventLoopGroup currentChildGroup = childGroup;
        final ChannelHandler currentChildHandler = childHandler;
        final Entry<ChannelOption<?>, Object>[] currentChildOptions;
        synchronized (childOptions) {
            currentChildOptions = childOptions.entrySet().toArray(EMPTY_OPTION_ARRAY);
        }
        final Entry<AttributeKey<?>, Object>[] currentChildAttrs = childAttrs.entrySet().toArray(EMPTY_ATTRIBUTE_ARRAY);

        p.addLast(new ChannelInitializer<Channel>() {
            @Override
            public void initChannel(final Channel ch) {
                final ChannelPipeline pipeline = ch.pipeline();
                ChannelHandler handler = config.handler();
                if (handler != null) {
                    pipeline.addLast(handler);
                }

                ch.eventLoop().execute(new Runnable() {
                    @Override
                    public void run() {
                        pipeline.addLast(new ServerBootstrapAcceptor(
                                ch, currentChildGroup, currentChildHandler, currentChildOptions, currentChildAttrs));
                    }
                });
            }
        });
    }
在上面代码的 initChannel()方法中,首先通过 handler()方法获取一个 handler,如果获取的 handler 不为空,则添加到pipeline 中。然后接着,添加了一个 ServerBootstrapAcceptor 的实例。那么这里的 handler()方法返回的是哪个对象呢? 其实它返回的是 handler 字段,而这个字段就是我们在服务器端的启动代码中设置的:
ServerBootstrap b = new ServerBootstrap();
b.group(bossGroup, workerGroup)
那么这个时候, pipeline 中的 handler 情况如下:

![]()
根据我们原来客户端代码的分析来,我们指定 channel 绑定到 eventLoop(在这里是指 NioServerSocketChannel 绑定 到 bossGroup)后,会在 pipeline 中触发fireChannelRegistered事件,接着就会触发对 ChannelInitializer的 initChannel() 方法的调用。因此在绑定完成后,此时的 pipeline 的内如下:

![]()
在前面我们分析 bossGroup 和 workerGroup 时,已经知道了 ServerBootstrapAcceptor 的 channelRead()方法会为新建的 Channel 设置 handler 并注册到一个 eventLoop 中,即:
@Override
        @SuppressWarnings("unchecked")
        public void channelRead(ChannelHandlerContext ctx, Object msg) {
            final Channel child = (Channel) msg;

            child.pipeline().addLast(childHandler);

            setChannelOptions(child, childOptions, logger);
            setAttributes(child, childAttrs);

            try {
                childGroup.register(child).addListener(new ChannelFutureListener() {
                    @Override
                    public void operationComplete(ChannelFuture future) throws Exception {
                        if (!future.isSuccess()) {
                            forceClose(child, future.cause());
                        }
                    }
                });
            } catch (Throwable t) {
                forceClose(child, t);
            }
        }
而这里的 childHandler 就是我们在服务器端启动代码中设置的 handler:
ServerBootstrap b = new ServerBootstrap();
            b.group(bossGroup, workerGroup).channel(NioServerSocketChannel.class).childHandler(new ChannelInitializer<SocketChannel>() {
                @Override
                public void initChannel(SocketChannel ch) throws Exception {

                }
            }).option(ChannelOption.SO_BACKLOG, 128).childOption(ChannelOption.SO_KEEPALIVE, true);
后续的步骤我们基本上已经清楚了,当客户端连接 Channel 注册后,就会触发 ChannelInitializer 的 initChannel()方法 的调用。最后我们来总结一下服务端 handler 与 childHandler 的区别与联系:
1、在服务器 NioServerSocketChannel 的 pipeline 中添加的是 handler 与 ServerBootstrapAcceptor。
2、当有新的客户端连接请求时,调用 ServerBootstrapAcceptor 的 channelRead()方法创建此连接的
NioSocketChannel 并添加 childHandler 到 NioSocketChannel 对应的 pipeline 中,并将此 channel 绑定到
workerGroup 中的某个 eventLoop 中。
3、handler 是在 accept 阶段起作用,它处理客户端的连接请求。
4、childHandler 是在客户端连接建立以后起作用,它负责客户端连接的 IO 交互。
最后来看一张图,加深理解。下图描述了服务端从启动初始化到有新连接接入的变化过程:
