之前的转换算子是无法访问事件的时间戳信息和水位线信息的,而这在一些应用场景下,极为重要。例如MapFunction这样子的map转换算子就无法访问时间戳或者当前事件的事件事件。
基于此,DataStream API提供了一系列LOW-LEVEL的转换算子调用。可以访问时间戳,watermark以及注册定时事件,还可以输出特定的一些事件,例如超时时间等。
process function用来构建事件驱动的应用以及实现自定义的业务逻辑(使用之前的window函数和转换算子无法实现)。例如Flink SQL就是使用Process Function实现的。
Flink提供了8个 Process Function
ProcessFunction
KeyedProcessFunction
CoProcessFunction
ProcessJoinFunction
BroadcastProcessFunction
KeyedBroadcastProcessFunction
ProcessWindowFunction
下面几个栗子来一一说明:
栗子1- 实现一个连续15秒如果温度持续上升就报警
package com.mafei.apitest

import com.mafei.sinktest.SensorReadingTest5
import org.apache.flink.api.common.state.{ValueState, ValueStateDescriptor}
import org.apache.flink.streaming.api.functions.KeyedProcessFunction
import org.apache.flink.streaming.api.scala._
import org.apache.flink.util.Collector

object ProcessFunctionTest {

  def main(args: Array[String]): Unit = {
    //创建执行环境
    val env = StreamExecutionEnvironment.getExecutionEnvironment

    env.getConfig.setAutoWatermarkInterval(200) //直接全局设置watermark的时间为200毫秒
//    val inputStream = env.readTextFile("/opt/java2020_study/maven/flink1/src/main/resources/sensor.txt")

    //接收一个socket文本流
    val inputStream = env.socketTextStream("127.0.0.1",6666)

    env.setParallelism(1)

    //先转换成样例类类型
    val dataStream = inputStream
      .map(data => {
        val arr = data.split(",") //按照,分割数据,获取结果
        SensorReadingTest5(arr(0), arr(1).toLong, arr(2).toDouble) //生成一个传感器类的数据,参数中传toLong和toDouble是因为默认分割后是字符串类别
      })
      .keyBy(_.id)
//      .process(new TestKeydProcessFunction)  //demo
      .process(new TempIncreWarning(15000L))

    dataStream.print()
    env.execute("定时器KeydProcessFunction")

  }

}

/**
 * 定义3个参数: Key  因为上面是按照id做groupby的,所以是string
 * 输入数据: SensorReadingTest5
 * 输出数据: 这个直接定,可以根据实际情况来改
 */

class TempIncreWarning(alertInterval: Long) extends KeyedProcessFunction[String, SensorReadingTest5,String]{
  //定义状态: 保存上一个温度进行比较,保存注册定时器的时间用于删除
  lazy val lastTempValue: ValueState[Double] = getRuntimeContext.getState(new ValueStateDescriptor[Double]("lastTempValue", classOf[Double]))

  //定时器时间戳
  lazy val timerTimestampState: ValueState[Long] = getRuntimeContext.getState(new ValueStateDescriptor[Long]("timerTimestampState", classOf[Long]))

  //每条数据都会经过这个方法
  override def processElement(value: SensorReadingTest5, ctx: KeyedProcessFunction[String, SensorReadingTest5, String]#Context, out: Collector[String]): Unit = {
    //先把上一次的值,和定时器的时间给拿出来
    var lastTemp = lastTempValue.value()
    var timerTimestamp = timerTimestampState.value()

    //把上一次的值,设置成这一次的,用在下次调用
    lastTempValue.update(value.temperature)
    //用这次的温度和上一次的温度值做比较,如果比上次大,那说明在升温
    if (value.temperature > lastTemp){
      //说明是第一次,没有定时器被设定(定义的没有默认值,长整型所以是0
      if (timerTimestamp == 0){
        val ts = ctx.timerService().currentProcessingTime() + alertInterval
        ctx.timerService().registerProcessingTimeTimer(ts)
        timerTimestampState.update(ts)
      }
    }else if( value.temperature <= lastTemp){ //如果温度值没有在上升,那就需要把这个定时器给销毁掉,因为不满足15秒持续上升条件了
      ctx.timerService().deleteProcessingTimeTimer(timerTimestamp)
//      timerTimestampState.update(0L)// 可以直接设置成0
      timerTimestampState.clear() //调用这个清空方法也是一样的效果
    }

  }

  //定义触发的时候实际要做的操作
  override def onTimer(timestamp: Long, ctx: KeyedProcessFunction[String, SensorReadingTest5, String]#OnTimerContext, out: Collector[String]): Unit = {
    // ctx.getCurrentKey就是当前的sensor ID ,是上面.keyBy(_.id)这一步定义的
    out.collect("传感器 "+ctx.getCurrentKey+"温度持续了"+alertInterval +"秒在持续上升!!!!")
    timerTimestampState.clear() //已经触发了,那需要把定时器的时间给清空掉
  }
}

/**
 * 在KeyedProcessFunction中,点进去就可以看到要传的3个参数
 * * @param <K> Type of the key.
 * * @param <I> Type of the input elements.
 * * @param <O> Type of the output elements.
 */
class TestKeydProcessFunction extends KeyedProcessFunction[String, SensorReadingTest5, String]{
//  var stateTest1: valueState[Int] = _

  override def processElement(value: SensorReadingTest5, ctx: KeyedProcessFunction[String, SensorReadingTest5, String]#Context, out: Collector[String]): Unit = {
//    ctx.output()    //定义一个侧输出流
    ctx.getCurrentKey // 获取当前key, 跟从value中一个效果
    ctx.timerService().currentWatermark() //获取当前水印
    ctx.timerService().currentProcessingTime() //当前处理时间
    ctx.timerService().registerEventTimeTimer(ctx.timestamp()+ 30000L) //注册一个定时器到当前时间30秒之后
    ctx.timerService().registerProcessingTimeTimer(ctx.timestamp() * 30000L) //跟上面一样,换成processTime
    ctx.timerService().deleteEventTimeTimer(ctx.timestamp()+ 30000L) //删除一个定时器,这里的时间跟定义的时间要对的上,因为可以注册多个

  }

  override def onTimer(timestamp: Long, ctx: KeyedProcessFunction[String, SensorReadingTest5, String]#OnTimerContext, out: Collector[String]): Unit = super.onTimer(timestamp, ctx, out)
}
代码结构和运行效果: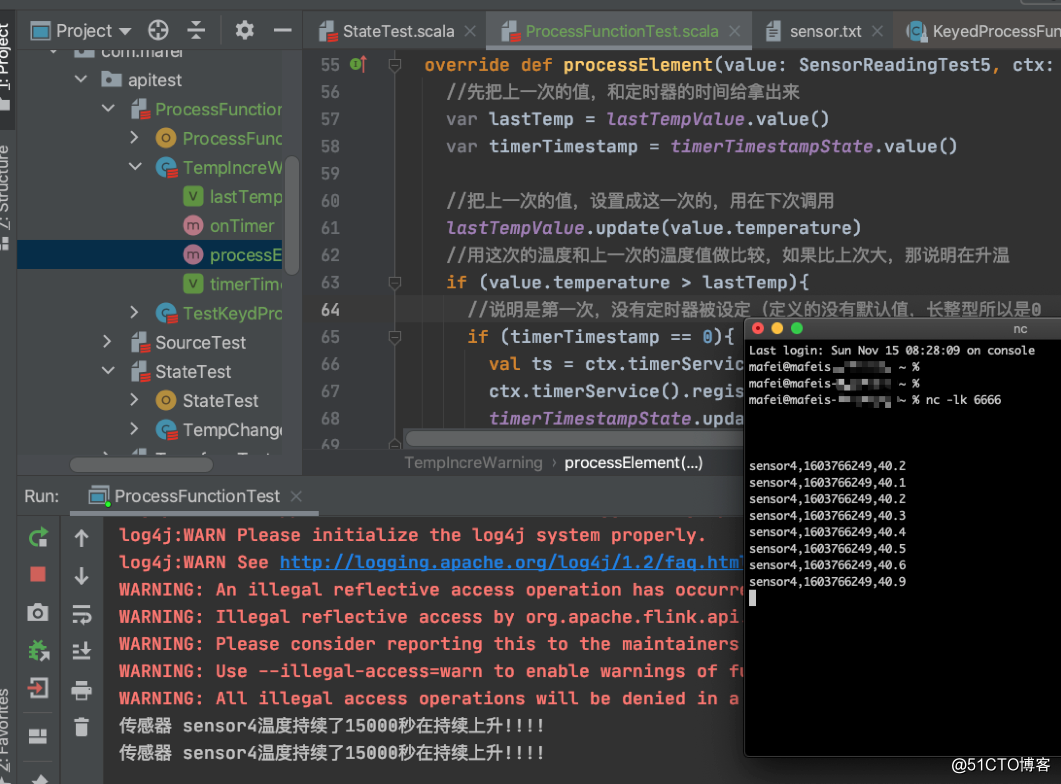
栗子2-实现一个如果温度超过15,则输出到主流上,否则输出到侧流上,实现一个分流操作
package com.mafei.apitest

import com.mafei.sinktest.SensorReadingTest5
import jdk.jfr.Threshold
import org.apache.flink.streaming.api.functions.ProcessFunction
import org.apache.flink.streaming.api.scala._
import org.apache.flink.util.Collector

object SideOutputTest {
  def main(args: Array[String]): Unit = {
    //使用ProcessFunction,利用侧输出流实现一个分流操作
    //创建执行环境
    val env = StreamExecutionEnvironment.getExecutionEnvironment

    env.getConfig.setAutoWatermarkInterval(200) //直接全局设置watermark的时间为200毫秒
    //    val inputStream = env.readTextFile("/opt/java2020_study/maven/flink1/src/main/resources/sensor.txt")

    //接收一个socket文本流
    val inputStream = env.socketTextStream("127.0.0.1",6666)

    env.setParallelism(1)

    //先转换成样例类类型
    val dataStream = inputStream
      .map(data => {
        val arr = data.split(",") //按照,分割数据,获取结果
        SensorReadingTest5(arr(0), arr(1).toLong, arr(2).toDouble) //生成一个传感器类的数据,参数中传toLong和toDouble是因为默认分割后是字符串类别
      })
      //      .process(new TestKeydProcessFunction)  //demo
      val highTempStream = dataStream.process(new SplitTempProcess(10.1))
      highTempStream.print("this is high stream: ")

    /**
     * new OutputTag[(String,Long, Double)]("low")
     * 这里[]内的是定义输出的格式,根据实际情况来改,()里面的low是标签的名称
     */
    val lowTempStream = highTempStream.getSideOutput(new OutputTag[(String,Long, Double)]("low"))
    lowTempStream.print("this is low stream: ")

    env.execute("side output test")
  }
}

//实现自定义的processFunction,利用侧输出流,进行分流操作
/**
 *
 * @param threshold
 * ProcessFunction传2个参数,第一个是输入的数据类型,第二个是输出的数据类型,都可以自定义
 *
 *
 */
class SplitTempProcess(threshold: Double) extends ProcessFunction[SensorReadingTest5, SensorReadingTest5]{
  override def processElement(value: SensorReadingTest5, ctx: ProcessFunction[SensorReadingTest5, SensorReadingTest5]#Context, out: Collector[SensorReadingTest5]): Unit = {
    //如果温度值大于设置的阈值,那直接输出
    if (value.temperature > threshold){
      out.collect(value)
    }else{   //如果小于等于就输出到侧输出流
      /**
       * 这里侧输出流的定义必须数据类型和id都要跟上面对的上,low后边的参数代表具体要输出的数据,
       */
      ctx.output(new OutputTag[(String,Long, Double)]("low"),(value.id, value.timestamp, value.temperature))
    }

  }
}
代码结构及运行效果: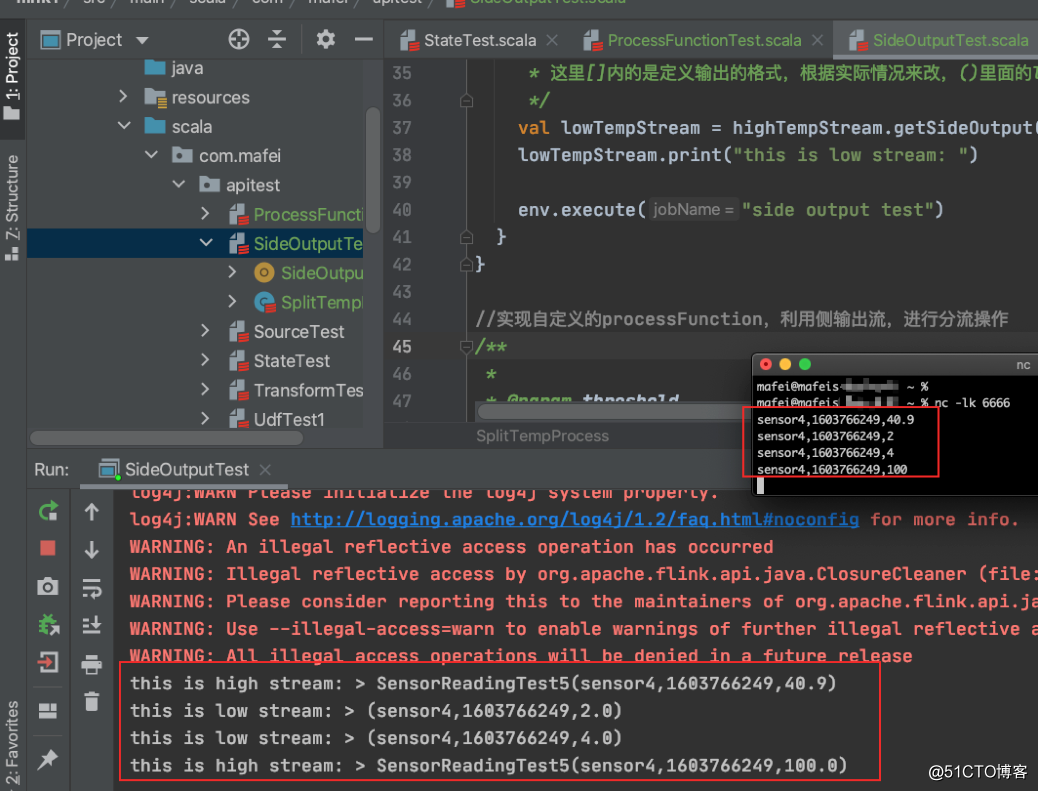
状态后端
Flink提供多种状态后端的存储形式
1)MemoryStateBackend
内存级的状态后端,会将键控状态作为内存中对象进行管理,将他们存储在TaskManager的JVM堆上,而将checkpoint存储在JobManager的内存中
特点: 快速、低延迟、单不稳定(不落盘当然快,但是掉电或者重启进程之类的就没了,通常用在测试)
FsStateBackend
将checkpoint存储到远程的持久化文件系统(FileSystem)上,而对于本地状态,跟MemoryStateBackend一样,也会存在TaskManager的JVM堆上
同时拥有内存级的本地访问速度,和更好的容错保证
RocksDBStateBackend
将所有状态序列化后,存入本地的RocksDB中存储
RocksDB的支持并不直接包含在flink中,需要单独引入依赖:
<dependency>
    <groupId>org.apache.flink</groupId>
    <artifactId>flink-statebackend-rocksdb_2.12</artifactId>
    <version>1.10.1</version>
</dependency>
在代码中配置:
//    env.setStateBackend(new MemoryStateBackend())
//    env.setStateBackend(new FsStateBackend(""))
//    env.setStateBackend(new RocksDBStateBackend(""))