参考链接: 底部导航栏的实现
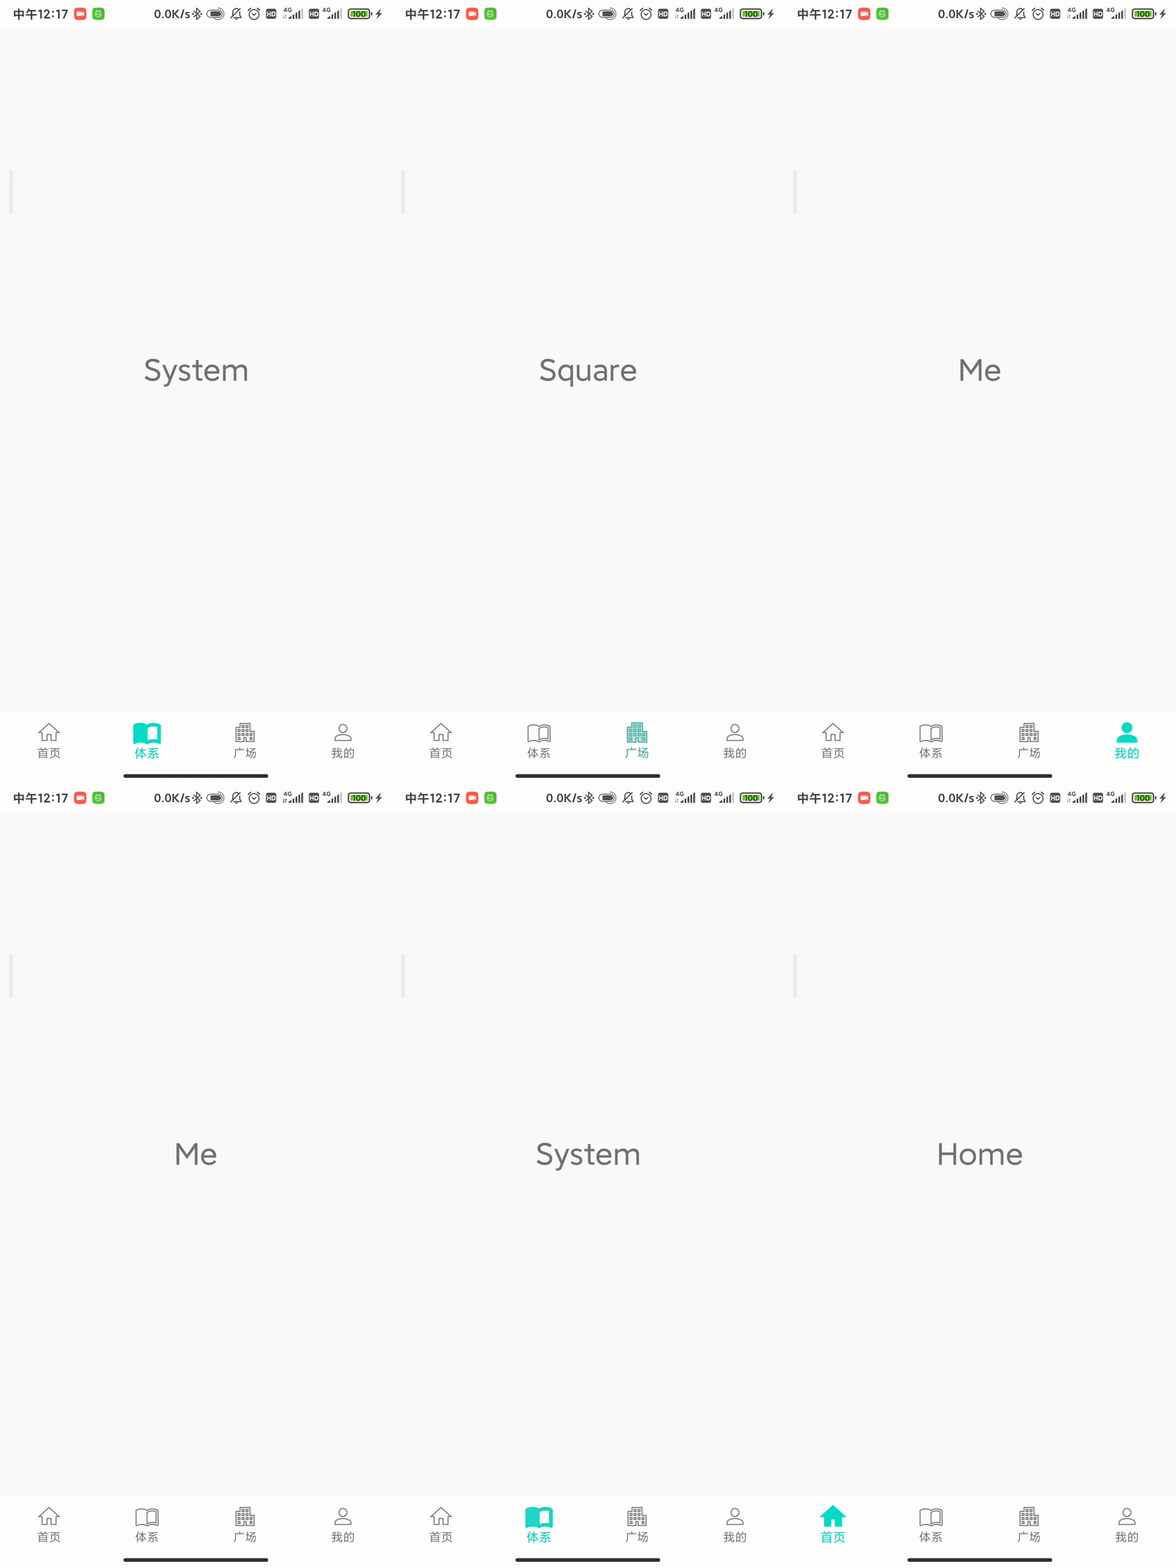
效果如下

一、MotionLayout
1.创建矢量图
在drawable目录下创建矢量图,每个矢量图都创建 fill(填充) 以及 stroke(无填充,边框) 版本,用于实现点击切换按钮状态。矢量图可以使用AS自带的,快捷创建如下图。


创建完成后会自动 fill 状态代码,可以修改相关属性。
fill
<vector xmlns:android="http://schemas.android.com/apk/res/android"
    android:width="24dp"
    android:height="24dp"
    android:viewportWidth="24"
    android:viewportHeight="24"
    android:tint="?attr/colorControlNormal">
  <path
      android:fillColor="@android:color/white"
      android:pathData="M10,20v-6h4v6h5v-8h3L12,3 2,12h3v8z"/>
</vector>
复制粘贴生成一份 stroke 状态代码。
stroke
<vector xmlns:android="http://schemas.android.com/apk/res/android"
    android:width="24dp"
    android:height="24dp"
    android:viewportWidth="24"
    android:viewportHeight="24"
    android:tint="?attr/colorControlNormal">
  <path
      android:strokeColor="@android:color/white"
      android:strokeWidth="1"
      android:pathData="M10,20v-6h4v6h5v-8h3L12,3 2,12h3v8z"/>
</vector>
2.创建MotionLayout
AS 4.0 版本支持了新的动画编辑器,让我们可以通过可视化的操作,来创建 MotionLayout 动画,MotionLayout 可以从 ConstraintLayout 转化而来。

MotionLayout 编辑界面,start状态是初始状态,即显示界面。
end是结束状态。
Transation 中控制过渡属性。

<?xml version="1.0" encoding="utf-8"?>
<androidx.constraintlayout.motion.widget.MotionLayout
    xmlns:android="http://schemas.android.com/apk/res/android"
    xmlns:app="http://schemas.android.com/apk/res-auto"
    xmlns:tools="http://schemas.android.com/tools"
    android:layout_width="match_parent"
    android:layout_height="match_parent"
    app:layoutDescription="@xml/icon_layout_scene">

    <androidx.constraintlayout.utils.widget.ImageFilterView
        android:id="@+id/imageView"
        android:layout_width="wrap_content"
        android:layout_height="wrap_content"
        app:layout_constraintBottom_toBottomOf="parent"
        app:layout_constraintEnd_toEndOf="parent"
        app:layout_constraintStart_toStartOf="parent"
        app:layout_constraintTop_toTopOf="parent"
        app:layout_constraintVertical_bias="0.5"
        app:layout_goneMarginBottom="300dp"
        app:srcCompat="@drawable/ic_home_stroke"
        app:altSrc="@drawable/ic_home_fill"
        />

    <TextView
        android:id="@+id/textView"
        android:layout_width="wrap_content"
        android:layout_height="wrap_content"
        android:text="首页"
        app:layout_constraintBottom_toBottomOf="parent"
        app:layout_constraintEnd_toEndOf="parent"
        app:layout_constraintStart_toStartOf="parent"
        app:layout_constraintTop_toBottomOf="@+id/imageView"
        android:textSize="12sp"
        />
</androidx.constraintlayout.motion.widget.MotionLayout>
ImageFilterView 可以实现图片的过渡效果。
从 ConstraintLayout 转化而来的 MotionLayout 会自动创建Scene文件,用于控制过渡动画,初始结束状态。
<?xml version="1.0" encoding="utf-8"?>
<MotionScene
    xmlns:android="http://schemas.android.com/apk/res/android"
    xmlns:motion="http://schemas.android.com/apk/res-auto">

    <Transition              // 过渡属性控制
        motion:constraintSetEnd="@+id/end"
        motion:constraintSetStart="@id/start"
        motion:duration="2000">
        <OnClick motion:targetId="@id/imageView" />
        <KeyFrameSet ></KeyFrameSet>
    </Transition>

    <ConstraintSet android:id="@+id/start">  // 初始状态
        <Constraint
            android:id="@+id/imageView"
            motion:layout_constraintEnd_toEndOf="parent"
            android:layout_width="wrap_content"
            android:layout_height="wrap_content"
            motion:layout_constraintBottom_toBottomOf="parent"
            android:layout_marginBottom="8dp"
            motion:layout_constraintTop_toTopOf="parent"
            motion:layout_constraintStart_toStartOf="parent"
            motion:layout_constraintHorizontal_bias="0.5"
            android:layout_marginTop="0dp">
            <CustomAttribute  // 颜色属性
                motion:attributeName="colorFilter"
                motion:customColorValue="?attr/colorControlNormal" />
            <CustomAttribute  // 过渡属性
                motion:attributeName="crossfade"
                motion:customFloatValue="0" />
        </Constraint>
        <Constraint
            android:id="@+id/textView"
            motion:layout_constraintEnd_toEndOf="parent"
            android:layout_width="wrap_content"
            android:layout_height="wrap_content"
            motion:layout_constraintBottom_toBottomOf="parent"
            motion:layout_constraintTop_toBottomOf="@+id/imageView"
            motion:layout_constraintStart_toStartOf="parent"
            android:layout_marginTop="0dp">
            <CustomAttribute
                motion:attributeName="textColor"
                motion:customColorValue="?attr/colorControlNormal" />
        </Constraint>
    </ConstraintSet>

    <ConstraintSet android:id="@+id/end">  // 结束状态
        <Constraint
            android:id="@+id/imageView"
            motion:layout_constraintEnd_toEndOf="parent"
            android:layout_width="wrap_content"
            android:layout_height="wrap_content"
            motion:layout_constraintBottom_toBottomOf="parent"
            android:layout_marginBottom="8dp"
            motion:layout_constraintTop_toTopOf="parent"
            motion:layout_constraintStart_toStartOf="parent"
            android:scaleX="1.2"
            android:scaleY="1.2">
            <CustomAttribute
                motion:attributeName="colorFilter"
                motion:customColorValue="@color/colorAccent" />
            <CustomAttribute
                motion:attributeName="crossfade"
                motion:customFloatValue="1" />
        </Constraint>
        <Constraint
            android:id="@+id/textView"
            motion:layout_constraintEnd_toEndOf="parent"
            android:layout_width="wrap_content"
            android:layout_height="wrap_content"
            motion:layout_constraintBottom_toBottomOf="parent"
            motion:layout_constraintTop_toBottomOf="@+id/imageView"
            motion:layout_constraintStart_toStartOf="parent"
            android:scaleX="1.05"
            android:scaleY="1.05">
            <CustomAttribute
                motion:attributeName="textColor"
                motion:customColorValue="@color/colorAccent" />
        </Constraint>
    </ConstraintSet>
</MotionScene>
activity_main.xml
放置一个 LinearLayout 布局,然后引入4个 MotionLayout 布局。
<?xml version="1.0" encoding="utf-8"?>
<androidx.constraintlayout.widget.ConstraintLayout
    xmlns:android="http://schemas.android.com/apk/res/android"
    xmlns:app="http://schemas.android.com/apk/res-auto"
    xmlns:tools="http://schemas.android.com/tools"
    android:layout_width="match_parent"
    android:layout_height="match_parent"
    tools:context=".MainActivity">


    <LinearLayout
        android:layout_width="0dp"
        android:layout_height="56dp"
        android:background="#FFFFFF"
        android:orientation="horizontal"
        app:layout_constraintBottom_toBottomOf="parent"
        app:layout_constraintEnd_toEndOf="parent"
        app:layout_constraintStart_toStartOf="parent">


        <include
            layout="@layout/home_icon_layout"
            android:layout_width="wrap_content"
            android:layout_height="wrap_content"
            android:layout_weight="1" />

        <include
            layout="@layout/system_icon_layout"
            android:layout_width="wrap_content"
            android:layout_height="wrap_content"
            android:layout_weight="1" />

        <include
            layout="@layout/square_icon_layout"
            android:layout_width="wrap_content"
            android:layout_height="wrap_content"
            android:layout_weight="1" />

        <include
            layout="@layout/me_icon_layout"
            android:layout_width="wrap_content"
            android:layout_height="wrap_content"
            android:layout_weight="1" />
    </LinearLayout>
</androidx.constraintlayout.widget.ConstraintLayout>
在LinearLayout上面放一个 NavHostFragment 用于放置导航碎片。
<fragment
    android:id="@+id/fragment"
    android:name="androidx.navigation.fragment.NavHostFragment"
    android:layout_width="409dp"
    android:layout_height="673dp"
    android:layout_marginBottom="1dp"
    app:defaultNavHost="true"
    app:layout_constraintBottom_toTopOf="@+id/linearLayout"
    app:layout_constraintEnd_toEndOf="parent"
    app:layout_constraintStart_toStartOf="parent"
    app:layout_constraintTop_toTopOf="parent"
    app:navGraph="@navigation/my_nav"   // 引入my_nav 导航界面,my_nav 中放置4个fragment
    />
二、Navigation
首先在 res 目录下创建 navigation 文件夹,然后再在文件夹下创建navigation resource file,最后导入4个fragment。

由于不需要过渡动画,所以不需要在fragment间连线。
MainActivity
为4个底部layout设置点击事件。
val destinationMap = mapOf(         // 简化重复代码, 可用于有大量重复的键值对数据
    R.id.homeFragment to homeLayout,
    R.id.systemFragment to systemLayout,
    R.id.squareFragment to squareLayout,
    R.id.meFragment to meLayout
)
navController = Navigation.findNavController(this, R.id.fragment)
destinationMap.forEach {

               // 循环map中的entity
    map ->
    map.value.setOnClickListener{

    navController.navigate(map.key)}
}
设置对应layout的动画。
navController.addOnDestinationChangedListener {

     controller, destination, arguments ->
            controller.popBackStack()
            destinationMap.forEach {

     map -> map.value.progress = 0f } // 循环设置 layout 状态为初始状态
//            when(destination.id) {


//                R.id.homeFragment -> homeLayout.transitionToEnd()
//                R.id.systemFragment -> systemLayout.transitionToEnd()
//                R.id.squareFragment -> squareLayout.transitionToEnd()
//                R.id.meFragment -> meLayout.transitionToEnd()
//            }
            destinationMap[destination.id]?.transitionToEnd() // 跳转对应 layout 状态至最终状态
        }
总结
AS 4.0 版本支持了新的动画编辑器,让我们可以通过可视化的操作,非常简单的创建 MotionLayout 动画,用来实现底部导航栏图标的动画效果。同时搭配 Navigation 使用可以方便的实现 fragment 的切换。