最近刚开始学习react-native,在做一些小项目,实现底部tab栏时卡了半天,终于解决了!
开始去网上找实现底部tab栏的方法时,很多文章都写了用react-native-tab-navigator这个npm包实现。但是react-native-tab-navigator最后更新时间已经是2017年了,已经有两年多没有维护和更新了!因此随着react版本的更新,react-native-tab-navigator很多实现方法已经和新版本的react发生冲突了,如果项目引入了这个包,运行时就会发现报错。例如:Warning: componentWillReceiveProps has been renamed, and is not recommended for use。原因是componentWillReceiveProps生命周期钩子在react中已经改为了UNSAFE_componentWillReceiveProps。诸如此类,因此不要再使用react-native-tab-navigator了(好多文章居然2019年了还在用这个包)。
推荐使用react-navigation-tabs包,以下是相关步骤。
1.引入相关包
运行下面两个指令之一
npm install react-native-reanimated react-native-gesture-handler react-native-screensreact-navigation react-navigation-tabs --save
yarn add react-native-reanimated react-native-gesture-handler react-native-screensreact-navigation react-navigation-tabs引入react-native-reanimated,react-native-gesture-handler,react-native-screens,react-navigation,react-navigation-tabs5个包,因为我们的底部导航栏要配合路由使用,前三个包是和react-native路由相关的包,后两个是和我们底部导航相关的包。
2.简单底部导航
import React from 'react';
import { Text, View } from 'react-native';
import { createAppContainer } from 'react-navigation';
import { createBottomTabNavigator } from 'react-navigation-tabs';
// 路由  组件 HomeScreen
class HomeScreen extends React.Component {
  render() {
    return (
      <View style={{ flex: 1, justifyContent: 'center', alignItems: 'center' }}>
        <Text>Home!</Text>
      </View>
    );
  }
}
// 路由  组件 SettingsScreen
class SettingsScreen extends React.Component {
  render() {
    return (
      <View style={{ flex: 1, justifyContent: 'center', alignItems: 'center' }}>
        <Text>Settings!</Text>
      </View>
    );
  }
}
// 生成导航栏
const TabNavigator = createBottomTabNavigator({
  Home: HomeScreen,
  Settings: SettingsScreen,
});

const AppContainer = createAppContainer(TabNavigator);

class App extends React.Component {
  render(){
    return <AppContainer></AppContainer>
  }
};

export default App;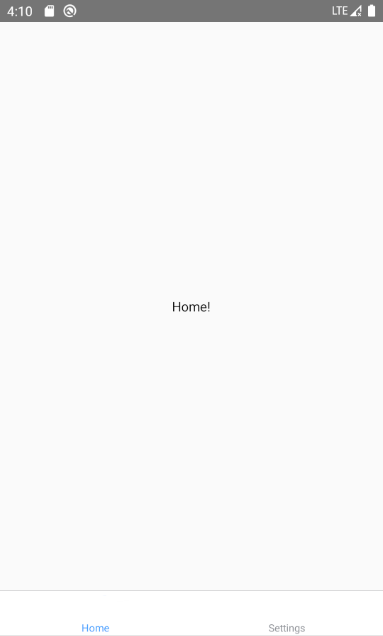
发现成功显示了导航栏,但是因为没有图标,看上去有些奇怪,配置图标继续往下走
3.导航图标相关配置
- 引入react-native-vector-icons包
运行指令yarn add react-native-vector-icons或者npm install react-native-vector-icons --save - 进行相关配置
首先在项目android/app/build.gradle目录中加入如下代码:
project.ext.vectoricons = [
    iconFontNames: [ 'MaterialIcons.ttf', 'EvilIcons.ttf', 'FontAwesome' ]
]
apply from: "../../node_modules/react-native-vector-icons/fonts.gradle"然后将node_modules/react-native-vector-icons/Fonts文件夹下面的所有文件,复制到android/app/src/main/assets/fonts文件夹下(若没有该文件夹则新建该文件夹)。
4.引入导航后最终demo代码
import React from 'react';
import { Text, View } from 'react-native';
import { createAppContainer } from 'react-navigation';
import { createBottomTabNavigator } from 'react-navigation-tabs';
// 路由  组件 HomeScreen
class HomeScreen extends React.Component {
  render() {
    return (
      <View style={{ flex: 1, justifyContent: 'center', alignItems: 'center' }}>
        <Text>Home!</Text>
      </View>
    );
  }
}
// 路由  组件 SettingsScreen
class SettingsScreen extends React.Component {
  render() {
    return (
      <View style={{ flex: 1, justifyContent: 'center', alignItems: 'center' }}>
        <Text>Settings!</Text>
      </View>
    );
  }
}
// 生成导航栏
const TabNavigator = createBottomTabNavigator(
  {
    Home: HomeScreen,
    Settings: SettingsScreen,
  },
  {
    defaultNavigationOptions: ({ navigation }) => ({
      tabBarIcon: ({ focused, horizontal, tintColor }) => {
        const { routeName } = navigation.state;
        let iconName;
        if (routeName === 'Home') {
          iconName = 'home'
        } else if (routeName === 'Settings') {
          iconName = `gear`;
        }
        return <Icon name={iconName} size={25} color={tintColor} />;
      },
    }),
    tabBarOptions: {
      activeTintColor: '#409EFF',  // 选中项的颜色
      inactiveTintColor: '#909399', // 未选中项的颜色
    },
  }
);

const AppContainer = createAppContainer(TabNavigator);

class App extends React.Component {
  render(){
    return <AppContainer></AppContainer>
  }
};
成功实现!