前言
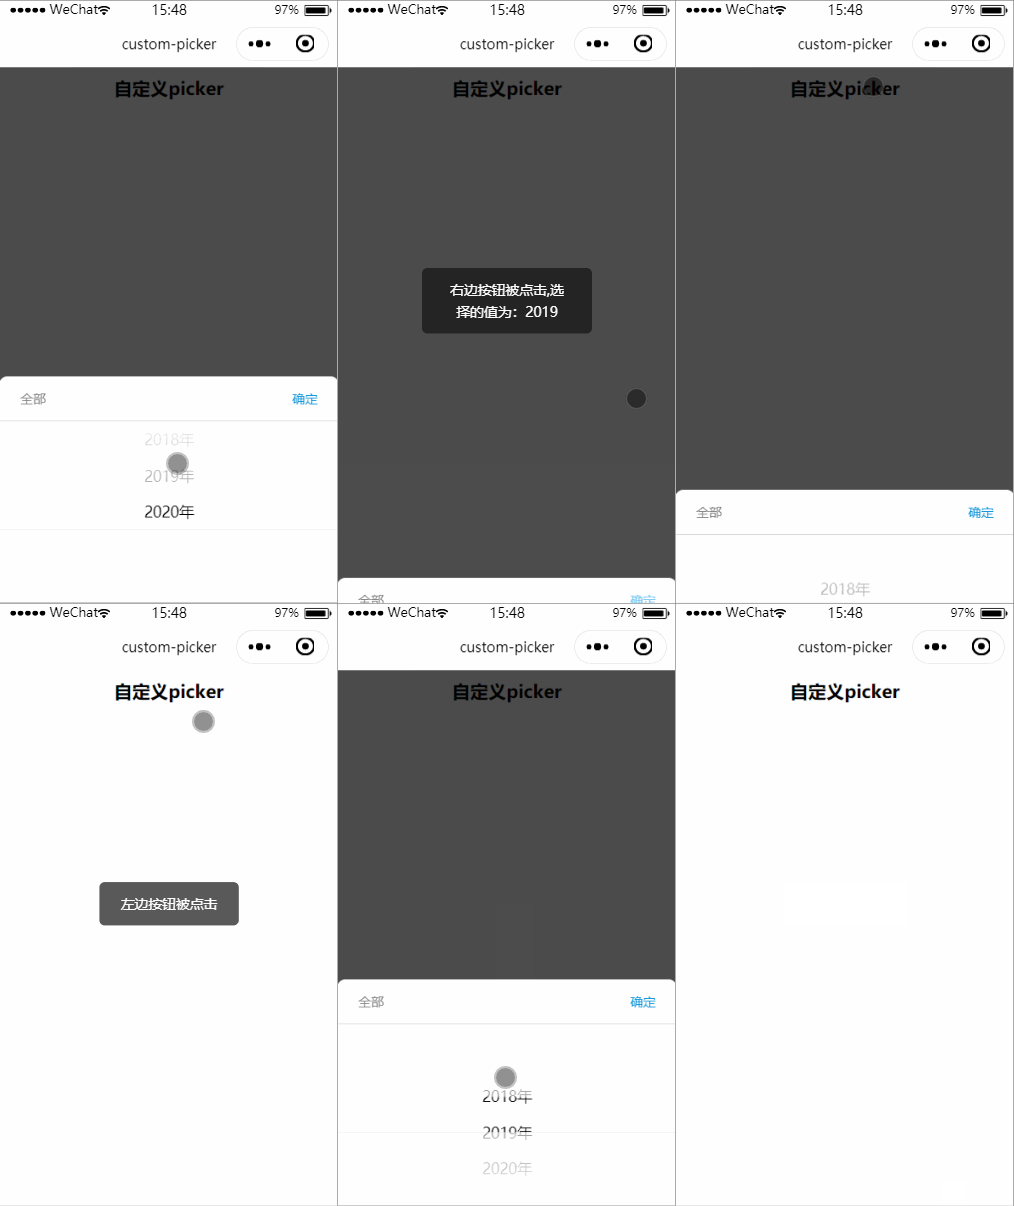
之前UI丢了一张类似这样的效果图(当然这个是本文的效果图,不是原图,不过差不多)给我:

当时看到图就想这个还不简单,直接使用picker就行了。然后就是一顿操作,选择mode为date,最终出现了效果图:

正当我沉浸在完成功能的喜悦中的时候,心里有个声音一直在提醒我:你没有达到UI需求效果,你没有达到UI需求效果,你没有达到UI需求效果…
定睛一看果然和UI效果图有些许区别,UI左上角显示的是【全部】,而我们现在是【取消】,顶部是圆角,而我们现在是直角。第二个问题影响显然比第一个问题影响小,我们直接通过微信提供的picker相关API把左上角的字修改成【全部】勉强也能用,那我们就去查看下相关API。

查遍picker这货的所有API,竟然不支持修改左上角的文字。然后我们会妥协,让UI把这个全部功能去掉或者移动到其他地方么?不,这辈子都不可能妥协,程序猿永不为奴!!!既然这样,那我们就自己来实现个picker把,开干~~

实现
通过分析UI图可以发现,整个是由四部分组成:
- 蒙层
- 底部内容
- 内容顶部按钮
- picker滚动区域
蒙层
.mask {


  position: fixed;
  width: 100%;
  height: 100%;
  left: 0;
  right: 0;
  top: 0;
  bottom: 0;
  display: flex;
  background-color: rgba(0,0,0,0.7);
  z-index: 9999;
  flex-direction: column;
  justify-content: flex-end;
 }
z-index是设置显示层级,为了让内容显示在底部,使用column布局方式,并且justify-content为flex-end。这些知识在我之前系列的文章微信小程序布局技巧里面有提到,不太清楚的可以看之前的文章。
底部内容
 .content {


  display: flex;
  flex-direction: column;
  width: 100%;
  background: white;
  border-top-right-radius: 20rpx;
  border-top-left-radius: 20rpx;
}
布局是上下排列,所以使用column布局方式,然后通过border-top-right-radius和border-top-left-radius来实现左上角和右上角的圆角。
内容顶部
.top {


  display: flex;
  flex-direction: row;
  justify-content: space-between;
  align-items: center;
  height: 100rpx;
  border-bottom: 1rpx solid #d3cfcf;
}

.top-text {


  font-size: 30rpx;
  width: 150rpx;
  height: 100rpx;
  display: flex;
  flex-direction: row;
  justify-content: center;
  align-items: center;
}
横向排列按钮,所以选用row布局,然后设置字体样式。
picker
这里主要是使用的系统提供的picekr-view实现,后面会给出完整代码。
布局实现
<view class='mask' wx:if="{

     {isShow}}" catchtap="cancel">
	<view class="content" style="height:500rpx" animation="{

     {animation}}">
		<view class="top">
			<view class="top-text top-left-color" hover-class="top-left-color-hover" catchtap="lefttap">全部</view>
			<view class="top-text top-right-color" hover-class="top-right-color-hover" catchtap="righttap">确定</view>
		</view>
		<picker-view style="width: 100%; height: 400rpx;" value="{

     {value}}" bindchange="bindChange" catchtap="no">
			<picker-view-column>
				<view wx:for="{

     {years}}" style="line-height: 50px" class="item">{

   {item}}年</view>
			</picker-view-column>
		</picker-view>
	</view>
</view>
js实现
我们这里为了更好的封装采用component形式:
var that
Component({


  /**
   * 组件的属性列表
   */
  properties: {


  	//开始年份
    start: {


      type: Number,
      value: 1900
    },
    //结束年份
    end: {


      type: Number,
      value: 9999
    }
  },

  /**
   * 组件的初始数据
   */
  data: {


    isShow: false,
    value: [0],//设置picker-view默认哪项选中
    years: [],
    year: 1900,
    current: 1900,
    dialogh: 0
  },
  attached: function () {


    console.log('attached')
    that = this
    //动画
    that.animation = wx.createAnimation({


      duration: 300
    })
    //500rpx转成px
    var dialoghpx = 500 / 750 * wx.getSystemInfoSync().windowWidth
    that.setData({


      dialogh: dialoghpx
    })
  },
  detached: function () {


    console.log('detached')
  },
  pageLifetimes: {


    //组件所在的页面被展示时执行 最低版本2.2.3
    show: function () {


      console.log('页面show')
      var yearstemp = []
      for(var i = that.properties.start; i <= that.properties.end; i ++){


        yearstemp.push(i)
      }
      //通过配置属性获取years
      that.setData({


        years: yearstemp
      })
    },
    //组件所在的页面被隐藏时执行 最低版本2.2.3
    hide: function () {


      console.log('页面被隐藏')
    },
    //这个函数一般使用场景较少,了解就可以了  最低版本2.4.0
    resize: function (size) {


      console.log('页面尺寸变化')
    }
  },
  /**
   * 组件的方法列表
   */
  methods: {


    bindChange: function (e) {


      const val = e.detail.value
      that.setData({


        year: this.data.years[val[0]]
      })
    },
    //这个current不放properties中是因为properties中的属性只会初始化一次,而这里需要动态改变
    showDialog(current){


      that.setData({


        isShow: true
      })
      var currentindex = 0
      //筛选出默认选择项目
      that.data.years.forEach(function(v,i,s){


        if(current == v){


          currentindex = i
        }
      })
      that.setData({


        [`value[0]`] : currentindex,
        year: that.data.years[currentindex],
        current: current
      })
	  //先向下移动dialog高度,然后恢复原位从而形成从下向上弹出效果
      that.animation.translateY(that.data.dialogh).translateY(0).step()
      that.setData({

    animation: that.animation.export()})
    },
    cancel(){


      //绑定cancel事件
      this.triggerEvent("cancel")
      that.dimsss()
    },
    dimsss(){


      //从原位向下移动dailog高度,形成从上向下的收起效果
      that.animation.translateY(that.data.dialogh).step()
      that.setData({

    animation: that.animation.export()})
      //动画结束后蒙层消失
      setTimeout(() => {


        that.setData({


          isShow: false
        })
     }, 300)
    },
    lefttap(){


      //绑定lefttap事件
      this.triggerEvent("lefttap")
      that.dimsss()
    },
    righttap(){


      //绑定righttap事件
      this.triggerEvent("righttap",{


        year: that.data.year
      })
      that.dimsss()
    }
  }
})
样式
.mask {


  position: fixed;
  width: 100%;
  height: 100%;
  left: 0;
  right: 0;
  top: 0;
  bottom: 0;
  display: flex;
  background-color: rgba(0,0,0,0.7);
  z-index: 9999;
  flex-direction: column;
  justify-content: flex-end;
 }

 .content {


  display: flex;
  flex-direction: column;
  width: 100%;
  background: white;
  border-top-right-radius: 20rpx;
  border-top-left-radius: 20rpx;
}

.top {


  display: flex;
  flex-direction: row;
  justify-content: space-between;
  align-items: center;
  height: 100rpx;
  border-bottom: 1rpx solid #d3cfcf;
}

.top-text {


  font-size: 30rpx;
  width: 150rpx;
  height: 100rpx;
  display: flex;
  flex-direction: row;
  justify-content: center;
  align-items: center;
}

.top-left-color {


  color: #878787;
}

.top-left-color-hover {


  color: #f1eaea;
}

.top-right-color {


  color: #1296DB;
}

.top-right-color-hover {


  color: #82ccf3;
}

.item {


  width: 100%;
  align-items: center;
  justify-content: center;
  display: flex;
  flex-direction: row;
  font-size: 35rpx;
}
使用姿势
json中引用组件:
"usingComponents": {


    "custom-picker":"../component/datepickerview/datepickerview"
  }
布局文件:
<button bindtap="showpicker">自定义picker</button>
<custom-picker id="custom-picker" start="2018" end="2020" bind:lefttap='_lefttap' bind:righttap='_righttap' bindcancel="_cancel"/>
js文件:
const app = getApp()
var that
Page({


  data: {


    current: 2019
  },
  onLoad: function () {


    that = this
  },
  onReady: function () {


    that.picker = that.selectComponent("#custom-picker")
  },
  showpicker(){


    that.picker.showDialog(that.data.current)
  },
  _lefttap(){


    wx.showToast({


      title: '左边按钮被点击',
      icon: 'none'
    })
  },
  _righttap(e){


    var year = e.detail.year
    wx.showToast({


      title: '右边按钮被点击,选择的值为:'+year,
      icon: 'none'
    })
    //保存选择的年份
    that.setData({


      current:year
    })
  },
  _cancel(){


    wx.showToast({


      title: 'picker被取消',
      icon: 'none'
    })
  }
})
最终效果图:

代码获取
如果你想要获取完整代码
请戳↓↓↓↓
点击用微信开发者工具打开
尾巴
这里还是要吐槽下微信小程序的API设计,这么一个简单的API都没有提供给开发者,为了这么一个小功能还得自己整一个picker。不过虽然折腾了下,我怎么觉得自定义的这个picker比官方的更好看,哈哈。

文章中关键位置已经做好注释,如果有问题欢迎留言。
老规矩,喜欢我的文章,欢迎素质三连:点赞,评论,关注,谢谢大家!