文章目录
一、类微信界面能实现的功能
Android Studio设计的微信类界面应该具备的功能:
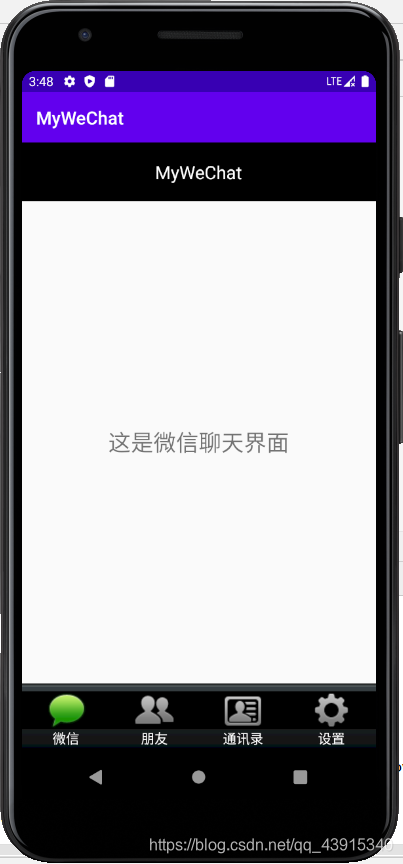
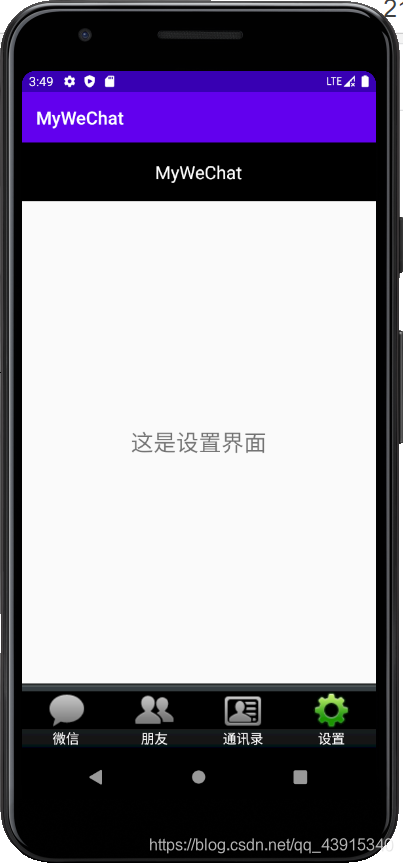
1、可以展示出微信、朋友、通讯录、设置四个主界面;
2、可以在四个主界面之间自由切换;
3、界面上方栏有标题居中,界面中间显示内容,内容随下方栏的选择而切换,界面下方栏分成四个小板块可点击切换,且正在使用的界面的图标为绿色,没有使用的界面的图标为灰色。
二、xml代码
top.xml
界面上方栏居中写标题。
<?xml version="1.0" encoding="utf-8"?>
<LinearLayout xmlns:android="http://schemas.android.com/apk/res/android"
    android:layout_width="match_parent"
    android:layout_height="65dp"
    android:gravity="center"
    android:background="#000000"
    android:orientation="vertical">

    <TextView
        android:id="@+id/textView"
        android:layout_width="wrap_content"
        android:layout_height="wrap_content"
        android:layout_gravity="center_horizontal"
        android:text="@string/app_name"
        android:textColor="#ffffff"
        android:textSize="20sp" />
</LinearLayout>

bottom.xml
界面下方栏分成四个小板块可点击切换,且正在使用的界面的图标为绿色,没有使用的界面的图标为灰色。用LinearLayout中嵌套LinearLayout。
<?xml version="1.0" encoding="utf-8"?>
 <LinearLayout xmlns:android="http://schemas.android.com/apk/res/android"
     xmlns:app="http://schemas.android.com/apk/res-auto"
     android:layout_width="match_parent"
     android:layout_height="80dp"
     android:background="@drawable/bottom_bar"
     android:orientation="horizontal"
     android:baselineAligned="false">

     <LinearLayout
         android:id="@+id/id_tab_weixin"
         android:layout_width="0dp"
         android:layout_height="match_parent"
         android:layout_weight="1"
         android:gravity="center"
         android:orientation="vertical">

         <ImageButton
             android:id="@+id/id_tab_weixin_img"
             android:layout_width="match_parent"
             android:layout_height="wrap_content"
             android:background="#000000"
             android:clickable="false"
             android:contentDescription="@string/app_name"
             app:srcCompat="@drawable/tab_weixin_pressed" />

         <TextView
             android:id="@+id/textView1"
             android:layout_width="match_parent"
             android:layout_height="wrap_content"
             android:layout_gravity="center_horizontal"
             android:gravity="center"
             android:text="微信"
             android:textColor="#ffffff"
             android:clickable="false"
             android:textSize="15sp" />
     </LinearLayout>

    <LinearLayout
        android:id="@+id/id_tab_frd"
        android:layout_width="0dp"
        android:layout_height="match_parent"
        android:layout_weight="1"
        android:gravity="center"
        android:orientation="vertical">

        <ImageButton
            android:id="@+id/id_tab_frd_img"
            android:layout_width="match_parent"
            android:layout_height="wrap_content"
            android:background="#000000"
            android:clickable="false"
            android:contentDescription="@string/app_name"
            app:srcCompat="@drawable/tab_find_frd_normal" />

        <TextView
            android:id="@+id/textView2"
            android:layout_width="match_parent"
            android:layout_height="wrap_content"
            android:layout_gravity="center_horizontal"
            android:gravity="center"
            android:text="朋友"
            android:textColor="#ffffff"
            android:clickable="false"
            android:textSize="15sp" />
    </LinearLayout>

     <LinearLayout
         android:id="@+id/id_tab_contact"
         android:layout_width="0dp"
         android:layout_height="match_parent"
         android:gravity="center"
         android:layout_weight="1"
         android:orientation="vertical">

         <ImageButton
             android:id="@+id/id_tab_contact_img"
             android:layout_width="match_parent"
             android:layout_height="wrap_content"
             android:background="#000000"
             android:clickable="false"
             android:contentDescription="@string/app_name"
             app:srcCompat="@drawable/tab_address_normal" />

         <TextView
             android:id="@+id/textView3"
             android:layout_width="match_parent"
             android:layout_height="wrap_content"
             android:layout_gravity="center_horizontal"
             android:gravity="center"
             android:text="通讯录"
             android:textColor="#ffffff"
             android:clickable="false"
             android:textSize="15sp" />
     </LinearLayout>

     <LinearLayout
         android:id="@+id/id_tab_settings"
         android:layout_width="0dp"
         android:layout_height="match_parent"
         android:gravity="center"
         android:layout_weight="1"
         android:orientation="vertical">

         <ImageButton
             android:id="@+id/id_tab_settings_img"
             android:layout_width="match_parent"
             android:layout_height="wrap_content"
             android:background="#000000"
             android:clickable="false"
             android:contentDescription="@string/app_name"
             app:srcCompat="@drawable/tab_settings_normal" />

         <TextView
             android:id="@+id/textView4"
             android:layout_width="match_parent"
             android:layout_height="wrap_content"
             android:layout_gravity="center_horizontal"
             android:gravity="center"
             android:text="设置"
             android:textColor="#ffffff"
             android:clickable="false"
             android:textSize="15sp" />
     </LinearLayout>
 </LinearLayout>

tab.xml
界面中间显示内容,有四个主界面所以要有四个tab.xml分别对应。四个tab.xml代码基本一样只需要修改文本内容即可,这儿就只展示了第一个微信界面的tab01.xml。
<?xml version="1.0" encoding="utf-8"?>
<LinearLayout xmlns:android="http://schemas.android.com/apk/res/android"
    android:layout_width="match_parent"
    android:layout_height="match_parent"
    android:gravity="center"
    android:orientation="horizontal">

    <TextView
        android:id="@+id/textView5"
        android:layout_width="wrap_content"
        android:layout_height="wrap_content"
        android:layout_gravity="center"
        android:layout_weight="1"
        android:gravity="center"
        android:text="这是微信聊天界面"
        android:textSize="25sp" />

</LinearLayout>

activity_main.xml
主界面需要用到插件FrameLayout和include。
<?xml version="1.0" encoding="utf-8"?>
<LinearLayout xmlns:android="http://schemas.android.com/apk/res/android"
    android:layout_width="match_parent"
    android:layout_height="65dp"
    android:gravity="center"
    android:background="#000000"
    android:orientation="vertical">

    <TextView
        android:id="@+id/textView"
        android:layout_width="wrap_content"
        android:layout_height="wrap_content"
        android:layout_gravity="center_horizontal"
        android:text="@string/app_name"
        android:textColor="#ffffff"
        android:textSize="20sp" />
</LinearLayout>

三、Java代码
MainActivity.java
package com.example.mywechat;
import androidx.appcompat.app.AppCompatActivity;
import android.app.Fragment;
import android.app.FragmentManager;
import android.app.FragmentTransaction;
import android.os.Bundle;
import android.view.View;
import android.view.Window;
import android.widget.ImageButton;
import android.widget.LinearLayout;

public class MainActivity extends AppCompatActivity  implements View.OnClickListener {

    private Fragment mTab01 = new weixinFragment();
    private Fragment mTab02 = new frdFragment();
    private Fragment mTab03 = new contactFragment();
    private Fragment mTab04 = new settingsFragment();

    private FragmentManager fm;

    private LinearLayout mTabweixin;
    private LinearLayout mTabfrd;
    private LinearLayout mTabcontact;
    private LinearLayout mTabsettings;

    private ImageButton mImgTabweixin;
    private ImageButton mImgTabfrd;
    private ImageButton mImgTabcontact;
    private ImageButton mImgTabsettings;

    @Override
    protected void onCreate(Bundle savedInstanceState) {
        super.onCreate(savedInstanceState);
        requestWindowFeature(Window.FEATURE_NO_TITLE );
        setContentView(R.layout.activity_main);

        initView();
        initFragment();
        initEvent();
        selectfragment(0);
    }

    private void initFragment(){
        fm = getFragmentManager();
        FragmentTransaction transaction = fm.beginTransaction();
        transaction.add(R.id.id_content, mTab01);
        transaction.add(R.id.id_content, mTab02);
        transaction.add(R.id.id_content, mTab03);
        transaction.add(R.id.id_content, mTab04);
        transaction.commit();
    }

    private void initView(){
        mTabweixin=(LinearLayout) findViewById(R.id.id_tab_weixin);
        mTabfrd=(LinearLayout) findViewById(R.id.id_tab_frd);
        mTabcontact=(LinearLayout) findViewById(R.id.id_tab_contact);
        mTabsettings=(LinearLayout) findViewById(R.id.id_tab_settings);

        mImgTabweixin = (ImageButton)findViewById(R.id.id_tab_weixin_img);
        mImgTabfrd = (ImageButton)findViewById(R.id.id_tab_frd_img);
        mImgTabcontact = (ImageButton)findViewById(R.id.id_tab_contact_img);
        mImgTabsettings = (ImageButton)findViewById(R.id.id_tab_settings_img);
    }

    private void initEvent(){
        mTabweixin.setOnClickListener(this);
        mTabfrd.setOnClickListener(this);
        mTabcontact.setOnClickListener(this);
        mTabsettings.setOnClickListener(this);
    }

    private void hideFragment(FragmentTransaction transaction) {
        transaction.hide(mTab01);
        transaction.hide(mTab02);
        transaction.hide(mTab03);
        transaction.hide(mTab04);
    }

    private void selectfragment(int i){
        FragmentTransaction transaction = fm.beginTransaction();
        hideFragment(transaction);
        //把图片设置为亮的
        //设置内容区域
        switch (i){
            case 0:
                transaction.show(mTab01);
                mImgTabweixin.setImageResource(R.drawable.tab_weixin_pressed);
                break;
            case 1:
                transaction.show(mTab02);
                mImgTabfrd.setImageResource(R.drawable.tab_find_frd_pressed);
                break;
            case 2:
                transaction.show(mTab03);
                mImgTabcontact.setImageResource(R.drawable.tab_address_pressed);
                break;
            case 3:
                transaction.show(mTab04);
                mImgTabsettings.setImageResource(R.drawable.tab_settings_pressed);
                break;
            default:
                break;
        }
        transaction.commit();
    }

    @Override
    public void onClick(View view) {
        resetimg();
        switch (view.getId()){
            case R.id.id_tab_weixin:
                selectfragment(0);
                break;
            case R.id.id_tab_frd:
                selectfragment(1);
                break;
            case R.id.id_tab_contact:
                selectfragment(2);
                break;
            case R.id.id_tab_settings:
                selectfragment(3);
                break;
        }
    }

    public void resetimg(){
        //图片变灰
        mImgTabweixin.setImageResource(R.drawable.tab_weixin_normal);
        mImgTabfrd.setImageResource(R.drawable.tab_find_frd_normal);
        mImgTabcontact.setImageResource(R.drawable.tab_address_normal);
        mImgTabsettings.setImageResource(R.drawable.tab_settings_normal);
    }
}
介绍一下各个函数的作用,initFragment函数中利用transaction来实现fragment的切换;initView改变图标的颜色;selectfragment显示正在使用界面的fragment的内容,并且让正在使用的界面的图标为绿色;hideFragment把没有使用的界面的fragment的内容隐藏起来;resetimg让没有使用的界面的图标为灰色;onClick监听函数,监听到底是哪一个图标被击中从而显示哪一个界面的内容。
weixinFragment
调用tab01
package com.example.mywechat;
import android.os.Bundle;
import android.app.Fragment;
import android.view.LayoutInflater;
import android.view.View;
import android.view.ViewGroup;

public class weixinFragment extends Fragment {
    private static final String ARG_PARAM1 = "param1";
    private static final String ARG_PARAM2 = "param2";
    private String mParam1;
    private String mParam2;

    public weixinFragment() {
        // Required empty public constructor
    }

    /**
     * Use this factory method to create a new instance of
     * this fragment using the provided parameters.
     *
     * @param param1 Parameter 1.
     * @param param2 Parameter 2.
     * @return A new instance of fragment weixinFragment.
     */
    // TODO: Rename and change types and number of parameters
    public static weixinFragment newInstance(String param1, String param2) {
        weixinFragment fragment = new weixinFragment();
        Bundle args = new Bundle();
        args.putString(ARG_PARAM1, param1);
        args.putString(ARG_PARAM2, param2);
        fragment.setArguments(args);
        return fragment;
    }

    @Override
    public void onCreate(Bundle savedInstanceState) {
        super.onCreate(savedInstanceState);
        if (getArguments() != null) {
            mParam1 = getArguments().getString(ARG_PARAM1);
            mParam2 = getArguments().getString(ARG_PARAM2);
        }
    }

    @Override
    public View onCreateView(LayoutInflater inflater, ViewGroup container,
                             Bundle savedInstanceState) {
        // Inflate the layout for this fragment
        return inflater.inflate(R.layout.tab01, container, false);
    }
}
frdFragment
调用tab02
package com.example.mywechat;
import android.os.Bundle;
import android.view.LayoutInflater;
import android.view.View;
import android.view.ViewGroup;
import android.app.Fragment;

public class frdFragment extends Fragment {

    // TODO: Rename parameter arguments, choose names that match
    // the fragment initialization parameters, e.g. ARG_ITEM_NUMBER
    private static final String ARG_PARAM1 = "param1";
    private static final String ARG_PARAM2 = "param2";

    // TODO: Rename and change types of parameters
    private String mParam1;
    private String mParam2;

    public frdFragment() {
        // Required empty public constructor
    }

    /**
     * Use this factory method to create a new instance of
     * this fragment using the provided parameters.
     *
     * @param param1 Parameter 1.
     * @param param2 Parameter 2.
     * @return A new instance of fragment weixinFragment.
     */
    // TODO: Rename and change types and number of parameters
    public static frdFragment newInstance(String param1, String param2) {
        frdFragment fragment = new frdFragment();
        Bundle args = new Bundle();
        args.putString(ARG_PARAM1, param1);
        args.putString(ARG_PARAM2, param2);
        fragment.setArguments(args);
        return fragment;
    }

    @Override
    public void onCreate(Bundle savedInstanceState) {
        super.onCreate(savedInstanceState);
        if (getArguments() != null) {
            mParam1 = getArguments().getString(ARG_PARAM1);
            mParam2 = getArguments().getString(ARG_PARAM2);
        }
    }

    @Override
    public View onCreateView(LayoutInflater inflater, ViewGroup container,
                             Bundle savedInstanceState) {
        // Inflate the layout for this fragment
        return inflater.inflate(R.layout.tab02, container, false);
    }
}
contactFragment
调用tab03
package com.example.mywechat;
import android.os.Bundle;
import android.view.LayoutInflater;
import android.view.View;
import android.view.ViewGroup;
import android.app.Fragment;

public class contactFragment extends Fragment {

    // TODO: Rename parameter arguments, choose names that match
    // the fragment initialization parameters, e.g. ARG_ITEM_NUMBER
    private static final String ARG_PARAM1 = "param1";
    private static final String ARG_PARAM2 = "param2";

    // TODO: Rename and change types of parameters
    private String mParam1;
    private String mParam2;

    public contactFragment() {
        // Required empty public constructor
    }

    /**
     * Use this factory method to create a new instance of
     * this fragment using the provided parameters.
     *
     * @param param1 Parameter 1.
     * @param param2 Parameter 2.
     * @return A new instance of fragment weixinFragment.
     */
    // TODO: Rename and change types and number of parameters
    public static contactFragment newInstance(String param1, String param2) {
        contactFragment fragment = new contactFragment();
        Bundle args = new Bundle();
        args.putString(ARG_PARAM1, param1);
        args.putString(ARG_PARAM2, param2);
        fragment.setArguments(args);
        return fragment;
    }

    @Override
    public void onCreate(Bundle savedInstanceState) {
        super.onCreate(savedInstanceState);
        if (getArguments() != null) {
            mParam1 = getArguments().getString(ARG_PARAM1);
            mParam2 = getArguments().getString(ARG_PARAM2);
        }
    }

    @Override
    public View onCreateView(LayoutInflater inflater, ViewGroup container,
                             Bundle savedInstanceState) {
        // Inflate the layout for this fragment
        return inflater.inflate(R.layout.tab03, container, false);
    }
}
settingsFragment
调用tab04
package com.example.mywechat;
import android.os.Bundle;
import android.view.LayoutInflater;
import android.view.View;
import android.view.ViewGroup;
import android.app.Fragment;

public class settingsFragment extends Fragment {

    // TODO: Rename parameter arguments, choose names that match
    // the fragment initialization parameters, e.g. ARG_ITEM_NUMBER
    private static final String ARG_PARAM1 = "param1";
    private static final String ARG_PARAM2 = "param2";

    // TODO: Rename and change types of parameters
    private String mParam1;
    private String mParam2;

    public settingsFragment() {
        // Required empty public constructor
    }

    /**
     * Use this factory method to create a new instance of
     * this fragment using the provided parameters.
     *
     * @param param1 Parameter 1.
     * @param param2 Parameter 2.
     * @return A new instance of fragment weixinFragment.
     */
    // TODO: Rename and change types and number of parameters
    public static settingsFragment newInstance(String param1, String param2) {
        settingsFragment fragment = new settingsFragment();
        Bundle args = new Bundle();
        args.putString(ARG_PARAM1, param1);
        args.putString(ARG_PARAM2, param2);
        fragment.setArguments(args);
        return fragment;
    }

    @Override
    public void onCreate(Bundle savedInstanceState) {
        super.onCreate(savedInstanceState);
        if (getArguments() != null) {
            mParam1 = getArguments().getString(ARG_PARAM1);
            mParam2 = getArguments().getString(ARG_PARAM2);
        }
    }

    @Override
    public View onCreateView(LayoutInflater inflater, ViewGroup container,
                             Bundle savedInstanceState) {
        // Inflate the layout for this fragment
        return inflater.inflate(R.layout.tab04, container, false);
    }
}
四、运行界面展示


最后附上源码的代码仓库地址(码云)
链接:https://gitee.com/yuiaikn/android