文章目录
一、事务的概念
(1)什么是事务
事务指的是逻辑上的一组操作,组成这组操作的各个单元要么全都成功,要么全都失败。
作用:保证在一个事务中多次操作数据库表中数据时,要么全部成功,要么全部失败。
目的:
- (1)保持多并发情况下数据一致.
- (2)如果出现错误的操作可以进行改正
1000    update-100
断电
1000   update +100
(2)事务的特性
事务的特性(ACID)
数据库的事务必须具备ACID特性,ACID是指 Atomic(原子性)、Consistensy(一致性)、Isolation(隔离型)和Durability(持久性)的英文缩写。
- 1、原子性(Atomicity)
事务包装的一组sql,要么都执行成功,要么都失败。这些操作是不可分割的。 - 2、一致性(Consistency)
数据库的数据状态是一致的。
事务的成功与失败,最终数据库的数据都是符合实际生活的业务逻辑。一致性绝大多数依赖业务逻辑和原子性。 - 3、持久性:(Durability)
事务成功提交之后,对于数据库的改变是永久的。哪怕数据库发生异常,重启之后数据亦然存在。 - 4、隔离性(Isolation)
一个事务的成功或者失败对于其他的事务是没有影响。2个事务应该相互独立。
二、事务的术语
(1)什么是事务的隔离级别

(2)并发问题
-
脏读: 一个事务读到了另一个事务的还没有提交数据.
脏数据(正在编辑中的数据) dirty data
Clean data : 编辑完成的数据(保存,撤销)

-
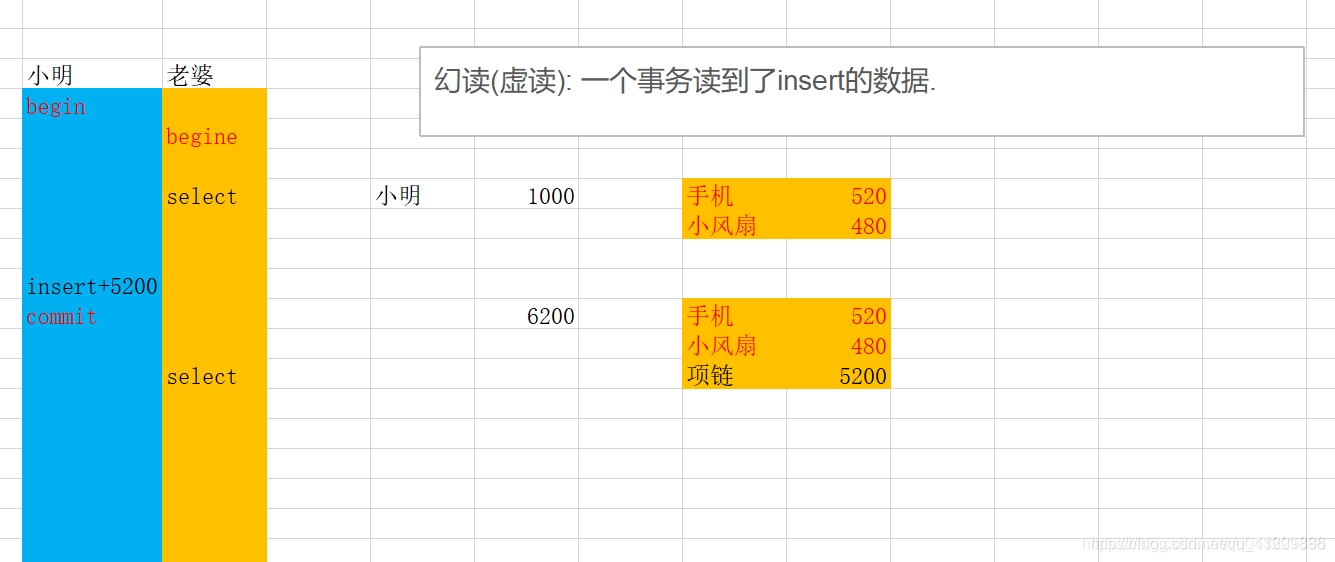
幻读(虚读):一个事务读到了insert的数据.
-
不可重复读:一个事务中多次读到的数据不一致.一个事务读到了另一个事务修改后的数据.

-
幻读与不可重复读的区别:
两者有些相似,但是前者针对的是insert,后者针对的update或delete。
三、Spring事务管理–准备
(1)spring的事务实现方式
- 1.编程式事务管理
- 2.声明式事务管理 (使用aop xml 或注解的配置即可实现事务管理)
(2)准备数据库
sql
create database day23db ;
use day23db;
create table `account` (
  `id` int(8) not null  primary key auto_increment,
  `name` varchar(64) default null,
  `money` double default null
)

insert into account values(null,'jack',1000);
insert into account values(null,'rose',1000);

# 转账
update account set money=money-500 where `name`='jack';
update account set money=money+500 where `name`='rose';
(3)POM.xml
<dependencies>
        <!-- jdbc-->
        <dependency>
            <groupId>mysql</groupId>
            <artifactId>mysql-connector-java</artifactId>
            <version>5.1.46</version>
        </dependency>
        <!-- ioc-->
        <dependency>
            <groupId>org.springframework</groupId>
            <artifactId>spring-context</artifactId>
            <version>5.2.9.RELEASE</version>
        </dependency>
        <!-- jdbctemplate-->
        <dependency>
            <groupId>org.springframework</groupId>
            <artifactId>spring-jdbc</artifactId>
            <version>5.2.9.RELEASE</version>
        </dependency>
        <!-- test-->
        <dependency>
            <groupId>org.springframework</groupId>
            <artifactId>spring-test</artifactId>
            <version>5.2.9.RELEASE</version>
        </dependency>
        <dependency>
            <groupId>junit</groupId>
            <artifactId>junit</artifactId>
            <version>4.12</version>
        </dependency>
       <!-- aop-->
        <dependency>
            <groupId>org.aspectj</groupId>
            <artifactId>aspectjweaver</artifactId>
            <version>1.7.2</version>
        </dependency>
    </dependencies>
(4)实现
- 编写TestAccountService
@RunWith(SpringJUnit4ClassRunner.class)
@ContextConfiguration("classpath:applicationContext.xml")
public class TestAccountServiceImpl {


    @Autowired
    IAccountService service ;
    @Test
    public void test01(){


        //业务对象
        //IAccountService service = new AccountServiceImpl();
        //调用方法 translate(一个人转出,另一个转入,金额)
        service.translate("jack","rose",500.00);
    }
}
- AccountServiceImpl
@Service
public class AccountServiceImpl implements IAccountService{


    @Autowired
    IAccountDao dao ;

    @Override
    public void translate(String from, String to, double money) {


        //创建AccountDaoImpl
        //AccountDaoImpl dao = new AccountDaoImpl();
        //调用方法
        dao.translateOut(from,money);
        System.out.println(1/0); //断电
        dao.translateIn(to,money);
        System.out.println("--translate");
    }
}
- IAccountService
public interface IAccountService {


    //转账本身就是从一个账户减钱,另一个账户加钱
    void translate(String from, String to, double money);
}
- AccountDaoImpl
@Repository
public class AccountDaoImpl implements IAccountDao {


    @Autowired
    JdbcTemplate jdbcTemplate;
    @Override
    public void update(String account, double v) {


       System.out.println(account+" "+v);
       jdbcTemplate.update("update account set money=money+? where `name`=?",v,account);
    }

    @Override
    public void translateOut(String account, double v) {


        jdbcTemplate.update("update account set money=money-? where `name`=?",v,account);
    }

    @Override
    public void translateIn(String account, double v) {


        jdbcTemplate.update("update account set money=money+? where `name`=?",v,account);
    }
}
- IAccountDao
public interface IAccountDao {


    @Deprecated
    void update(String account, double v);
    void translateOut(String account, double v);
    void translateIn(String account, double v);
}
- applicationContext.xml
<?xml version="1.0" encoding="UTF-8"?>
<beans xmlns="http://www.springframework.org/schema/beans"
       xmlns:xsi="http://www.w3.org/2001/XMLSchema-instance"
       xmlns:context="http://www.springframework.org/schema/context"
       xmlns:aop="http://www.springframework.org/schema/aop"
       xsi:schemaLocation="http://www.springframework.org/schema/beans http://www.springframework.org/schema/beans/spring-beans.xsd http://www.springframework.org/schema/context http://www.springframework.org/schema/context/spring-context.xsd http://www.springframework.org/schema/aop http://www.springframework.org/schema/aop/spring-aop.xsd">

    <!-- 数据源-->
    <bean id="dataSource" class="org.springframework.jdbc.datasource.DriverManagerDataSource">
        <property name="url" value="jdbc:mysql://localhost:3306/day23db"/>
        <property name="username" value="root"/>
        <property name="password" value="123456"/>
    </bean>
    <!-- jdbcTemplate-->
    <bean id="jdbcTemplate" class="org.springframework.jdbc.core.JdbcTemplate">
        <constructor-arg name="dataSource" ref="dataSource"/>
    </bean>

    <!--包扫描创建对象 扫描包与它下面的子包中的所有类-->
    <context:component-scan base-package="com.wzx"/>

    <!--开启自动AOP代理-->
    <aop:aspectj-autoproxy/>

</beans>
四、Spring事务管理–转账–xml事务
解决方式是使用spring基于xml的事务管理.
步骤:
一.在bean.xml中配置3个内容
1.配置平台事务管理器(注入dataSource)
2.编写一个tx:Advice 设置事务的增强
3.配置aop (配置切点, 切点和增强的组合);

- tx标签
<?xml version="1.0" encoding="UTF-8"?>
<beans xmlns="http://www.springframework.org/schema/beans"
       xmlns:xsi="http://www.w3.org/2001/XMLSchema-instance"
       xmlns:context="http://www.springframework.org/schema/context" xmlns:tx="http://www.springframework.org/schema/tx"
       xmlns:aop="http://www.springframework.org/schema/aop"
       xsi:schemaLocation="http://www.springframework.org/schema/beans
       http://www.springframework.org/schema/beans/spring-beans.xsd
        http://www.springframework.org/schema/context
         http://www.springframework.org/schema/context/spring-context.xsd
         http://www.springframework.org/schema/tx
         http://www.springframework.org/schema/tx/spring-tx.xsd
          http://www.springframework.org/schema/aop
           http://www.springframework.org/schema/aop/spring-aop.xsd">
- 配置tx
 <!--1.要在bean.xml中创建spring的平台事务管理器  (DataSourceTransactionManager   )  注入dataSource-->
    <bean id="transactionManager" class="org.springframework.jdbc.datasource.DataSourceTransactionManager">
        <property name="dataSource" ref="dataSource"/>
    </bean>

    <!--2.我们需要创建一个 tx:advice 增强-->
    <!--里面定义了筛选那些方法进行事务控制, 设置事务的隔离级别规则,  设置事务传播行为的规则  , 设置事务超时时间  设置事务是否只读..-->
    <tx:advice id="adviceId" transaction-manager="transactionManager">
        <tx:attributes>
            <!--
                该增强中的规则:
                name代表筛选那些方法收到事务的增强
                isolation : 隔离级别 REPEATABLE_READ 可重复读
                propagation: 传播行为
                read-only: 是否为只读事务
                timeout: 事务是否超时
            -->
            <tx:method name="translate" isolation="REPEATABLE_READ"  propagation="REQUIRED" read-only="false" timeout="-1" />
        </tx:attributes>
    </tx:advice>

    <aop:config>
        <aop:pointcut id="translate" expression="execution(* com.wzx.service.AccountServiceImpl.translate(..))"/>
        <aop:advisor advice-ref="adviceId" pointcut-ref="translate"/>
    </aop:config>
</beans>
五、Spring事务管理–转账–注解
使用注解事务管理:
1.重新复制 dao层的代码 service层的代码 (给实现类上添加@Repository @Service) 注入的时候使用@Autowried自动注入
2.重新编写一个bean3.xml (保留: 加载db.properties , DataSource , JdbcTemplate , 平台事务管理器其他xml配置删除); 先配置包扫描
再该xml中重新添加 注解驱动 (支持注解方式的事务)
3.给AccountServiceImpl 类上添加一个@Transactional注解即可
4.测试AccountService 的transfer方法 看看是否能够控制事务
- applicationContext.xml
  <!--1.要在bean.xml中创建spring的平台事务管理器  (DataSourceTransactionManager   )  注入dataSource-->
    <bean id="transactionManager" class="org.springframework.jdbc.datasource.DataSourceTransactionManager">
        <property name="dataSource" ref="dataSource"/>
    </bean>

    <!--2.配置注解驱动-->
    <tx:annotation-driven transaction-manager="transactionManager"/>
- AccountServiceImpl
@Service
//@Transactional(isolation = Isolation.REPEATABLE_READ ,propagation = Propagation.REQUIRED ,timeout = -1)
public class AccountServiceImpl implements IAccountService{


    @Autowired
    IAccountDao dao ;
    @Transactional(isolation = Isolation.REPEATABLE_READ ,propagation = Propagation.REQUIRED ,timeout = -1)
    @Override
    public void translate(String from, String to, double money) {


        //创建AccountDaoImpl
        //AccountDaoImpl dao = new AccountDaoImpl();
        //调用方法

        dao.translateOut(from,money);
        System.out.println(1/0); //断电
        dao.translateIn(to,money);
        System.out.println("--translate");
    }
}