1.准备rpm安装包:
rpm地址:https://packages.microsoft.com/rhel/7/

软件包:
wget https://packages.microsoft.com/rhel/7/mssql-server-2019/mssql-server-15.0.4073.23-4.x86_64.rpm
工具包:
wget https://packages.microsoft.com/rhel/7/prod/msodbcsql17-17.6.1.1-1.x86_64.rpm
wget https://packages.microsoft.com/rhel/7/prod/mssql-tools-17.6.1.1-1.x86_64.rpm
2.yum安装mssql-server
yum localinstall mssql-server-15.0.4073.23-4.x86_64.rpm
3.配置:
[root@oem sqlserver2019]# cd /opt/mssql/bin
[root@oem bin]# pwd
/opt/mssql/bin
[root@oem bin]# ./mssql-conf setup

4.验证服务:
systemctl status mssql-server
5.启用代理服务:
/opt/mssql/bin/mssql-conf list|grep sqlagent
/opt/mssql/bin/mssql-conf set sqlagent.enabled true
systemctl restart mssql-server
6.安装工具:
yum localinstall msodbcsql17-17.6.1.1-1.x86_64.rpm
yum localinstall mssql-tools-17.6.1.1-1.x86_64.rpm
7.防火墙打开1433端口
firewall-cmd --zone=public --add-port=1433/tcp --permanent
firewall-cmd --reload
8.测试连接:
[root@oem sqlserver2019]# echo 'export PATH="$PATH:/opt/mssql-tools/bin"' >> ~/.bash_profile
[root@oem sqlserver2019]# source ~/.bash_profile
[root@oem sqlserver2019]# echo 'export PATH="$PATH:/opt/mssql-tools/bin"' >> ~/.bashrc
[root@oem sqlserver2019]# source ~/.bashrc
[root@oem sqlserver2019]# sqlcmd -S localhost -U sa
Password:
1> SELECT @@VERSION
2> go
------------------------------------------------------------------------------------------------------------------------------------------------------------------------------------------------------------------------------------------------------------------------------------------------------------
Microsoft SQL Server 2019 (RTM-CU8) (KB4577194) - 15.0.4073.23 (X64)
Sep 23 2020 16:03:08
Copyright (C) 2019 Microsoft Corporation
Developer Edition (64-bit) on Linux (CentOS Linux 7 (Core)) <X64>
(1 rows affected)
1> select name from sys.databases;
2> go
name
--------------------------------------------------------------------------------------------------------------------------------
master
tempdb
model
msdb
(4 rows affected)
1>
数据库默认路径:

9.可以在windows系统安smss工具进行管理连接


尝试将数据库文件存放到指定目录下


代理服务报错:
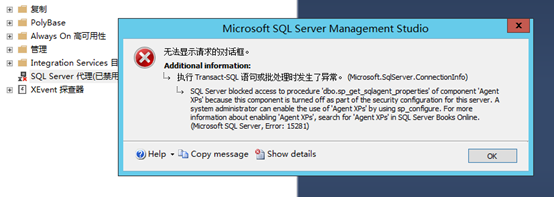
解决办法参考链接:
https://www.mssqltips.com/sqlservertip/2729/how-to-start-sql-server-agent-when-agent-xps-show-disabled/
1.检查
EXEC SP_CONFIGURE 'Agent XPs'
2.
EXEC SP_CONFIGURE 'show advanced options',1
GO
RECONFIGURE
GO
EXEC SP_CONFIGURE 'show advanced options'
3.
EXEC SP_CONFIGURE 'Agent XPs',1
GO
RECONFIGURE
4.重新刷新代理服务,绿色正常。

最后查看检查EXEC SP_CONFIGURE 'Agent XPs'

其它参考:https://www.cnblogs.com/fishparadise/p/8057650.html