远程调用主要处理三个流程:
- 消费者向提供者发起请求
- 提供者处理消费者请求
- 消费者处理提供者响应
1. NettyClient 的创建
上一章服务订阅,有两个地方没有说完,其中之一:无论是本地注册表方式,还是注册中心方式,最终都会使用Dubbo协议构建Invoker时,我们只分析到了DubboProtocol的protocolBindingRefer方法,看到创建了DubboInvoker,但是并没有分析这个类,现在我们要分析这个类,因为DubboInvoker里包含了一个非常重要的对象ExchangeClient,就是通过它负责和服务端通信的:
PS:服务注册的时候提供者端会启动ExchangeServer,包含了一个由NettyServer实现的Server,而ExchangeClient包含了一个由NettyClient实现的Client
首先要清楚,一个 Consumer 与一个 Provider 间的连接可以是多个,这个具体数量可以在配置文件中指定。在 Consumer 动态更新来自于 zk 的Provider 时,Consumer 会为每个连接创建一个 NettyClient,用于向 Provider 提交请求。
通过<dubbo:reference/>的connections属性可以配置消费者服务端之间的连接数量,每一个连接对应一个NettyClient,一但配置了初始化但时候直接创建10个连接,而不是来一个请求创建一个,除非配置了延迟连接
- NettyServer是同一个协议下,相同地址端口,对应一个NettyServer
- NettyClient是根据connections决定,如果没配置,大家共享一个NettyClient,否则会创建对应connections的NettyClient

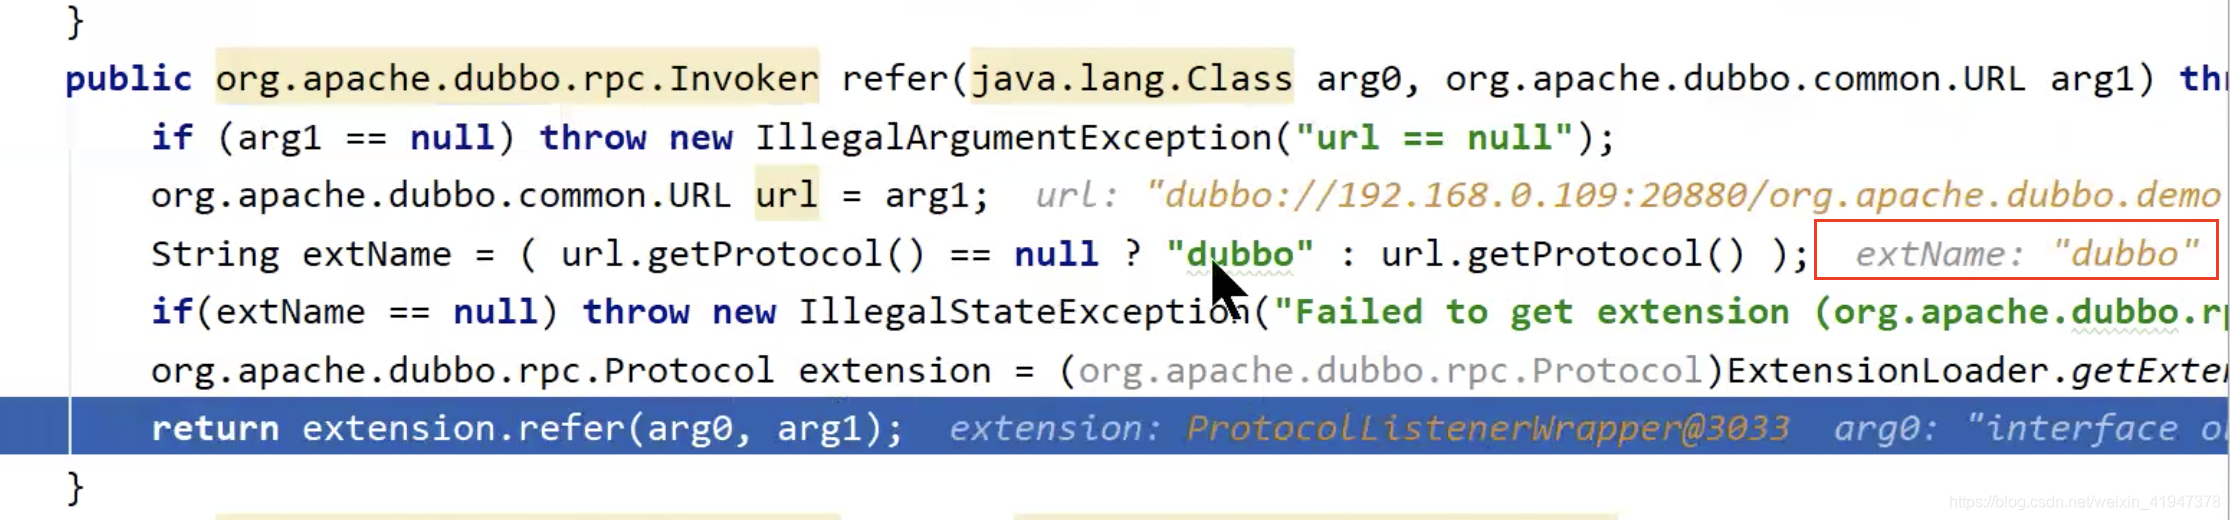
我们直接从DubboProtocol根据URL创建Invoker的入口开始分析,看protocol.refer(serviceType, url)方法,一开始protocol是动态生成的自适应类:
DEBUG:
看到处理dubbo://xxxxx…时extName是dubbo,最终交给DubboProtocol处理
org.apache.dubbo.rpc.protocol.ProtocolListenerWrapper#refer(允许通过Activate机制注册InvokerListener,在invoker被引用、销毁的时候可以触发自定义的监听器)
org.apache.dubbo.rpc.protocol.ProtocolFilterWrapper#refer(允许通过Activate机制注册过滤器,Invoker执行的时候会先被过滤器拦截,dubbo内置了很多拦截器,其中声明式缓存就是通过CacheFilter实现的)
org.apache.dubbo.rpc.protocol.AbstractProtocol#refer
//org.apache.dubbo.rpc.protocol.AbstractProtocol#refer
//DubboProtocol的父类
public <T> Invoker<T> refer(Class<T> type, URL url) throws RpcException {


	//AsyncToSyncInvoker 异步转同步的Invoker
    return new AsyncToSyncInvoker<>(protocolBindingRefer(type, url));
}
org.apache.dubbo.rpc.protocol.AbstractProtocol#protocolBindingRefer
org.apache.dubbo.rpc.protocol.dubbo.DubboProtocol#protocolBindingRefer
//org.apache.dubbo.rpc.protocol.dubbo.DubboProtocol#protocolBindingRefer
public <T> Invoker<T> protocolBindingRefer(Class<T> serviceType, URL url) throws RpcException {


    optimizeSerialization(url);

    // create rpc invoker.
    // 核心就是这个DubboInvoker
    // NettyClient的创建就是在getClients方法中
    DubboInvoker<T> invoker = new DubboInvoker<T>(serviceType, url, getClients(url), invokers);
    invokers.add(invoker);

    return invoker;
}
DubboInvoker的构造其实不需要特别关注,主要看getClients方法:
//org.apache.dubbo.rpc.protocol.dubbo.DubboProtocol#getClients
private ExchangeClient[] getClients(URL url) {


    // whether to share connection
	// 表示是否使用共享连接
    boolean useShareConnect = false;

    // 获取connections属性值,默认为0
    // connections是用来配置和服务端建立连接的数量
    // 不配置的话会用共享连接,配置的话会新建指定的数量的连接
    // <dubbo:reference/>和<dubbo:service/>可以配connections属性
    int connections = url.getParameter(CONNECTIONS_KEY, 0);

    // 可以做引用计数的ExchangeClient,就是共享连接,计数为了统计被共享的次数
    List<ReferenceCountExchangeClient> shareClients = null;
    // if not configured, connection is shared, otherwise, one connection for one service
    // 若没有设置connections属性值,则默认为0,会使用共享连接
    if (connections == 0) {


	    //标记为使用共享连接
        useShareConnect = true;

        /**
         * The xml configuration should have a higher priority than properties.
         * xml配置比properties优先级更高
         */

        // 获取<dubbo:consumer/>中的shareconnections属性值,表示共享连接的数量
        String shareConnectionsStr = url.getParameter(SHARE_CONNECTIONS_KEY, (String) null);
        // ConfigUtils.getProperty方法是从系统变量、properties配置文件
        // 中尝试获取shareconnections属性值
        // DEFAULT_SHARE_CONNECTIONS="1",如果都没有配置默认是1
        connections = Integer.parseInt(StringUtils.isBlank(shareConnectionsStr) ? ConfigUtils.getProperty(SHARE_CONNECTIONS_KEY,
                DEFAULT_SHARE_CONNECTIONS) : shareConnectionsStr);

        // 获取指定数量的共享连接(第一次获取还没有会创建)
        shareClients = getSharedClient(url, connections);
    }

    // 此时的connections代表的是连接数,已经不区分是共享还是新创建的连接了
    ExchangeClient[] clients = new ExchangeClient[connections];
    for (int i = 0; i < clients.length; i++) {


        // 若是共享的,直接从shareClients 里取
        if (useShareConnect) {


            clients[i] = shareClients.get(i);

        } else {


	        // 若不是共享的,则新建连接
            clients[i] = initClient(url);
        }
    }

    return clients;
}
这里先看getSharedClient方法,获取共享连接:
//org.apache.dubbo.rpc.protocol.dubbo.DubboProtocol#getSharedClient
private List<ReferenceCountExchangeClient> getSharedClient(URL url, int connectNum) {


    String key = url.getAddress();
    //先从缓存获取
    List<ReferenceCountExchangeClient> clients = referenceClientMap.get(key);

    if (checkClientCanUse(clients)) {

    //clients 中所有的连接必须都有效才会通过
    	//遍历clients,调用每个ReferenceCountExchangeClient的incrementAndGetCount方法
    	//计数器加一即可
        batchClientRefIncr(clients);
        return clients;
    }
	// 代码走到这里要么说明缓存中是空的,还没有共享连接
	// 要么说明共享连接中,有些连接已经失效了
    locks.putIfAbsent(key, new Object());
    synchronized (locks.get(key)) {


        clients = referenceClientMap.get(key);
        // dubbo check 双重检查锁
        // 再次检查,有可能是网络问题,又恢复了
        if (checkClientCanUse(clients)) {


            batchClientRefIncr(clients);
            return clients;
        }

        // connectNum must be greater than or equal to 1
        connectNum = Math.max(connectNum, 1);

        // If the clients is empty, then the first initialization is
        if (CollectionUtils.isEmpty(clients)) {


        	// 如果clients是空的,说明还没有初始化过
            clients = buildReferenceCountExchangeClientList(url, connectNum);
            referenceClientMap.put(key, clients);

        } else {


        	// 不是空的说明已经初始化过了,但是连接中有些已经失效了
        	// 所以依次遍历,检查连接是否失效,为失效的连接重新建立连接
            for (int i = 0; i < clients.size(); i++) {


                ReferenceCountExchangeClient referenceCountExchangeClient = clients.get(i);
                // If there is a client in the list that is no longer available, create a new one to replace him.
                if (referenceCountExchangeClient == null || referenceCountExchangeClient.isClosed()) {


                    clients.set(i, buildReferenceCountExchangeClient(url));
                    continue;
                }

                referenceCountExchangeClient.incrementAndGetCount();
            }
        }

        /**
         * I understand that the purpose of the remove operation here is to avoid the expired url key
         * always occupying this memory space.
         */
        locks.remove(key);

        return clients;
    }
}
这个方法可以看出有三种情况:
- 如果共享连接已经初始化过,并且每个连接都是有效的,给所有连接计数器+1,直接返回
- 如果还没有初始化过,则进行第一次初始化
- 如果共享连接已经初始化过了,但是连接中部分连接已经失效,则遍历检查为失效的连接重新建立连接
这里只要看buildReferenceCountExchangeClientList:
//org.apache.dubbo.rpc.protocol.dubbo.DubboProtocol#buildReferenceCountExchangeClientList
private List<ReferenceCountExchangeClient> buildReferenceCountExchangeClientList(URL url, int connectNum) {


    List<ReferenceCountExchangeClient> clients = new ArrayList<>();
    for (int i = 0; i < connectNum; i++) {


		//创建共享连接
		//buildReferenceCountExchangeClient:为失效共享连接重新建立连接也是这个方法
        clients.add(buildReferenceCountExchangeClient(url));
    }

    return clients;
}

//org.apache.dubbo.rpc.protocol.dubbo.DubboProtocol#buildReferenceCountExchangeClient
private ReferenceCountExchangeClient buildReferenceCountExchangeClient(URL url) {


    // 创建一个纯粹的exchageClient
    // 此处initClient方法和前面
    // org.apache.dubbo.rpc.protocol.dubbo.DubboProtocol#getClients方法中
    // 非共享连接情况,创建新连接是同一个方法
    ExchangeClient exchangeClient = initClient(url);

    return new ReferenceCountExchangeClient(exchangeClient);
}
这里可以看出ReferenceCountExchangeClient实际上只是包装了一下ExchangeClient,前面不是共享连接的情况新建连接也是调用initClient方法,是同一个方法:
看下ReferenceCountExchangeClient
final class ReferenceCountExchangeClient implements ExchangeClient {


    private final URL url;
    private final AtomicInteger referenceCount = new AtomicInteger(0);

    private ExchangeClient client;

    public ReferenceCountExchangeClient(ExchangeClient client) {


        //封装了普通连接,同时维护了一个计数器
        this.client = client;
        referenceCount.incrementAndGet();
        // 记录当前共享连接被共享了几次
        this.url = client.getUrl();
    }
    ...
}
看initClient方法:
//org.apache.dubbo.rpc.protocol.dubbo.DubboProtocol#initClient
private ExchangeClient initClient(URL url) {


    // client type setting.
    // DEFAULT_REMOTING_CLIENT="netty",默认用netty
    String str = url.getParameter(CLIENT_KEY, url.getParameter(SERVER_KEY, DEFAULT_REMOTING_CLIENT));

    url = url.addParameter(CODEC_KEY, DubboCodec.NAME);
    // enable heartbeat by default 启动心跳
    url = url.addParameterIfAbsent(HEARTBEAT_KEY, String.valueOf(DEFAULT_HEARTBEAT));

    // BIO is not allowed since it has severe performance issue.
    if (str != null && str.length() > 0 && !ExtensionLoader.getExtensionLoader(Transporter.class).hasExtension(str)) {


        throw new RpcException("Unsupported client type: " + str + "," +
                " supported client type is " + StringUtils.join(ExtensionLoader.getExtensionLoader(Transporter.class).getSupportedExtensions(), " "));
    }

    ExchangeClient client;
    try {


        // connection should be lazy
        if (url.getParameter(LAZY_CONNECT_KEY, false)) {


		    //延迟连接,只有真正发起请求的时候才会建立连接
            client = new LazyConnectExchangeClient(url, requestHandler);

        } else {


	        // 主动建立连接
	        // 创建exchangeClient,其会绑定一个Netty Client
            client = Exchangers.connect(url, requestHandler);
        }

    } catch (RemotingException e) {


        throw new RpcException("Fail to create remoting client for service(" + url + "): " + e.getMessage(), e);
    }

    return client;
}
看Exchangers.connect(url, requestHandler)方法:
//org.apache.dubbo.remoting.exchange.Exchangers#connect(org.apache.dubbo.common.URL, org.apache.dubbo.remoting.exchange.ExchangeHandler)
public static ExchangeClient connect(URL url, ExchangeHandler handler) throws RemotingException {


    if (url == null) {


        throw new IllegalArgumentException("url == null");
    }
    if (handler == null) {


        throw new IllegalArgumentException("handler == null");
    }
    url = url.addParameterIfAbsent(Constants.CODEC_KEY, "exchange");
    return getExchanger(url).connect(url, handler);
}

public static Exchanger getExchanger(URL url) {


	//默认DEFAULT_EXCHANGER = "header"
    String type = url.getParameter(Constants.EXCHANGER_KEY, Constants.DEFAULT_EXCHANGER);
    return getExchanger(type);
}

public static Exchanger getExchanger(String type) {


	//type="header",默认会调用HeaderExchanger
    return ExtensionLoader.getExtensionLoader(Exchanger.class).getExtension(type);
}
继续看HeaderExchanger.connect:
public class HeaderExchanger implements Exchanger {


    public static final String NAME = "header";

    @Override
    public ExchangeClient connect(URL url, ExchangeHandler handler) throws RemotingException {


	    //返回一个HeaderExchangeClient
	    //其中包含了Transporters.connect生成的Client就是NettyClient
        return new HeaderExchangeClient(Transporters.connect(url, new DecodeHandler(new HeaderExchangeHandler(handler))), true);
    }

    @Override
    public ExchangeServer bind(URL url, ExchangeHandler handler) throws RemotingException {


	    //这个是之前跟服务注册时候看过~
        return new HeaderExchangeServer(Transporters.bind(url, new DecodeHandler(new HeaderExchangeHandler(handler))));
    }

}
继续跟Transporters.connect
//org.apache.dubbo.remoting.Transporters#connect(org.apache.dubbo.common.URL, org.apache.dubbo.remoting.ChannelHandler...)
public static Client connect(URL url, ChannelHandler... handlers) throws RemotingException {


    if (url == null) {


        throw new IllegalArgumentException("url == null");
    }
    ChannelHandler handler;
    if (handlers == null || handlers.length == 0) {


        handler = new ChannelHandlerAdapter();
    } else if (handlers.length == 1) {


        handler = handlers[0];
    } else {


        handler = new ChannelHandlerDispatcher(handlers);
    }
    return getTransporter().connect(url, handler);
}
//org.apache.dubbo.remoting.Transporters#getTransporter
public static Transporter getTransporter() {


    return ExtensionLoader.getExtensionLoader(Transporter.class).getAdaptiveExtension();
}
DEBUG,getTransporter返回的是动态生成的自适应类:
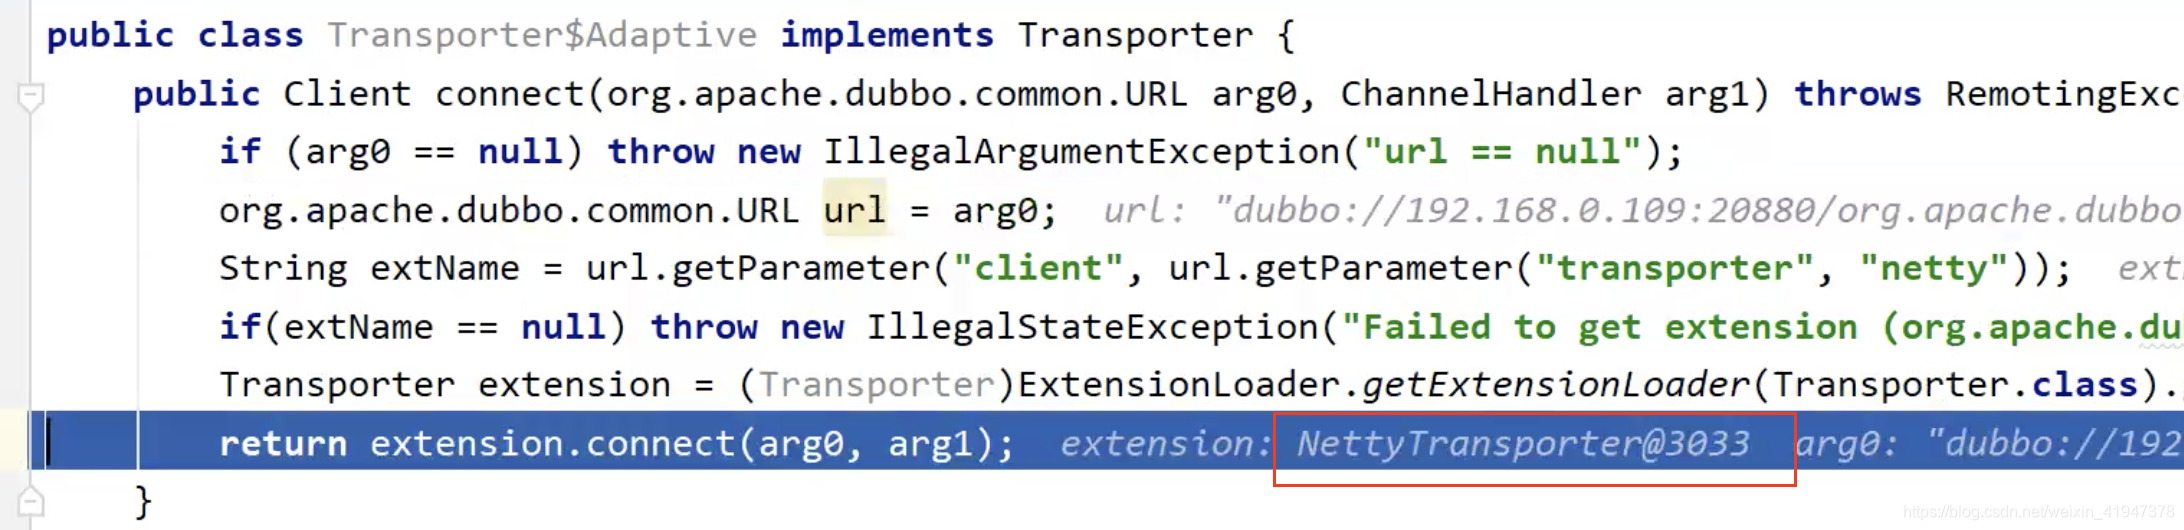
继续看org.apache.dubbo.remoting.transport.netty4.NettyTransporter#connect:
public class NettyTransporter implements Transporter {


    public static final String NAME = "netty";

    @Override
    public Server bind(URL url, ChannelHandler listener) throws RemotingException {


    	//之前服注册的时候创建的是NettyServer!!!
        return new NettyServer(url, listener);
    }

    @Override
    public Client connect(URL url, ChannelHandler listener) throws RemotingException {


    	//看到这里创建了NettyClient!!!!
        return new NettyClient(url, listener);
    }

}
看一下NettyClient的构造:
//org.apache.dubbo.remoting.transport.netty4.NettyClient#NettyClient
public NettyClient(final URL url, final ChannelHandler handler) throws RemotingException {


	// you can customize name and type of client thread pool by THREAD_NAME_KEY and THREADPOOL_KEY in CommonConstants.
	// the handler will be warped: MultiMessageHandler->HeartbeatHandler->handler
	super(url, wrapChannelHandler(url, handler));
}
//父类构造:
//org.apache.dubbo.remoting.transport.AbstractClient#AbstractClient
public AbstractClient(URL url, ChannelHandler handler) throws RemotingException {


    super(url, handler);

    needReconnect = url.getParameter(Constants.SEND_RECONNECT_KEY, false);

    try {


    	//主要看doOpen
        doOpen();
    } catch (Throwable t) {


		...
    }
    try {


        // connect.
        connect();
		...
    } catch (RemotingException t) {


		...
    } catch (Throwable t) {


		...
    }
	...
}
核心就是doOpen和connect方法,实现都在子类NettyClient:
-
doOpen:
protected void doOpen() throws Throwable {


    final NettyClientHandler nettyClientHandler = new NettyClientHandler(getUrl(), this);
    bootstrap = new Bootstrap();
    bootstrap.group(nioEventLoopGroup)
            .option(ChannelOption.SO_KEEPALIVE, true)
            .option(ChannelOption.TCP_NODELAY, true)
            .option(ChannelOption.ALLOCATOR, PooledByteBufAllocator.DEFAULT)
            //.option(ChannelOption.CONNECT_TIMEOUT_MILLIS, getTimeout())
            .channel(NioSocketChannel.class);

    if (getConnectTimeout() < 3000) {


        bootstrap.option(ChannelOption.CONNECT_TIMEOUT_MILLIS, 3000);
    } else {


        bootstrap.option(ChannelOption.CONNECT_TIMEOUT_MILLIS, getConnectTimeout());
    }

    bootstrap.handler(new ChannelInitializer() {


        @Override
        protected void initChannel(Channel ch) throws Exception {


            int heartbeatInterval = UrlUtils.getHeartbeat(getUrl());
            NettyCodecAdapter adapter = new NettyCodecAdapter(getCodec(), getUrl(), NettyClient.this);
            ch.pipeline()//.addLast("logging",new LoggingHandler(LogLevel.INFO))//for debug
                    .addLast("decoder", adapter.getDecoder())
                    .addLast("encoder", adapter.getEncoder())
                    .addLast("client-idle-handler", new IdleStateHandler(heartbeatInterval, 0, 0, MILLISECONDS))
                    .addLast("handler", nettyClientHandler);
            String socksProxyHost = ConfigUtils.getProperty(SOCKS_PROXY_HOST);
            if(socksProxyHost != null) {


                int socksProxyPort = Integer.parseInt(ConfigUtils.getProperty(SOCKS_PROXY_PORT, DEFAULT_SOCKS_PROXY_PORT));
                Socks5ProxyHandler socks5ProxyHandler = new Socks5ProxyHandler(new InetSocketAddress(socksProxyHost, socksProxyPort));
                ch.pipeline().addFirst(socks5ProxyHandler);
            }
        }
    });
}
由此可以看出,消费者端接受服务端响应的入口就是NettyClientHandler! -
connect:
    protected void doConnect() throws Throwable {


        long start = System.currentTimeMillis();
        //异步连接
        ChannelFuture future = bootstrap.connect(getConnectAddress());
        try {


            boolean ret = future.awaitUninterruptibly(getConnectTimeout(), MILLISECONDS);

            if (ret && future.isSuccess()) {


            	//连接成功获取通道
                Channel newChannel = future.channel();
                try {


                    // Close old channel
                    // copy reference
                    Channel oldChannel = NettyClient.this.channel;
                    if (oldChannel != null) {


                        try {


                            if (logger.isInfoEnabled()) {


                                logger.info("Close old netty channel " + oldChannel + " on create new netty channel " + newChannel);
                            }
                            oldChannel.close();
                        } finally {


                            NettyChannel.removeChannelIfDisconnected(oldChannel);
                        }
                    }
                } finally {


                    if (NettyClient.this.isClosed()) {


                        try {


                            if (logger.isInfoEnabled()) {


                                logger.info("Close new netty channel " + newChannel + ", because the client closed.");
                            }
                            newChannel.close();
                        } finally {


                            NettyClient.this.channel = null;
                            NettyChannel.removeChannelIfDisconnected(newChannel);
                        }
                    } else {


                        NettyClient.this.channel = newChannel;
                    }
                }
            } else if (future.cause() != null) {


                throw new RemotingException(this, "client(url: " + getUrl() + ") failed to connect to server "
                        + getRemoteAddress() + ", error message is:" + future.cause().getMessage(), future.cause());
            } else {


                throw new RemotingException(this, "client(url: " + getUrl() + ") failed to connect to server "
                        + getRemoteAddress() + " client-side timeout "
                        + getConnectTimeout() + "ms (elapsed: " + (System.currentTimeMillis() - start) + "ms) from netty client "
                        + NetUtils.getLocalHost() + " using dubbo version " + Version.getVersion());
            }
        } finally {


            // just add new valid channel to NettyChannel's cache
            if (!isConnected()) {


                //future.cancel(true);
            }
        }
    }
2. 消费者向提供者发起请求
2.2 入口
上一章服务订阅还有一个点没说完,无论是本地注册表方式,还是注册中心方式,最终都只会有一个Invoker,并且最终会通过该Invoker对象创建代理对象:
直接看org.apache.dubbo.config.ReferenceConfig#createProxy方法:
private T createProxy(Map<String, String> map) {


    // 判断是否是本地调用
    if (shouldJvmRefer(map)) {

      // 处理本地调用请求
		...
		... //将URL构建成invoker
    } else {

      // 处理远程调用
		...//URL的处理(直连方式和注册中心方式)

		...//将URL构建成invoker
    }
	...
    // 若元数据中心不为空,则将消费者元数据写入到元数据中心保存
	...
	// 无论是本地注册表方式,还是注册中心方式,最终都只会有一个Invoker
	// 最终会对Invoker对象创建代理对象
    // create service proxy 创建消费者代理对象
    return (T) PROXY_FACTORY.getProxy(invoker);
}
PROXY_FACTORY是ProxyFactory的自适应类实例,代理工厂不指定默认会用Javassist,所以最终会调用JavassistProxyFactory的getProxy方法:
public class JavassistProxyFactory extends AbstractProxyFactory {


    @Override
    @SuppressWarnings("unchecked")
    public <T> T getProxy(Invoker<T> invoker, Class<?>[] interfaces) {


        return (T) Proxy.getProxy(interfaces).newInstance(new InvokerInvocationHandler(invoker));
    }
    ...
}
上一章其实已经分析了前半段方法Proxy.getProxy(interfaces),这个方法返回的结果就是动态生成的Proxy抽象类子类的实例,动态生成的这个Proxy子类的实例和jdk的Proxy动态代理原理一样,newInstance方法获取的代理对象会包含InvocationHandler,最终代理对象所有的方法执行都会交给InvocationHandler,所以我们关键要看InvokerInvocationHandler,即远程调用发起请求的入口的,就是org.apache.dubbo.rpc.proxy.InvokerInvocationHandler#invoke方法:
public class InvokerInvocationHandler implements InvocationHandler {


    private static final Logger logger = LoggerFactory.getLogger(InvokerInvocationHandler.class);
    private final Invoker<?> invoker;

    public InvokerInvocationHandler(Invoker<?> handler) {


        this.invoker = handler;
    }

    @Override
    public Object invoke(Object proxy, Method method, Object[] args) throws Throwable {


        String methodName = method.getName();
        Class<?>[] parameterTypes = method.getParameterTypes();
        // 若当前调用的方法是Object的方法,则进行本地调用
        if (method.getDeclaringClass() == Object.class) {


            return method.invoke(invoker, args);
        }
        // 若当前调用的方法是重写的toString()、hashCode()与equals(),则调用重写的
        if ("toString".equals(methodName) && parameterTypes.length == 0) {


            return invoker.toString();
        }
        if ("hashCode".equals(methodName) && parameterTypes.length == 0) {


            return invoker.hashCode();
        }
        if ("equals".equals(methodName) && parameterTypes.length == 1) {


            return invoker.equals(args[0]);
        }
        // 远程调用
        return invoker.invoke(new RpcInvocation(method, args)).recreate();
    }
}
2.3 流程分析
我们从头开始跟,下面是消费者端的DEMO:
public class ConsumerApplication {


    /**
     * In order to make sure multicast registry works, need to specify '-Djava.net.preferIPv4Stack=true' before
     * launch the application
     */
    public static void main(String[] args) {


        ClassPathXmlApplicationContext context = new ClassPathXmlApplicationContext("spring/dubbo-consumer.xml");
        context.start();
        DemoService demoService = context.getBean("demoService", DemoService.class);
        String hello = demoService.sayHello("world");
        System.out.println("result: ========================= " + hello);
    }
}
当执行demoService.sayHello("world")方法时,就会进入org.apache.dubbo.rpc.proxy.InvokerInvocationHandler#invoke方法:
public class InvokerInvocationHandler implements InvocationHandler {


    private static final Logger logger = LoggerFactory.getLogger(InvokerInvocationHandler.class);
    private final Invoker<?> invoker;

    public InvokerInvocationHandler(Invoker<?> handler) {


        this.invoker = handler;
    }

    @Override
    public Object invoke(Object proxy, Method method, Object[] args) throws Throwable {


        String methodName = method.getName();
        Class<?>[] parameterTypes = method.getParameterTypes();
        // 若当前调用的方法是Object的方法,则进行本地调用
        if (method.getDeclaringClass() == Object.class) {


            return method.invoke(invoker, args);
        }
        // 若当前调用的方法是重写的toString()、hashCode()与equals(),则调用重写的
        if ("toString".equals(methodName) && parameterTypes.length == 0) {


            return invoker.toString();
        }
        if ("hashCode".equals(methodName) && parameterTypes.length == 0) {


            return invoker.hashCode();
        }
        if ("equals".equals(methodName) && parameterTypes.length == 1) {


            return invoker.equals(args[0]);
        }
        // 远程调用
        return invoker.invoke(new RpcInvocation(method, args)).recreate();
    }
}
这里可以看到,如果执行的方法是远程服务的方法,会将方法、参数封装成RpcInvocation,交给invoker触发
接下来我们跟invoker.invoker方法,invoker里面各种嵌套invoker,有些是我们暂时不需要关注的,所以我们断点看一下流程:
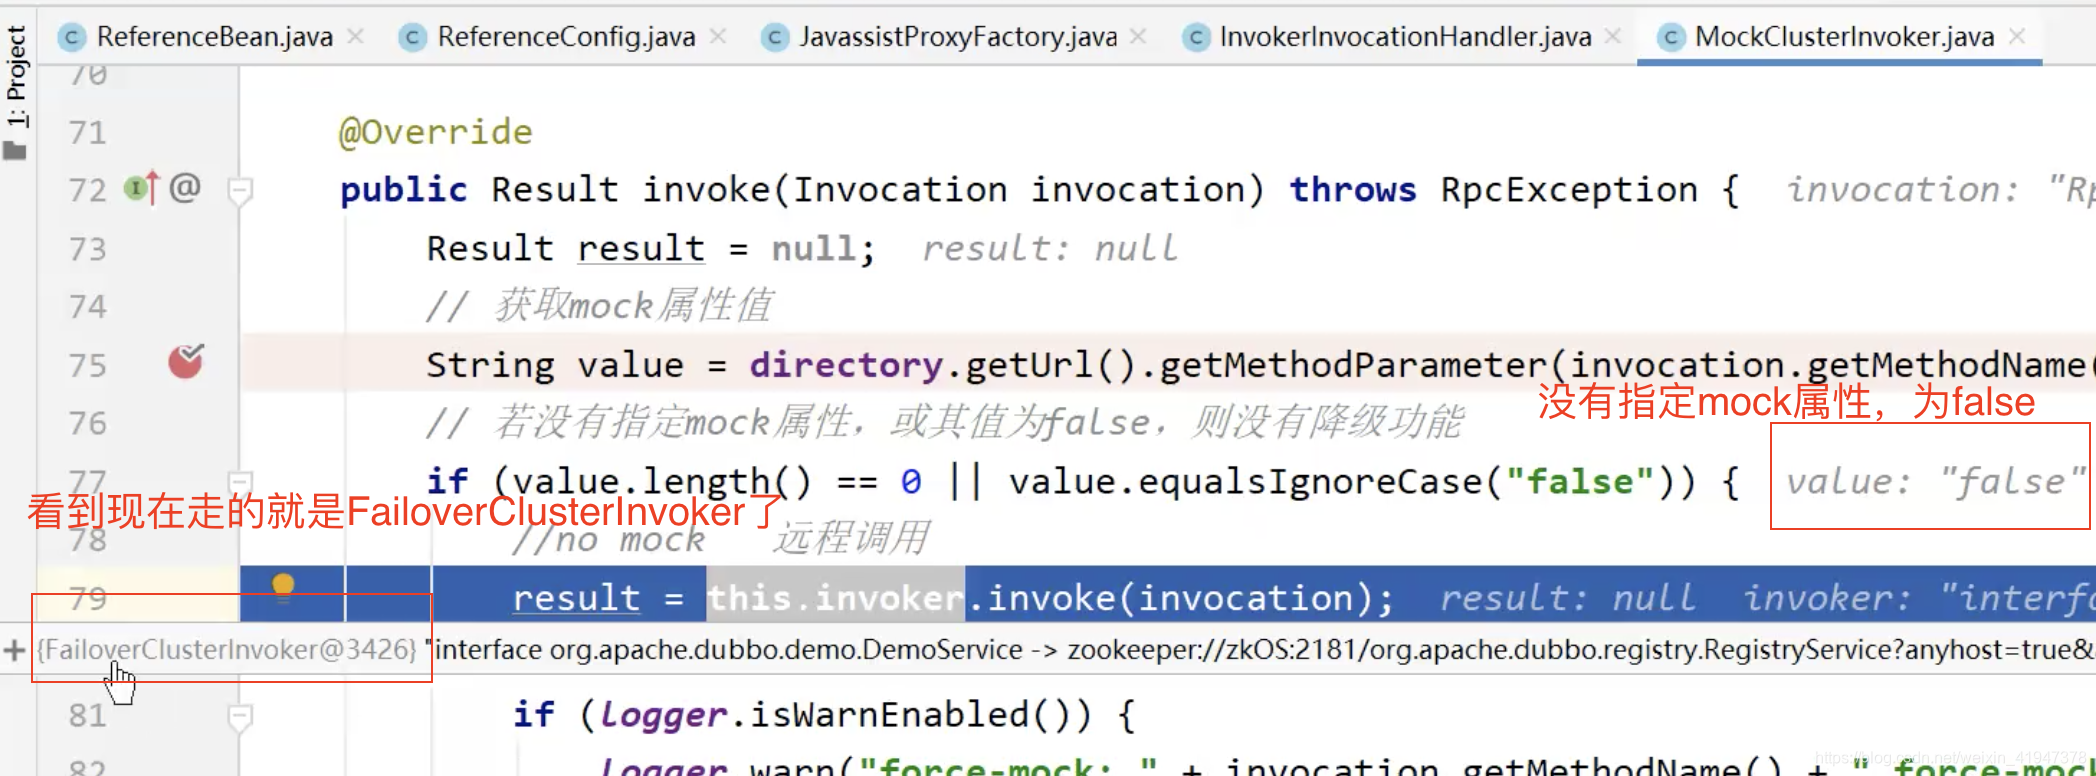
DEBUG,第一层进入的是MockClusterInvoker.invoke方法:

//org.apache.dubbo.rpc.cluster.support.wrapper.MockClusterInvoker#invoke
public Result invoke(Invocation invocation) throws RpcException {


    Result result = null;
    // 获取mock属性值
    String value = directory.getUrl().getMethodParameter(invocation.getMethodName(), MOCK_KEY, Boolean.FALSE.toString()).trim();
    // 若没有指定mock属性,或其值为false,则没有降级功能
    if (value.length() == 0 || value.equalsIgnoreCase("false")) {


        //no mock   远程调用
        result = this.invoker.invoke(invocation);
    } else if (value.startsWith("force")) {


    	// 若mock的值以force开头,则进行强制降级处理
        if (logger.isWarnEnabled()) {


            logger.warn("force-mock: " + invocation.getMethodName() + " force-mock enabled , url : " + directory.getUrl());
        }
        //force:direct mock  降级处理
        result = doMockInvoke(invocation, null);
    } else {

      // mock的值为其它情况
        //fail-mock
        try {


            // 先进行远程调用
            result = this.invoker.invoke(invocation);
        } catch (RpcException e) {


            if (e.isBiz()) {


                throw e;
            }

            if (logger.isWarnEnabled()) {


                logger.warn("fail-mock: " + invocation.getMethodName() + " fail-mock enabled , url : " + directory.getUrl(), e);
            }
            // 若远程调用过程中出现了问题(Directory不可用,或为空),则进行降级处理
            result = doMockInvoke(invocation, e);
        }
    }
    return result;
}
服务降级相关内容后期专门讲,我们现在直接走result = this.invoker.invoke(invocation)方法,继续远程调用:
DEBUG
可以看到此时invoker是FailoverClusterInvoker,处理集群容错的,后面也会专门讲。
先走的是FailoverClusterInvoker的父类抽象类invoke方法:
//org.apache.dubbo.rpc.cluster.support.AbstractClusterInvoker#invoke
public Result invoke(final Invocation invocation) throws RpcException {


    checkWhetherDestroyed();

    // binding attachments into invocation.
    Map<String, String> contextAttachments = RpcContext.getContext().getAttachments();
    if (contextAttachments != null && contextAttachments.size() != 0) {


        ((RpcInvocation) invocation).addAttachments(contextAttachments);
    }
    // 服务路由
    List<Invoker<T>> invokers = list(invocation);
    // 获取负载均衡策略
    LoadBalance loadbalance = initLoadBalance(invokers, invocation);
    RpcUtils.attachInvocationIdIfAsync(getUrl(), invocation);
    return doInvoke(invocation, invokers, loadbalance);
}
对照十层架构图看,可以看到流程是一样的:
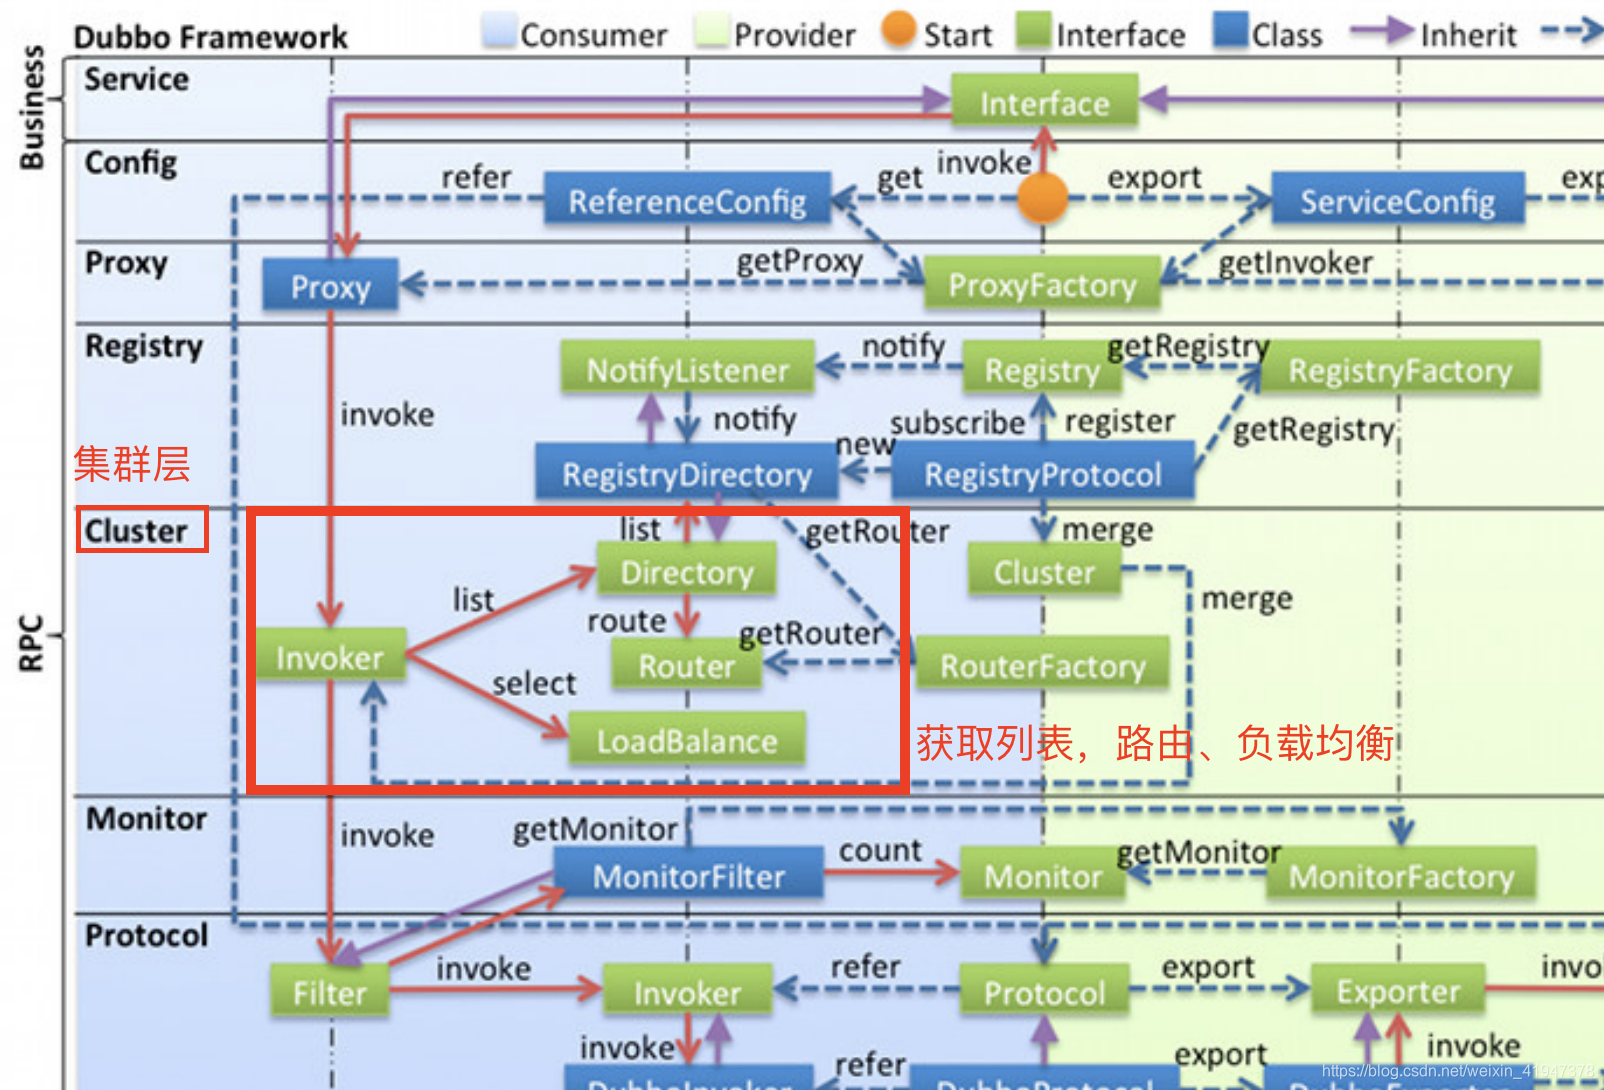
看doInvoke的实现,断点已经知道是FailoverClusterInvoker的doInvoker方法,这个方法里面包含了集群容错的内容(故障转移策略),还有负载均衡,这些后面会专门分析,现在的主要关注点是远程调用:
public class FailoverClusterInvoker<T> extends AbstractClusterInvoker<T> {


    private static final Logger logger = LoggerFactory.getLogger(FailoverClusterInvoker.class);

    public FailoverClusterInvoker(Directory<T> directory) {


        super(directory);
    }

    @Override
    @SuppressWarnings({

    "unchecked", "rawtypes"})
    public Result doInvoke(Invocation invocation, final List<Invoker<T>> invokers, LoadBalance loadbalance) throws RpcException {


		// 此时的invokers已经经过了路由的处理
        List<Invoker<T>> copyInvokers = invokers;
        ...
        // 获取配置的retries的值,并加一(故障转移策略的重试次数)
        int len = getUrl().getMethodParameter(methodName, RETRIES_KEY, DEFAULT_RETRIES) + 1;
		...
        Set<String> providers = new HashSet<String>(len);
        for (int i = 0; i < len; i++) {


			...
            // 负载均衡,copyInvokers是经过路由之后的结果,再进行负载均衡
            // 此时的invoker就是真正要执行的invoker
            Invoker<T> invoker = select(loadbalance, invocation, copyInvokers, invoked);
			...
            try {


                // 远程调用
                Result result = invoker.invoke(invocation);
                if (le != null && logger.isWarnEnabled()) {


					...
                }
                return result;
            } catch (RpcException e) {


				...
            } catch (Throwable e) {


                le = new RpcException(e.getMessage(), e);
            } finally {


                providers.add(invoker.getUrl().getAddress());
            }
        }  // end-for
		...
    }

}
接下来要跟Result result = invoker.invoke(invocation)方法,此时的invoker理论上来说才是真正的提供者代理对象,当然这个invoker被各种Wrapper、过滤器filter包装增强了:
org.apache.dubbo.rpc.protocol.InvokerWrapper#invoke(将URL元数据信息和Invoker绑定)
org.apache.dubbo.rpc.listener.ListenerInvokerWrapper#invoke(给invoker注册监听,监听invoker的构建、销毁时机)
org.apache.dubbo.rpc.protocol.ProtocolFilterWrapper.CallbackRegistrationInvoker#invoke(过滤器的回调监听)
org.apache.dubbo.rpc.Invoker#invoke(ProtocolFilterWrapper中的匿名内部类)
org.apache.dubbo.rpc.filter.ConsumerContextFilter#invoke
org.apache.dubbo.rpc.Invoker#invoke(ProtocolFilterWrapper中的匿名内部类)
org.apache.dubbo.rpc.protocol.dubbo.filter.FutureFilter#invoke
org.apache.dubbo.rpc.Invoker#invoke(ProtocolFilterWrapper中的匿名内部类)
org.apache.dubbo.monitor.support.MonitorFilter#invoke(处理监控)
org.apache.dubbo.rpc.protocol.AsyncToSyncInvoker#invoke(处理同步异步转换)
org.apache.dubbo.rpc.protocol.AbstractInvoker#invoke
org.apache.dubbo.rpc.protocol.dubbo.DubboInvoker#doInvoke
跟到DubboInvoker,看10层结构图:
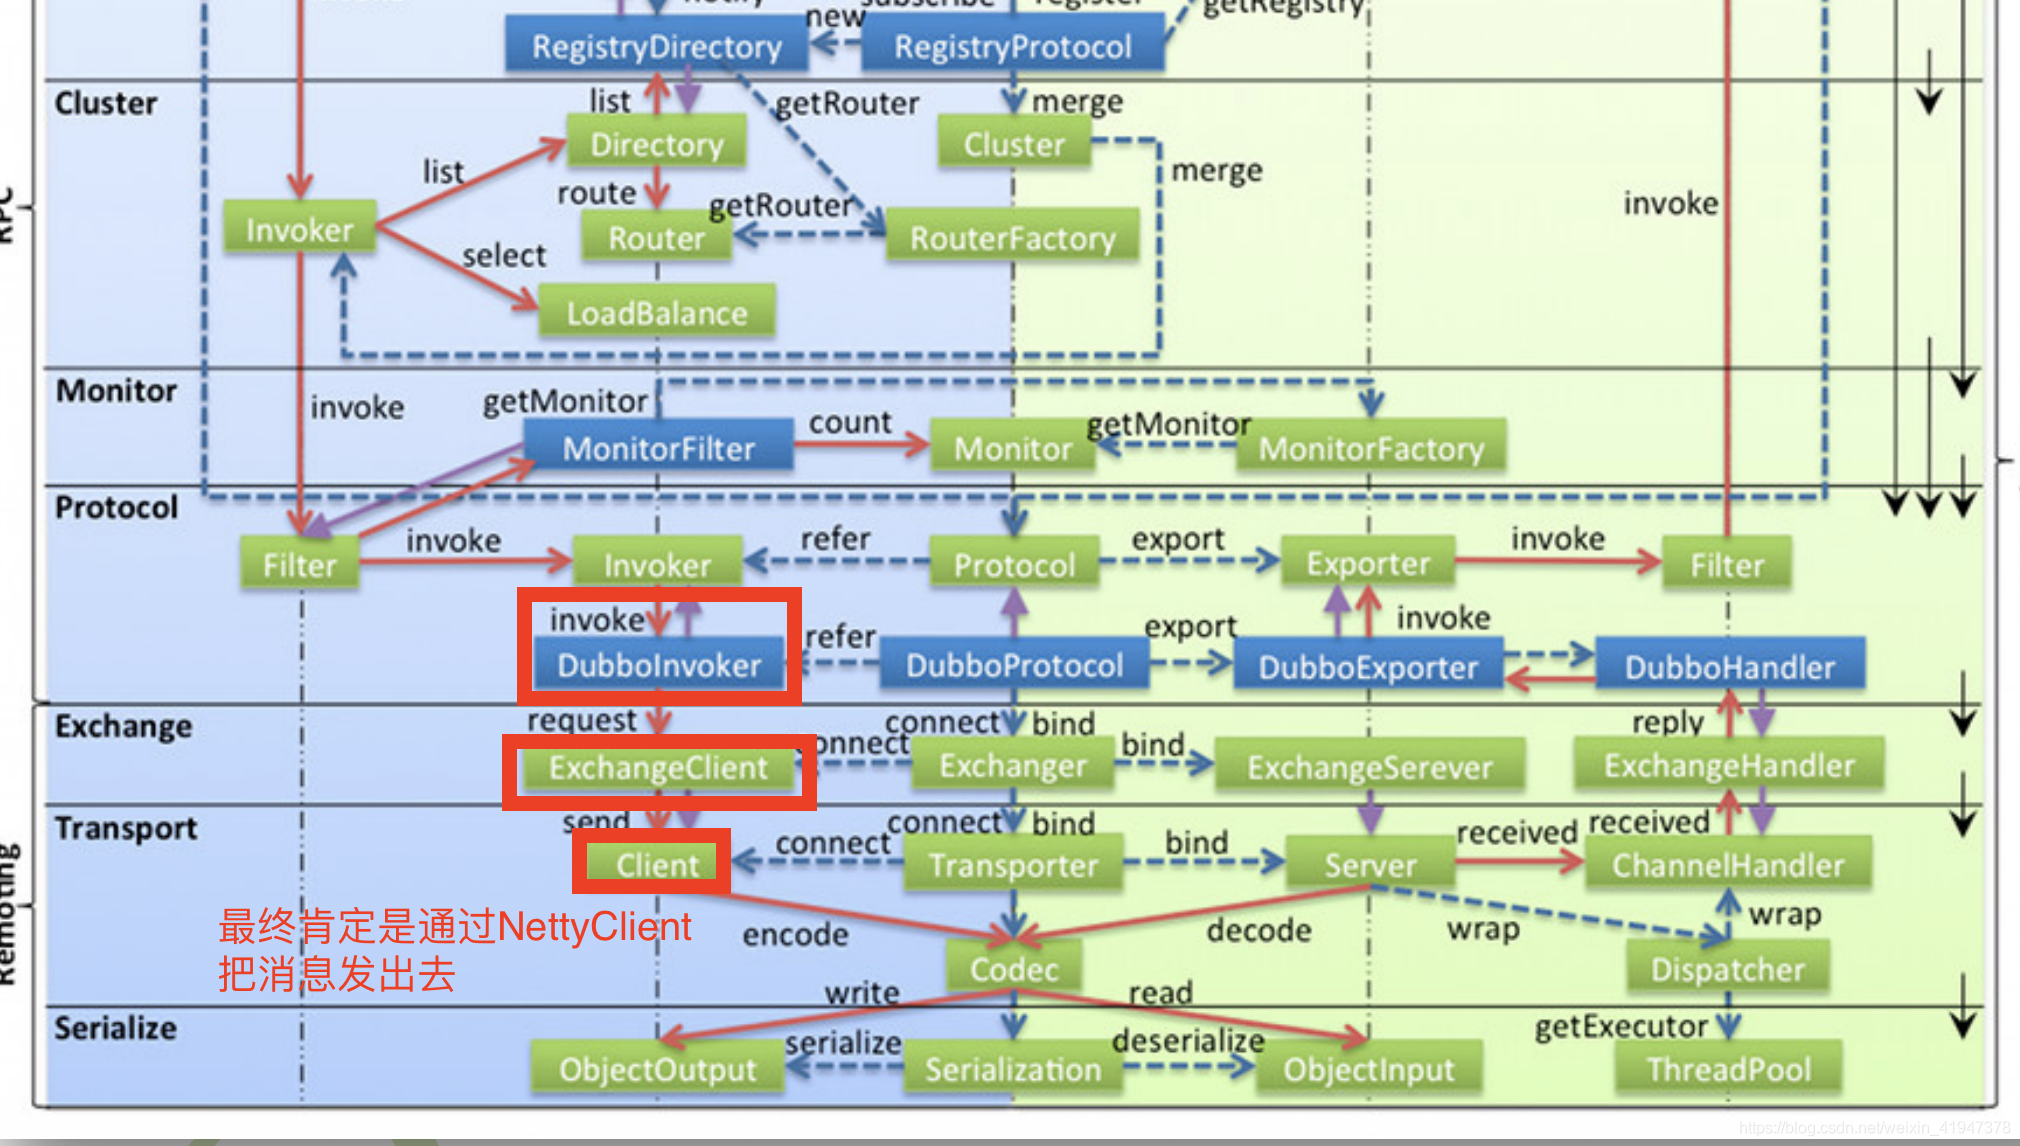
上一章服务订阅已经跟过DubboInvoker的创建过程了,以及在本章1中也已经跟过ExchangeClient、NettyClient的创建过程,现在直接看DubboInvoker的doInvoke方法:
//org.apache.dubbo.rpc.protocol.dubbo.DubboInvoker#doInvoke
protected Result doInvoke(final Invocation invocation) throws Throwable {


    RpcInvocation inv = (RpcInvocation) invocation;
    final String methodName = RpcUtils.getMethodName(invocation);
    inv.setAttachment(PATH_KEY, getUrl().getPath());
    inv.setAttachment(VERSION_KEY, version);

    ExchangeClient currentClient;
    if (clients.length == 1) {


        currentClient = clients[0];
    } else {

      // 若存在多个exchangeClient,则采用轮询方式
        currentClient = clients[index.getAndIncrement() % clients.length];
    }
    try {


	    // 若无需响应,则isOneWay为true,否则是需要响应的
	    // 注意无需响应并不代表是void方法,void方法也需要返回值,需要知道提供者端执行成功与否的状态信息
	    // 所以isOneWay这个字段是需要专门设置的
        boolean isOneway = RpcUtils.isOneway(getUrl(), invocation);
        // 超时时间,DEFAULT_TIMEOUT="1000",默认1秒
        int timeout = getUrl().getMethodPositiveParameter(methodName, TIMEOUT_KEY, DEFAULT_TIMEOUT);
        if (isOneway) {


            boolean isSent = getUrl().getMethodParameter(methodName, Constants.SENT_KEY, false);
            currentClient.send(inv, isSent);
            //无需响应,这里会直接返回已完成的异步结果
            return AsyncRpcResult.newDefaultAsyncResult(invocation);
        } else {


            AsyncRpcResult asyncRpcResult = new AsyncRpcResult(inv);
            // 发出异步调用请求
            // 此时这个方法不会等待请求结果,不会阻塞,而是先得到一个异步结果对象
            // 而真正的请求处理是异步处理的,即同步转异步
            CompletableFuture<Object> responseFuture = currentClient.request(inv, timeout);
            asyncRpcResult.subscribeTo(responseFuture);
            // save for 2.6.x compatibility, for example, TraceFilter in Zipkin uses com.alibaba.xxx.FutureAdapter
            FutureContext.getContext().setCompatibleFuture(responseFuture);
            // 注意这里AsyncRpcResult是Dubbo的API,
            // AsyncRpcResult实际上就是CompletableFuture,继承自CompletableFuture
            // 可能是需要增强一些功能吧
            return asyncRpcResult;
        }
    } catch (TimeoutException e) {


        throw new RpcException(...);
    } catch (RemotingException e) {


        throw new RpcException(...);
    }
}
主要看currentClient.request(inv, timeout)方法:
org.apache.dubbo.rpc.protocol.dubbo.ReferenceCountExchangeClient#request(java.lang.Object, int)(可以看出用的是共享连接)
org.apache.dubbo.remoting.exchange.support.header.HeaderExchangeClient#request(java.lang.Object, int)
org.apache.dubbo.remoting.exchange.support.header.HeaderExchangeChannel#request(java.lang.Object, int)
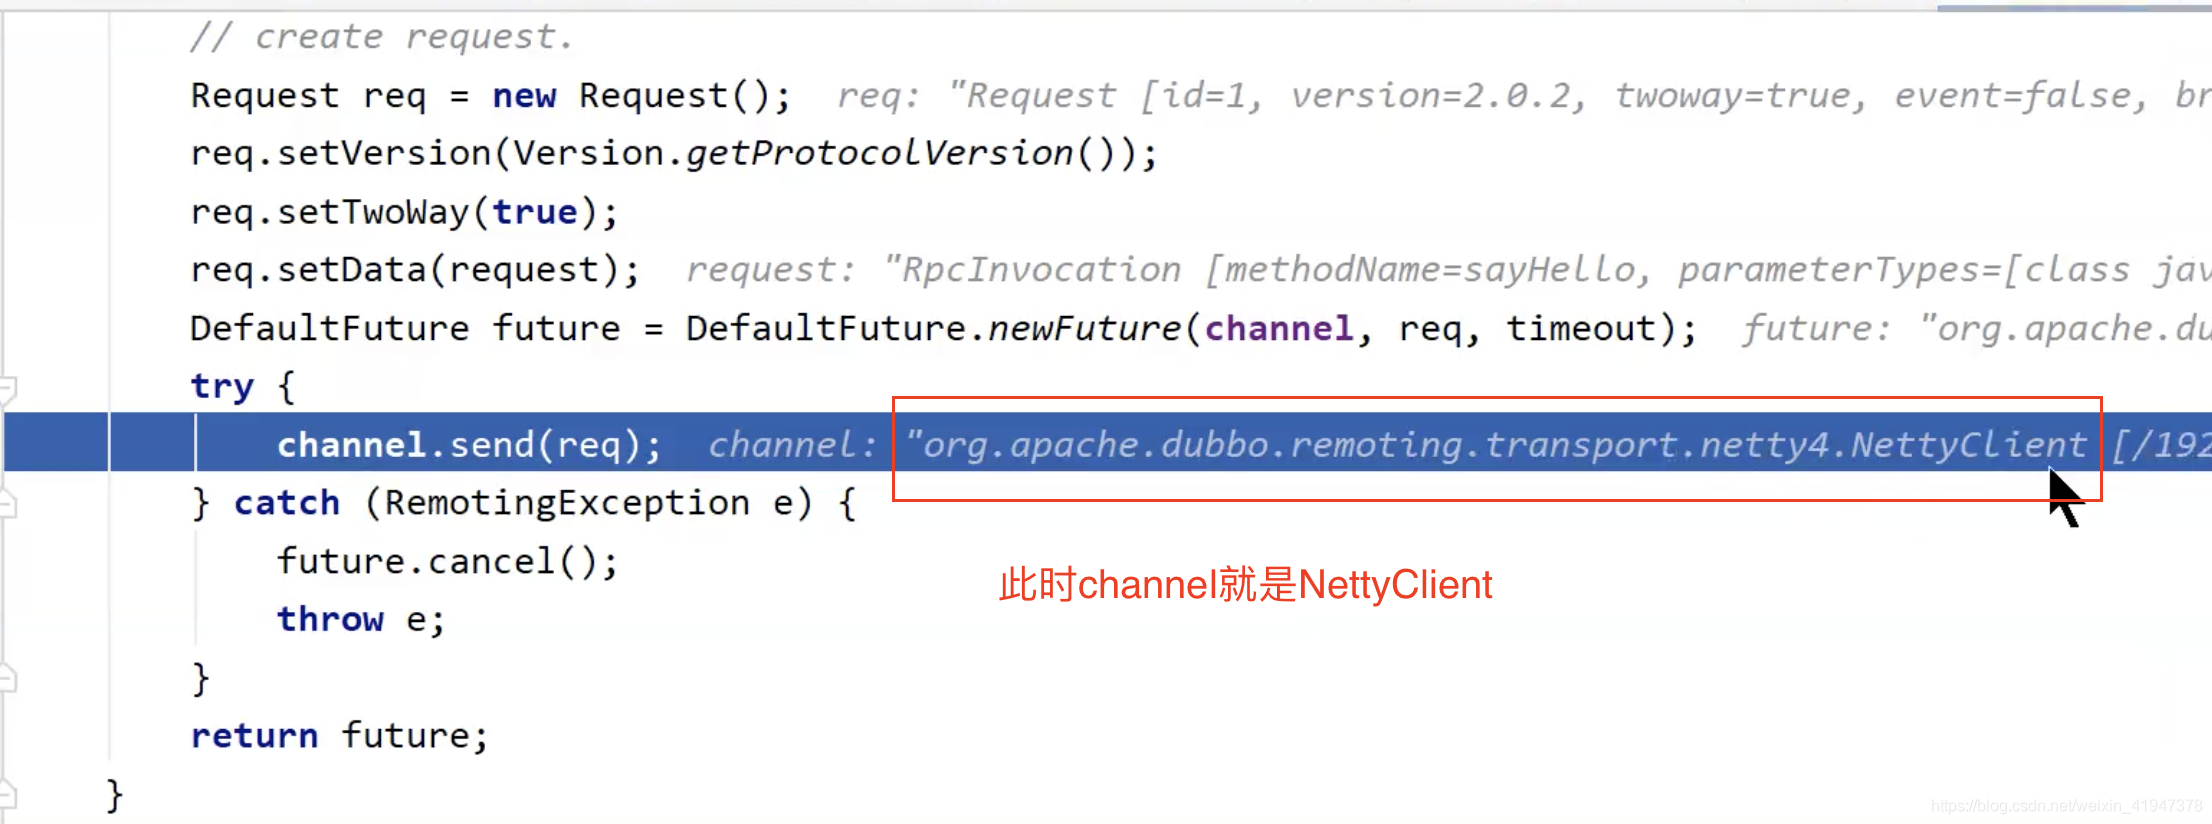
public CompletableFuture<Object> request(Object request, int timeout) throws RemotingException {


    if (closed) {


        throw new RemotingException(this.getLocalAddress(), null, "Failed to send request " + request + ", cause: The channel " + this + " is closed!");
    }
    // create request.
    Request req = new Request();
    req.setVersion(Version.getProtocolVersion());
    req.setTwoWay(true);
    req.setData(request);
    //这一步挺关键的,创建了一个异步操作结果对象
    //等提供者端处理完请求将响应发回的时候,会将该异步操作结果对象状态置为已完成
    DefaultFuture future = DefaultFuture.newFuture(channel, req, timeout);
    try {


        channel.send(req);
    } catch (RemotingException e) {


        future.cancel();
        throw e;
    }
    return future;
}

//org.apache.dubbo.remoting.exchange.support.DefaultFuture#newFuture
public static DefaultFuture newFuture(Channel channel, Request request, int timeout) {


    final DefaultFuture future = new DefaultFuture(channel, request, timeout);
    // timeout check
    timeoutCheck(future);
    return future;
}

//DefaultFuture的构造:
//org.apache.dubbo.remoting.exchange.support.DefaultFuture#DefaultFuture
private DefaultFuture(Channel channel, Request request, int timeout) {


    this.channel = channel;
    this.request = request;
    this.id = request.getId();
    this.timeout = timeout > 0 ? timeout : channel.getUrl().getPositiveParameter(TIMEOUT_KEY, DEFAULT_TIMEOUT);
    // put into waiting map.
    // 看到这里维护了请求id,并映射了请求和异步操作结果对象的关系
    FUTURES.put(id, this);
    CHANNELS.put(id, channel);
}
DEBUG
org.apache.dubbo.remoting.transport.AbstractPeer#send(NettyChannel的父类)
org.apache.dubbo.remoting.transport.AbstractClient#send(NettyChannel的父类)
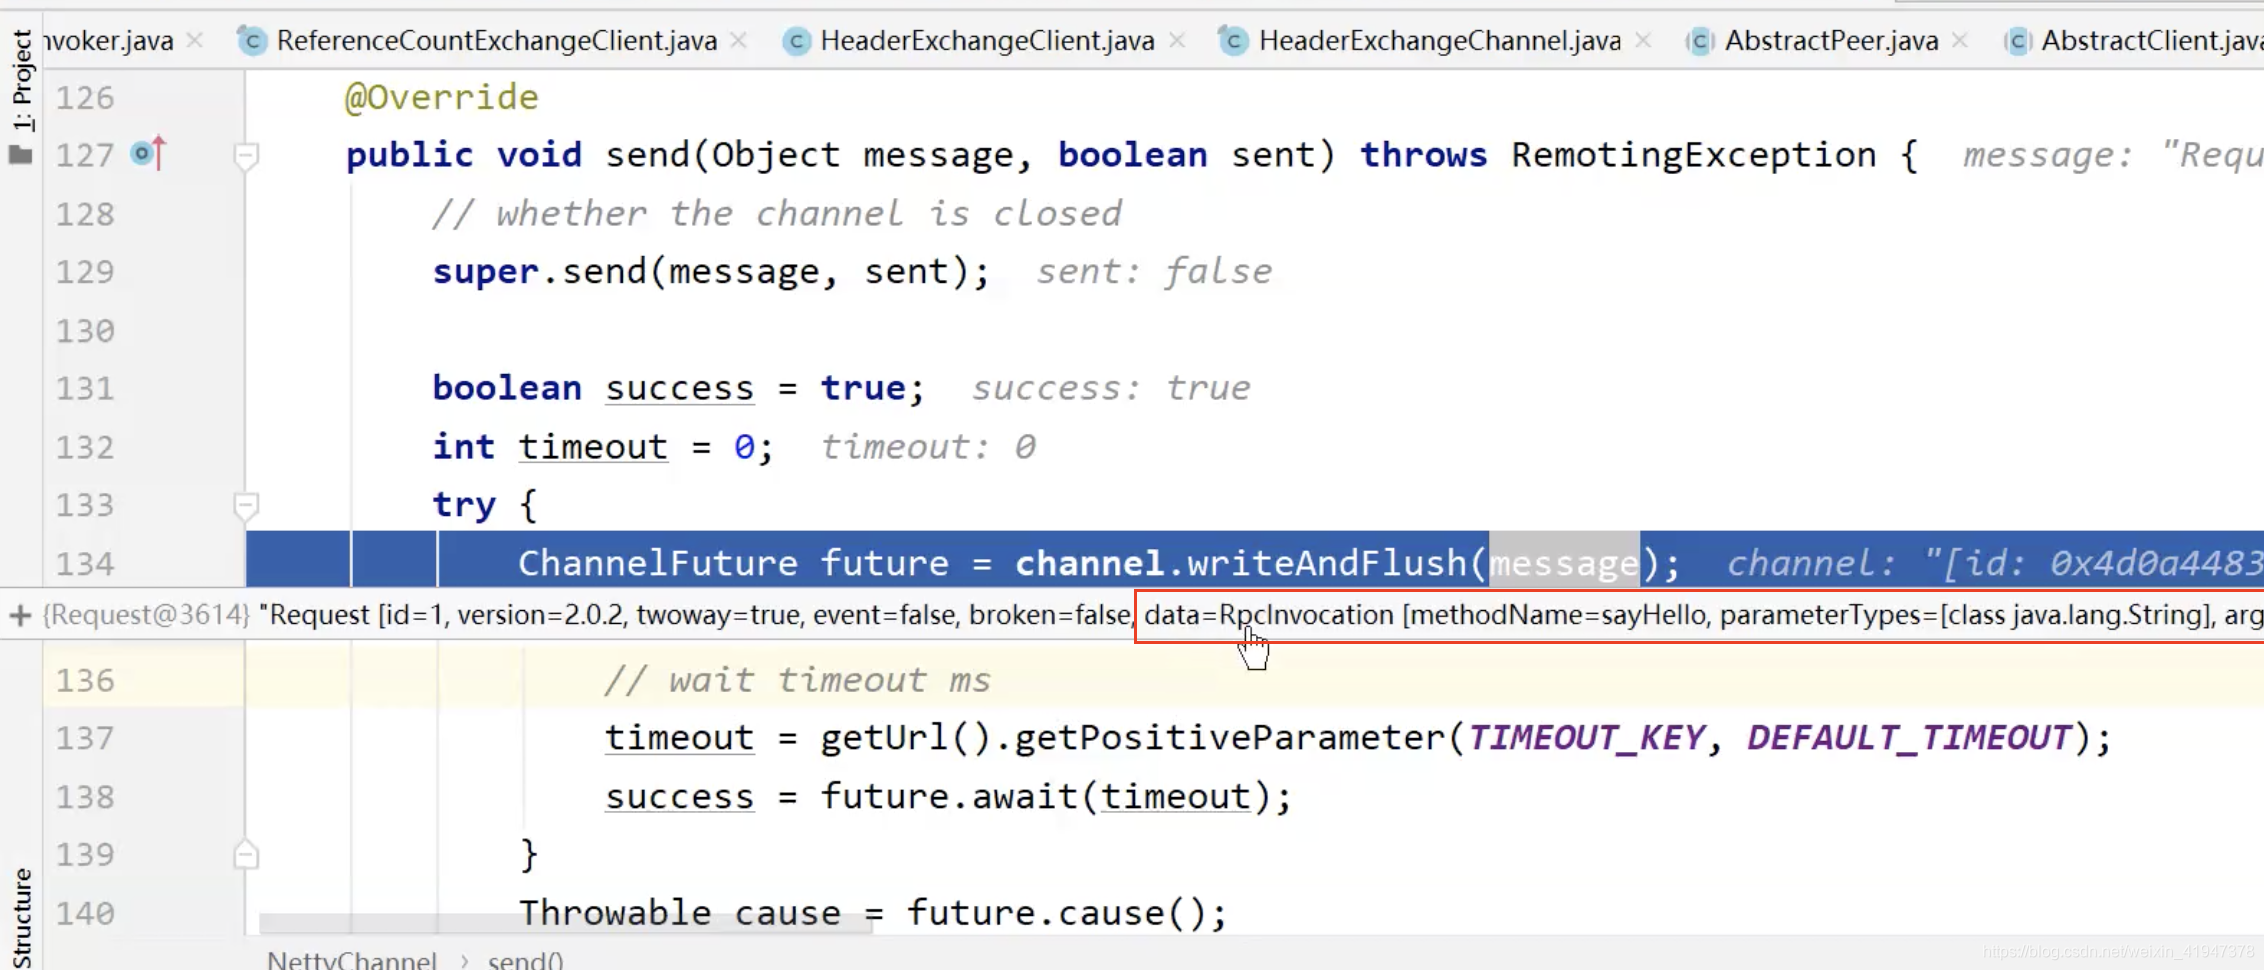
org.apache.dubbo.remoting.transport.netty4.NettyChannel#send
DEBUG
看一下RpcInvocation数据内容

3. 提供者处理消费者请求
3.1 入口
在分析服务发布的时候,我们知道Dubbo协议在进行发布的时候,会启动ExchangeServer,而ExchangeServer里面包含了一个Server就是NettyServer,提供者正是通过NettyServer的通道接受消费者的请求消息的:
看org.apache.dubbo.remoting.transport.netty4.NettyServer#doOpen方法:
//org.apache.dubbo.remoting.transport.netty4.NettyServer#doOpen
protected void doOpen() throws Throwable {


    bootstrap = new ServerBootstrap();

    bossGroup = new NioEventLoopGroup(1, new DefaultThreadFactory("NettyServerBoss", true));
    workerGroup = new NioEventLoopGroup(getUrl().getPositiveParameter(IO_THREADS_KEY, Constants.DEFAULT_IO_THREADS),
            new DefaultThreadFactory("NettyServerWorker", true));

    final NettyServerHandler nettyServerHandler = new NettyServerHandler(getUrl(), this);
    channels = nettyServerHandler.getChannels();

    bootstrap.group(bossGroup, workerGroup)
            .channel(NioServerSocketChannel.class)
            .childOption(ChannelOption.TCP_NODELAY, Boolean.TRUE)
            .childOption(ChannelOption.SO_REUSEADDR, Boolean.TRUE)
            .childOption(ChannelOption.ALLOCATOR, PooledByteBufAllocator.DEFAULT)
            .childHandler(new ChannelInitializer<NioSocketChannel>() {


                @Override
                protected void initChannel(NioSocketChannel ch) throws Exception {


                    // FIXME: should we use getTimeout()?
                    int idleTimeout = UrlUtils.getIdleTimeout(getUrl());
                    NettyCodecAdapter adapter = new NettyCodecAdapter(getCodec(), getUrl(), NettyServer.this);
                    ch.pipeline()//.addLast("logging",new LoggingHandler(LogLevel.INFO))//for debug
                            .addLast("decoder", adapter.getDecoder())
                            .addLast("encoder", adapter.getEncoder())
                            .addLast("server-idle-handler", new IdleStateHandler(0, 0, idleTimeout, MILLISECONDS))
                            .addLast("handler", nettyServerHandler);
                }
            });
    // bind
    ChannelFuture channelFuture = bootstrap.bind(getBindAddress());
    channelFuture.syncUninterruptibly();
    channel = channelFuture.channel();

}

提供者端接受到消费者的请求消息,入口就是NettyServerHandler的channelRead方法
3.2 流程分析
我们看NettyServerHandler的channelRead方法:
//org.apache.dubbo.remoting.transport.netty4.NettyServerHandler#channelRead
public void channelRead(ChannelHandlerContext ctx, Object msg) throws Exception {


	//handler就是NettyServer,之前通过构造传进来的
    NettyChannel channel = NettyChannel.getOrAddChannel(ctx.channel(), url, handler);
    try {


        handler.received(channel, msg);
    } finally {


        NettyChannel.removeChannelIfDisconnected(ctx.channel());
    }
}
DEBUG,看一下接受的数据内容:


继续跟
org.apache.dubbo.remoting.transport.AbstractPeer#received(NettyServer的父类)
//org.apache.dubbo.remoting.transport.AbstractPeer#received
public void received(Channel ch, Object msg) throws RemotingException {


    if (closed) {


        return;
    }
    //这个handler是DubboProtocol的一个叫requestHandler的成员变量
    //类型是ExchangeHandlerAdapter,是一个匿名内部类实例
    //调用Exchangers.connect方法创建ExchangeClient时传进来的
    //传进来以后又被层层包装...每一次包装耐心看都是能找到的,我就不列了
    handler.received(ch, msg);
}
继续跟handler的调用路径:
org.apache.dubbo.remoting.transport.MultiMessageHandler#received
//org.apache.dubbo.remoting.transport.MultiMessageHandler#received
public void received(Channel channel, Object message) throws RemotingException {


    // 判断当前请求是否是multipart请求
    if (message instanceof MultiMessage) {


        MultiMessage list = (MultiMessage) message;
        for (Object obj : list) {


            handler.received(channel, obj);
        }
    } else {


    	//这里会走这
        handler.received(channel, message);
    }
}
org.apache.dubbo.remoting.exchange.support.header.HeartbeatHandler#received
//org.apache.dubbo.remoting.exchange.support.header.HeartbeatHandler#received
public void received(Channel channel, Object message) throws RemotingException {


    setReadTimestamp(channel);
    if (isHeartbeatRequest(message)) {

      // 判断当前请求是否是一个客户端心跳
        Request req = (Request) message;
        if (req.isTwoWay()) {


            Response res = new Response(req.getId(), req.getVersion());
            res.setEvent(Response.HEARTBEAT_EVENT);
            channel.send(res);
            if (logger.isInfoEnabled()) {


                int heartbeat = channel.getUrl().getParameter(Constants.HEARTBEAT_KEY, 0);
                if (logger.isDebugEnabled()) {


                    logger.debug("Received heartbeat from remote channel " + channel.getRemoteAddress()
                            + ", cause: The channel has no data-transmission exceeds a heartbeat period"
                            + (heartbeat > 0 ? ": " + heartbeat + "ms" : ""));
                }
            }
        }
        return;
    }
    if (isHeartbeatResponse(message)) {

      // 判断当前是否是服务端发送来的心跳响应
        if (logger.isDebugEnabled()) {


            logger.debug("Receive heartbeat response in thread " + Thread.currentThread().getName());
        }
        return;
    }
    //都不是,走这个方法
    handler.received(channel, message);
}
org.apache.dubbo.remoting.transport.dispatcher.all.AllChannelHandler#received
//org.apache.dubbo.remoting.transport.dispatcher.all.AllChannelHandler#received
public void received(Channel channel, Object message) throws RemotingException {


    // ExecutorService本质是一个线程池
    ExecutorService executor = getExecutorService();
    try {


	    //执行任务,实际上就是异步执行ChannelEventRunnable的run方法
        executor.execute(new ChannelEventRunnable(channel, handler, ChannelState.RECEIVED, message));
    } catch (Throwable t) {


        //TODO A temporary solution to the problem that the exception information can not be sent to the opposite end after the thread pool is full. Need a refactoring
        //fix The thread pool is full, refuses to call, does not return, and causes the consumer to wait for time out
    	if(message instanceof Request && t instanceof RejectedExecutionException){


    		Request request = (Request)message;
    		if(request.isTwoWay()){


    			String msg = "Server side(" + url.getIp() + "," + url.getPort() + ") threadpool is exhausted ,detail msg:" + t.getMessage();
    			Response response = new Response(request.getId(), request.getVersion());
    			response.setStatus(Response.SERVER_THREADPOOL_EXHAUSTED_ERROR);
    			response.setErrorMessage(msg);
    			channel.send(response);
    			return;
    		}
    	}
        throw new ExecutionException(message, channel, getClass() + " error when process received event .", t);
    }
}
看下getExecutorService方法,获取线程池:
public class WrappedChannelHandler implements ChannelHandlerDelegate {


	...
    protected static final ExecutorService SHARED_EXECUTOR =
            Executors.newCachedThreadPool(new NamedThreadFactory("DubboSharedHandler", true));

    protected final ExecutorService executor;
	...

    public WrappedChannelHandler(ChannelHandler handler, URL url) {


        this.handler = handler;
        this.url = url;
	    //初始化线程池,这里底层返回的就是new 了一个ThreadPoolExecutor
        executor = (ExecutorService) ExtensionLoader
                .getExtensionLoader(ThreadPool.class)
                .getAdaptiveExtension()
                .getExecutor(url);

        String componentKey = Constants.EXECUTOR_SERVICE_COMPONENT_KEY;
        if (CONSUMER_SIDE.equalsIgnoreCase(url.getParameter(SIDE_KEY))) {


            componentKey = CONSUMER_SIDE;
        }
        DataStore dataStore = ExtensionLoader.getExtensionLoader(DataStore.class).getDefaultExtension();
        dataStore.put(componentKey, Integer.toString(url.getPort()), executor);
    }
	...
    public ExecutorService getExecutorService() {


	    //executor是在构造中初始化的,返回的就是ThreadPoolExecutor
        ExecutorService cexecutor = executor;
        if (cexecutor == null || cexecutor.isShutdown()) {


	        //如果为null,或者关闭了,则用共享的executor
	        //共享的executor也是ThreadPoolExecutor
            cexecutor = SHARED_EXECUTOR;
        }
        return cexecutor;
    }

}
再看ChannelEventRunnable的run方法:
//org.apache.dubbo.remoting.transport.dispatcher.ChannelEventRunnable#run
public void run() {


	//判断是否是获取数据的情况
    if (state == ChannelState.RECEIVED) {


        try {


        	//此时是服务端接受消费者发来的请求数据
        	//属于获取数据情况,肯定走这里
            handler.received(channel, message);
        } catch (Exception e) {


            logger.warn("ChannelEventRunnable handle " + state + " operation error, channel is " + channel
                    + ", message is " + message, e);
        }
    } else {


    	//这里是发出数据的情况
        switch (state) {


        case CONNECTED:
        	//主动建立连接
			...
        case DISCONNECTED:
        	//主动端口连接
			...
		case SENT:
			//主动发出数据
			...
        case ...
        default:
            logger.warn("unknown state: " + state + ", message is " + message);
        }
    }

}
继续跟handler.received(channel, message):
org.apache.dubbo.remoting.transport.DecodeHandler#received(对发来的数据解码)
//org.apache.dubbo.remoting.transport.DecodeHandler#received
public void received(Channel channel, Object message) throws RemotingException {


    if (message instanceof Decodeable) {


        decode(message);
    }

    if (message instanceof Request) {


        decode(((Request) message).getData());
    }

    if (message instanceof Response) {


        decode(((Response) message).getResult());
    }

    handler.received(channel, message);
}
org.apache.dubbo.remoting.exchange.support.header.HeaderExchangeHandler#received
//org.apache.dubbo.remoting.exchange.support.header.HeaderExchangeHandler#received
public void received(Channel channel, Object message) throws RemotingException {


    channel.setAttribute(KEY_READ_TIMESTAMP, System.currentTimeMillis());
    final ExchangeChannel exchangeChannel = HeaderExchangeChannel.getOrAddChannel(channel);
    try {


        if (message instanceof Request) {

    //处理请求
            // handle request.
            Request request = (Request) message;
            if (request.isEvent()) {


                handlerEvent(channel, request);
            } else {


                if (request.isTwoWay()) {

      // 判断是否需要给客户端响应
	                //我们是属于这种情况所以会走这
                    handleRequest(exchangeChannel, request);
                } else {


                    handler.received(exchangeChannel, request.getData());
                }
            }
        } else if (message instanceof Response) {

    //处理响应
            handleResponse(channel, (Response) message);
        } else if (message instanceof String) {


			...
        } else {


            handler.received(exchangeChannel, message);
        }
    } finally {


        HeaderExchangeChannel.removeChannelIfDisconnected(channel);
    }
}
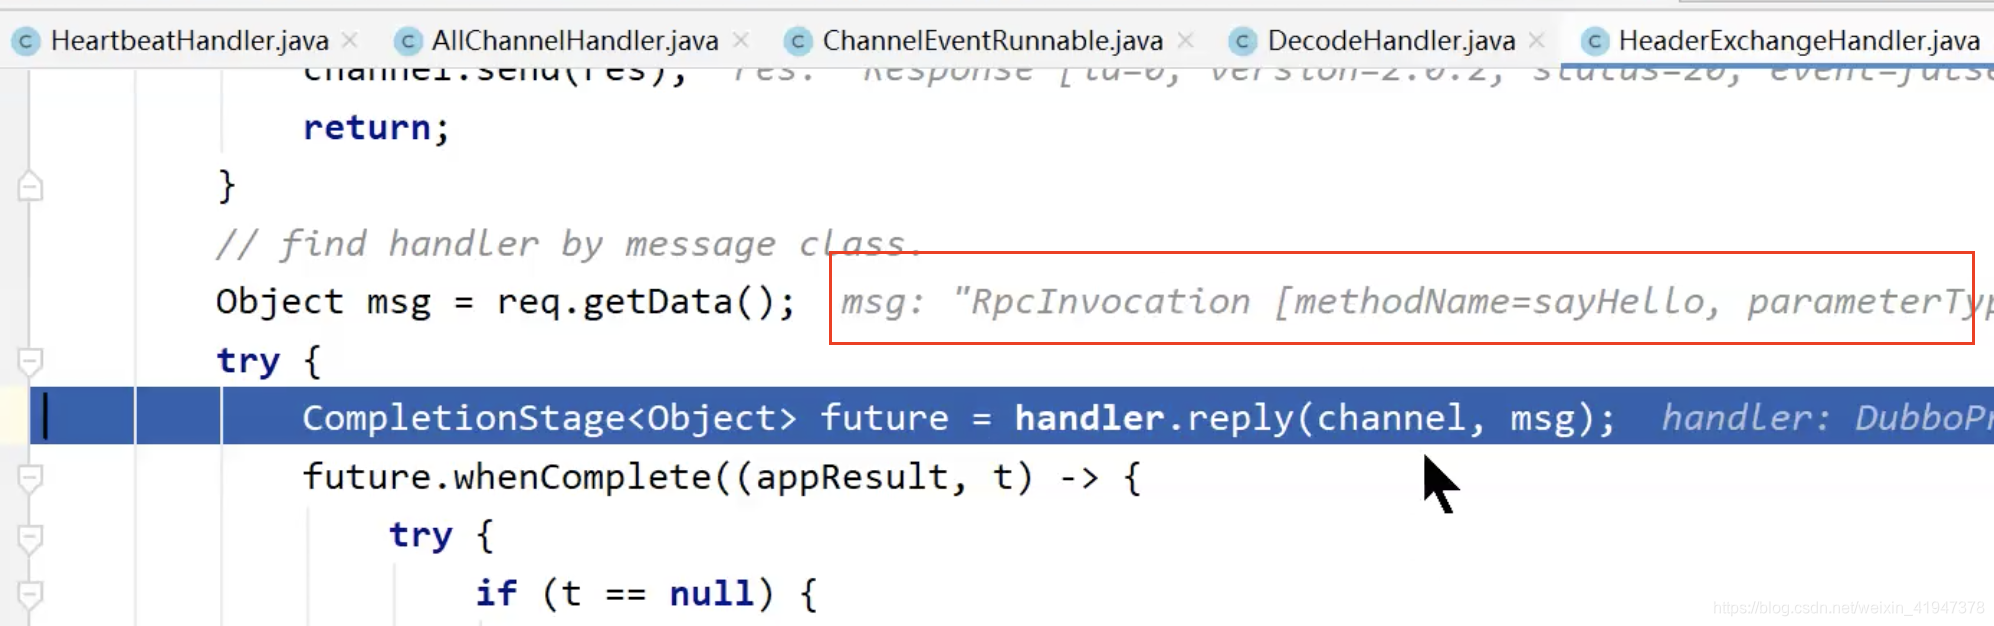
看handleRequest:
//org.apache.dubbo.remoting.exchange.support.header.HeaderExchangeHandler#handleRequest
void handleRequest(final ExchangeChannel channel, Request req) throws RemotingException {
Response res = new Response(req.getId(), req.getVersion());
if (req.isBroken()) {
//判断请求是否被打断(因为异常被打断了)
Object data = req.getData();
String msg;
if (data == null) {
msg = null;
} else if (data instanceof Throwable) {
msg = StringUtils.toString((Throwable) data);
} else {
msg = data.toString();
}
//如果是则响应异常信息
res.setErrorMessage("Fail to decode request due to: " + msg);
res.setStatus(Response.BAD_REQUEST);
channel.send(res);
return;
}
// find handler by message class.
// getData就是RpcInvocation
Object msg = req.getData();
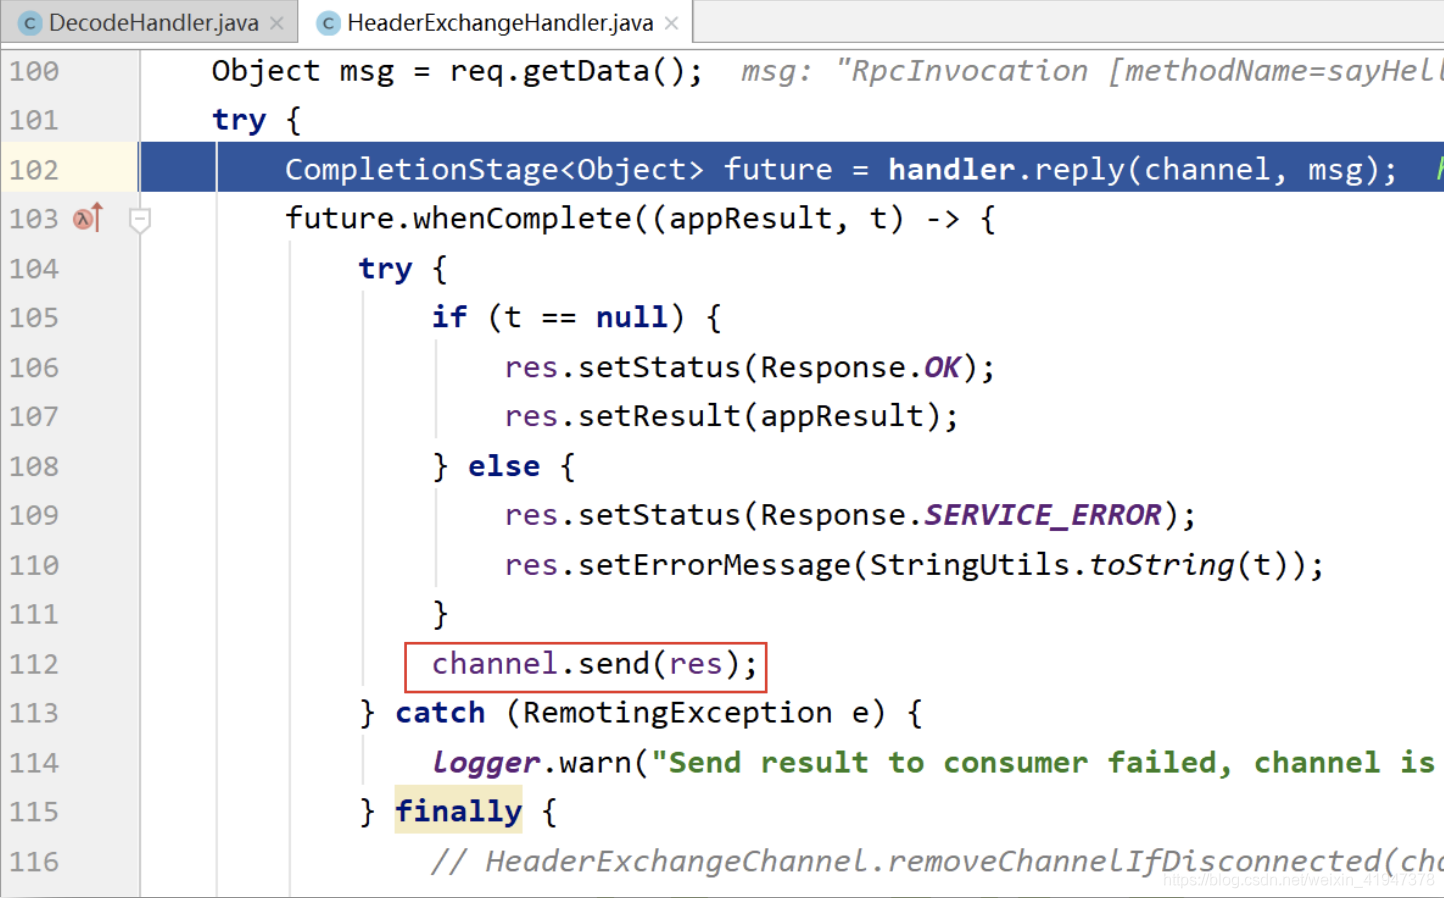
try {
//这里要进行 同步转异步
CompletionStage<Object> future = handler.reply(channel, msg);
future.whenComplete((appResult, t) -> {
//当异步处理完成后触发该方法
//appResult是异步操作结果数据
//t是异常信息
try {
if (t == null) {
//t为null说明没有异常
res.setStatus(Response.OK);
res.setResult(appResult);
} else {
//否则是认为发生异常
res.setStatus(Response.SERVICE_ERROR);
res.setErrorMessage(StringUtils.toString(t));
}
channel.send(res); // 将Server的处理结果返回给Client
} catch (RemotingException e) {
logger.warn("Send result to consumer failed, channel is " + channel + ", msg is " + e);
} finally {
// HeaderExchangeChannel.removeChannelIfDisconnected(channel);
}
});
} catch (Throwable e) {
res.setStatus(Response.SERVICE_ERROR);
res.setErrorMessage(StringUtils.toString(e));
channel.send(res);
}
}
DEBUG,看下Object msg = req.getData():
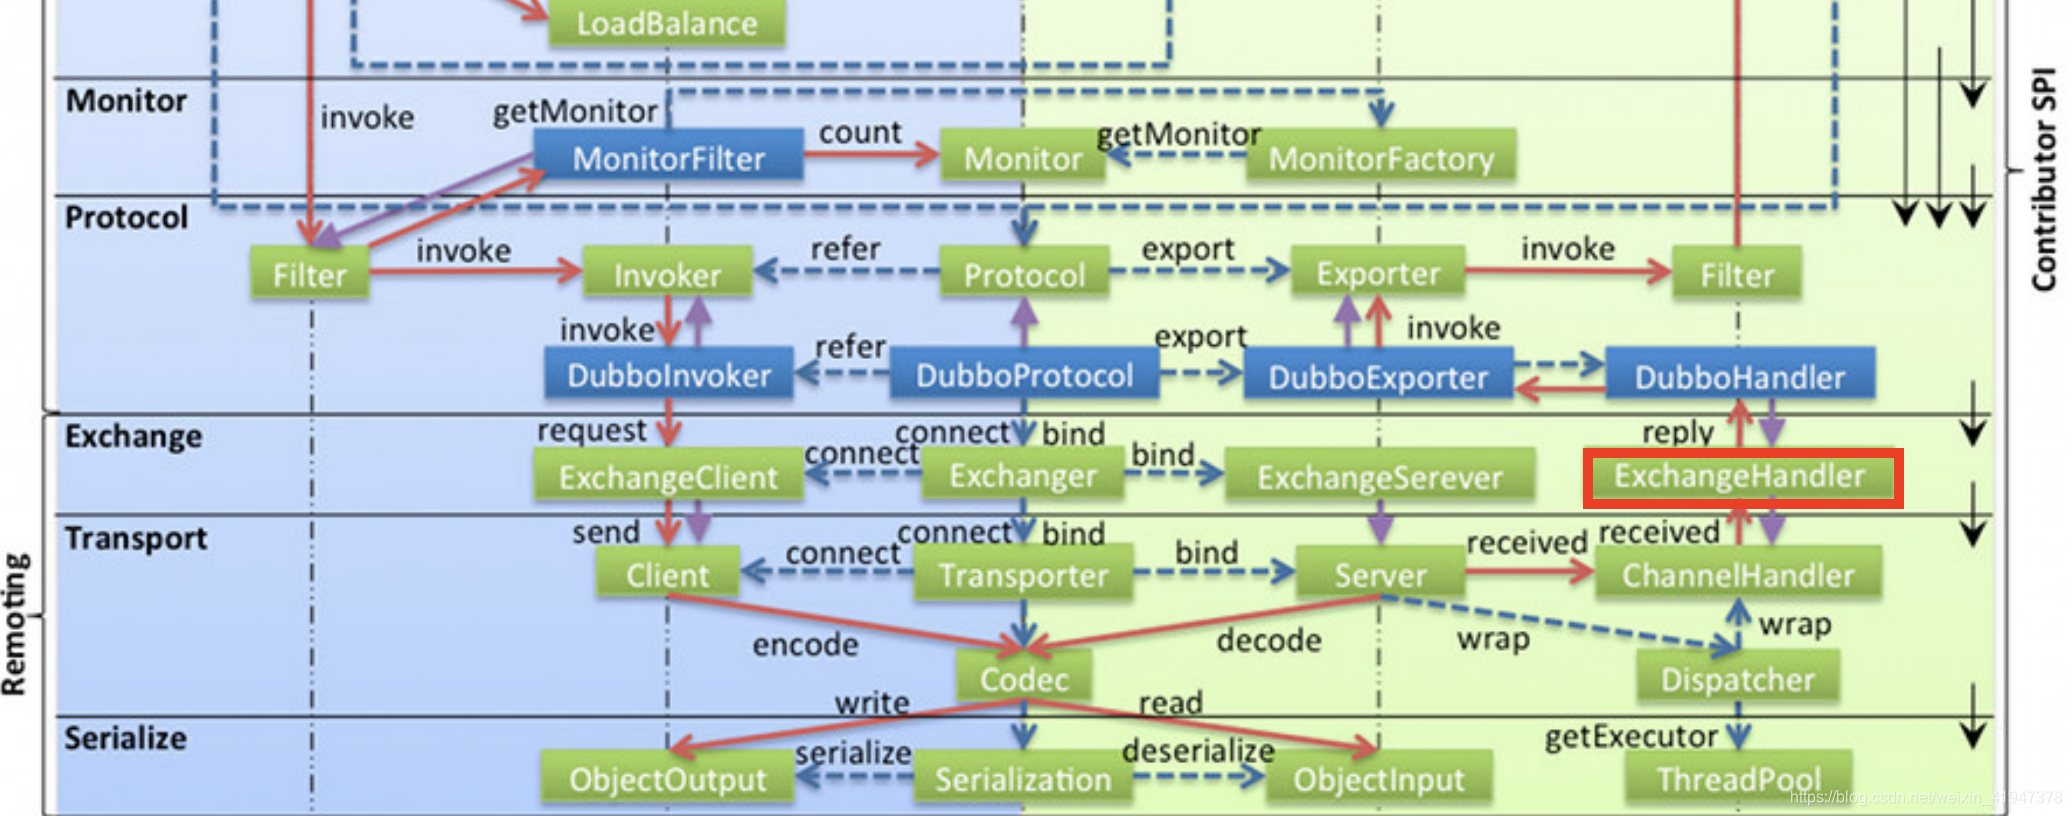
到这里关于Dubbo十层架构的Exchange 信息交换层,三个Exchanger现在都看到了:
- ExchangeServer,服务发布的时候会启动,里面封装了一个Server,是NettyServer实现的
- ExchangeClient,服务订阅,构建DubboInvoker时getClients方法中初始化的,里面封装了一个Client,是NettyClient实现的
- ExchangeHandler,消息的处理对象,提供者端用来处理消费者发来的消息,消费者端用来处理提供者发回的响应
现在我们看ExchangeHandler是如何处理消息的,架构图中可以看到DubboHandler,但这个其实并不是接口,而是代表ExchangeHandler接口在DubboProtocol的一个实现类,其实就是DubboProtocol中的requestHandler成员变量,是ExchangeHandlerAdapter的匿名内部类的实例,看一下该类的reply方法:
public class DubboProtocol extends AbstractProtocol {


	...
	//这个requestHandler是DubboProtocol的成员变量
	//是ExchangeHandlerAdapter的匿名内部类的实例
    private ExchangeHandler requestHandler = new ExchangeHandlerAdapter() {


        @Override
        //org.apache.dubbo.remoting.exchange.support.ExchangeHandlerAdapter#reply:
        public CompletableFuture<Object> reply(ExchangeChannel channel, Object message) throws RemotingException {


            if (!(message instanceof Invocation)) {


                throw new RemotingException(channel, "Unsupported request: "
                        + (message == null ? null : (message.getClass().getName() + ": " + message))
                        + ", channel: consumer: " + channel.getRemoteAddress() + " --> provider: " + channel.getLocalAddress());
            }

            Invocation inv = (Invocation) message;
            // 获取真正要处理本次调用的invoker
            Invoker<?> invoker = getInvoker(channel, inv);
            // need to consider backward-compatibility if it's a callback
            if (Boolean.TRUE.toString().equals(inv.getAttachments().get(IS_CALLBACK_SERVICE_INVOKE))) {


            	// 如果是回调,需要考虑向后兼容性
				...
			}
            RpcContext.getContext().setRemoteAddress(channel.getRemoteAddress());
            // 调用真正invoker的invoke()完成本次调用的Server运算
            Result result = invoker.invoke(inv);
            return result.completionFuture().thenApply(Function.identity());
        }
		...
    };
    ...
}
这里我们要关注两个点:
- 1.真正的invoker怎么来的?是什么?
- 2.调用真正invoker的invoker方法的流程
先看getInvoker方法,看看invoker从哪来?
//org.apache.dubbo.rpc.protocol.dubbo.DubboProtocol#getInvoker
Invoker<?> getInvoker(Channel channel, Invocation inv) throws RemotingException {


    boolean isCallBackServiceInvoke = false;
    boolean isStubServiceInvoke = false;
    int port = channel.getLocalAddress().getPort();
    String path = inv.getAttachments().get(PATH_KEY);

    // if it's callback service on client side
	...

    //callback
	...
	//serviceKey的格式:serviceGroup/serviceName:serviceVersion:port
    String serviceKey = serviceKey(port, path, inv.getAttachments().get(VERSION_KEY), inv.getAttachments().get(GROUP_KEY));
    // 通过serviceKey从缓存中获取真正的服务暴露对象exporter
    DubboExporter<?> exporter = (DubboExporter<?>) exporterMap.get(serviceKey);

    if (exporter == null) {


        throw new RemotingException(channel, "Not found exported service: " + ...);
    }
    // 通过暴露对象exporter获取真正的invoker
    return exporter.getInvoker();
}
可以看到invoker是就通过暴露对象exporter来的。
如果看过服务发布源码分析,我们其实是知道exporter的invoker是啥的,就是通过JavassistProxyFactory.getInvoker生成的一个代理对象:
public class JavassistProxyFactory extends AbstractProxyFactory {
...
@Override
public <T> Invoker<T> getInvoker(T proxy, Class<T> type, URL url) {
// TODO Wrapper cannot handle this scenario correctly: the classname contains '$'
final Wrapper wrapper = Wrapper.getWrapper(proxy.getClass().getName().indexOf('$') < 0 ? proxy.getClass() : type);
//AbstractProxyInvoker类很关键将同步操作转成了异步操作
return new AbstractProxyInvoker<T>(proxy, type, url) {
@Override
protected Object doInvoke(T proxy, String methodName,
Class<?>[] parameterTypes,
Object[] arguments) throws Throwable {
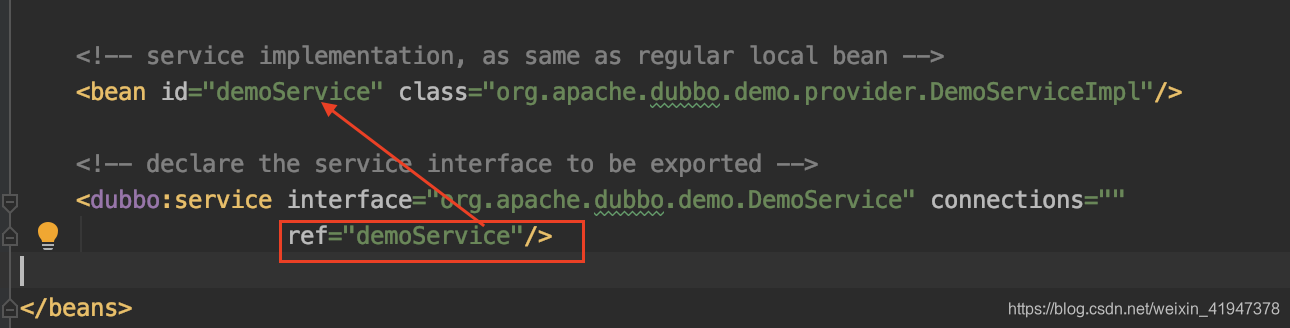
//虽然我们不知道这个wrapper代理类长什么样(有兴趣自己看)
//但是这个proxy就是<dubbo:service/>标签中ref属性
//引用的spring容器中的接口实现类啊!!
return wrapper.invokeMethod(proxy, methodName, parameterTypes, arguments);
}
};
}
}
proxy就是<dubbo:service/>标签中ref属性引用的spring容器中的接口实现类:

这里主要关注一下AbstractProxyInvoker这个类,它将我们调用真正服务实现类获取的结果封装成了“异步结果”:
//org.apache.dubbo.rpc.proxy.AbstractProxyInvoker#invoke
public Result invoke(Invocation invocation) throws RpcException {


    try {


    	//doInvoker底层会调用我们服务真正的实现类
        Object value = doInvoke(proxy, invocation.getMethodName(), invocation.getParameterTypes(), invocation.getArguments());
        //将结果封装成异步结果
        CompletableFuture<Object> future = wrapWithFuture(value, invocation);
        AsyncRpcResult asyncRpcResult = new AsyncRpcResult(invocation);
        //如果future操作已经完成,触发下面函数
        future.whenComplete((obj, t) -> {


            AppResponse result = new AppResponse();
            if (t != null) {


                if (t instanceof CompletionException) {


                    result.setException(t.getCause());
                } else {


                    result.setException(t);
                }
            } else {


                result.setValue(obj);
            }
            //让asyncRpcResult异步结果完成
            asyncRpcResult.complete(result);
        });
        return asyncRpcResult;
    } catch (InvocationTargetException e) {


        if (RpcContext.getContext().isAsyncStarted() && !RpcContext.getContext().stopAsync()) {


            logger.error("Provider async started, but got an exception from the original method, cannot write the exception back to consumer because an async result may have returned the new thread.", e);
        }
        return AsyncRpcResult.newDefaultAsyncResult(null, e.getTargetException(), invocation);
    } catch (Throwable e) {


        throw new RpcException("Failed to invoke remote proxy method " + invocation.getMethodName() + " to " + getUrl() + ", cause: " + e.getMessage(), e);
    }
}
其中先看下wrapWithFuture方法,将获取的结果包装:
//org.apache.dubbo.rpc.proxy.AbstractProxyInvoker#wrapWithFuture
private CompletableFuture<Object> wrapWithFuture (Object value, Invocation invocation) {


    if (RpcContext.getContext().isAsyncStarted()) {


        return ((AsyncContextImpl)(RpcContext.getContext().getAsyncContext())).getInternalFuture();
    } else if (value instanceof CompletableFuture) {


    	//看到这里不知道大家有没有想到高级配置篇说到的“消费者异步调用”
        return (CompletableFuture<Object>) value;
    }
    //大多情况都是这个方法,直接返回一个“已经完成的异步结果”
    return CompletableFuture.completedFuture(value);
}
至于为什么这么
多"异步结果",能力有限,我也不能完全讲明白,讲清楚,但可以给出思考方向:
- 本身提供者和消费者之间调用底层就是网络通信,肯定是异步的,但是需要让消费者感觉是同步的,这里就涉及到很多同步、异步之间的转换,已经异常情况要考虑。
- 本身Dubbo也是支持消费者异步调用的,这个在高级配置篇讲过
从org.apache.dubbo.rpc.proxy.AbstractProxyInvoker#invoke中可以看出:
- result异步操作完成了,就会触发asyncRpcResult.complete方法,让asyncRpcResult异步操作状态置为完成
- asyncRpcResult异步操作完成了又触发了asyncRpcResult在org.apache.dubbo.remoting.exchange.support.header.HeaderExchangeHandler#handleRequest中通过whenComplete方法设置的函数:
//org.apache.dubbo.remoting.exchange.support.header.HeaderExchangeHandler#handleRequest
void handleRequest(final ExchangeChannel channel, Request req) throws RemotingException {


    Response res = new Response(req.getId(), req.getVersion());
    if (req.isBroken()) {


		...
    }
    // find handler by message class.
    Object msg = req.getData();
    try {


    	//这个future就是org.apache.dubbo.rpc.proxy.AbstractProxyInvoker返回
    	//的AsyncRpcResult
        CompletionStage<Object> future = handler.reply(channel, msg);
        future.whenComplete((appResult, t) -> {


            try {


                if (t == null) {


                    res.setStatus(Response.OK);
                    res.setResult(appResult);
                } else {


                    res.setStatus(Response.SERVICE_ERROR);
                    res.setErrorMessage(StringUtils.toString(t));
                }
                channel.send(res);  // 将Server的处理结果返回给Client
            } catch (RemotingException e) {


				...
            } finally {


                // HeaderExchangeChannel.removeChannelIfDisconnected(channel);
            }
        });
    } catch (Throwable e) {


        res.setStatus(Response.SERVICE_ERROR);
        res.setErrorMessage(StringUtils.toString(e));
        channel.send(res);
    }
}
就是在这里触发了响应的回传!
DEBUG
4. 消费者接受提供者响应
4.1 入口
从1.NettyClient的创建可以知道入口是NettyClientHandler的channelRead方法
4.2 流程分析
看NettyClientHandler的channelRead方法:
//org.apache.dubbo.remoting.transport.netty4.NettyClientHandler#channelRead
public void channelRead(ChannelHandlerContext ctx, Object msg) throws Exception {


    NettyChannel channel = NettyChannel.getOrAddChannel(ctx.channel(), url, handler);
    try {


        handler.received(channel, msg);
    } finally {


        NettyChannel.removeChannelIfDisconnected(ctx.channel());
    }
}
DEBUG

org.apache.dubbo.remoting.transport.AbstractPeer#received(NettyClient的父类)
org.apache.dubbo.remoting.transport.MultiMessageHandler#received(判断是否是multipart请求)
org.apache.dubbo.remoting.exchange.support.header.HeartbeatHandler#received(心跳处理)
org.apache.dubbo.remoting.transport.dispatcher.all.AllChannelHandler#received(线程池异步执行ChannelEventRunnable)
org.apache.dubbo.remoting.transport.dispatcher.ChannelEventRunnable#run
public void run() {


    if (state == ChannelState.RECEIVED) {


    	//被动,消息入的情况
        try {


	        //走RECEIVED
            handler.received(channel, message);
        } catch (Exception e) {


            logger.warn("ChannelEventRunnable handle " + state + " operation error, channel is " + channel
                    + ", message is " + message, e);
        }
    } else {


    	//主动,消息出的情况
        switch (state) {


        case CONNECTED:
			...
        case DISCONNECTED:
			...
        case SENT:
			...
        case CAUGHT:
			...
        default:
            logger.warn("unknown state: " + state + ", message is " + message);
        }
    }

}
org.apache.dubbo.remoting.transport.DecodeHandler#received(解码)
org.apache.dubbo.remoting.exchange.support.header.HeaderExchangeHandler#received
//org.apache.dubbo.remoting.exchange.support.header.HeaderExchangeHandler#received
public void received(Channel channel, Object message) throws RemotingException {


    channel.setAttribute(KEY_READ_TIMESTAMP, System.currentTimeMillis());
    final ExchangeChannel exchangeChannel = HeaderExchangeChannel.getOrAddChannel(channel);
    try {


        if (message instanceof Request) {


            // handle request.
            ...
        } else if (message instanceof Response) {


	        //这个时候走这,处理响应
            handleResponse(channel, (Response) message);
        } else if (message instanceof String) {


            ...
        } else {


            handler.received(exchangeChannel, message);
        }
    } finally {


        HeaderExchangeChannel.removeChannelIfDisconnected(channel);
    }
}
//org.apache.dubbo.remoting.exchange.support.header.HeaderExchangeHandler#handleResponse
static void handleResponse(Channel channel, Response response) throws RemotingException {


    if (response != null && !response.isHeartbeat()) {


        DefaultFuture.received(channel, response);
    }
}
继续跟DefaultFuture.received:
//org.apache.dubbo.remoting.exchange.support.DefaultFuture#received(org.apache.dubbo.remoting.Channel, org.apache.dubbo.remoting.exchange.Response)
public static void received(Channel channel, Response response) {


    received(channel, response, false);
}

public static void received(Channel channel, Response response, boolean timeout) {


    try {


    	//这里很关键,可以看到response中有个id记录了当前是哪次请求
    	//通过id获取 消费者发起请求时创建的“异步结果”
        DefaultFuture future = FUTURES.remove(response.getId());
        if (future != null) {


            Timeout t = future.timeoutCheckTask;
            if (!timeout) {


                // decrease Time
                t.cancel();
            }
            future.doReceived(response);
        } else {


            logger.warn("The timeout response finally returned at "
                    + (new SimpleDateFormat("yyyy-MM-dd HH:mm:ss.SSS").format(new Date()))
                    + ", response " + response
                    + (channel == null ? "" : ", channel: " + channel.getLocalAddress()
                    + " -> " + channel.getRemoteAddress()));
        }
    } finally {


        CHANNELS.remove(response.getId());
    }
}
继续跟future.doReceived(response):
//org.apache.dubbo.remoting.exchange.support.DefaultFuture#doReceived
private void doReceived(Response res) {


    if (res == null) {


        throw new IllegalStateException("response cannot be null");
    }
    if (res.getStatus() == Response.OK) {


	    //修改异步操作结果
        this.complete(res.getResult());
    } else if (res.getStatus() == Response.CLIENT_TIMEOUT || res.getStatus() == Response.SERVER_TIMEOUT) {


        this.completeExceptionally(new TimeoutException(res.getStatus() == Response.SERVER_TIMEOUT, channel, res.getErrorMessage()));
    } else {


        this.completeExceptionally(new RemotingException(channel, res.getErrorMessage()));
    }
}
complete方法将当前“异步结果”状态置为以完成。
DefaultFuture继承自CompletableFuture,关于CompletableFuture(可完备化的异步操作结果)这个是JDK并发相关的内容,我们简单看下,跟complete方:
/**
 * If not already completed, sets the value returned by {@link
 * #get()} and related methods to the given value.
 * 如果还没有完成,将{@link #get()}和相关方法返回的值设置为给定的值。
 *
 * @param value the result value
 * @return {@code true} if this invocation caused this CompletableFuture
 * to transition to a completed state, else {@code false}
 */
//java.util.concurrent.CompletableFuture#complete
public boolean complete(T value) {


    boolean triggered = completeValue(value);
    postComplete();
    return triggered;
}
/**
 * Pops and tries to trigger all reachable dependents.  Call only
 * when known to be done.
 * 弹出并尝试触发所有可到达的依赖项。只有知道要完成的时候才调用。
 */
final void postComplete() {


    /*
     * On each step, variable f holds current dependents to pop
     * and run.  It is extended along only one path at a time,
     * pushing others to avoid unbounded recursion.
     * 在每一步中,变量f保存当前依赖项以弹出并运行。它一次只沿着一条路径进
     * 行扩展,推动其他路径以避免无限制的递归。
     */
    CompletableFuture<?> f = this; Completion h;
    while ((h = f.stack) != null ||
           (f != this && (h = (f = this).stack) != null)) {


        CompletableFuture<?> d; Completion t;
        if (f.casStack(h, t = h.next)) {


            if (t != null) {


                if (f != this) {


	                //不相同放回栈里
                    pushStack(h);
                    continue;
                }
                h.next = null;    // detach
            }
            f = (d = h.tryFire(NESTED)) == null ? this : d;
        }
    }
}

abstract static class Completion extends ForkJoinTask<Void>
    implements Runnable, AsynchronousCompletionTask {


    volatile Completion next;      // Treiber stack link

    /**
     * Performs completion action if triggered, returning a
     * dependent that may need propagation, if one exists.
     * 如果触发,则执行完成操作,返回可能需要传播的依赖项(如果存在)。
     *
     * @param mode SYNC, ASYNC, or NESTED
     */
    abstract CompletableFuture<?> tryFire(int mode);

    /** Returns true if possibly still triggerable. Used by cleanStack. */
    abstract boolean isLive();

    public final void run()                {

     tryFire(ASYNC); }
    public final boolean exec()            {

     tryFire(ASYNC); return true; }
    public final Void getRawResult()       {

     return null; }
    public final void setRawResult(Void v) {

    }
}
JDK的并发原理我没研究过,源码好像很复杂了,算了。。。关于用法可以参考https://www.cnblogs.com/txmfz/p/11266411.html这篇博文。
最后我们把目光放到AsyncToSyncInvoker这个类,这个类在消费者端调用DubboProtocol的refer方法,构建Invoker的时候可以看到,主要负责同异步转换的:
//org.apache.dubbo.rpc.protocol.AbstractProtocol#refer
public <T> Invoker<T> refer(Class<T> type, URL url) throws RpcException {


    return new AsyncToSyncInvoker<>(protocolBindingRefer(type, url));
}
public class AsyncToSyncInvoker<T> implements Invoker<T> {


	...
    @Override
    public Result invoke(Invocation invocation) throws RpcException {


    	//这里获得的是一个“异步操作结果对象”
        Result asyncResult = invoker.invoke(invocation);

        try {


            if (InvokeMode.SYNC == ((RpcInvocation) invocation).getInvokeMode()) {


            	//如果是同步模型,这里调用异步操作结果对象的get方法
            	//如果该异步操作没有完成,这里会阻塞!!!让调用者感觉是同步
                asyncResult.get(Integer.MAX_VALUE, TimeUnit.MILLISECONDS);
            }
        } catch (InterruptedException e) {


            throw new RpcException("Interrupted unexpectedly while waiting for remoting result to return!  method: " + invocation.getMethodName() + ", provider: " + getUrl() + ", cause: " + e.getMessage(), e);
        } catch (ExecutionException e) {


            Throwable t = e.getCause();
            if (t instanceof TimeoutException) {


                throw new RpcException(RpcException.TIMEOUT_EXCEPTION, "Invoke remote method timeout. method: " + invocation.getMethodName() + ", provider: " + getUrl() + ", cause: " + e.getMessage(), e);
            } else if (t instanceof RemotingException) {


                throw new RpcException(RpcException.NETWORK_EXCEPTION, "Failed to invoke remote method: " + invocation.getMethodName() + ", provider: " + getUrl() + ", cause: " + e.getMessage(), e);
            }
        } catch (Throwable e) {


            throw new RpcException(e.getMessage(), e);
        }
        return asyncResult;
    }
    ...
}
附录1 - ExecutorService详解
看org.apache.dubbo.remoting.transport.dispatcher.all.AllChannelHandler#received:
//org.apache.dubbo.remoting.transport.dispatcher.all.AllChannelHandler#received
public void received(Channel channel, Object message) throws RemotingException {


    // 线程池
    ExecutorService executor = getExecutorService();
    try {


        executor.execute(new ChannelEventRunnable(channel, handler, ChannelState.RECEIVED, message));
    } catch (Throwable t) {


        //TODO A temporary solution to the problem that the exception information can not be sent to the opposite end after the thread pool is full. Need a refactoring
        //fix The thread pool is full, refuses to call, does not return, and causes the consumer to wait for time out
    	if(message instanceof Request && t instanceof RejectedExecutionException){


    		Request request = (Request)message;
    		if(request.isTwoWay()){


    			String msg = "Server side(" + url.getIp() + "," + url.getPort() + ") threadpool is exhausted ,detail msg:" + t.getMessage();
    			Response response = new Response(request.getId(), request.getVersion());
    			response.setStatus(Response.SERVER_THREADPOOL_EXHAUSTED_ERROR);
    			response.setErrorMessage(msg);
    			channel.send(response);
    			return;
    		}
    	}
        throw new ExecutionException(message, channel, getClass() + " error when process received event .", t);
    }
}
看下java.util.concurrent.ExecutorService的注释:
/**
 * An {@link Executor} that provides methods to manage termination and
 * methods that can produce a {@link Future} for tracking progress of
 * one or more asynchronous tasks.
 * 一个{@link Executor},提供管理终止的方法,以及可以生成{@link Future}的方法,
 * 用于跟踪一个或多个异步任务的进度。
 *
 * ...
 *
 * @since 1.5
 * @author Doug Lea
 */
public interface ExecutorService extends Executor {

    ...}
ExecutorService继承了Executor:
/**
 * An object that executes submitted {@link Runnable} tasks. This
 * interface provides a way of decoupling task submission from the
 * mechanics of how each task will be run, including details of thread
 * use, scheduling, etc.  An {@code Executor} is normally used
 * instead of explicitly creating threads. For example, rather than
 * invoking {@code new Thread(new(RunnableTask())).start()} for each
 * of a set of tasks, you might use:
 * 执行提交的{@link Runnable}任务的对象。这个接口提供了一种将任务提交与每个任务
 * 运行机制(包括线程使用、调度等细节)分离的方法。通常使用{@code Executor}来代替
 * 显式地创建线程。例如,与其为一组任务调用
 * {@code new Thread(new(RunnableTask())).start()},不如使用:
 *
 * <pre>
 * Executor executor = <em>anExecutor</em>;
 * executor.execute(new RunnableTask1());
 * executor.execute(new RunnableTask2());
 * ...
 * </pre>
 *
 * ...
 *
 * @since 1.5
 * @author Doug Lea
 */
public interface Executor {


    /**
     * Executes the given command at some time in the future.  The command
     * may execute in a new thread, in a pooled thread, or in the calling
     * thread, at the discretion of the {@code Executor} implementation.
     * 在将来的某个时候执行给定的命令。该命令可以在新线程中执行,可以在合用线程中执行,
     * 也可以在调用线程中执行,由{@code Executor}实现决定。
     *
     * @param command the runnable task
     * @throws RejectedExecutionException if this task cannot be
     * accepted for execution
     * @throws NullPointerException if command is null
     */
    void execute(Runnable command);
}
现在看getExecutorService方法:
public class WrappedChannelHandler implements ChannelHandlerDelegate {


	...
	//共享的线程池
    protected static final ExecutorService SHARED_EXECUTOR =
            Executors.newCachedThreadPool(new NamedThreadFactory("DubboSharedHandler", true));
    protected final ExecutorService executor;
	...
    public WrappedChannelHandler(ChannelHandler handler, URL url) {


        this.handler = handler;
        this.url = url;

        //executor在这初始化的
        executor = (ExecutorService) ExtensionLoader
                .getExtensionLoader(ThreadPool.class)
                //获取自适应的线程池扩展类实例
                .getAdaptiveExtension()
                //获取线程池的执行器,返回的executor本身也是一个线程池
                .getExecutor(url);

        String componentKey = Constants.EXECUTOR_SERVICE_COMPONENT_KEY;
        if (CONSUMER_SIDE.equalsIgnoreCase(url.getParameter(SIDE_KEY))) {


            componentKey = CONSUMER_SIDE;
        }
        DataStore dataStore = ExtensionLoader.getExtensionLoader(DataStore.class).getDefaultExtension();
        dataStore.put(componentKey, Integer.toString(url.getPort()), executor);
    }
    ...
    public ExecutorService getExecutorService() {


        ExecutorService cexecutor = executor;
        if (cexecutor == null || cexecutor.isShutdown()) {


	        //如果为null或者被关闭了,返回共享的执行器
	        //它也是一个线程池,执行execute方法时底层会自动分配一个线程处理任务
            cexecutor = SHARED_EXECUTOR;
        }
        return cexecutor;
    }
}
共享执行器的创建,实际上就是一个线程池ThreadPoolExecutor
//java.util.concurrent.Executors#newCachedThreadPool(java.util.concurrent.ThreadFactory)
public static ExecutorService newCachedThreadPool(ThreadFactory threadFactory) {


    return new ThreadPoolExecutor(0, Integer.MAX_VALUE,
                                  60L, TimeUnit.SECONDS,
                                  new SynchronousQueue<Runnable>(),
                                  threadFactory);
}
构造中ExtensionLoader.getExtensionLoader(ThreadPool.class).getAdaptiveExtension().getExecutor(url)返回的也是一个线程池:
public class FixedThreadPool implements ThreadPool {


    @Override
    public Executor getExecutor(URL url) {


        String name = url.getParameter(THREAD_NAME_KEY, DEFAULT_THREAD_NAME);
        int threads = url.getParameter(THREADS_KEY, DEFAULT_THREADS);
        int queues = url.getParameter(QUEUES_KEY, DEFAULT_QUEUES);
        return new ThreadPoolExecutor(threads, threads, 0, TimeUnit.MILLISECONDS,
                queues == 0 ? new SynchronousQueue<Runnable>() :
                        (queues < 0 ? new LinkedBlockingQueue<Runnable>()
                                : new LinkedBlockingQueue<Runnable>(queues)),
                new NamedInternalThreadFactory(name, true), new AbortPolicyWithReport(name, url));
    }

}
现在看executor.execute(new ChannelEventRunnable(…))方法,实际上执行的是java.util.concurrent.ThreadPoolExecutor#execute方法:
/**
 * Executes the given task sometime in the future.  The task
 * may execute in a new thread or in an existing pooled thread.
 * 在将来的某个时候执行给定的任务。任务可以在新线程中执行,也可以在现有的池线程中执行。
 *
 * If the task cannot be submitted for execution, either because this
 * executor has been shutdown or because its capacity has been reached,
 * the task is handled by the current {@code RejectedExecutionHandler}.
 * 如果任务不能被提交执行,要么是因为这个执行器已经关闭,要么是因为它的容量已经达到,
 * 那么任务将由当前的{@code RejectedExecutionHandler}来处理。
 *
 * @param command the task to execute
 * @throws RejectedExecutionException at discretion of
 *         {@code RejectedExecutionHandler}, if the task
 *         cannot be accepted for execution
 * @throws NullPointerException if {@code command} is null
 */
//java.util.concurrent.ThreadPoolExecutor#execute
public void execute(Runnable command) {


    if (command == null)
        throw new NullPointerException();
    /*
     * Proceed in 3 steps:
     *
     * 1. If fewer than corePoolSize threads are running, try to
     * start a new thread with the given command as its first
     * task.  The call to addWorker atomically checks runState and
     * workerCount, and so prevents false alarms that would add
     * threads when it shouldn't, by returning false.
     * 1. 如果运行的线程少于corePoolSize,则尝试使用给定命令作为其第一个任务
     * 启动一个新线程。对addWorker的调用会自动检查runState和workerCount,
     * 从而通过返回false防止在不应该添加线程的情况下添加线程的错误警报。
     *
     * 2. If a task can be successfully queued, then we still need
     * to double-check whether we should have added a thread
     * (because existing ones died since last checking) or that
     * the pool shut down since entry into this method. So we
     * recheck state and if necessary roll back the enqueuing if
     * stopped, or start a new thread if there are none.
     * 2. 如果任务可以成功排队,那么我们仍然需要再次检查是否应该添加一个
     * 线程(因为现有的线程在上次检查后死亡),或者池在进入此方法后关闭。
     * 因此,我们会重新检查状态,如果停止队列,必要时回滚队列;如果没有线
     * 程,则启动一个新线程。
     *
     * 3. If we cannot queue task, then we try to add a new
     * thread.  If it fails, we know we are shut down or saturated
     * and so reject the task.
     * 3.如果我们不能将任务放入队列,那么我们尝试添加一个新线程。如果它失败了,
     * 我们知道我们被关闭或饱和,因此拒绝这个任务。
     */
    int c = ctl.get();
    if (workerCountOf(c) < corePoolSize) {


        if (addWorker(command, true))
            return;
        c = ctl.get();
    }
    if (isRunning(c) && workQueue.offer(command)) {


        int recheck = ctl.get();
        if (! isRunning(recheck) && remove(command))
            reject(command);
        else if (workerCountOf(recheck) == 0)
            addWorker(null, false);
    }
    else if (!addWorker(command, false))
        reject(command);
}