文章目录
一:Memcached作用
1)Memory Cache — 使用内存作为数据的缓冲,加快数据的读取,减少DB服务器的负担。
2)在无数的大型网站中,Memory Cache起着至关重要的作用,往往这些大型网站会用上百台Memory Cache服务器。
3)而在中小型的项目中,适当使用Memory Cache(性能与成本之间的妥协)也是非常有必要的。
二:搭建Memcache高可用
案例说明
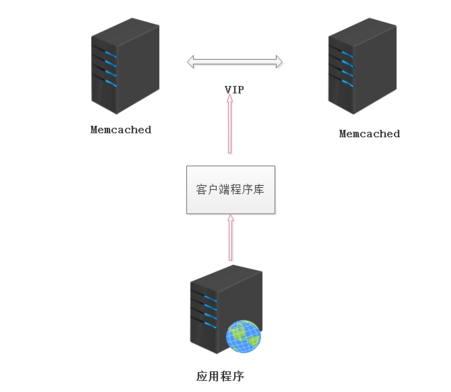
为解决memcached单点故障,需要实现memcached缓存的高可用。
首先,需要实现 Memcached的主主复制
指任意一台memcached服务器修改数据都会被同步到另外一台,但是memcached API无法判断连接哪一台服务器,因此需要VIP。其次,通过 Keepalived 产生的VIP连接memcached服务器,提供高可用架构。
实验环境
- 一台centos7虚拟机作为memcache主服务器,IP地址:20.0.0.41

- 一台centos7虚拟机作为memcache从服务器,IP地址:20.0.0.42

- 一台centos7虚拟机作为memcache客户端,IP地址:20.0.0.43:
2.1:memcache主从服务器搭建
- 主服务器需要安装:memcached,libevent,keepalived,magent
- 从服务器需要安装:memcached,libevent,keepalived:
2.21:主从服务器搭建mencache
- 以下的步骤主从都需要操作,仅展示主服务器的操作
#关闭防火墙规则跟防护功能
[root@localhost ~]# iptables -F
[root@localhost ~]# setenforce 0

#解压事件通知库到opt
#Memcache 用到了 libevent 这个库用于 Socket 的处理,所以还需要安装 libevent

[root@master ~]# tar zxvf libevent-2.1.8-stable.tar.gz  -C /opt

[root@master ~]# tar zxvf memcached-1.5.6.tar.gz -C /opt

[root@master ~]# mkdir /opt/magent                                 #从服务器不需要创建
[root@master ~]# tar zxvf magent-0.5.tar.gz -C /opt/magent/

#安装编译环境
[root@master ~]# yum install gcc gcc-c++ make -y

[root@master ~]# cd /opt/libevent-2.1.8-stable/
[root@master libevent-2.1.8-stable]# ./configure --prefix=/usr      #指定安装路径

#编译及安装
[root@master libevent-2.1.8-stable]# make && make install

[root@master libevent-2.1.8-stable]# cd ..
[root@master opt]# cd memcached-1.5.6/
./configure \
--prefix=/usr/local/memcached \
--with-libevent=/usr/local/libevent

#编译及安装
[root@slave memcache:d-1.5.6]# make && make install
2.2:主服务器安装magent代理
[root@master memcached-1.5.6]# cd /opt/magent/
[root@master magent]# ls
ketama.c  ketama.h  magent.c  Makefile

#修改magent配置文件
[root@master magent]# vim ketama.h
'//修改前两个如下'

#ifndef SSIZE_MAX
#define SSIZE_MAX 32767

..........
#endif

#修改Makefile配置文件
[root@master magent]# vim Makefile
'//首行添加-lm'

LIBS = -levent -lm

#make编译
[root@master magent]# make
gcc -Wall -O2 -g  -c -o magent.o magent.c
gcc -Wall -O2 -g  -c -o ketama.o ketama.c
gcc -Wall -O2 -g -o magent magent.o ketama.o -levent -lm
#编译后会产生magent可执行程序
[root@master magent]# ls
ketama.c  ketama.h  ketama.o  magent  magent.c  magent.o  Makefile

#下载远程传输  这样从服务器就不需要修改了
[root@master magent]# yum install openssh-clients -y

#将magent可执行程序复制到/usr/bin中
[root@master magent]# cp magent /usr/bin/

'//将magent可执行程序复制到从服务器的/usr/bin中'
'//此命令需要输入yes,输入从服务器的密码才能将文件拷贝过去,根据提示操作即可'
[root@master magent]# scp magent root@20.0.0.42:/usr/bin/
2.3:主从服务器搭建keeplived
#主从服务器都需要安装
[root@master magent]# yum install keepalived -y
2.31:修改主服务器中keepalived.conf
[root@slave keepalived]# vim /etc/keepalived/keepalived.conf

! Configuration File for keepalived
'//添加此段:定义了一个函数脚本'
vrrp_script magent {

                           '//脚本名字自定义'
      script "/opt/shell/magent.sh"        '//脚本指定位置'
      interval 2                           '//时间间隔'
}
global_defs {

                                  '//区域指定全局参数'
   notification_email {


     acassen@firewall.loc
     failover@firewall.loc
     sysadmin@firewall.loc
   }
   notification_email_from Alexandre.Cassen@firewall.loc
   smtp_server 192.168.200.1
   smtp_connect_timeout 30
   router_id MAGENT_HA                      '//执行名称备用服务器不能一样'
}
vrrp_instance VI_1 {

                             '//实例名称'
    state MASTER
    interface ens33                          '//承载网络为VIP地址的物理接口'
    virtual_router_id 51
    priority 100                             '//优先级 备用服务器小于主服务器'
    advert_int 1                             '//通告间隔秒数'
    authentication {


        auth_type PASS                       '//认证类型'
        auth_pass 1111                       '//密码验证'
    }
    track_script {

                               '//调用刚刚的函数在实例里面调用,调用名字'
        magent
}
    virtual_ipaddress {


        20.0.0.100                           '//漂移地址'
    }
}
#下面全部删除
2.32:配置从服务器中的keepalived.conf
[root@slave bin]# cd /etc/keepalived/
[root@slave keepalived]# ls
keepalived.conf
'//备份配置文件【改名】,就不会被识别'
[root@slave keepalived]# mv keepalived.conf keepalived.conf.bk

#拷贝主服务器的kaeepalived配置文件到从服务器
[root@master magent]# scp /etc/keepalived/keepalived.conf root@20.0.0.42:/etc/keepalived
root@20.0.0.42's password:                #输入密码
keepalived.conf                             100%  652   479.2KB/s   00:00

#下面这几项跟主服务器不一样
router_id MAGENT_HB         '//id名和第一台要不一样,从服务器改为MAGENT_HB'
state BACKUP                '//从服务器为BACKUP'
virtual_router_id 52        '//id号和第一台不一样即可'
priority 90                 '//优先级低与主服务器 '
2.4:主服务器创建magent脚本
- 上面keepalived.conf定义了函数定义脚本我们来创建
[root@master magent]# mkdir /opt/shell
[root@master magent]# cd /opt/shell/
[root@master shell]# vim magent.sh

#!/bin/bash
K=`ps -ef | grep keepalived | grep -v grep | wc -l`
if [ $K -gt 0 ]; then
        magent -u root -n 51200 -l 20.0.0.100 -p 12000 -s 20.0.0.41:11211 -b 20.0.0.42:11211
else
pkill -9 magent
fi

'//如下解释'
-n 51200             '//定义用户最大连接数'
-l 20.0.0.100        '//指定虚拟IP'
-p 12000             '//指定端口号'
-s                   '//指定主缓存服务器20.0.0.41'
-b                   '//指定从缓存服务器20.0.0.42'
11211				 '//memcache端口号'
- 参数说明
-d选项是作为守护进程在后台运行
-m是分配给Memcache使用的内存数量,单位是MB,我这里是10MB,
-u是运行Memcache的用户,我这里是root,
-l是监听的服务器IP地址,如果有多个地址的话
-p是设置Memcache监听的端口,我这里设置了12000,最好是1024以上的端口,
-c选项是最大运行的并发连接数,默认是1024,我这里设置了256,按照你服务器的负载量来设定,
-P是设置保存Memcache的pid文件
-vv是以very vrebose模式启动,将调试信息和错误输出到控制台
2.5:主从服务器启动
[root@master shell]# chmod +x magent.sh                  '//增加执行权限'
[root@master shell]# systemctl stop firewalld.service
[root@master shell]# systemctl start keepalived.service  '//启动服务 稍微有点慢'
[root@master shell]# netstat -ntap | grep 12000
tcp        0      0 20.0.0.100:12000        0.0.0.0:*               LISTEN      100623/magent
2.6:验证主从
[root@master shell]# vim /var/log/messages
搜索'//Transition to MASTER STATE',有即成功

[root@master shell]# ip addr              '//查看漂移地址是否绑定成功'
.....省略内容....
inet 20.0.0.100/32 scope global ens33
.....省略内容....

#从服务器
[root@slave keepalived]# vim /var/log/messages
搜索'//Entering BACKUP STATE',有即成功
[root@slave keepalived]# ip addr	'//查看漂移地址是否绑定成功'
...省略内容
  inet 20.0.0.100/32 scope global ens33
	'//绑定成功 '
...省略内容.....
2.7:主从服务器开启memcache并测试本地连接
-m:指定缓存   -d:指定守护进程    -p:端口号
[root@master shell]# ln -s /usr/local/memcached/bin/* /usr/local/bin/
[root@master shell]# memcached -m 512k -u root -d -l 20.0.0.41 -p 11211
[root@master shell]# netstat -ntap |grep 11211
tcp        0      0 20.0.0.41:11211         0.0.0.0:*               LISTEN      100207/memcached

'//设置从服务器'
[root@slave shell]# ln -s /usr/local/memcached/bin/* /usr/local/bin/
[root@slave shell]# memcached -m 512k -u root -d -l 20.0.0.42 -p 11211
[root@slave shell]# netstat -ntap |grep 11211
tcp        0      0 20.0.0.42:11211         0.0.0.0:*               LISTEN      22510/memcached
2.8:测试本地是否连接memcache
'//主服务器测试'
[root@master shell]# yum install telnet -y       #安装Telnet远程程序
[root@master shell]# telnet 20.0.0.41 11211
Trying 20.0.0.41...                              #连接成功
Connected to 20.0.0.41.
Escape character is '^]'.
quit                                             #quit
Connection closed by foreign host.

'//从服务器测试'
[root@slave shell]# yum install telnet -y        #安装Telnet
[root@slave shell]# telnet 20.0.0.42 11211
Trying 20.0.0.42...
Connected to 20.0.0.42.
Escape character is '^]'.
quit
Connection closed by foreign host.
2.9:memcache客户端测试
[root@tom03 ~]# yum install telnet -y
#进行连接
[root@tom03 ~]# telnet 20.0.0.100 12000
Trying 20.0.0.100...
Connected to 20.0.0.100.
Escape character is '^]'.
add shuai 0 0 4     '//客户端插入并新建一个数据'
1234
STORED

#返回主服务器查看是否同步数据
[root@master shell]# telnet 20.0.0.41 11211
Trying 20.0.0.41...
Connected to 20.0.0.41.
Escape character is '^]'.
get shuai                        '//查看数据'
VALUE shuai 0 4
1234
END

#从服务器进行验证
[root@slave shell]# telnet 20.0.0.42 11211
Trying 20.0.0.42...
Connected to 20.0.0.42.
Escape character is '^]'.
get shuai                        '//查看数据'
VALUE shuai 0 4
1234
END
'//测试成功,主从都成功生成数据'
3.0:测试高可用群集
客户端直接访问多个 memcache 实例
优点:简单,未引入新的节点;
缺点:维护不方便,未实现集中管理;性能不满足,实例宕机后不能自动踢出(hash 到该实例的请求都要等到超时才能转到其他正常实例)。
'//宕机主服务器,看从服务器是否正常使用'
[root@master shell]# systemctl stop keepalived.service       '//关闭主服务器keepalived服务'

#客户端登录
[root@tom03 ~]# telnet 20.0.0.100 12000                      '//客户端登陆成功'
Trying 20.0.0.100...
Connected to 20.0.0.100.
Escape character is '^]'.
set niu 0 0 3
123
STORED

'//从服务器验证'
[root@slave shell]# telnet 20.0.0.42 11211
Trying 20.0.0.42...
Connected to 20.0.0.42.
Escape character is '^]'.
get niu
VALUE niu 0 3
123
END
高可用群集搭建成功。今天你努力了吗?