启动过程和初始化一样,由Bootstrap反射调用Catalina的start方法
public void start()
        throws Exception {


        if( catalinaDaemon==null ) init();
    	// 调用CatAlina的Start方法
        Method method = catalinaDaemon.getClass().getMethod("start", (Class [] )null);
        method.invoke(catalinaDaemon, (Object [])null);
}
Catalina
主要分为以下三个步骤,其核心逻辑在于Server组件:
- 调用Server的start方法,启动Server组件
- 注册jvm关闭的勾子程序,用于安全地关闭Server组件,以及其它组件
- 开启shutdown端口的监听并阻塞,用于监听关闭指令
public void start() {


    // 省略若干代码......
    // 1.Start the new server
    try {


        getServer().start();
    } catch (LifecycleException e) {


        // 省略......
        return;
    }
    // 2.注册勾子,用于安全关闭tomcat
    if (useShutdownHook) {


        if (shutdownHook == null) {


            shutdownHook = new CatalinaShutdownHook();
        }
        Runtime.getRuntime().addShutdownHook(shutdownHook);
    }
    // 3.Bootstrap中会设置await为true,其目的在于让tomcat在shutdown端口阻塞监听关闭命令
    if (await) {


        await();
        stop();
    }
}
1.启动Server
StandardSever
- 先是由LifecycleBase统一发出STARTING_PREP事件,StandardServer额外还会发出CONFIGURE_START_EVENT、STARTING事件,用于通知LifecycleListener在启动前做一些准备工作,比如NamingContextListener会处理CONFIGURE_START_EVENT事件,实例化tomcat相关的上下文,以及ContextResource资源.
- 然后,启动内部的NamingResourcesImpl实例,这个类封装了各种各样的数据,比如ContextEnvironment、ContextResource、Container等等,它用于Resource资源的初始化,以及为webapp应用提供相关的数据资源,比如 JNDI 数据源(对应ContextResource).
- 接着,启动Service组件,这一块的逻辑将在下面进行详细分析,最后由LifecycleBase发出STARTED事件,完成start.
protected void startInternal() throws LifecycleException {


    fireLifecycleEvent(CONFIGURE_START_EVENT, null);
    setState(LifecycleState.STARTING);

    globalNamingResources.start();

    // Start our defined Services
    synchronized (servicesLock) {


        for (int i = 0; i < services.length; i++) {


            services[i].start();
        }
    }
}
2.启动Service
tandardService
- 启动Engine,Engine的child容器都会被启动,webapp的部署会在这个步骤完成;
- 启动Executor,这是tomcat用Lifecycle封装的线程池,继承至java.util.concurrent.Executor以及tomcat的Lifecycle接口
- 启动MapperListener
- 启动Connector组件,由Connector完成Endpoint的启动,这个时候意味着tomcat可以对外提供请求服务了。
protected void startInternal() throws LifecycleException {


    setState(LifecycleState.STARTING);
    // 1.启动Engine
    if (engine != null) {


        synchronized (engine) {


            engine.start();
        }
    }
    // 2.启动Executor线程池
    synchronized (executors) {


        for (Executor executor: executors) {


            executor.start();
        }
    }
    // 3.启动MapperListener
    mapperListener.start();
    // 4.启动Connector
    synchronized (connectorsLock) {


        for (Connector connector: connectors) {


            try {


                // If it has already failed, don't try and start it
                if (connector.getState() != LifecycleState.FAILED) {


                    connector.start();
                }
            } catch (Exception e) {


                // logger......
            }
        }
    }
}
3.启动Engine
StandardEngine
Engine主要是调用调用父类ContainerBase的startInternal
protected synchronized void startInternal() throws LifecycleException {


    // Log our server identification information
    if(log.isInfoEnabled())
        log.info( "Starting Servlet Engine: " + ServerInfo.getServerInfo());

    // 调用父类ContainerBase的startInternal方法
    super.startInternal();
}
ContainerBase
-
启动子容器,通过线程池(默认只有一个线程,可以在配置文件中设置(startStopThread))
<Host name="localhost" appBase="webapps" unpackWARs="true" autoDeploy="true" startStopThreads="4"> <Valve className="org.apache.catalina.valves.AccessLogValve" directory="logs" prefix="localhost_access_log" suffix=".txt" pattern="%h %l %u %t "%r" %s %b" /> </Host> -
启动Pipeline,并且发出STARTING事件
-
如果backgroundProcessorDelay参数 >= 0,则开启ContainerBackgroundProcessor线程,用于调用子容器的backgroundProcess。
protected synchronized void startInternal() throws LifecycleException {


    // 省略若干代码......

    // 把子容器的启动步骤放在线程中处理,默认情况下线程池只有一个线程处理任务队列
    Container children[] = findChildren();
    List<Future<Void>> results = new ArrayList<>();
    for (int i = 0; i < children.length; i++) {


        results.add(startStopExecutor.submit(new StartChild(children[i])));
    }
    // 1.阻塞当前线程,直到子容器start完成
    boolean fail = false;
    for (Future<Void> result : results) {


        try {


            result.get();
        } catch (Exception e) {


            log.error(sm.getString("containerBase.threadedStartFailed"), e);
            fail = true;
        }
    }
    // 2.启用Pipeline
    if (pipeline instanceof Lifecycle)
        ((Lifecycle) pipeline).start();
    setState(LifecycleState.STARTING);

    // 3.开启ContainerBackgroundProcessor线程用于调用子容器的backgroundProcess方法
    // 默认情况下backgroundProcessorDelay=-1,不会启用该线程
    threadStart();
}
4.启动Pipeline
**StandPipeline **
我们来看 Pipeline 启动过程,默认使用 StandardPipeline 实现类,它也是一个Lifecycle。在容器启动的时候,StandardPipeline 会遍历 Valve 链表,如果 Valve 是 Lifecycle 的子类,则会调用其 start 方法启动 Valve 组件,代码如下\
public class StandardPipeline extends LifecycleBase
        implements Pipeline, Contained {


    // 省略若干代码......
    protected synchronized void startInternal() throws LifecycleException {


        Valve current = first;
        if (current == null) {


            current = basic;
        }
        while (current != null) {


            if (current instanceof Lifecycle)
                ((Lifecycle) current).start();
            current = current.getNext();
        }
        setState(LifecycleState.STARTING);
    }
}
5.启动Host
StandardHost
protected synchronized void startInternal() throws LifecycleException {


    // errorValve默认使用org.apache.catalina.valves.ErrorReportValve
    String errorValve = getErrorReportValveClass();
    if ((errorValve != null) && (!errorValve.equals(""))) {


        try {


            boolean found = false;
            // 如果所有的阀门中已经存在这个实例,则不进行处理,否则添加到  Pipeline 中
            Valve[] valves = getPipeline().getValves();
            for (Valve valve : valves) {


                if (errorValve.equals(valve.getClass().getName())) {


                    found = true;
                    break;
                }
            }
            // 如果未找到则添加到 Pipeline 中,注意是添加到 basic valve 的前面
            // 默认情况下,first valve 是 AccessLogValve,basic 是 StandardHostValve
            if(!found) {


                Valve valve =
                    (Valve) Class.forName(errorValve).getConstructor().newInstance();
                getPipeline().addValve(valve);
            }
        } catch (Throwable t) {


            // 处理异常,省略......
        }
    }
    // 调用父类 ContainerBase,完成统一的启动动作
    super.startInternal();
}
StandardHost Pipeline 包含的Valve 组件:
- basic:org.apache.catalina.core.StandardHostValve
- first:org.apache.catalina.valves.AccessLogValve
需要注意的是,在往Pipeline 中添加 Valve 阀门时,是添加到first 后面,basic 前面
由上面的代码可知,在start 的时候,StandardHost 并没有做太多的处理,那么StandardHost 又是怎么知道它有哪些 child 容器需要启动呢?
HostConfig
tomcat 在这块的逻辑处理有点特殊,使用 HostConfig 加载子容器,而这个 HostConfig 是一个LifecycleListener,它会处理 start、stop事件通知,并且会在线程池中启动、停止 Context 容器,接下来看下HostConfig 是如何工作的
- 以下是HostConfig 处理事件通知的代码,
- 我们着重关注下 start 方法,这个方法主要是做一些应用部署的准备工作,比如过滤无效的webapp、解压war包等
- 而主要的逻辑在于deployDirectories 中,它会往线程池中提交一个 DeployDirectory 任务,并且调用Future#get() 阻塞当前线程,直到 deploy 工作完成
// org.apache.catalina.startup.HostConfig
public void lifecycleEvent(LifecycleEvent event) {


    // (省略若干代码) 判断事件是否由 Host 发出,并且为 HostConfig 设置属性
    if (event.getType().equals(Lifecycle.PERIODIC_EVENT)) {


        check();
    } else if (event.getType().equals(Lifecycle.BEFORE_START_EVENT)) {


        beforeStart();
    } else if (event.getType().equals(Lifecycle.START_EVENT)) {


        start();
    } else if (event.getType().equals(Lifecycle.STOP_EVENT)) {


        stop();
    }
}
-start()
public void start() {


    // (省略若干代码)
    if (host.getDeployOnStartup())
        deployApps();
}
–deployApps()
protected void deployApps() {
    File appBase = host.getAppBaseFile();
    File configBase = host.getConfigBaseFile();
    // 过滤出 webapp 要部署应用的目录
    String[] filteredAppPaths = filterAppPaths(appBase.list());
    // 部署 xml 描述文件
    deployDescriptors(configBase, configBase.list());
    // 解压 war 包,但是这里还不会去启动应用
    deployWARs(appBase, filteredAppPaths);
    // 处理已经存在的目录,前面解压的 war 包不会再行处理
    deployDirectories(appBase, filteredAppPaths);
}
—DeployDirectory
这个DeployDirectory 任务很简单,只是调用HostConfig#deployDirectory(cn, dir)
private static class DeployDirectory implements Runnable {


    // (省略若干代码)
    @Override
    public void run() {


        config.deployDirectory(cn, dir);
    }
}
----deployDirectory()
protected void deployDirectory(ContextName cn, File dir) {


    Context context = null;
    File xml = new File(dir, Constants.ApplicationContextXml);
    File xmlCopy = new File(host.getConfigBaseFile(), cn.getBaseName() + ".xml");

    // 实例化 StandardContext
    if (deployThisXML && xml.exists()) {


        synchronized (digesterLock) {


            // 省略若干异常处理的代码
            context = (Context) digester.parse(xml);
        }

        // (省略)为 Context 设置 configFile
    } else if (!deployThisXML && xml.exists()) {


        // 异常处理
        context = new FailedContext();
    } else {


        context = (Context) Class.forName(contextClass).getConstructor().newInstance();
    }

    // 实例化 ContextConfig,作为 LifecycleListener 添加到 Context 容器中,
    // S这和 StandardHost 的套路一样,都是使用 XXXConfig
    Class<?> clazz = Class.forName(host.getConfigClass());
    LifecycleListener listener = (LifecycleListener) clazz.getConstructor().newInstance();
    context.addLifecycleListener(listener);

    context.setName(cn.getName());
    context.setPath(cn.getPath());
    context.setWebappVersion(cn.getVersion());
    context.setDocBase(cn.getBaseName());

    // 实例化 Context 之后,为 Host 添加子容器
    host.addChild(context);

}
现在有两个疑问:
- 为什么要使用HostConfig 组件启动 Context 容器呢,不可以直接在Host 容器中直接启动吗?
- HostConfig 不仅仅是启动、停止Context 容器,还封装了很多应用部署的逻辑
- 此外,还会对 web.xml、context.xml文件的改动进行监听,默认情况会重新启动 Context 容器。
- 而这个Host 只是负责管理 Context 的生命周期,基于单一职责的原则,tomcat 利用事件通知的方式,很好地解决了藕合问题,Context 容器也是如此,它会对应一个 ContextConfig
- Context 容器又是如何启动的?
- 前面我们也提到了,HostConfig将当前 Context 实例作为子容器添加到Host 容器中(调用 ContainerBase.addChild 方法 ),而Context 的启动就是在添加的时候调用的
- ContainerBase 的关键代码如下所示,Context启动的时候会解析web.xml,以及启动Servlet、Listener,Servlet3.0还支持注解配置,等等这一系列逻辑将在下一篇文章进行分析
6.启动Context
首先我们思考两个问题:
-
tomcat 如何支持servlet3.0 的注解编程,比如对javax.servlet.annotation.WebListener 注解的支持?
- 如果 tomcat 利用ClassLoader 加载 webapp 下面所有的class,从而分析 Class 对象的注解,这样子肯定会导致很多问题,比如 MetaSpace 出现内存溢出,而且加载了很多不想干的类我们知道 jvm 卸载 class 的条件非常苛刻,这显然是不可取的。
- 因此,tomcat 开发了字节码解析的工具类,位于 org.apache.tomcat.util.bcel,bcel即:Byte Code Engineering Library,专门用于解析class 字节码,而不是像我们前面猜测的那样,把类加载到 jvm 中。
-
假如 webapp 目录有多个应用,使用的开源框架的 jar 版本不尽一致,tomcat 是怎样避免出现类冲突?
不同的 webapp 使用不同的ClassLoader 实例加载 class,因此webapp 内部加载的 class 是不同的,自然不会出现类冲突,当然这里要排除 ClassLoader 的parent 能够加载的 class。
StandardContext的属性主要有:
// 即ServletContext上下文
protected ApplicationContext context
// 根据 class 实例化对象,比如 Listener、Filter、Servlet 实例对象
private InstanceManager instanceManager
// SessionListener、ContextListner 等集合
private List<Object> applicationEventListenersList
// filer 名字与 FilterConfig 的映射关系
private HashMap<String, ApplicationFilterConfig> filterConfigs
// 用于加载class等资源
private Loader loader
// 用于对loader的读写操作
private final ReadWriteLock loaderLock
// Session管理器
protected Manager manager
// 用于对manager的读写操作
private final ReadWriteLock managerLock
// url与Servlet名字的映射关系
private HashMap<String, String> servletMappings
// 错误码与错误页的映射
private HashMap<Integer, ErrorPage> statusPages
// 用于扫描jar包资源
private JarScanner jarScanner
// cookies处理器,默认使用Rfc6265CookieProcessor
private CookieProcessor cookieProcessor
StandardContext 和其他 Container 一样,也是重写了 startInternal 方法。由于涉及到webapp 的启动流程,需要很多准备工作,比如使用 WebResourceRoot 加载资源文件、利用Loader 加载 class、使用JarScanner 扫描 jar 包,等等。因此StandardContext 的启动逻辑比较复杂,这里描述下几个重要的步骤:
- 创建工作目录,比如$CATALINA_HOME\work\Catalina\localhost\examples;实例化ContextServlet,应用程序拿到的是 ApplicationContext的外观模式
- 实例化WebResourceRoot,默认实现类是 StandardRoot,用于读取webapp 的文件资源
- 实例化Loader 对象,Loader 是tomcat 对于 ClassLoader 的封装,用于支持在运行期间热加载 class
- 发出CONFIGURE_START_EVENT 事件,ContextConfig 会处理该事件,主要目的是从 webapp 中读取 servlet 相关的Listener、Servlet、Filter等
- 实例化Sesssion 管理器,默认使用 StandardManager
- 调用listenerStart,实例化 servlet 相关的各种Listener,并且调用 ServletContextListener
- 处理Filter
- 加载Servlet
下面,将分析下几个重要的步骤
6.1 ContextConfig读取web.xml
ContextConfig 它是一个 LifycycleListener,它在 Context 启动过程中是承担了一个非常重要的角色。StandardContext 会发出 CONFIGURE_START_EVENT 事件,而 ContextConfig 会处理该事件,主要目的是通过 web.xml 或者 Servlet3.0 的注解配置,读取 Servlet 相关的配置信息,比如 Filter、Servlet、Listener等,其核心逻辑在 ContextConfig#webConfig() 方法中实现。下面,我们对 ContextConfig 进行详细分析
首先,是通过 WebXmlParser 对web.xml 进行解析,如果存在 web.xml 文件,则会把文件中定义的Servlet、Filter、Listener注册到 WebXml 实例中
protected void webConfig() {


    WebXmlParser webXmlParser = new WebXmlParser(context.getXmlNamespaceAware(),
            context.getXmlValidation(), context.getXmlBlockExternal());
	Set<WebXml> defaults = new HashSet<>();
	defaults.add(getDefaultWebXmlFragment(webXmlParser));

	// 创建 WebXml实例,并解析 web.xml 文件
	WebXml webXml = createWebXml();
	InputSource contextWebXml = getContextWebXmlSource();
	if (!webXmlParser.parseWebXml(contextWebXml, webXml, false)) {


   	 	ok = false;
	}
}
如果没有 web.xml 文件,tomcat 会先扫描 WEB-INF/classes 目录下面的 class 文件,然后扫描 WEB-INF/lib 目录下面的 jar 包,解析字节码读取 servlet 相关的注解配置类,这里不得不吐槽下 serlvet3.0 注解,对 servlet 注解的处理相当重量级。tomcat不会预先把该 class 加载到 jvm 中,而是通过解析字节码文件,获取对应类的一些信息,比如注解、实现的接口等,核心代码如下所示
protected void processAnnotationsStream(InputStream is, WebXml fragment,
            boolean handlesTypesOnly, Map<String,JavaClassCacheEntry> javaClassCache)
            throws ClassFormatException, IOException {


    // is 即 class 字节码文件的 IO 流
    ClassParser parser = new ClassParser(is);

    // 使用 JavaClass 封装 class 相关的信息
    JavaClass clazz = parser.parse();
    checkHandlesTypes(clazz, javaClassCache);

    if (handlesTypesOnly) {


        return;
    }

    AnnotationEntry[] annotationsEntries = clazz.getAnnotationEntries();
    if (annotationsEntries != null) {


        String className = clazz.getClassName();
        for (AnnotationEntry ae : annotationsEntries) {


            String type = ae.getAnnotationType();
            if ("Ljavax/servlet/annotation/WebServlet;".equals(type)) {


                processAnnotationWebServlet(className, ae, fragment);
            }else if ("Ljavax/servlet/annotation/WebFilter;".equals(type)) {


                processAnnotationWebFilter(className, ae, fragment);
            }else if ("Ljavax/servlet/annotation/WebListener;".equals(type)) {


                fragment.addListener(className);
            } else {


                // Unknown annotation - ignore
            }
        }
    }
}
tomcat 还会加载 WEB-INF/classes/META-INF/resources/、WEB-INF/lib/xxx.jar/META-INF/resources/ 的静态资源,这一块的作用暂时不清楚,关键代码如下所示:
protected void processResourceJARs(Set<WebXml> fragments) {


    for (WebXml fragment : fragments) {


        URL url = fragment.getURL();
        if ("jar".equals(url.getProtocol()) || url.toString().endsWith(".jar")) {


            try (Jar jar = JarFactory.newInstance(url)) {


                jar.nextEntry();
                String entryName = jar.getEntryName();
                while (entryName != null) {


                    if (entryName.startsWith("META-INF/resources/")) {


                        context.getResources().createWebResourceSet(
                                WebResourceRoot.ResourceSetType.RESOURCE_JAR,
                                "/", url, "/META-INF/resources");
                        break;
                    }
                    jar.nextEntry();
                    entryName = jar.getEntryName();
                }
            }
        } else if ("file".equals(url.getProtocol())) {


            File file = new File(url.toURI());
            File resources = new File(file, "META-INF/resources/");
            if (resources.isDirectory()) {


                context.getResources().createWebResourceSet(
                        WebResourceRoot.ResourceSetType.RESOURCE_JAR,
                        "/", resources.getAbsolutePath(), null, "/");
            }
        }
    }
}
6.2 启动Wrapper容器
ContextConfig 把 Wrapper 子容器添加到 StandardContext 容器中之后,便会挨个启动 Wrapper 子容器。但是实际上,由于StandardContext 至 ContainerBase,在添加子容器的时候,便会调用 start 方法启动 Wrapper。
for (Container child : findChildren()) {


    if (!child.getState().isAvailable()) {


        child.start();
    }
}
6.3 初始化处理
在初始化 Servlet、Listener 之前,便会先调用 ServletContainerInitializer,进行额外的初始化处理。注意:ServletContainerInitializer 需要的是 Class 对象,而不是具体的实例对象,这个时候 servlet 相关的Listener 并没有被实例化,因此不会产生矛盾
// 指定 ServletContext 的相关参数
mergeParameters();

// 调用 ServletContainerInitializer#onStartup()
for (Map.Entry<ServletContainerInitializer, Set<Class<?>>> entry :
    initializers.entrySet()) {


    try {


        entry.getKey().onStartup(entry.getValue(),
                getServletContext());
    } catch (ServletException e) {


        log.error(sm.getString("standardContext.sciFail"), e);
        ok = false;
        break;
    }
}
6.4 启动Servlet 相关的 Listener
WebConfig 加载Listener 时,只是保存了 className,实例化动作由StandardContext 触发。前面在介绍StandardContext 的时候提到了InstanceManager,创建实例的逻辑由 InstanceManager 完成。
Listener 监听器分为Event、Lifecycle 监听器,WebConfig在加载 Listener 的时候是不会区分的,实例化之后才会分开存储。在完成 Listener 实例化之后,tomcat容器便启动 OK 了。此时,tomcat 需要通知应用程序定义的ServletContextListener,方便应用程序完成自己的初始化逻辑,它会遍历 ServletContextListener 实例,并调用其contextInitialized 方法,比如 spring 的ContextLoaderListener
- 有以下 Event 监听器,主要是针对事件通知:
- ServletContextAttributeListener
- ServletRequestAttributeListener
- ServletRequestListener
- HttpSessionIdListener
- HttpSessionAttributeListener
- 有以下两种 Lifecycle 监听器,主要是针对ServletContext、HttpSession 的生命周期管理,比如创建、销毁等
- ServletContextListener
- HttpSessionListener
6.5 初始化Filter
ContextConfig 在处理CONFIGURE_START_EVENT 事件的时候,会使用 FilterDef 保存Filter 信息。而 StandardContext 会把FilterDef 转化成 ApplicationFilterConfig,在ApplicationFilterConfig 构造方法中完成 Filter 的实例化,并且调用Filter 接口的 init 方法,完成Filter 的初始化。ApplicationFilterConfig 是javax.servlet.FilterConfig 接口的实现类。
public boolean filterStart() {


    boolean ok = true;
    synchronized (filterConfigs) {


        filterConfigs.clear();
        for (Entry<String,FilterDef> entry : filterDefs.entrySet()) {


            String name = entry.getKey();
            try {


                // 在构造方法中完成 Filter 的实例化,
                // 并且调用 Filter 接口的 init 方法,完成 Filter 的初始化
                ApplicationFilterConfig filterConfig =
                        new ApplicationFilterConfig(this, entry.getValue());
                filterConfigs.put(name, filterConfig);
            } catch (Throwable t) {


                // 省略 logger 处理
                ok = false;
            }
        }
    }
    return ok;
}
6.6 处理Wrapper 容器
Servlet对应 tomcat 的Wrapper 容器,完成 Filter 初始化之后便会对Wrapper 容器进行处理,如果 Servlet 的loadOnStartup >= 0,便会在这一阶段完成 Servlet 的加载,并且值越小越先被加载,否则在接受到请求的时候才会加载 Servlet。加载过程,主要是完成 Servlet 的实例化,并且调用Servlet 接口的 init 方法
// StandardWrapper 实例化并且启动 Servlet,由于 Servlet 存在 loadOnStartup 属性
// 因此使用了 TreeMap,根据 loadOnStartup 值 对 Wrapper 容器进行排序,然后依次启动 Servlet
if (ok) {


    if (!loadOnStartup(findChildren())){


        log.error(sm.getString("standardContext.servletFail"));
        ok = false;
    }
}
loadOnStartup 方法使用 TreeMap 对 Wrapper 进行排序,loadOnStartup 值越小越靠前,值相同的 Wrapper 放在同一个 List 中,代码如下所示:
public boolean loadOnStartup(Container children[]) {


    // 使用 TreeMap 对 Wrapper 进行排序,loadOnStartup 值越小越靠前,值相同 Wrapper 放在同一个 List 中
    TreeMap<Integer, ArrayList<Wrapper>> map = new TreeMap<>();
    for (int i = 0; i < children.length; i++) {


        Wrapper wrapper = (Wrapper) children[i];
        int loadOnStartup = wrapper.getLoadOnStartup();
        if (loadOnStartup < 0)
            continue;
        Integer key = Integer.valueOf(loadOnStartup);
        ArrayList<Wrapper> list = map.get(key);
        if (list == null) {


            list = new ArrayList<>();
            map.put(key, list);
        }
        list.add(wrapper);
    }

    // 根据 loadOnStartup 值有序加载 Wrapper 容器
    for (ArrayList<Wrapper> list : map.values()) {


        for (Wrapper wrapper : list) {


            try {


                wrapper.load();
            } catch (ServletException e) {


                if(getComputedFailCtxIfServletStartFails()) {


                    return false;
                }
            }
        }
    }
    return true;
}
7.启动Wrapper
Wrapper 容器是 tomcat 所有容器中最底层子容器,它没有子容器,并且父容器是 Context。默认实现StandardWrapper,我们先来看看类定义,它继承至 ContainBase,实现了 servlet 的 ServletConfig 接口,以及 tomcat 的 Wrapper 接口,说明 StandardWrapper 不仅仅是一个 Wrapper 容器实现,还是 ServletConfig 实现,部分代码如下所示:
public class StandardWrapper extends ContainerBase
    implements ServletConfig, Wrapper, NotificationEmitter {


    // Wrapper 的门面模式,调用 Servlet 的 init 方法传入的是该对象
    protected final StandardWrapperFacade facade = new StandardWrapperFacade(this);
    protected volatile Servlet instance = null; // Servlet 实例对象
    protected int loadOnStartup = -1;   // 默认值为 -1,不立即启动 Servlet
    protected String servletClass = null;
    public StandardWrapper() {


        super();
        swValve=new StandardWrapperValve();
        pipeline.setBasic(swValve);
        broadcaster = new NotificationBroadcasterSupport();
    }
}
由前面对 Context 的分析可知,StandardContext 在启动的时候会发出 CONFIGURE_START_EVENT 事件,ContextConfig 会处理该事件,通过解析 web.xml 或者读取注解信息获取Wrapper 子容器,并且会添加到 Context 容器中。由于 StandardContext 继承至 ContainerBase,在调用 addChild 的时候默认会启动 child 容器(即 Wrapper),我们来看看 StandardWrapper 的启动逻辑
7.1 启动Wrapper容器
StandardWrapper 没有子容器,启动逻辑相对比较简单清晰,它重写了 startInternal 方法,主要是完成了 jmx 的事件通知,先后向 jmx 发出 starting、running事件,代码如下所示:
protected synchronized void startInternal() throws LifecycleException {


    // 发出 j2ee.state.starting 事件通知
    if (this.getObjectName() != null) {


        Notification notification =
            new Notification("j2ee.state.starting", this.getObjectName(), sequenceNumber++);
        broadcaster.sendNotification(notification);
    }

    // ConainerBase 的启动逻辑
    super.startInternal();
    setAvailable(0L);

    // 发出 j2ee.state.running 事件通知
    if (this.getObjectName() != null) {


        Notification notification =
            new Notification("j2ee.state.running", this.getObjectName(), sequenceNumber++);
        broadcaster.sendNotification(notification);
    }
}
7.2 加载 Wrapper
由前面对 Context 容器的分析可知,Context 完成 Filter 初始化之后,如果 loadOnStartup >= 0 便会调用 load 方法加载
Wrapper 容器。StandardWrapper 使用 InstanceManager 实例化 Servlet,并且调用 Servlet 的 init 方法进行初始化,传入的 ServletConfig 是 StandardWrapperFacade 对象。
public synchronized void load() throws ServletException {


    // 实例化 Servlet,并且调用 init 方法完成初始化
    instance = loadServlet();
    if (!instanceInitialized) {


        initServlet(instance);
    }
    if (isJspServlet) {


        // 处理 jsp Servlet
    }
}
总结
tomcat 实现了javax.servlet.ServletContext 接口,在 Context 启动的时候会实例化该对象。由 Context 容器通过 web.xml 或者 扫描class 字节码读取 servlet3.0 的注解配置,从而加载webapp 定义的 Listener、Servlet、Filter等 servlet 组件,但是并不会立即实例化对象。全部加载完毕之后,依次对 Listener、Filter、Servlet进行实例化、并且调用其初始化方法,比如ServletContextListener#contextInitialized()、Flter#init() 等。
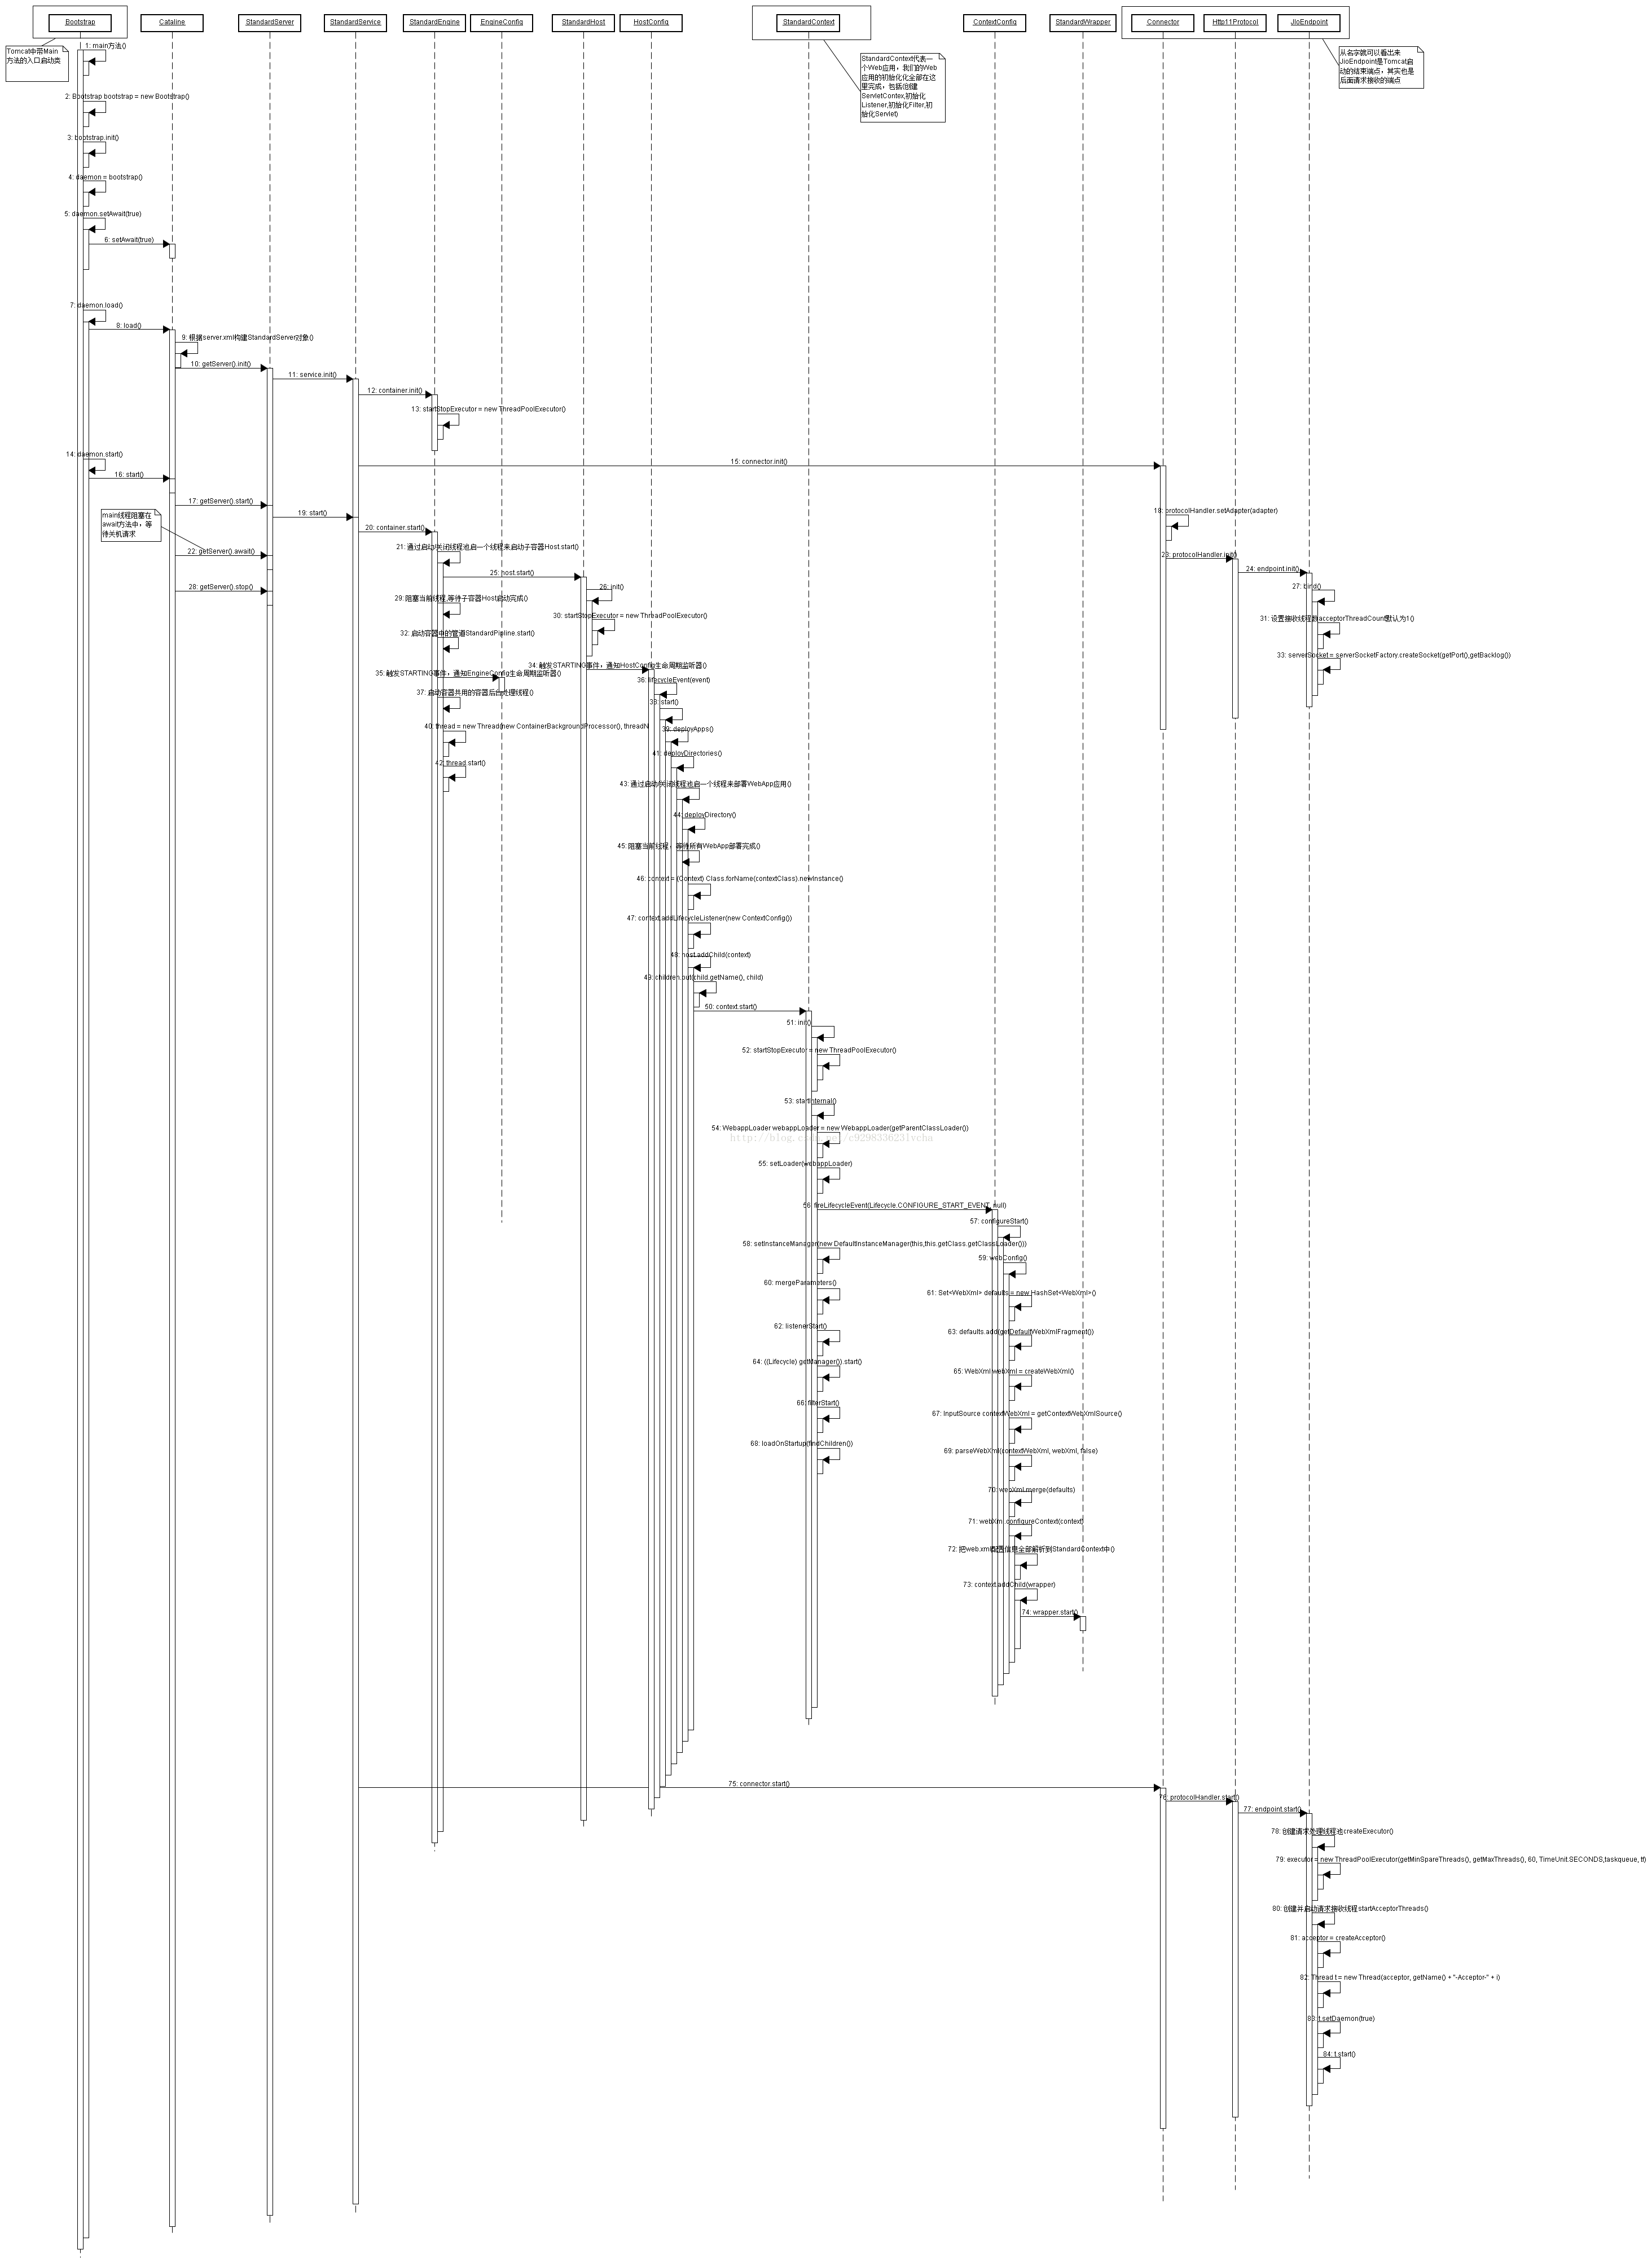
初始化和启动的的时序图