一、总述
上一篇我们讲到在编译时挂载过程中,会将template编译成render表达式,为后面的形成vnode做准备。
我们来总览下编译的过程。

整个过程分为三个阶段:
1、parse,将templat转成AST模型树。
2、optimize,标注静态节点。
3、generate,生成render表达式。
我们也将分成三个章节进行介绍,本章节重点介绍第一个阶段。
二、入口
在前一篇我们讲到src/platform/web/entry-runtime-with-compiler.js中的代码
     //2、编译,生成render
     ...
      const { render, staticRenderFns } = compileToFunctions(template, {
        shouldDecodeNewlines,
        shouldDecodeNewlinesForHref,
        delimiters: options.delimiters,
        comments: options.comments
      }, this)
      options.render = render
      options.staticRenderFns = staticRenderFns
      ...
    }
compileToFunctions的入参为template,options数组,以及vm对象,最后返回render,以及staticRenderFns对象。compileToFunctions在src/platform/compiler/index.js中定义,是由createCompiler返回。
import { baseOptions } from './options'
import { createCompiler } from 'compiler/index'

const { compile, compileToFunctions } = createCompiler(baseOptions)
createCompiler,入参为baseOptions对象,返回了compile,以及compileToFunctions两个方法 。
继续查看createCompiler(src/compiler/index.js)
export const createCompiler = createCompilerCreator(function baseCompile (
  template: string,
  options: CompilerOptions
): CompiledResult {
  const ast = parse(template.trim(), options)
  if (options.optimize !== false) {
    optimize(ast, options)
  }
  const code = generate(ast, options)
  return {
    ast,
    render: code.render,
    staticRenderFns: code.staticRenderFns
  }
})
createCompiler是由createCompilerCreator方法返回的,createCompilerCreator方法在src/compiler/create-compiler.js中定义
export function createCompilerCreator (baseCompile: Function): Function {
  return function createCompiler (baseOptions: CompilerOptions) {
    function compile (
      template: string,
      options?: CompilerOptions
    ): CompiledResult {
     ...
      //真正实现编译的核心代码
      const compiled = baseCompile(template, finalOptions)
      ...
      compiled.errors = errors
      compiled.tips = tips
      return compiled
    }
    return {
      compile,
      compileToFunctions: createCompileToFunctionFn(compile)
    }
  }
}
createCompilerCreator入参为 baseCompile方法,函数体中定义了createCompiler 方法,而在createCompiler 中又定义了compile方法,在该方法中调用baseCompile实现了真正的编译。createCompiler返回了compileToFunctions方法,该方法在createCompileToFunctionFn中实现
export function createCompileToFunctionFn (compile: Function): Function {
  const cache = Object.create(null)

  return function compileToFunctions (
    template: string,
    options?: CompilerOptions,
    vm?: Component
  ): CompiledFunctionResult {
    ....
     const compiled = compile(template, options)
    ....
    return (cache[key] = res)
  }
}
createCompileToFunctionFn的入参为compile方法,返回了compileToFunctions,这个就是我们最开始调用的方法,终于找到了源头。
整个入口定义的过程非常的绕,我们用下面的图,一层一层拨开你的皮。
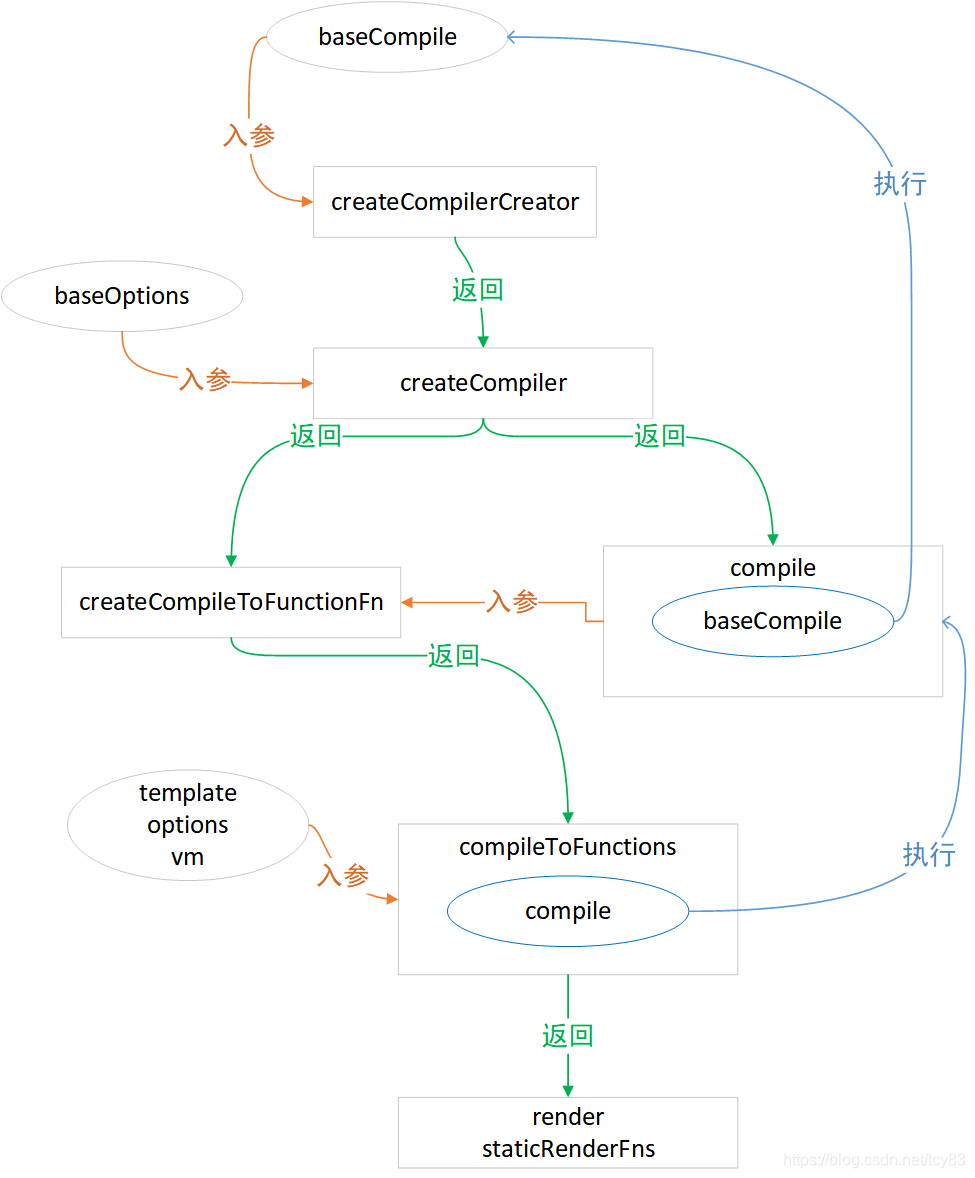
为什么要这么搞,这不是炫技,vue.js在不同的平台下编译依赖的baseoptions是不一样的,但是核心的编译过程baseComplie又是相同的,所以巧妙的利用了函数柯里化实现。我们写出这个过程的柯里化伪函数
createCompilerCreator(baseCompile)(baseOptions)(compile)(template,options,vm)三、AST
根据上面的分析,编译的最终就是执行baseCompile方法。
export const createCompiler = createCompilerCreator(function baseCompile (
  template: string,
  options: CompilerOptions
): CompiledResult {
  //1、parse,将templat转成AST模型
  const ast = parse(template.trim(), options)
  //2、optimize,标注静态节点
  if (options.optimize !== false) {
    optimize(ast, options)
  }
  //3、generate,生成render表达式
  const code = generate(ast, options)
  return {
    ast,
    render: code.render,
    staticRenderFns: code.staticRenderFns
  }
})
这个方法定义了编译过程的三个阶段。parse解析是将template转成AST模型,AST是一种抽象的语法树。我们以下面的template为例。
<div id="app">
  <ul>
    <li v-for="item in items">
      itemid:{{item.id}}
    </li>
  </ul>
</div>
转成AST抽象树模型后,如下:
{
    "type": 1,
    "tag": "div",
    "attrsList": [
        {
            "name": "id",
            "value": "app"
        }
    ],
    "attrsMap": {
        "id": "app"
    },
    "children": [
        {
            "type": 1,
            "tag": "ul",
            "attrsList": [],
            "attrsMap": {},
            "parent": {
                "$ref": "$"
            },
            "children": [
                {
                    "type": 1,
                    "tag": "li",
                    "attrsList": [],
                    "attrsMap": {
                        "v-for": "item in items"
                    },
                    "parent": {
                        "$ref": "$[\"children\"][0]"
                    },
                    "children": [
                        {
                            "type": 2,
                            "expression": "\"\\n      itemid:\"+_s(item.id)+\"\\n    \"",
                            "tokens": [
                                "\n      itemid:",
                                {
                                    "@binding": "item.id"
                                },
                                "\n    "
                            ],
                            "text": "\n      itemid:{{item.id}}\n    "
                        }
                    ],
                    "for": "items",
                    "alias": "item",
                    "plain": true
                }
            ],
            "plain": true
        }
    ],
    "plain": false,
    "attrs": [
        {
            "name": "id",
            "value": "\"app\""
        }
    ]
}
AST的每层的element,包含自身节点的信息(tag,attr等),同时parent,children分别指向其父element和子element,层层嵌套,形成一棵树。对于各属性的描述我们暂不深究,先有个直观的认识。下面我们看下这个树是如何形成的。
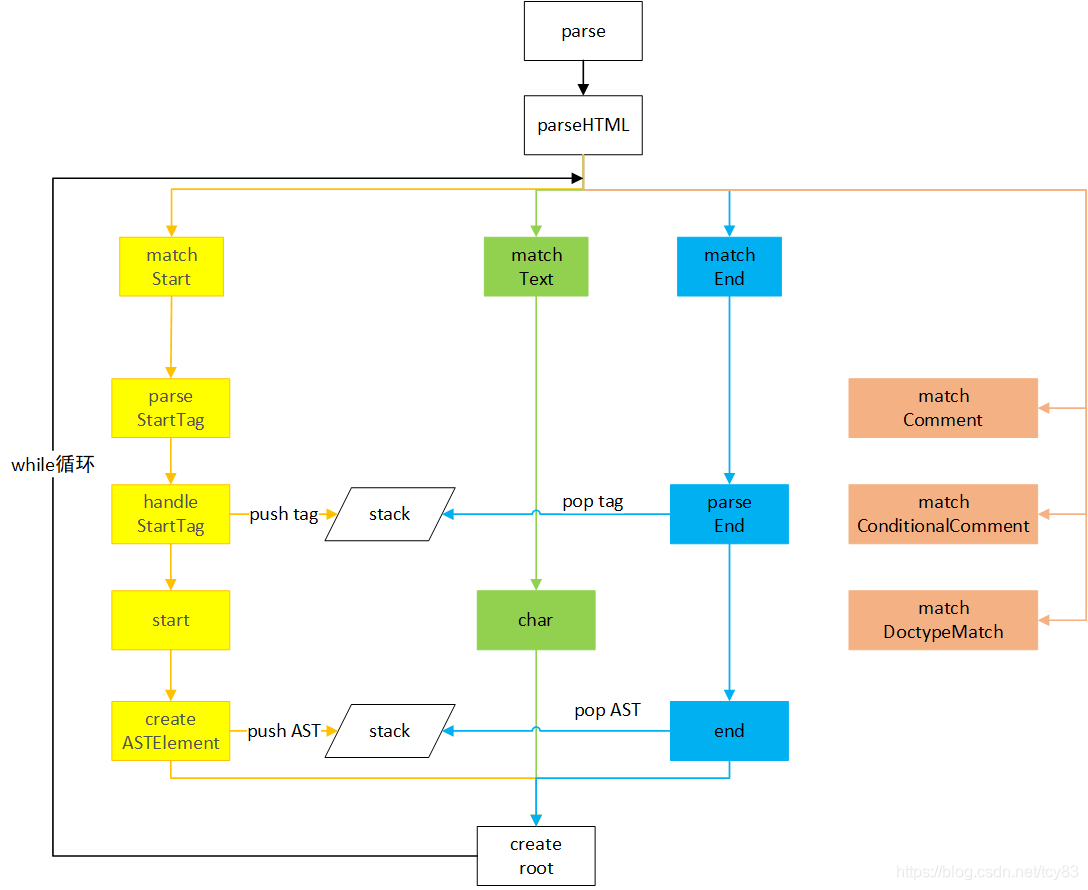
四、parse
parse方法定义在src/parser/index.js中,该方法内容较多,我们把结构写出来,如下:
export function parse (
  template: string,
  options: CompilerOptions
): ASTElement | void {
  ....
  //定义AST模型对象
  let root
  ...

  //主要的解析方法
  parseHTML(template, {
    ...
  })
  //返回AST
  return root
}
入参是template和options,输出为生成的AST模型root。其主要就是调用parseHTML方法完成的,该方法内容也较多,我们也只写出结构
export function parseHTML (html, options) {
  const stack = []
  const expectHTML = options.expectHTML
  const isUnaryTag = options.isUnaryTag || no
  const canBeLeftOpenTag = options.canBeLeftOpenTag || no
  let index = 0
  let last, lastTag
  //循环处理html
  while (html) {
    last = html
    // Make sure we're not in a plaintext content element like script/style
    //处理非script,style,textarea
    if (!lastTag || !isPlainTextElement(lastTag)) {
      let textEnd = html.indexOf('<')
      //1."<"字符打头
      if (textEnd === 0) {
        // Comment:
        //1.1、处理标准注释,<!--
        if (comment.test(html)) {
          ...
        }

        // http://en.wikipedia.org/wiki/Conditional_comment#Downlevel-revealed_conditional_comment
        //1.2、处理条件注释,<![
        if (conditionalComment.test(html)) {
          ...
        }

        // Doctype:
        //1.3、处理申明,DOCTYPE
        const doctypeMatch = html.match(doctype)
        if (doctypeMatch) {
          ...
        }

        // End tag:
        //1.4、处理结束标签
        const endTagMatch = html.match(endTag)
        if (endTagMatch) {
          ...
        }

        // Start tag:
        //1.5、处理开始标签
        const startTagMatch = parseStartTag()
        if (startTagMatch) {
          ...
        }
      }

      //2、非"<"打头,作为text内容处理
      let text, rest, next
      if (textEnd >= 0) {
        ....
       }
     ...
     }else{
       ....
     }

  }

  ...

}
通过while的大循环,对传入的html字符进行逐行解析,整个方法可以分为两部分:
1、对"<"开始的字符,又进一步判断类型,分为标准注释,条件注释,申请,结束标签,开始标签,进行不同的处理
2、对非"<"开始的字符,作为text文本处理。
下面我们以前面的template为例,重点分析开始,结束,以及text模块解析流程。
五、startTag
html模板的解析从第一句开始:
<div id="app">
  <ul>
    ...
由于是"<"字符开头,进入循环,由开始标签的代码段进行处理:
const startTagMatch = parseStartTag()
if (startTagMatch) {
      handleStartTag(startTagMatch)
      if (shouldIgnoreFirstNewline(lastTag, html)) {
            advance(1)
      }
      continue
 }
1、parseStartTag
通过各类正则表达式对模板进行解析,并将相关的信息保存到match对象中。
function parseStartTag () {
    //1、匹配<${qnameCapture}字符,如:<div
    const start = html.match(startTagOpen)
    //start=[<div,div,index=0]
    if (start) {
      //定义match对象保存相关属性
      const match = {
        tagName: start[1],
        attrs: [],
        start: index
      }
      //2、步进tag的长度
      advance(start[0].length)
      //3、循环查找该标签的attr,直到结束符>
      let end, attr
      while (!(end = html.match(startTagClose)) && (attr = html.match(attribute))) {
        //步进该attr的长度
        advance(attr[0].length)
        match.attrs.push(attr)
      }
      //4、tag结束,记录全局的位置
      if (end) {
        match.unarySlash = end[1]
        advance(end[0].length)
        match.end = index
        return match
      }
    }
  }
(1)通过RegExp(`^<${qnameCapture}`)匹配出开始的标签,本例中匹配的字符为"<div",并初始化match对象。
(2)步进tag的长度,
function advance (n) {
    //index为全局位置
    index += n
    //从n位置开始截取,后面的字符作为新的html
    html = html.substring(n)
}
截取标签后的字符作为新的html,完成后如下:
   id="app">
  <ul>
    ...
(3)循环处理该标签的属性,直到遇到结束符>
第一次判断循环条件,html.match(attribute)匹配出属性字符id="app",进入循环,步进属性的字符数,并将属性保存到match对象中。步进后新的html如下:
       >
  <ul>
    ...
第二次判断循环条件,html.match(startTagClose)匹配出结束符>,直接跳出。
(4)tag结束,步进结束符长度,并记录保存全局的位置,本例中就是<div id="app">的长度14。新的html字符为:
     <ul>
    ...
至此,div的开始标签解析完毕,返回match对象,继续下面的处理流程。
2、handleStartTag
handleStartTag的入参就是match对象,主要实现对属性对象进行规整,并调用start方法,创建该标签的AST模型。
  //处理开始标签
  function handleStartTag (match) {
    const tagName = match.tagName
    const unarySlash = match.unarySlash

    //有些tag可以作结束处理
    if (expectHTML) {
      if (lastTag === 'p' && isNonPhrasingTag(tagName)) {
        parseEndTag(lastTag)
      }
      if (canBeLeftOpenTag(tagName) && lastTag === tagName) {
        parseEndTag(tagName)
      }
    }

    //是否为单元素,如<img  />
    const unary = isUnaryTag(tagName) || !!unarySlash

    //1、整理attr为字面量对象
    const l = match.attrs.length
    const attrs = new Array(l)
    for (let i = 0; i < l; i++) {
      const args = match.attrs[i]
      // hackish work around FF bug https://bugzilla.mozilla.org/show_bug.cgi?id=369778
      if (IS_REGEX_CAPTURING_BROKEN && args[0].indexOf('""') === -1) {
        if (args[3] === '') { delete args[3] }
        if (args[4] === '') { delete args[4] }
        if (args[5] === '') { delete args[5] }
      }
      const value = args[3] || args[4] || args[5] || ''
      const shouldDecodeNewlines = tagName === 'a' && args[1] === 'href'
        ? options.shouldDecodeNewlinesForHref
        : options.shouldDecodeNewlines
      attrs[i] = {
        name: args[1],
        value: decodeAttr(value, shouldDecodeNewlines)
      }
    }

    //2、非单元素,压入到stack,并在lastTag中缓存
    if (!unary) {
      stack.push({ tag: tagName, lowerCasedTag: tagName.toLowerCase(), attrs: attrs })
      lastTag = tagName
    }
    //3、创建该标签的AST模型,并建立关联关系
    if (options.start) {
      options.start(tagName, attrs, unary, match.start, match.end)
    }
  }
主要的流程有以下三部分:
1、循环规整attrs为字面量对象,规整完毕后,对象如下:
attrs=[{name=id,value=app}]
2、对于非单元素,压入到stack栈中,通过缓存当前的tagname为lastTag。该stack在后面的结束tag中进行闭环处理。
3、继续调用start方法,创建该标签元素的AST模型,建立模型树。
3、start
options.start是核心方法,在该方法中实现了AST模型的创建,以及关联关系的建立。
start (tag, attrs, unary) {
      // check namespace.
      // inherit parent ns if there is one
      const ns = (currentParent && currentParent.ns) || platformGetTagNamespace(tag)

      // handle IE svg bug
      /* istanbul ignore if */
      if (isIE && ns === 'svg') {
        attrs = guardIESVGBug(attrs)
      }

      //1、创建ASTelement
      let element: ASTElement = createASTElement(tag, attrs, currentParent)
      if (ns) {
        element.ns = ns
      }

      if (isForbiddenTag(element) && !isServerRendering()) {
        element.forbidden = true
        process.env.NODE_ENV !== 'production' && warn(
          'Templates should only be responsible for mapping the state to the ' +
          'UI. Avoid placing tags with side-effects in your templates, such as ' +
          `<${tag}>` + ', as they will not be parsed.'
        )
      }

      //2、以下是处理属性中各类指令,从attrsList中删除相关的属性,
      // apply pre-transforms
      for (let i = 0; i < preTransforms.length; i++) {
        element = preTransforms[i](element, options) || element
      }

      if (!inVPre) {
        processPre(element)
        if (element.pre) {
          inVPre = true
        }
      }
      if (platformIsPreTag(element.tag)) {
        inPre = true
      }
      if (inVPre) {
        processRawAttrs(element)
      } else if (!element.processed) {
        // structural directives
        processFor(element)
        processIf(element)
        processOnce(element)
        // element-scope stuff
        processElement(element, options)
      }

      function checkRootConstraints (el) {
        if (process.env.NODE_ENV !== 'production') {
          if (el.tag === 'slot' || el.tag === 'template') {
            warnOnce(
              `Cannot use <${el.tag}> as component root element because it may ` +
              'contain multiple nodes.'
            )
          }
          if (el.attrsMap.hasOwnProperty('v-for')) {
            warnOnce(
              'Cannot use v-for on stateful component root element because ' +
              'it renders multiple elements.'
            )
          }
        }
      }

      // tree management
      //3、构建AST模型树
      if (!root) {
        //如第一个元素,设置根元素
        root = element
        checkRootConstraints(root)
      } else if (!stack.length) {
        //其他元素,构建关联关系
        // allow root elements with v-if, v-else-if and v-else
        if (root.if && (element.elseif || element.else)) {
          checkRootConstraints(element)
          addIfCondition(root, {
            exp: element.elseif,
            block: element
          })
        } else if (process.env.NODE_ENV !== 'production') {
          warnOnce(
            `Component template should contain exactly one root element. ` +
            `If you are using v-if on multiple elements, ` +
            `use v-else-if to chain them instead.`
          )
        }
      }
      if (currentParent && !element.forbidden) {
        if (element.elseif || element.else) {
          processIfConditions(element, currentParent)
        } else if (element.slotScope) { // scoped slot
          currentParent.plain = false
          const name = element.slotTarget || '"default"'
          ;(currentParent.scopedSlots || (currentParent.scopedSlots = {}))[name] = element
        } else {
          //建立父子element关系
          currentParent.children.push(element)
          element.parent = currentParent
        }
      }
       //4、非单元素,将元素push到stack数组,
      if (!unary) {
        currentParent = element
        stack.push(element)
      } else {
        closeElement(element)
      }
    }
忽略掉其中的细节处理,主要有四部分:
1、调用createASTElement,创建该标签元素的AST模型对象。‘
export function createASTElement (
  tag: string,
  attrs: Array<Attr>,
  parent: ASTElement | void
): ASTElement {
  return {
    type: 1,//1-标签,2-表达式text,3-普通内容
    tag,//标签
    attrsList: attrs,//标签属性数组
    attrsMap: makeAttrsMap(attrs),//标签属性map
    parent,//父元素
    children: []//子元素
  }
}
第三部分我们讲到最后生成的AST模型,就是这里定义的。AST模型就是字面量对象,定义该标签元素的相关信息,包括标签,属性,关联的父子元素等。
2、处理属性中各类指令,并从attrsList中删除相关的属性,为后续的处理做准备。
3、构建AST模型树。第一个标签元素作为根元素,比如本例中的div,接下来的标签元素,通过设置parent,children,构建关联关系。最终形成一颗树。
4、对于非单元素,将当前的AST element push到stack数组(注意与上面的stack的区别,两者保存的对象不同,也是为后面的结束进行闭环准备)。对于单元素,调用closeElement做结束处理。
讲了这么多,其实才处理了<div id="app">这一行,接下来,while循环继续处理下面的两行,流程一致。
<ul>
    <li v-for="item in items">
六、text
开始标签处理完成后,当解析到下面这一行,由于非"<"开始,作为text处理。
itemid:{{item.id}}
   </li>
  </ul>
</div>
进入到下面的代码块
let text, rest, next
      if (textEnd >= 0) {
        rest = html.slice(textEnd)
        while (
          !endTag.test(rest) &&
          !startTagOpen.test(rest) &&
          !comment.test(rest) &&
          !conditionalComment.test(rest)
        ) {
          // < in plain text, be forgiving and treat it as wen
          //普通文本中包含的<字符,作为普通字符处理
          next = rest.indexOf('<', 1)
          if (next < 0) break
          textEnd += next
          rest = html.slice(textEnd)
        }

        //1、获取text内容,并步进到新的位置
        text = html.substring(0, textEnd)
        advance(textEnd)
      }
      //html的<字符匹配结束,将剩余字符都作为text处理
      if (textEnd < 0) {
        text = html
        html = ''
      }
      //2、创建text的AST模型
      if (options.chars && text) {
        options.chars(text)
      }
1、根据textend,获取text内容(即</li>)前面的字符,itemid:{{item.id}}。
2、调用chars对字符进行处理。创建AST模型。
我们看下其主要的逻辑:
chars (text: string) {
      ...
      //创建AST模型
      if (text) {
        let res
        //包含表达式的text
        if (!inVPre && text !== ' ' && (res = parseText(text, delimiters))) {
          children.push({
            type: 2,
            expression: res.expression,
            tokens: res.tokens,
            text
          })
        }
        //纯文本的text
        else if (text !== ' ' || !children.length || children[children.length - 1].text !== ' ') {
          children.push({
            type: 3,
            text
          })
        }
      }
    }
将text作为所属元素的child,纳入到AST模型树,本例就是就是<li>的标签元素。根据text中是否包括表达式(即"{{ }}")分两种情况处理。
1、表达式文本,type为3,并利用expression,tokens属性,保存表达式。
2、纯文本,type为2。
本例属于第一种情况。解析完成后如下:
{
      "type": 2,
      "expression": "\"\\n      itemid:\"+_s(item.id)+\"\\n    \"",
      "tokens": [
                 itemid:",
                 {"@binding": "item.id"},
                 "\n    "
               ],
                "text": "\n      itemid:{{item.id}}\n    "
  }
大家可以看下expression与tokens中的内容,后面我们再详细分析。
text文本解析完成,接下来处理结束tag。
七、end
解析到结束标签,则为该标签的元素对象做闭环处理。继续看余下的html
   </li>
  </ul>
</div>
处理的代码段:
const endTagMatch = html.match(endTag)
if (endTagMatch) {
    const curIndex = index
    //步进结束tag的长度
    advance(endTagMatch[0].length)
    parseEndTag(endTagMatch[1], curIndex, index)
    continue
 }
html.match(endTag)正则匹配到</xx>这类字符,确定为标签结束符,记录当前结束符的位置到curIndex中,然后步进结束tag的长度,调用parseEndTag进行处理。
function parseEndTag (tagName, start, end) {
    ...

    // Find the closest opened tag of the same type
    //1、从stack数组中查找结束的tag标签,并记录位置pos
    if (tagName) {
      for (pos = stack.length - 1; pos >= 0; pos--) {
        if (stack[pos].lowerCasedTag === lowerCasedTagName) {
          break
        }
      }
    } else {
      // If no tag name is provided, clean shop
      pos = 0
    }
    //2、当pos>0,关闭从pos到最后的所有元素,理论上只会有一个,但也要防止不规范多写了结束标签
    if (pos >= 0) {
      // Close all the open elements, up the stack
      for (let i = stack.length - 1; i >= pos; i--) {
        if (process.env.NODE_ENV !== 'production' &&
          (i > pos || !tagName) &&
          options.warn
        ) {
          options.warn(
            `tag <${stack[i].tag}> has no matching end tag.`
          )
        }
        //处理end
        if (options.end) {
          options.end(stack[i].tag, start, end)
        }
      }

      // Remove the open elements from the stack
      //从stack中删除元素
      stack.length = pos
      lastTag = pos && stack[pos - 1].tag
    } else if (lowerCasedTagName === 'br') {
      ...
    }
  }
1、在stack中查找tag,在处理开始时,我们将各标签的match对象压入到stack中,本例中stack有三个对象
[{tag:div, ...},{tag:ul, ...},{tag:li, ...}]
从后往前匹配,匹配到第三个对象li。记录pos为2。
2、当pos>0表示匹配到了标签,调用end方法进行处理,并从stack中删除该对象。
end () {
      // remove trailing whitespace
      //从AST中查找该标签的模型对象
      const element = stack[stack.length - 1]
      //删除text为空格的child
      const lastNode = element.children[element.children.length - 1]
      if (lastNode && lastNode.type === 3 && lastNode.text === ' ' && !inPre) {
        element.children.pop()
      }
      // pop stack
      //stack中删除该模型模型对象,并变更当前的currentParent
      stack.length -= 1
      currentParent = stack[stack.length - 1]
      //关闭
      closeElement(element)
}
end方法为该标签元素对象做闭环处理,从stack中删除AST模型对象,更新当前的parent对象等。
处理完成</li>后,继续</ul>,</div>等标签的处理。
parseHTML处理完成所有的html字符后,将回溯到parse方法,最终返回AST的模型树root对象。
八、总计
本章节重点分析了parse的过程,下面我们用一张流程图梳理下整个的过程