制作引导光盘和U盘
可以将定制安装光盘,并结合kickstart实现基于光盘启动的半自动化安装
实现过程
[root@centos8 ~]#mkdir –pv /data/myiso
[root@centos8 ~]#cp -r /mnt/isolinux/ /data/myiso/ #复制目录到光盘文件 -r 递归复制
[root@centos8 ~]#tree /data/myiso/
/data/myiso/
└── isolinux
 ├── boot.cat
 ├── boot.msg
 ├── grub.conf
 ├── initrd.img
 ├── isolinux.bin
 ├── isolinux.cfg
 ├── ldlinux.c32
 ├── libcom32.c32
 ├── libutil.c32
 ├── memtest
 ├── splash.png
 ├── TRANS.TBL
 ├── vesamenu.c32
 └── vmlinuz
1 directory, 14 files
[root@centos8 ~]#vim /data/myiso/isolinux/isolinux.cfg
#方法1:应答方件放在ISO文件里
label linux
menu label ^Auto Install CentOS Linux 8
kernel vmlinuz
 initrd=initrd.img text ks=cdrom:/myks.cfg

#方法2:应答方件放在http服务器上
label linux
menu label ^Auto Install CentOS Linux 8
kernel vmlinuz
append initrd=initrd.img quiet ks=http://10.0.0.80/ksdir/centos8.cfg

label rescue #  救援模式
menu label ^Rescue a CentOS Linux system
kernel vmlinuz
append initrd=initrd.img inst.repo=http://10.0.0.80/centos/8/os/x86_64/ rescue
quiet

label local     #本地硬盘启动
menu default
menu label Boot from ^local drive
localboot 0xffff

[root@centos8 ~]#cp /root/myks.cfg /data/myiso/
[root@centos8 ~]#dnf -y install mkisofs
[root@centos8 ~]#mkisofs -R -J -T -v --no-emul-boot --boot-load-size 4 --boot-info-table -V "CentOS 8.0 x86_64 boot" -b isolinux/isolinux.bin -c isolinux/boot.cat -o /root/boot.iso /data/myiso/
注意:以上相对路径都是相对于光盘的根,和工作目录无关
mkisofs选项说明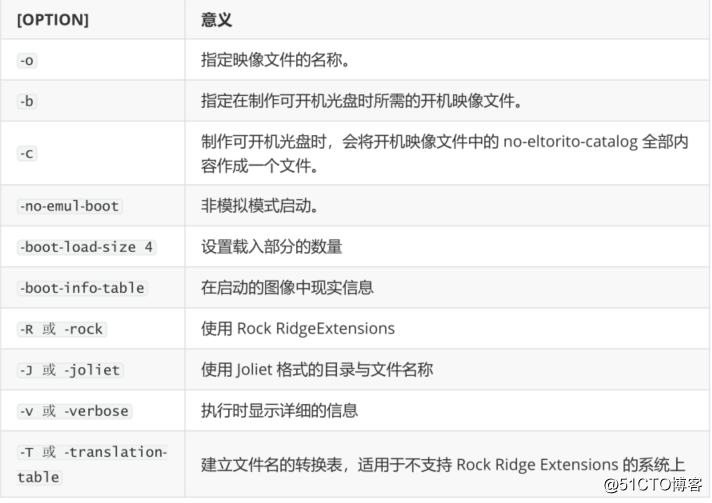
实现DHCP服务
主机获取网络配置可以通过两种方式:
-
静态指定
-
动态获取:
bootp:boot protocol MAC与IP一一静态对应
dhcp:增强的bootp,支持静态和动态
4.1 DHCP工作原理
DHCP: Dynamic Host Configuration Protocol,动态主机配置协议
UDP协议,C/S模式,dhcp server:67/udp,dhcpv4c 服务器端
client :68/udp,dhcpv6 client:546/udp 客户端
主要用途:
- 用于内部网络和网络服务供应商自动分配IP地址给用户
- 用于内部网络管理员作为对所有电脑作集中管理的手段
- 自动化安装系统
- 解决IPV4资源不足问题
DHCP共有八种报文
- DHCP DISCOVER:客户端到服务器
- DHCP OFFER :服务器到客户端
- DHCP REQUEST:客户端到服务器
- DHCP ACK :服务器到客户端
- DHCP NAK:服务器到客户端,通知用户无法分配合适的IP地址
- DHCP DECLINE :客户端到服务器,指示地址已被使用
- DHCP RELEASE:客户端到服务器,放弃网络地址和取消剩余的租约时间
- DHCP INFORM:客户端到服务器, 客户端如果需要从DHCP服务器端获取更为详细的配置信息,则发送Inform报文向服务器进行请求,极少用到
DHCP服务续租
- 50% :租赁时间达到50%时来续租,刚向DHCP服务器发向新的DHCPREQUEST请求。如果dhcp服务没有拒绝的理由,则回应DHCPACK信息。当DHCP客户端收到该应答信息后,就重新开始新的租用周期
- 87.5%:如果之前DHCP Server没有回应续租请求,等到租约期的7/8时,主机会再发送一次广播请求
同网段多DHCP服务
- DHCP服务必须基于本地
- 先到先得的原则
跨网段
- RFC 1542 Compliant Routers
- dhcp relay agent: 中继代理
相关协议
- arp
- rarp
租期:
-
长租期:IP相对稳定,网络资源消耗较少,但是浪费IP资源
- 短租期:IP相对不稳定,网络资源消耗较多,但是IP资源可以充分利用,可以实现较少IP为较多的主机
服务
DHCP实现
注意:实现DHCP服务前,先将网络已有DHCP服务,如:mware中的DHCP关闭,访止冲突
DHCP服务的实现软件:
- dhcp(CentOS 7 之前版本) 或 dhcp-server(CentOS 8 中的包名)
- dnsmasq:小型服务软件,可以提供dhcp和dns功能
DHCP相关文件组成
dhcp或dhcp-server 包文件组成
- /usr/sbin/dhcpd dhcp服务主程序
- /etc/dhcp/dhcpd.conf dhcp服务配置文件
- /usr/share/doc/dhcp-server/dhcpd.conf.example #dhcp服务配置范例文件
- /usr/lib/systemd/system/dhcpd.service #dhcp服务service文件
- /var/lib/dhcpd/dhcpd.leases 地址分配记录
dhcp-client客户端包
- /usr/sbin/dhclient #客户端程序
-
/var/lib/dhclient #自动获取的IP信息
windows 工具 - ipconfig /release #释放DHCP获取的IP,重新申请IP
- ipconfig/renew #刷新租约,续约
DHCP服务器配置文件
帮助参考:man 5 dhcpd.conf
/etc/dhcp/dhcpd.conf 格式
全局配置
subnet {
...
}
host {
}
检查语法命令:service dhcpd configtest (CentOS 6 之前版本支持)
范例:dhcpd.conf
#安装服务
[root@Centos8 ~]#dnf install dhcp-server    #centos7 yum -y install dhcp
[root@centos8 ~]#grep -v "#" /etc/dhcp/dhcpd.conf
option domain-name "magedu.org";
option domain-name-servers 180.76.76.76, 223.6.6.6;
default-lease-time 600;
max-lease-time 7200;
log-facility local7;
subnet 10.0.0.0 netmask 255.255.255.0 {
range 10.0.0.10  10.0.0.100;
range 10.0.0.110 10.0.0.200;
option routers 10.0.0.2;
next-server 10.0.0.8;
filename "pxelinux.0";
}
host testclient {
hardware ethernet 00:0c:29:33:b4:1a;  #固定主机ip和DHCp 分配的地址
fixed-address 10.0.0.106;
default-lease-time 86400;
max-lease-time 864000;
option routers 10.0.0.254;
option domain-name-servers 114.114.114.114,8.8.8.8 ;
option domain-name "magedu.net";
}
注释vim下不需要的字段,注意是从光标开始
.,$s/^\([^#]\)/#\1/DHCP配置文件其它配置选项:
-
next-server:提供引导文件的服务器IP地址
-
filename: 指明引导文件名称
范例
subnet 192.168.100.0 netmask 255.255.255.0 {
range 192.168.100.10  192.168.100.100;
range 192.168.100.150  192.168.100.200;
option routers 192.168.100.1;
next-server 192.168.1.100; #TFTP服务器地址
filename "pxelinux.0";   #bootloader启动文件的名称
}
范例:dhcp 客户端申请地址的过程
[root@centos7 ~]#dhclient -d
Internet Systems Consortium DHCP Client 4.2.5
Copyright 2004-2013 Internet Systems Consortium.
All rights reserved.
For info, please visit https://www.isc.org/software/dhcp/
Listening on LPF/eth0/00:0c:29:01:f9:48
Sending on  LPF/eth0/00:0c:29:01:f9:48
Sending on  Socket/fallback
DHCPDISCOVER on eth0 to 255.255.255.255 port 67 interval 8 (xid=0x4147178b)
DHCPREQUEST on eth0 to 255.255.255.255 port 67 (xid=0x4147178b)
DHCPOFFER from 10.0.0.8
DHCPACK from 10.0.0.8 (xid=0x4147178b)
bound to 10.0.0.100 -- renewal in 32740 seconds.

#DHCP客户端的日志
[root@centos7 ~]#ls /var/lib/dhclient/
dhclient.leases
[root@centos7 ~]#cat /var/lib/dhclient/dhclient.leases
lease {
interface "eth0";
fixed-address 10.0.0.100;
option subnet-mask 255.255.255.0;
option routers 10.0.0.2;
option dhcp-lease-time 86400;
option dhcp-message-type 5;
option domain-name-servers 180.76.76.76,223.5.5.5,223.6.6.6;
option dhcp-server-identifier 10.0.0.8;
option domain-name "magedu.com";
renew 3 2020/05/27 16:18:15;
rebind 4 2020/05/28 04:12:33;
expire 4 2020/05/28 07:12:33;
}
#DHCP服务器的日志
[root@centos8 ~]#tail -f /var/lib/dhcpd/dhcpd.leases
# The format of this file is documented in the dhcpd.leases(5) manual page.
# This lease file was written by isc-dhcp-4.3.6
# authoring-byte-order entry is generated, DO NOT DELETE
authoring-byte-order little-endian;
server-duid "\000\001\000\001&`\315\277\000\014)?s\225";
lease 10.0.0.100 {
starts 3 2020/05/27 07:12:33;
ends 4 2020/05/28 07:12:33;
cltt 3 2020/05/27 07:12:33;
binding state active;
next binding state free;
rewind binding state free;
hardware ethernet 00:0c:29:01:f9:48;
}
范例: DHCP服务器给指定主机分配固定IP
[root@centos8 ~]#vim /etc/dhcp/dhcpd.conf
subnet 10.0.0.0 netmask 255.255.255.0 {
 range 10.0.0.50 10.0.0.100;
 range 10.0.0.150 10.0.0.200;
 option routers 10.0.0.2;
 next-server 10.0.0.8;
 filename "pxelinux.0";
}
host test {
hardware ethernet 00:0c:29:cd:90:10;
fixed-address 10.0.0.123;
}
实现TFTP服务
TFTP介绍
TFTP:Trivial File Transfer Protocol ,是一种用于传输文件的简单高级协议,是文件传输协议(FTP)
的简化版本。用来传输比文件传输协议(FTP)更易于使用但功能较少的文件
TFTP和FTP的区别
1、安全性区别
FTP支持登录安全,具有适当的身份验证和加密协议,在建立连接期间需要与FTP身份验证通信
TFTP是一种开放协议,缺乏安全性,没有加密机制,与TFTP通信时不需要认证
2、传输层协议的区别
FTP使用TCP作为传输层协议,TFTP使用UDP作为传输层协议
3、使用端口的区别
FTP使用2个端口:TCP端口21,是个侦听端口;TCP端口20或更高TCP端口1024以上用于源连接
TFTP仅使用一个具有停止和等待模式的端口:端口:69/udp
4、RFC的区别
FTP是基于RFC 959文档,带有其他RFC涵盖安全措施;TFTP基于RFC 1350文档
5、执行命令的区别
FTP有许多可以执行的命令(get,put,ls,dir,lcd)并且可以列出目录等
TFTP只有5个指令可以执行(rrq,wrq,data,ack,error)
安装和使用TFTP
安装包:
- tftp-server #服务器包
- tftp #客户端包
范例:安装并使用tftp下载文件
#安装tftp服务器包
[root@centos8 ~]#dnf install tftp-server -y
[root@centos8 ~]#rpm -ql tftp-server
/usr/lib/.build-id
/usr/lib/.build-id/8c
/usr/lib/.build-id/8c/6921a9fb21d66da4fb299d516bce9ee6afea34
/usr/lib/systemd/system/tftp.service #tftp service文件
/usr/lib/systemd/system/tftp.socket #tftp socket文件
/usr/sbin/in.tftpd  #tftp主程序
/usr/share/doc/tftp-server
/usr/share/doc/tftp-server/CHANGES
/usr/share/doc/tftp-server/README
/usr/share/doc/tftp-server/README.security
/usr/share/man/man8/in.tftpd.8.gz
/usr/share/man/man8/tftpd.8.gz
/var/lib/tftpboot  #TFTP服务数据目录
#启动服务
[root@centos8 ~]#systemctl enable --now tftp.service
Created symlink /etc/systemd/system/sockets.target.wants/tftp.socket →
/usr/lib/systemd/system/tftp.socket.
[root@centos8 ~]#ss -nulp|grep tftp
UNCONN  0     0             *:69           *:*
users:(("in.tftpd",pid=10100,fd=0),("systemd",pid=1,fd=32))
#准备测试文件
[root@centos8 ~]#cp /etc/fstab /var/lib/tftpboot/f1.txt
[root@centos8 ~]#mkdir /var/lib/tftpboot/dir
[root@centos8 ~]#cp /etc/password /var/lib/tftpboot/dir/f2.txt
#安装tftp客户端包
[root@centos7 ~]#yum -y install tftp
#客户端通过tftp测试下载文件
[root@centos7 ~]#tftp 10.0.0.8
tftp> help
tftp-hpa 5.2
Commands may be abbreviated. Commands are:
connect connect to remote tftp
mode  set file transfer mode
put   send file
get   receive file
quit  exit tftp
verbose toggle verbose mode
trace  toggle packet tracing
literal toggle literal mode, ignore ':' in file name
status show current status
binary set mode to octet
ascii  set mode to netascii
rexmt  set per-packet transmission timeout
timeout set total retransmission timeout
?    print help information
help  print help information
tftp> get f1.txt
tftp> get dir/f2.txt
tftp> quit
[root@centos7 ~]#ls
anaconda-ks.cfg f1.txt f2.txt
#以下在tftp服务器执行,当用户下载文件后,可以观察到服务器端自动打开in.tftpd主程序
[root@centos8 tftpboot]#ps aux|grep in.tftp
root    1276  0.0  0.2  14912  1720 ?    Ss  12:03  0:00
/usr/sbin/in.tftpd -s /var/lib/tftpboot
root    1282  0.0  0.1  12108  960 pts/0  R+  12:04  0:00 grep --
color=auto in.tftp