mybatis和spring jdbc持久层框架事务支持分析
持久层框架中的事务支持指的是持久层框架如何支持数据库事务,我们先梳理出原生数据库事务操作的主线脉络,它是通过java.sql 包下的Connection接口中定义的几个关键方法来实现的,包括setAutoCommit、commit、rollback几个核心的方法;先通过设置setAutoCommit false来关闭自动提交,然后通过显式的调用commit方法来提交事务;同样Connection接口中也定义了设置事务隔离级别的方法。
底层实现事务方式的接口方法我们梳理清楚之后,我们要去探究持久层框架究竟是如何实现数据库事务的,就很清晰了,我们只要找到持久层框架在哪里调用了connection 接口的setAutoCommit、commit、rollback 方法就知道了,然后我们沿着这个思路去分析下mybatis是怎么实现事务的,spring jdbc是怎么实现事务的,这就是我们分析的一个方法论。
一、mybatis 事务支持源码剖析
1、实例
我们先写个实例看下,mybatis事务怎么去操作
private static void simpleExecutorTest() {


        long start = System.currentTimeMillis();
        // 然后根据 sqlSessionFactory 得到 session,关闭自动提交
        SqlSession session = sqlSessionFactory.openSession(ExecutorType.SIMPLE,false);

        // 获取学生
        Student student3 = session.selectOne("getStudent", 3);
        System.out.println(student3);

        // 获取学生
        Student student4 = session.selectOne("getStudent", 4);
        System.out.println(student4);

        // 获取学生
        Student student5 = session.selectOne("getStudent", 5);
        System.out.println(student5);

        // 修改学生
        student3.setName("修改的学生3");
        session.update("updateStudent", student3);

        // 修改学生
        student4.setName("修改的学生4");
        session.update("updateStudent", student4);

        // 修改学生
        student5.setName("修改的学生5");
        session.update("updateStudent", student5);

        // 手动提交
        session.commit();

        long end = System.currentTimeMillis();
        System.out.println("SimpleExecutor 更新的执行时间为:" + (end - start));
    }
首先通过sqlSessionFactory 来开启会话openSession的时候我们需要将自动提交设置为false,然后最后通过session.commit()方法来提交事务,不执行commit的话实际数据库更新操作是没有提交的。
2、源码剖析
openSession这个方法怎么关闭自动提交的,我们一层一层点进去看下,看下false这个参数传给了谁,最终我们会发现它传给了JdbcTransaction,JdbcTransaction是用来获取连接的,我们接着看下它获取连接的方法
protected void openConnection() throws SQLException {


    if (log.isDebugEnabled()) {


      log.debug("Opening JDBC Connection");
    }
    connection = dataSource.getConnection();
    if (level != null) {


      connection.setTransactionIsolation(level.getLevel());
    }
    // 设置自动提交
    setDesiredAutoCommit(autoCommmit);
  }

 protected void setDesiredAutoCommit(boolean desiredAutoCommit) {


    try {


      if (connection.getAutoCommit() != desiredAutoCommit) {


        if (log.isDebugEnabled()) {


          log.debug("Setting autocommit to " + desiredAutoCommit + " on JDBC Connection [" + connection + "]");
        }
          // 设置自动提交
        connection.setAutoCommit(desiredAutoCommit);
      }
    } catch (SQLException e) {


      // Only a very poorly implemented driver would fail here,
      // and there's not much we can do about that.
      throw new TransactionException("Error configuring AutoCommit.  "
          + "Your driver may not support getAutoCommit() or setAutoCommit(). "
          + "Requested setting: " + desiredAutoCommit + ".  Cause: " + e, e);
    }
  }
最终我们发现就是这个地方调用了connection的setAutoCommit方法;同样commit方法也可以通过这种方式去分析。
二、spring jdbc 事务支持源码剖析
1、实例
同样先来看一个使用示例,
配置
<?xml version="1.0" encoding="UTF-8"?>
<beans xmlns="http://www.springframework.org/schema/beans"
       xmlns:xsi="http://www.w3.org/2001/XMLSchema-instance"
       xmlns:context="http://www.springframework.org/schema/context" xmlns:tx="http://www.springframework.org/schema/tx"
       xsi:schemaLocation="http://www.springframework.org/schema/beans http://www.springframework.org/schema/beans/spring-beans.xsd http://www.springframework.org/schema/context http://www.springframework.org/schema/context/spring-context.xsd http://www.springframework.org/schema/tx http://www.springframework.org/schema/tx/spring-tx.xsd">

    <!--直接配置数据库连接-->
    <bean id="testDbDs" class="org.springframework.jdbc.datasource.DriverManagerDataSource">
        <property name="driverClassName" value="com.mysql.jdbc.Driver"/>
        <property name="url" value="jdbc:mysql://localhost:3306/test"/>
        <property name="username" value="root"/>
        <property name="password" value="root"/>
    </bean>

    <!-- DAL客户端接口实现 -->
    <bean id="sqlSession"
          class="com.handserome.daat.session.DefaultSqlSession">
        <property name="sqlMapConfigLocation" value="classpath*:conf/sqlMap/sqlMap_*.xml"/>
        <property name="dataSource" ref="testDbDs"/>
    </bean>

    <bean id="jdbcTemplate" class="org.springframework.jdbc.core.namedparam.NamedParameterJdbcTemplate">
        <constructor-arg type="javax.sql.DataSource" ref="testDbDs"/>
    </bean>

    <bean id="studentDao" class="com.handserome.test.dao.StudentDaoImpl">
        <property name="jdbcTemplate" ref="jdbcTemplate"/>
    </bean>

    <context:annotation-config />
    <context:component-scan base-package="com.handserome.test.dao" />

    <bean id="transactionManager" class="org.springframework.jdbc.datasource.DataSourceTransactionManager">
        <property name="dataSource" ref="testDbDs"/>
    </bean>

    <tx:annotation-driven transaction-manager="transactionManager"/>

</beans>
dao层实现类
public class StudentDaoImpl implements StudentDao {


    private NamedParameterJdbcTemplate jdbcTemplate;

    @Transactional
    @Override
    public void insertTransactionTest() {


        insert();
        insert1();
    }

    public void insert() {


        String sql = "insert into student(student_id, name, create_time) values (:studentId, :name, :createTime)";
        Map<String, Object> paramMap = new HashMap<String, Object>();
        paramMap.put("studentId", "454");
        paramMap.put("name", "bbbb");
        paramMap.put("createTime", new Timestamp(System.currentTimeMillis()));
        // 返回的是更新的行数
        int count = jdbcTemplate.update(sql, paramMap);
        System.out.println(count);
    }

    public void insert1() {


        String sql = "insert into student(student_id, name, create_time) values (:studentId, :name, :createTime)";
        Map<String, Object> paramMap = new HashMap<String, Object>();
        paramMap.put("studentId", "454");
        paramMap.put("name", "bbbb");
        paramMap.put("createTime", new Timestamp(System.currentTimeMillis()));
        // 返回的是更新的行数
        int count = jdbcTemplate.update(sql, paramMap);
        System.out.println(count);
    }

    public NamedParameterJdbcTemplate getJdbcTemplate() {


        return jdbcTemplate;
    }

    public void setJdbcTemplate(NamedParameterJdbcTemplate jdbcTemplate) {


        this.jdbcTemplate = jdbcTemplate;
    }
}
在spring事务使用的时候,只要加个@Transactional注解就实现了事务的处理,跟mybatis不一样我们没有看到它在哪设置了自动提交false,在哪调用了commit方法,应此我们只需要找到在哪调用的这两个方法就能梳理清楚它的脉络。
2、源码剖析
首先在配置文件中,可以看到配了几个东西,1、是配置了事务管理器DataSourceTransactionManager 2、是开启了包路径扫描 3、是开启了注解使用;
配的事务管理器DataSourceTransactionManager 肯定是用来管理事务的,那么稍微思考下就知道它肯定包含一些事务的操作方法,像开启事务,提交事务,回滚事务,具体我们分析一个就可以了。
protected void doBegin(Object transaction, TransactionDefinition definition) {


		DataSourceTransactionObject txObject = (DataSourceTransactionObject) transaction;
		Connection con = null;

		try {


			if (txObject.getConnectionHolder() == null ||
					txObject.getConnectionHolder().isSynchronizedWithTransaction()) {


				Connection newCon = this.dataSource.getConnection();
				if (logger.isDebugEnabled()) {


					logger.debug("Acquired Connection [" + newCon + "] for JDBC transaction");
				}
				txObject.setConnectionHolder(new ConnectionHolder(newCon), true);
			}

			txObject.getConnectionHolder().setSynchronizedWithTransaction(true);
			con = txObject.getConnectionHolder().getConnection();

			Integer previousIsolationLevel = DataSourceUtils.prepareConnectionForTransaction(con, definition);
			txObject.setPreviousIsolationLevel(previousIsolationLevel);

			// Switch to manual commit if necessary. This is very expensive in some JDBC drivers,
			// so we don't want to do it unnecessarily (for example if we've explicitly
			// configured the connection pool to set it already).
			if (con.getAutoCommit()) {


				txObject.setMustRestoreAutoCommit(true);
				if (logger.isDebugEnabled()) {


					logger.debug("Switching JDBC Connection [" + con + "] to manual commit");
				}
				// 关闭自动提交
				con.setAutoCommit(false);
			}
			txObject.getConnectionHolder().setTransactionActive(true);

			int timeout = determineTimeout(definition);
			if (timeout != TransactionDefinition.TIMEOUT_DEFAULT) {


				txObject.getConnectionHolder().setTimeoutInSeconds(timeout);
			}

			// Bind the session holder to the thread.
			if (txObject.isNewConnectionHolder()) {


				TransactionSynchronizationManager.bindResource(getDataSource(), txObject.getConnectionHolder());
			}
		}

		catch (Exception ex) {


			DataSourceUtils.releaseConnection(con, this.dataSource);
			throw new CannotCreateTransactionException("Could not open JDBC Connection for transaction", ex);
		}
	}
我们可以看到,它从transaction对象里面先拿到了connectionHolder, 然后通过connectionHolder拿到connection,然后再调用的connection的setAutoCommit方法;看到这是不是感觉和mybatis很像了,都是从transaction中获取到连接,然后调用connection的setAutoCommit 方法。
分析到这还不够,我们要进一步思考,什么时候会调用DataSourceTransactionManager 的doBegin方法呢,实例里面调用insertTransactionTest方法和它又存在什么关联呢?我们只需要在doBegin方法里打个断点,看下调用链栈,方法反向追踪下就清楚了。
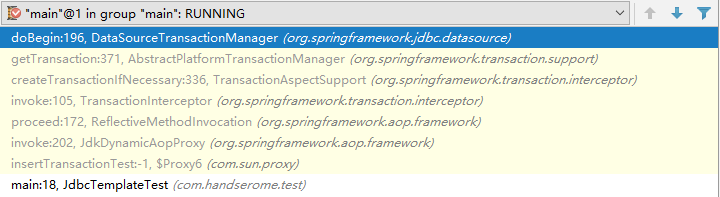
从线程栈里我们可以看到上层是JdkDynamicAopProxy inoke 方法调用的,是jdk动态代理实现的,StudentDaoImpl这个对象被包装了,它的insertTransactionTest方法实际是通过JdkDynamicAopProxy 动态代理去完成了,动态代理增强了insertTransactionTest方法,在它执行前最终调用了DataSourceTransactionManager 的doBegin方法。关于动态代理对象又是如何构建的可以去看spring 容器的创建和初始化加载过程,这里就不讲了,这和配置里面开启包路径扫描和注解使用时相关的。