| 这篇文章主要为大家详细介绍了WPF实现文字粒子闪烁动画效果,文中示例代码介绍的非常详细,具有一定的参考价值,感兴趣的小伙伴们可以参考一下 |
本文实例为大家分享了WPF实现文字粒子闪烁动画的具体代码,供大家参考,具体内容如下
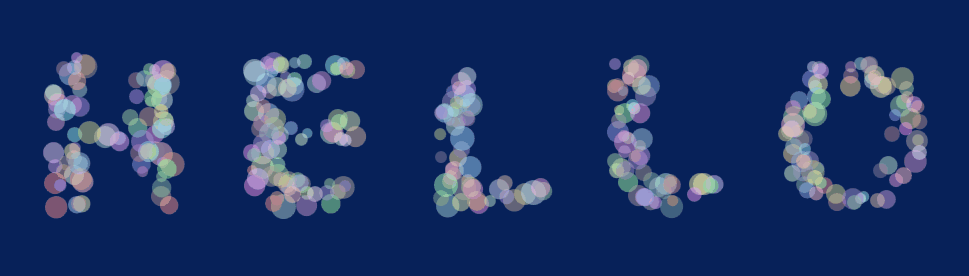
实现效果如下:
思路:
首先根据显示文本创建文本路径Geometry,然后在路径内随机生成圆形粒子并添加动画。
步骤:
1、粒子类Particle.cs
public class Particle
 {
    ///
/// 形状 /// public Ellipse Shape; /// /// 坐标 /// public Point Position; }
2、粒子系统ParticleSystem.cs
///
/// 粒子路径 /// private Geometry particleGeometry; /// /// 粒子个数 /// private int particleCount = 100; /// /// 粒子最小尺寸 /// private static int sizeMin = 10; /// /// 粒子最大尺寸 /// private int sizeMax = 20; /// /// 随机数 /// private Random random; /// /// 粒子列表 /// private List particles; /// /// 粒子容器 /// private Canvas containerParticles; public ParticleSystem(Geometry _path, int _maxRadius, int _particleCount, Canvas _containerParticles) { particleGeometry = _path; particleCount = _particleCount; sizeMax = _maxRadius; containerParticles = _containerParticles; random = new Random(); particles = new List(); SpawnParticle(); } /// /// 初始化粒子 /// private void SpawnParticle() { //清空粒子队列 particles.Clear(); containerParticles.Children.Clear(); //生成粒子 for (int i = 0; i < particleCount; i++) { double size = random.Next(sizeMin, sizeMax + 1); while(true) { Point po = new Point(random.Next((int)particleGeometry.Bounds.Left, (int)particleGeometry.Bounds.Right), random.Next((int)particleGeometry.Bounds.Top, (int)particleGeometry.Bounds.Bottom)); if (particleGeometry.FillContains(po, 2, ToleranceType.Absolute)) { Particle p = new Particle { Shape = new Ellipse { Width = size, Height = size, Stretch = System.Windows.Media.Stretch.Fill, Fill = GetRandomColorBursh(), }, Position = po, }; SetParticleSizeAnimation(p.Shape); particles.Add(p); Canvas.SetLeft(p.Shape, p.Position.X); Canvas.SetTop(p.Shape, p.Position.Y); containerParticles.Children.Add(p.Shape); break; } } } } /// /// 设置粒子大小动画 /// private void SetParticleSizeAnimation(Ellipse p) { Storyboard sb = new Storyboard(); //动画完成事件 再次设置此动画 sb.Completed += (S, E) => { SetParticleSizeAnimation(p); }; int size = random.Next(sizeMin, sizeMax + 1); int time = random.Next(100, 1000); DoubleAnimation daX = new DoubleAnimation(size, new Duration(TimeSpan.FromMilliseconds(time))); DoubleAnimation daY = new DoubleAnimation(size, new Duration(TimeSpan.FromMilliseconds(time))); Storyboard.SetTarget(daX, p); Storyboard.SetTarget(daY, p); Storyboard.SetTargetProperty(daX, new PropertyPath("Width")); Storyboard.SetTargetProperty(daY, new PropertyPath("Height")); sb.Children.Add(daX); sb.Children.Add(daY); sb.Begin(); } /// /// 获取随机颜色画刷 /// private SolidColorBrush GetRandomColorBursh() { byte r = (byte)random.Next(128, 256); byte g = (byte)random.Next(128, 256); byte b = (byte)random.Next(128, 256); return new SolidColorBrush(Color.FromArgb(125, r, g, b)); }
3、主窗体交互
private ParticleSystem ps;

public MainWindow()
    {
      InitializeComponent();
      this.Loaded += MainWindow_Loaded;
    }

    private void MainWindow_Loaded(object sender, RoutedEventArgs e)
    {
      Geometry g = CreateTextPath("H E L L O", new Point(this.cvs_particleContainer.Margin.Left, this.cvs_particleContainer.Margin.Top), new Typeface(new FontFamily("Arial"), FontStyles.Normal, FontWeights.Bold, FontStretches.Normal), 200);
      ps = new ParticleSystem(g, 25, 350, this.cvs_particleContainer);
    }

    ///
/// 创建文本路径 /// /// 文本字符串 /// 显示位置 /// 字体信息 /// 字体大小 /// private Geometry CreateTextPath(string word, Point point, Typeface typeface, int fontSize) { FormattedText text = new FormattedText(word, new System.Globalization.CultureInfo("en-US"), FlowDirection.LeftToRight, typeface, fontSize, Brushes.Black); Geometry g = text.BuildGeometry(point); PathGeometry path = g.GetFlattenedPathGeometry(); return path; }
以上就是本文的全部内容,希望对大家的学习有所帮助。