多种方式实现依赖注入:
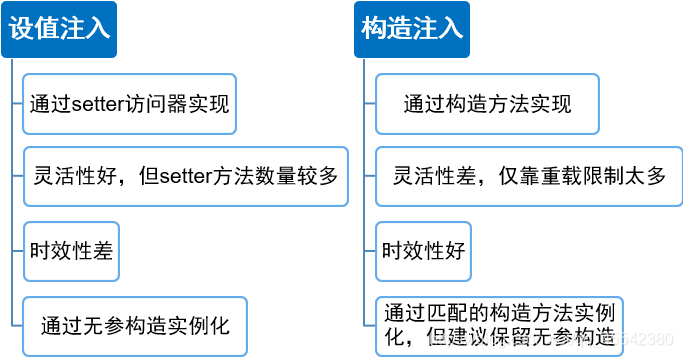
上一章简单的使用Spring 通过 setter 访问器实现对属性的赋值; 称为 "设值注入"
Spring 还提供了通过构造方法赋值的能力: "构造注入"
上代码!
Data接口类型:Data.java
//数据库接口
public interface Data {


	//描述
	public void show();
}
两个实现接口的类:
MysqlData.java 和 OracleData.java
//Mysql数据库
public class MysqlData implements Data {


	@Override
	public void show() {


		// TODO Auto-generated method stub
		System.err.println("Mysql数据库");
	}
}


//Mysql数据库
public class MysqlData implements Data {


	@Override
	public void show() {


		// TODO Auto-generated method stub
		System.err.println("Mysql数据库");
	}
}
实体类:User.Java
//上一篇文章简单的使用Spring 通过 setter 访问器实现对属性的赋值; 称为 "设值注入"
//Spring 还提供了通过构造方法赋值的能力: "构造注入"
//用户类
public class User {


	//无参构造函数;
	public User(){


		//设置注入时,Spring通过无参构造方法创建实例对象; 调用set()赋值
		//为了确保灵活性,建议自行添加一个无参构造方法,防止异常;
	};
	//带参构造函数
	public User(Data data,String can){


		this.date = data;
		System.out.println(can);  //打印参数,
	}
	//初始化方法()
	public void into(){


		this.date.show();
	//	System.out.println(1/0);   //主动抛出异常
	}

	//数据库接口,类型对象;
	private Data date;

	//get/set 方法;
	public Data getDate() {


		return date;
	}
	public void setDate(Data date) {


		this.date = date;
	}
}
Spring 配置文件: applicationContext.xml
<!-- Spring:三种注入 -->

<!-- setter方式的"设值注入" -->

<!-- 构造注入 -->
	<!-- 定义User带参构造方法 -->
	<!-- <bean id="user" class="com.wsm.entity.User" >
		<constructor-arg>
			<ref bean="mysql" />     复杂类型赋值,引用bean id即可;
		</constructor-arg>
		<constructor-arg>
			<value>打印参数</value>   基本数据类型赋值;
		</constructor-arg>

			一个<constructor-arg>元素表示构造方法的一个参数,且使用时不区分顺序。
			通过<constructor-arg>元素的index 属性可以指定该参数的位置索引,位置从0 开始。
			<constructor-arg>元素还提供了type 属性用来指定参数的类型,避免字符串和基本数据类型的混淆。
	</bean>
 	-->
<!-- 使用p命名空间注入属性值 -->
	<!--
		p 命名空间的特点:使用属性而不是子元素的形式配置Bean的属性,从而简化了配置代码
		使用前要先要在Spring配置文件中引入p命名空间: xmlns:p="http://www.springframework.org/schema/p"
		Spring配置2.0开始采用:schema形式,使用不同命名空间管理不同类型配置,配置文件具有扩展性;

		基本类型:p:属性名="值"
		复杂类型:p:属性名-ref="Bean的Id"           p:命名空间方式注入,其实也是setter一种;
	-->
	<bean id="user" class="com.wsm.entity.User"
		p:date-ref="oracle"
	/>
构造注入 与 设值注入的区别:
注意:配置文件是 xml 所以如果注入一些特殊字符还需要进行一些处理…
| 符号 | 引用实体 |
|---|---|
| < | < ; |
| > | > ; |
| & | & ; |
| ’ | &apos ; |
| " | " ; |
…
Spring注入不同数据类型: list map set prop
CS.java
import java.util.List;
import java.util.Map;
import java.util.Properties;
import java.util.Set;

public class CS {


	private List<String> list;			//泛型 String
	private Map<String, Object> map;	//泛型 String Object
	private Set<Integer> set;			//泛型 integer
	private Properties prop;			//跟Map 键值对存储类似,不同是它是 name-value name只能是字符串类型;

	//重写toString(); 用于待会打印查看结果...
	@Override
	public String toString() {


		return "CS [list=" + list + ", map=" + map + ", set=" + set + ", prop="
				+ prop + "]";
	}

	//get/set方法
	public List<String> getList() {


		return list;
	}
	public void setList(List<String> list) {


		this.list = list;
	}
	public Map<String, Object> getMap() {


		return map;
	}
	public void setMap(Map<String, Object> map) {


		this.map = map;
	}
	public Set<Integer> getSet() {


		return set;
	}
	public void setSet(Set<Integer> set) {


		this.set = set;
	}
	public Properties getProp() {


		return prop;
	}
	public void setProp(Properties prop) {


		this.prop = prop;
	}
}
Spring 配置文件: applicationContext.xml
<!--
注入不同数据类型
	Spring对一些类型,提供了不同的参数注入方式:对于 设置注入和构造注入	都适用;
	本次使用:设置注入
	构造注入就是把标签替换为:<constructor-arg></constructor-arg> 即可
-->
<!-- 专门创一个新Java类进行操做: CS -->
	<bean id="cs" class="com.wsm.entity.CS" >
		<!-- 语法如下: -->
		<property name="list">
			<list>
				<value>root</value>
				<value>system</value>
			</list>
		</property>
		<property name="set">
			<set>
				<value>100</value>
				<value>200</value>
			</set>
		</property>
		<property name="map">
			<map>
				<entry key="one" value="打篮球"></entry>
				<entry key="two" value="踢足球"></entry>
			</map>
		</property>
		<property name="prop">
			<props>
				<prop key="张">三丰</prop>
				<prop key="王">无极</prop>
			</props>
		</property>
	</bean>
<!--
	扩:对于一些 null 和空字符串值:
		使用<null/>注入null 值
 		使用<value></value>注入空字符串值
 -->
// 对于Spring的注入大致就是这么多… 现在是不是对IOC 又有更多了解了呢… 下面介绍一下 AOP;
Spring的 AOP 扩展:
上一章介绍了, Spring的Aop; 前置增强 后置增强
现在让我们来更加深入了解AOP:
将复杂的需求分解出不同方面,将散布在系统中的公共功能集中解决
采用代理机制组装起来运行,在不改变原程序的基础上对代码段进行增强处理,增加新的功能
对于这些增强的方法代码,把它们集中放在一个增强类中, 方便处理:
增强处理类:Aop.java
import java.util.Arrays;
import org.apache.log4j.Logger;
import org.aspectj.lang.JoinPoint;
import org.aspectj.lang.ProceedingJoinPoint;
//增强处理类:
public class Aop {


	//创建日志对象;
	private Logger log = Logger.getLogger(Aop.class);
	//可拔插的处理方案,增强方法都是 可拔插式的,用就在配置文件中定义,不用就直接删除即可;

	//前置增强			//连接点对象
	public void beforeee(JoinPoint joinPoint){


		log.info("前置,调用" + joinPoint.getTarget() + "类,下的方法是"
				+ joinPoint.getSignature().getName() + ",方法的参数是:"
				+ Arrays.toString(joinPoint.getArgs()));
	}

	//后置增强				//连接点对象,返回值
	public void afterReting(JoinPoint joinPoint,Object result){


		log.info("后置,调用" + joinPoint.getTarget() + "类,下的方法是"
				+ joinPoint.getSignature().getName() + ",方法的参数是:"
				+ Arrays.toString(joinPoint.getArgs()) + ",方法的返回值是:" + result);
	}


	//异常抛出增强 特点:
		//在目标方法抛出异常时织入增强处理; 相当于 try-catch, catch中的代码,连接点方法出现异常会执行该 异常抛出增强中的方法();
	public void afterThrowing(JoinPoint joinPoint, RuntimeException e) {


		//参数  RuntimeException 表示运行期异常,可有多个根据,不同异常参数进行判断,处理不同异常的解决;
		System.out.println("程序运行异常,方法结束");
		System.out.println("是否是算术异常"+(e instanceof ArithmeticException));   //判断异常类型;
		log.info("异常增强 ,调用" + joinPoint.getTarget() + "类,下的方法是"
				+ joinPoint.getSignature().getName() + "出现的异常是:" + e);
	}

	//最终增强特点:
		//无论方法是否抛出异常,都会在目标方法最后织入增强处理,即:该增强都会得到执行,类似于 finally一般用于释放资源;
		//可以为各功能模块提供统一的,可拔插的处理方案;
	public void after(JoinPoint joinPoint) {


		log.info("最终增强,调用" + joinPoint.getTarget() + "类,下的方法是"
				+ joinPoint.getSignature().getName() + ",方法的参数是:"
				+ Arrays.toString(joinPoint.getArgs()));
	}

	//环绕增强 特点:
		//目标方法前后都可织入增强处理,功能最强大的增强处理. 相当于:前置增强  后置增强  异常抛出增强   最终增强 的合集; 所以我就可以把上面的注释了!
		//可获取或修改目标方法的参数、返回值,可对它进行异常处理,甚至可以决定目标方法是否执行.
	public Object around(ProceedingJoinPoint joinPoint) {


		Object result = null;
		try {


			//前置增强
			log.info("前置,调用" + joinPoint.getTarget() + "类,下的方法是"
					+ joinPoint.getSignature().getName() + ",方法的参数是:"
					+ Arrays.toString(joinPoint.getArgs()));
			//后置增强
			log.info("后置,调用" + joinPoint.getTarget() + "类,下的方法是"
					+ joinPoint.getSignature().getName() + ",方法的参数是:"
					+ Arrays.toString(joinPoint.getArgs()) + ",方法的返回值是:" + result);

			result = joinPoint.proceed(); //获取连接点返回值参数;
		} catch (ArithmeticException e) {

     //算术异常
			//异常抛出增强
			System.err.println("算术异常");
		} catch (Throwable e){

     //异常父类
			System.err.println("异常");
		}
		finally{


			//最终增强
			log.info("最终增强,调用" + joinPoint.getTarget() + "类,下的方法是"
					+ joinPoint.getSignature().getName() + ",方法的参数是:"
					+ Arrays.toString(joinPoint.getArgs()));
		}
		return result;
	}
}
Spring 配置文件: applicationContext.xml
使用AOP前注意: Aop命名空间;
<aop:config>
		<!-- 切入点,指定AOP处理的方法 -->
		<aop:pointcut expression="execution (public void into())" id="mypoint"/>

		<aop:aspect ref="myLogAop">
		<!--
			前置增强
			<aop:before method="beforeee" pointcut-ref="mypoint"/>
			后置增强
			<aop:after-returning method="afterReting" 	pointcut-ref="mypoint"	 returning="result"/>
			异常抛出增强
			<aop:after-throwing method="afterThrowing" pointcut-ref="mypoint"  throwing="e" />
			最终增强
			<aop:after method="after" pointcut-ref="mypoint" /> -->

			<!-- 环绕增强:可以说是前四种的总和!,注释前四种-->
			<aop:around method="around" pointcut-ref="mypoint"/>
		</aop:aspect>

	</aop:config>

	<!-- 增强处理类 -->
	<bean id="myLogAop"  class="com.wsm.aop.Aop"></bean>
最后最后,奉上Run 开始运行啦
Run.Java
import org.springframework.context.ApplicationContext;
import org.springframework.context.support.ClassPathXmlApplicationContext;
import com.wsm.entity.CS;
import com.wsm.entity.User;

public class Run {


	public static void main(String[] args) {


		通过 ClassPathXmlApplicationContext 实例化 Spring 上下文;
		ApplicationContext context = new ClassPathXmlApplicationContext("applicationContext.xml");
		//创建user实例
		User u = (User)context.getBean("user");
		//调用方法
		System.out.println("------------into()-------------");
		u.into();
		System.out.println();
		//创建cs实例
		CS cs = (CS)context.getBean("cs");
		System.out.println("--------list--map--set------prop--------------");
		System.out.println(cs); 	//打印实例,重写了toString();...
	}
}


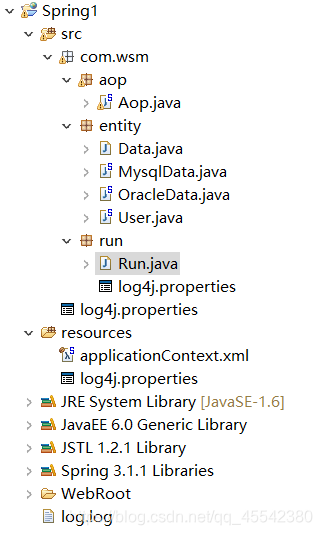
项目结构是随意写的,别建议…后面会注意的;
**感谢观看,有疑问的欢迎提出,一起进步. 可以看我之前的文章解答疑问:click 猛击!
Spring使用注解完成IOC / AOP:
使用注解实现 IOC 配置:
根据上面实例代码进行更改:
Data接口类型:Data.java 没啥变化;
//数据库接口
public interface Data {


	//描述
	public void show();

}
两个实现接口的类:
MysqlData.java 和 OracleData.java
import org.springframework.stereotype.Repository;
//Mysql数据库
@Repository("mysql")    //相当于 <bean id="mysql" class="com.wsm.dao.MysqlData" ></bean>  括号里面就是ID;
public class MysqlData implements Data {


	@Override
	public void show() {


		// TODO Auto-generated method stub
		System.err.println("Mysql数据库");
	}
}
import org.springframework.stereotype.Repository;
//Oracle数据库
@Repository("Oracle")
public class OracleData implements Data {


	@Override
	public void show() {


		// TODO Auto-generated method stub
		System.err.println("Oracle数据库");
	}
}
Spring 注解实现IOC:
注解方式将Bean的定义信息和Bean实现类结合在一起,Spring提供的注解有
@Component:
------@Component(“xx”) 相当于在 Spring配置中编写 :< bean id=“xx” class=“当前类的引用” > </ bean> 实现Bean组件的定义 。
**除了 @Component 还有以下几种… : **
@Repository :用于标注DAO类
@Service : :用于标注业务类
@Controller :用于标注控制器类
------使用特定的Spring 注解, 使组件用途更加清晰, 有可能在以后Spring 会给它们添加特殊的功能,所以建议规范来使用… (如果Spring真的更改了特殊用法麻烦评论告知~^^)
使用注解实现Bean 组件装配:
import org.springframework.beans.factory.annotation.Autowired;
import org.springframework.beans.factory.annotation.Qualifier;
import org.springframework.stereotype.Repository;
@Repository("user")
public class User {


	//Spring 注解完成组件装配:
//方式一:
//	@Autowired			//自动实例化:@Autowired对属性完成注入依赖对象,之间对其赋值,此时可以省略 setter();
	/*对于@Autowired:@Autowired(required = false/true)
	 * 		@Autowired注解进行匹配时候,如果找不到相匹配的Bean组件,Spring容器会抛出异常;
	 * 		此时如果 依赖不是必须的,为了避免抛出异常可以设置  required = false
	 * 		required默认为 true :必须找到匹配的Bean完成装配,否则抛出异常;
	 * */
//	private Data date;

//方式二:
	@Autowired			//@Autowired注解实现Bean的自动装配,默认按类型匹配。
	@Qualifier("mysql") //也可以使用@Qualifier指定Bean的名称
	private Data date;
//方式三:
	//带参构造函数: 也可以对方法的入参进行标注
	public User(@Qualifier("mysql")Data data){


		this.date = data;
	}

	//无参构造
	public User(){

    }

	//初始化
	public void into(){


		this.date.show();
//		System.out.println(1/0);   //主动抛出异常
	}

	//get/set 方法;
	public Data getDate() {


		return date;
	}
	public void setDate(Data date) {


		this.date = date;
	}
}
补充:(因为实例不是很好描述,如果改实例项目代码. 也感觉不太好就截图了…)
字太丑了就没写, 黑笔抹去了 –
总结: 就是 @Resource 可以是,对 @Autowired @Qualifier(“xx”); 的一个整个,可以同时表示两个用法;
Spring 配置文件: applicationContext.xml
使用注解最大好处就是,大大简化了 Spring配置信息中的代码:只需要一个进行扫描 注解的即可,剩下就是底层的代码…实现;
<!--
		引用命名空间:  xmlns:context="http://www.springframework.org/schema/context"
		myelicpse:	  直接在文件下——Namespaces——打勾:contexte — http://www.springframework.org/schema/context 即可;
			context命名空间下:component-scan		扫描包中,注解标注的类;
			base-package 	:						指定扫描的包/类,或使用 * 表示所有;
	 -->
	<context:component-scan base-package="*"></context:component-scan>
使用注解完成AOP
import java.util.Arrays;

import org.apache.log4j.Logger;
import org.aspectj.lang.JoinPoint;
import org.aspectj.lang.ProceedingJoinPoint;
import org.aspectj.lang.annotation.After;
import org.aspectj.lang.annotation.AfterReturning;
import org.aspectj.lang.annotation.AfterThrowing;
import org.aspectj.lang.annotation.Around;
import org.aspectj.lang.annotation.Aspect;
import org.aspectj.lang.annotation.Before;
import org.aspectj.lang.annotation.Pointcut;

/*
 * 使用注解定义切面
AspectJ
面向切面的框架,它扩展了Java语言,定义了AOP 语法,能够在编译期提供代码的织入
@AspectJ
AspectJ 5新增的功能,使用JDK 5.0 注解技术和正规的AspectJ切点表达式语言描述切面
Spring通过集成AspectJ实现了以注解的方式定义增强类,大大减少了配置文件中的工作量
利用轻量级的字节码处理框架asm处理@AspectJ中所描述的方法参数名
使用@AspectJ,首先要保证所用的JDK 是5.0或以上版本
 * */

@Aspect
public class Aop {


	private Logger log = Logger.getLogger(Aop.class);

	@Pointcut("execution(public void into())")   //切入点表达式:使用@Pointcut注解表示;
	public void wsm(){

    }							 //切入点签名通过一个普通方法,返回值必须是 void类型;
												 //引用匹配之后,Myelicpse方法旁边会有小箭头标志~
	//前置增强
	//@Before("wsm()")						 	 //使用时直接:"方法名()"  即可;
	//@Before("execution(public void into())")	 //与上面效果一样;
	public void beforeee(JoinPoint joinPoint){


		log.info("前置,调用" + joinPoint.getTarget() + "类,下的方法是"
				+ joinPoint.getSignature().getName() + ",方法的参数是:"
				+ Arrays.toString(joinPoint.getArgs()));
	}

	//后置增强
	//@AfterReturning(pointcut="execution(public void into())",returning="result")    //returning="返回值的参数名"
	public void afterReting(JoinPoint joinPoint,Object result){


		log.info("后置,调用" + joinPoint.getTarget() + "类,下的方法是"
				+ joinPoint.getSignature().getName() + ",方法的参数是:"
				+ Arrays.toString(joinPoint.getArgs()) + ",方法的返回值是:" + result);
	}

	//异常抛出增强
	//@AfterThrowing(pointcut="execution(public void into())",throwing="e")
	public void afterThrowing(JoinPoint joinPoint, RuntimeException e) {


		//参数  RuntimeException 表示运行期异常,可有多个根据,不同异常参数进行判断,处理不同异常的解决;
		System.out.println("程序运行异常,方法结束");
		System.out.println("是否是算术异常"+(e instanceof ArithmeticException));
		log.info("异常增强 ,调用" + joinPoint.getTarget() + "类,下的方法是"
				+ joinPoint.getSignature().getName() + "出现的异常是:" + e);
	}

	//最终增强
	//@After("wsm()")
	public void after(JoinPoint joinPoint) {


		log.info("最终增强,调用" + joinPoint.getTarget() + "类,下的方法是"
				+ joinPoint.getSignature().getName() + ",方法的参数是:"
				+ Arrays.toString(joinPoint.getArgs()));
	}

	//环绕增强
	@Around("wsm()")
	public Object around(ProceedingJoinPoint joinPoint) {


		Object result = null;
		try {


			//前置增强
			log.info("前置,调用" + joinPoint.getTarget() + "类,下的方法是"
					+ joinPoint.getSignature().getName() + ",方法的参数是:"
					+ Arrays.toString(joinPoint.getArgs()));
			//后置增强
			log.info("后置,调用" + joinPoint.getTarget() + "类,下的方法是"
					+ joinPoint.getSignature().getName() + ",方法的参数是:"
					+ Arrays.toString(joinPoint.getArgs()) + ",方法的返回值是:" + result);

			result = joinPoint.proceed(); //获取连接点返回值参数;

		} catch (ArithmeticException e) {

     //算术异常
			//异常抛出增强
			System.err.println("算术异常");
		} catch (Throwable e){

     			  //异常父类:最后处理...
			System.err.println("父级异常");
		}
		finally{


			//最终增强
			log.info("最终增强,调用" + joinPoint.getTarget() + "类,下的方法是"
					+ joinPoint.getSignature().getName() + ",方法的参数是:"
					+ Arrays.toString(joinPoint.getArgs()));
		}
		return result;

	}
}
Spring 配置文件: applicationContext.xml
<!-- 增强处理类 -->
	<bean id="myLogAop"  class="com.wsm.aop.Aop"></bean>
	<!-- 使用Aspectj 完成注解切面: -->
	<aop:aspectj-autoproxy />  <!-- 是的没错就这一行代码就行了!! 启用对于@AspectJ注解的支持  -->
Run.Java
import org.springframework.context.ApplicationContext;
import org.springframework.context.support.ClassPathXmlApplicationContext;
import com.wsm.entity.User;
//使用注解完成Bean
public class Run {


	public static void main(String[] args) {


		ApplicationContext context = new ClassPathXmlApplicationContext("applicationContext.xml");
		//创建user实例
		User u = (User)context.getBean("user");
		//调用方法
		u.into();
	}
}

感谢观看