文章目录
简介
●一款高性能、轻量级Web服务软件
稳定性高
系统资源消耗低
●对HTTP并发连接的处理能力高(能够处理高并发)
单台物理服务器可支持30000~50000个并发请求
一、Nginx主配置文件剖析
1.1全局配置
#user nobody;           ##指定用户,默认是匿名用户
worker_processes 1;   ##工作进程,实现高并发可以增加值
#error_log logs/error.log;  ##错误日志文件
#pid     logs/nginx.pid;      ##pid文件
1.2I/O事件配置
events {           ##一个进程包含多个线程
    use epoll; #能显著提高程序在大量并发连接中只有少量活跃的情况下的系统CPU利用率
    worker_connections 4096;
}
连接数是4096,基于上面的进程数
1.3http配置
http{}:协议层面;server{}:服务层面;location{}:网页站点目录层面
http {
     access_log logs/access.log main;
     sendfile     on;        ##发送邮件
     keepalive timeout 65;  ##连接超时时间
     server {
         listen  80;
         server_name localhost;    ##域名
         charset utf-8;       ##字符集
         location  / {
               root  html;     ##网页站点目录名称
               index index.html index.php; }    ##主页的相对路径
         error_page  500 502 503 504 /50x.html;    ##提示错误页面(500是服务器出错)
         location = /50x.html {
            root  html; }
    }
}
二、Nginx优化服务
2.1Nginx的访问状态统计
1.编译安装nginx(configure的时候需要添加–with-http_stub_status_module)
nginx -V 可以查看已安装的nginx是否包含http_stub_status模块
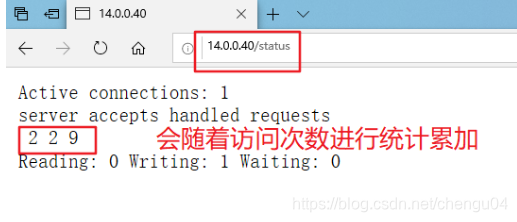
[root@localhost ~]# vim /usr/local/nginx/conf/nginx.conf ##进入主配置文件配置统计页面,(location /status 虚拟目录),添加如下配置
 location /status {
         stub_status on;         ##统计模块开启
         access_log off;         ##访问日志关闭
        }
2.进入客户端浏览器访问14.0.0.40/status进行验证
2.2Nginx支持的虚拟主机
●基于域名的虚拟主机
●基于IP的虚拟主机
●基于端口的虚拟主机
●通过“server{}”配置段实现
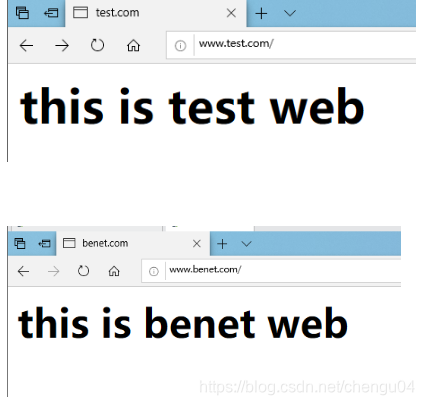
2.2.1基于域名的虚拟主机
www.test.com 14.0.0.40
www.benet.com 14.0.0.40
1.配置两个域名的域名解析
[root@localhost ~]# vim /etc/named.conf
options {
        listen-on port 53 { any; };
        allow-query     { any; };
[root@localhost ~]# vim /etc/named.rfc1912.zones
zone "test.com" IN {
        type master;
        file "test.com.zone";
        allow-update { none; };
};
zone "benet.com" IN {
        type master;
        file "benet.com.zone";
        allow-update { none; };
};
[root@localhost ~]# cd /var/named
[root@localhost named]# cp -p named.localhost test.com.zone
[root@localhost named]# vim test.com.zone
...省略内容
        NS      @
        A       127.0.0.1
www IN  A       14.0.0.40
[root@localhost named]# cp -p test.com.zone benet.com.zone
[root@localhost named]# systemctl start named
2.进入主配置文件配置虚拟主机(可在配置文件末尾单独插入,注意大括号)
[root@localhost ~]# vim /usr/local/nginx/conf/nginx.conf
server {
       server_name www.test.com;
       location / {
         root /var/www/test;
         index test.html;
     }
  }
server {
       server_name www.benet.com;
       location / {
         root /var/www/benet;
         index benet.html;
     }
  }
[root@localhost www]# pkill nginx
[root@localhost www]# nginx
3.用客户端的浏览器访问www.test.com和www.benet.com进行验证
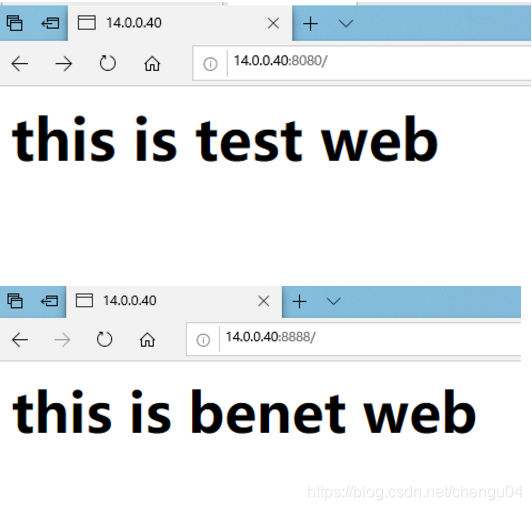
2.2.2基于端口的虚拟主机
注意:访问网站前,先清空浏览器缓存
www.test.com 14.0.0.40:8080
www.benet.com 14.0.0.40:8888
1.修改主配置文件
[root@localhost www]# vim /usr/local/nginx/conf/nginx.conf
server {
       listen 14.0.0.40:8080;
       server_name 14.0.0.40:8080;
       location / {
         root /var/www/test;
         index test.html;
     }
  }
server {
       listen 14.0.0.40:8888;
       server_name 14.0.0.40:8888;
       location / {
         root /var/www/benet;
         index benet.html;
     }
  }
2.访问14.0.0.40:8080,14.0.0.40:8888进行验证
2.2.3基于IP的虚拟主机
www.test.com 14.0.0.40
www.benet.com 14.0.0.128
1.主机配置两个IP地址,修改Nginx服务器主配置文件
[root@localhost www]# vim /usr/local/nginx/conf/nginx.conf
server {
       listen 14.0.0.40:80;
       server_name 14.0.0.40:80;
       location / {
         root /var/www/test;
         index test.html;
     }
  }
server {
       listen 14.0.0.128:80;
       server_name 14.0.0.128:80;
       location / {
         root /var/www/benet;
         index benet.html;
     }
  }
2.访问14.0.0.40,14.0.0.128进行验证

2.3Nginx身份验证访问
1.创建能够访问web网站的用户
[root@localhost benet]# yum -y install httpd
[root@localhost benet]# which htpasswd
/usr/bin/htpasswd
                                     ##htpasswd命令需要先安装httpd
[root@localhost ~]# htpasswd -c /usr/local/nginx/passwd.db tom
New password:
Re-type new password:
Adding password for user tom
[root@localhost ~]# ll /usr/local/nginx | grep passwd.db
-rw-r--r--. 1 root  root   42 8月   7 17:21 passwd.db
[root@localhost ~]# chown nginx /usr/local/nginx/passwd.db
[root@localhost ~]# chmod 400 /usr/local/nginx/passwd.db
[root@localhost ~]# vim /usr/local/nginx/conf/nginx.conf
...省略内容
 location / {
            auth_basic "secret";
            auth_basic_user_file /usr/local/nginx/passwd.db;
            root   html;
            index  index.html index.htm;
        }
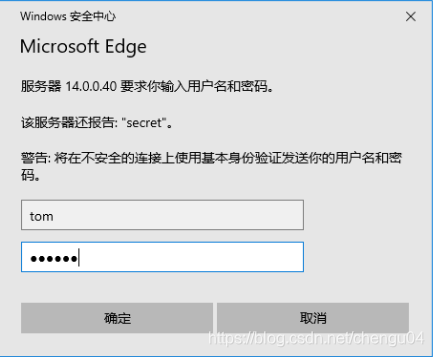
2.登录网站14.0.0.40进行验证
2.4Nginx基于客户端控制用户访问
deny IP/IP段:拒绝某个IP或IP段的客户端访问
allow IP/IP段:允许某个IP或IP段的客户端访问
规则从上往下执行,如匹配则停止,不再往下匹配
1.进入主配置文件,location / { }配置段中加入黑名单14.0.0.77
[root@localhost ~]# vim /usr/local/nginx/conf/nginx.conf
...省略内容
location / {
            deny 14.0.0.77;
            allow all;
            root   html;
            index  index.html index.htm;
        }
...省略内容
2.在IP地址为14.0.0.77的客户端中使用浏览器访问网站,会显示禁止访问