Java高级特性知识点梳理
集合框架和泛型
用数组存储多个同类型的数据,会存在如下一些明显的缺陷:
- 数组长度固定不变,不能很好地适应元素数量动态变化的情况
- 可通过数组名.leng()获取数组的长度,却无法直接获取数组中实际存储的元素个数
- 数组采用在内存中分配连续空间的存储方式存储,根据元素信息查找时效率比较低,需要多次比较
Java集合框架提供了一套性能优良、使用方便的接口和类,它们都位于java.util包中,其主要内容及彼此之间的关系如下图所示:
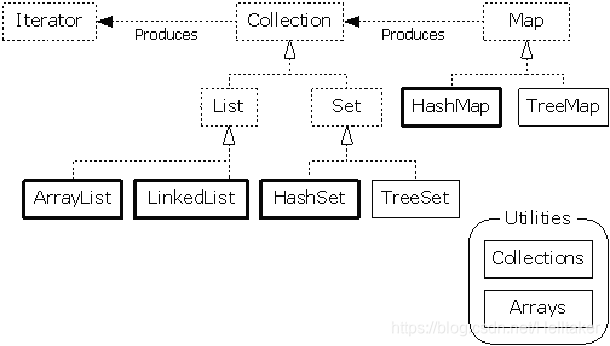
Java的集合类主要由Map接口和Collection接口派生而来,其中Collection接口有两个常用的子接口,即List接口和Set接口。
List接口
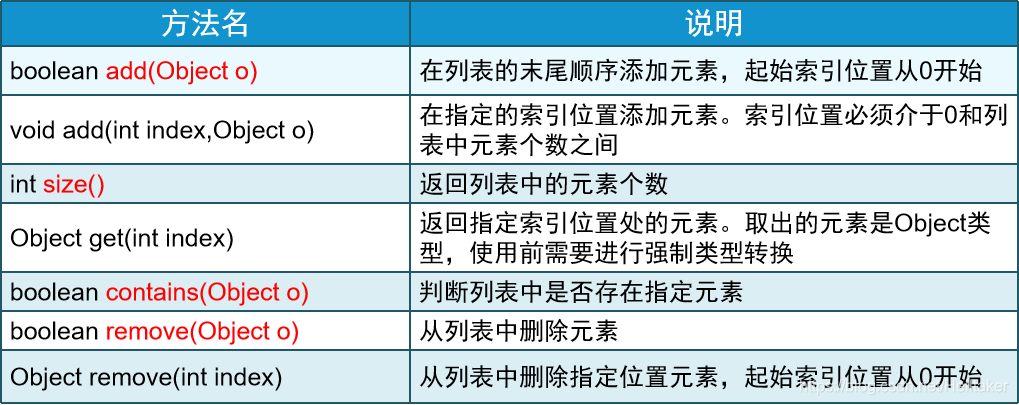
可以存储一组不唯一、无序的对象;List接口常用的实现类有ArrayList和LinkedList
ArrayList
ArrayList类底层为动态数组,遍历元素更快,改变值也就更快;它可以添加任何类型的数据,并且添加的数据都将转换成Object类型
ArrayList类的常用方法
具体实现步骤
1.导入ArrayList类
2.创建ArrayList对象,并添加数据
3.判断集合中是否包含某元素
4.移除索引为0的元素
5.把索引为1的元素替换为其他元素
6.输出某个元素所在的索引位置
7.清空ArrayList集合中的数据
8.判断ArrayList集合中是否包含数据
public static void main(String[] args){
	ArrayList list=new ArrayList(); // 1
	list.add("张三");
	list.add("李四");
	list.add("王五"); // 2
	//判断集合中是否包含"小刘" 3
	System.out.println(list.contains("小刘")); //输出false
	// 4
	list.remove(0);
	// 5
	list.set(1, "黄蓉");
	// 6
	System.out.println(list.indexOf("小龙女")) //没有该元素,输出-1
	// 7
	list.clear();
	// 8
	System.out.println(list.isEmpty()); //第7步已经清空,这里输出true
	//遍历
	for (int i=0; i<list.size(); i++){
		String name = (String)list.get(i);
		System.out.println(name);
	}
	for (Object obj:list){ //增强for
		String name = (String)obj;
		System.out.println(name);
	}
}
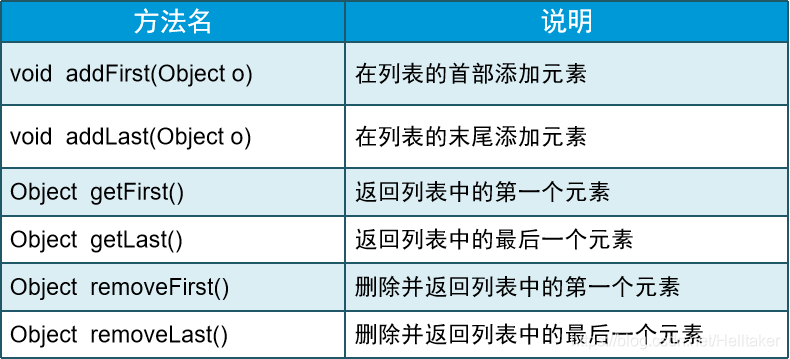
LinkedList
LinkedList类底层是双向链表结构,插入和删除更快。它支持实现所有List解耦可选的列表的操作,并允许元素值是任何数据,包括null
LinkedList类的常用方法
LinkedList除了包含ArrayList类所包含的方法外,还提供一些自身特有的方法
具体实现步骤
1.创建LinkedList对象,并添加数据
2.添加头条和末条元素
3.获取头条和末条元素
4.删除头条和末条元素
NewTitle car = new NewTitle(1,"汽车","管理员");
NewTitle medical = new NewTitle(2,"医学","管理员");
NewTitle fun = new NewTitle(3,"娱乐","管理员");
NewTitle gym = new NewTitle(4,"体育","管理员");

// 创建存储新闻标题的集合对象并添加数据
LinkedList newsTitleList = new LinkedList();
newsTitleList.add(car);
newsTitleList.add(medical);

// 2
newsTitleList.addFirst(fun);
newsTitleList.addLast(gym);

// 3
NewTitle first = (NewTitle) newsTitleList.getFirst();
NewTitle last = (NewTitle) newsTitleList.getLast();

// 4
newsTitleList.removeFirst();
newsTitleList.removeLast();
Set接口
Set接口可以存储一组唯一、无序的对象,它常用的实现类有HashSet
HashSet
HashSet集合的特点如下:
- 集合内的元素是无序排列
- HashSet类是非线程安全
- 允许集合元素值为null
HashSet类的常用方法
| 方法 | 作用 |
|---|---|
| boolean add(Object o) | 如果Set中尚未包含指定元素o,则添加指定元素o |
| void clear() | 从Set中移除所有元素 |
| int size | 返回Set中的元素的数量 |
| boolean isEmpty() | 如果Set不包含任何元素,则返回true |
| boolean contains(Object o) | 如果Set包含指定元素o,则返回true |
| boolean remove(Object o) | 如果指定元素o存在于Set中,则将其移除 |
注意!Set接口不存在 get() 方法!
具体实现步骤
1.创建HashSet对象,并添加数据
2.获取新闻标题的总数
3.判断集合中是否包含汽车新闻标题
4.移除对象
5.判断集合是否为空
6.遍历集合
NewTitle car = new NewTitle(1,"汽车","管理员");
NewTitle medical = new NewTitle(2,"医学","管理员");
// 1
Set newsTitleList = new HashSet();
newsTitleList.add(car);
newsTitleList.add(medical);
// 2
newsTitleList.size();
// 3
newsTitleList.contains(car);
// 4
newsTitleList.remove(medical);
// 5
newsTitleList.isEmpty();
// 6
for (Object obj:newsTitleList){
	NewTitle title = (NewTitle) obj;
	System.out.println(title.getTitleName());
}
Iterator接口
Iterator接口表示对集合进行迭代的迭代器。Iterator接口为集合而生,专门实现集合的遍历。此接口主要有如下两个方法:
- hasNext() 判断是否存在下一个可访问的元素,如果有元素可以迭代,则返回true
- next() 返回要访问的下一个元素
使用Iterator接口遍历List类集合:(Set同理)
Iterator it = list.iterator();
while (it.hasNext()){
	System.out.println(it.next());
}
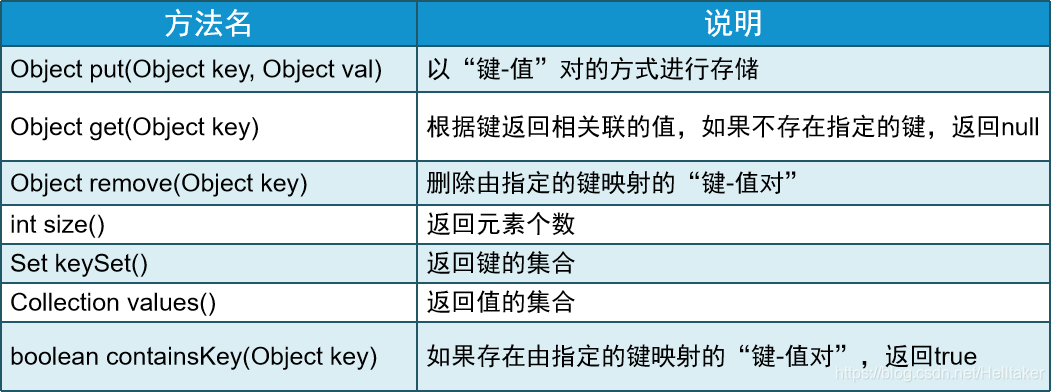
Map接口
Map接口存储一组成对的键(key)— 值(value)对象,提供key到value的映射,通过key来检索。Map接口中的key不要求有序,不允许重复。value同样不要求有序,但允许重复。
Map接口的常用用法
HashMap实现步骤
最常用的Map实现类是HashMap,其优点是查询指定元素效率高。
1.导入HashMap类
2.创建HashMap对象
3.调用HashMap对象的put()方法,向集合中添加数据
4.输出学员个数
5.输出键集
6.判断是否存在“Jack”这个键,如果存在,则根据键获取相应的值
// 1
Student student1 = new Student("李明","男");
Student student2 = new Student("刘丽","女");
// 2
Map students = new HashMap();
// 3
students.put("Jack", student1);
students.put("Rose", student2);
// 4
students.size();
// 5
students.keySet();
// 6
String key = "Jack";
if (students.containsKey(key)) {
	Student student = (Student) students.get(key);
	System.out.println("英文名为"+key+"的学员姓名:"+student.getName());
}
遍历HashMap集合
1.遍历:使用entrySet方法获取键值对的集合
Set set = students.entrySet();
Iterator itr = set.iterator();
while (itr.hasNext()){
	System.out.println(itr.next());
}
2.遍历键集:键集用Set存储
for (Object key:students.keySet()) {
	System.out.println(key.toString());
}
3.遍历值集:值集用Collection存储
Collection values = map.values();
for (Object value : values) {
	System.out.println(value);
}
Collections类
Collections类是Java提供的一个集合操作工具类,它包含了大量的静态方法,用于实现对集合元素的排序、查找和替换等操作。
注意!Collections和Collection是不同的,前者是集合的操作类,后者是集合接口。
Collections类常用方法
以下方法皆为静态方法:
sort() 排序
binarySearch() 查找
max()\min() 查找最大\最小值
Comparable接口
通过重写compareTo()方法,用来实现比较大小
定义语句:int compareTo(Object obj);
参数:obj即将要比较的对象
返回值:负整数、零或正整数,根据此对象是小于、等于还是大雨指定对象返回不同的值
实例:
public int compareTo(Object obj) {
	Student student = (Student) obj;
	//如果学号相同,那么两者就是相等的
	if (this.number==student.getNumber){
		return 0;
	//如果这个学生的学号大于传入学生的学号
	} else if (this.number>student.getNumber()){
		return 1;
	//如果这个学生的学号小于传入学生的学号
	} else {
		return -1;
	}
}
元素之间可以比较大小之后,就可以使用Collections类的sort()方法对元素进行排序操作了。Map接口本身是无序的,所以不能进行排序。可以对List接口进行排序,但注意必须是实现了Comparable接口的元素才可以。
ArrayList list = new ArrayList();
list.add(student1);
list.add(student2);
list.add(student3);
//sort()方法排序
Collections.sort(list);
//binarySearch()方法查找
int index = Collections.binarySearch(list, students3);
替换集合元素
如果需要把一个List集合中的所有元素都替换为相同的元素,则可以使用Collections类的静态方法fill()来实现
Collections.fill(list, "李明");
泛型
泛型的本质是参数化类型。Java语言引入泛型的好处是安全简单,且所有强制转换都是自动和隐式进行的,提高了代码的重用率
泛型的定义
语法格式:类1或者接口<类型实参>对象=new 类2<类型实参>();
例如:ArrayList<String> list = new ArrayList<String>();
上述代码表示创建了一个ArrayList集合,但规定该集合中存储的元素类型必须为String类型
泛型在集合中的应用
学习List接口时提到add()方法的参数是Object类型,无论什么对象放入List接口,或其子接口,或实现类,都会被转换为Object类型。在通过get()方法取出集合中的元素是必须进强制类型转换,不仅繁琐且容易出现异常。
引入泛型是如何解决上述问题的呢? 使用泛型集合在创建集合对象时指定了集合中元素的类型,从集合中取出元素时,无需进行强制类型转换,并且如果把非指定类型对象放入集合,会出现编译错误。
List和ArrayList的泛型形式是List<E> ArrayList<E>
Map和HashMap的泛型形式是Map<K,V> HashMap<K,V>
实用类
Java应用程序编程接口是运行库的集合,预定义了一些接口和类,程序员可以直接使用这些已经被打包的接口和类来开发具体的应用。
常用的包:
java.lang: 编写Java程序时最广泛使用的包,自动导入到所有的程序中,包含了Java程序的基础类和接口
java.util: 包含了系统辅助类,特别是Collection、List和Map等集合类
java.io: 包含了与输入\输出有关的类
java.sql: 包含了与数据库相关的类
枚举
枚举是指有一组固定的常量组成的类型,使用关键字enum定义
[Modifier] enum enumName {
	enumContantName1, enumConstantName2... // 表示枚举常量列表,枚举常量之间以逗号隔开
	[field, method] //表示其他的成员,包括构造方法,置于枚举常量的后面
}
//在枚举中,如果除了定义枚举常量,还定义了其他成员,则枚举常量列表必须以分号(;)结尾
实例:
public enum Week{
	MON, TUE, WED, THU, FRI, SAT, SUN
}
public void doWhat(Week day){
	switch(day){
		case MON:
		case TUE:
		case WED:
		case THU:
		case FRI:
			System.out.println("工作日");
			break;
		case SAT:
		case SUN:
			System.out.println("周末");
			break;
	}
}
包装类
Java语言是面向对象的,但是基本数据类型不是面向对象的。包装类的用途主要有两个:
- 包装类作为和基本数据类型对应的类存在,方便对象操作
- 包装类包含每种基本数据类型的相关属性,如最大最小值,以及祥光的操作方法
| 基本数据类型 | 包装类 |
|---|---|
| byte | Byte |
| boolean | Boolean |
| short | Short |
| cahr | Character |
| int | Integer |
| long | Long |
| float | Float |
| double | Double |
拆箱和装箱
装箱:把基本数据类型变为包装类型
拆箱:把包装类型转为基本数据类型
赋值方式
以Integer为例:几种赋值方法
- new Integer(整形)
- new Integer(字符串)
- Interger.valueOf(字符串/整形)
- Integer.paraseInt(字符串)
注意:Character类的valueOf()方法只有一个版本的定义,即valueOf(char c),它返回一个表示指定char值的Character对象
Math类
java.lang.Math类提供了常用的数学运算方法和两个静态常量E(自然对数的底数) 和PI(圆周率)
这个类是final类,因此没有子类,Math类常见方法:
- static double abs(double a) 返回一个绝对值
- static double max(double a, double b) 返回其中一个较大的值
- static double random() 返回一个随机值
Random类
Random类用于生成随机数
| 构造方法 | 说明 |
|---|---|
| Random() | 创建一个新的随机数生成器 |
| Random(long seed) | 使用单个long种子创建一个新的随机数生成器 |
用同一个种子值来初始化两个Random 对象,然后用每个对象调用相同的方法,得到的随机数也是相同的
比较常用的是nextInt()方法,它返回下一个伪随机整型数
int nextInt();
int nextInt(int n); //从0到n之间(不包括n)
日期操作类
Date类 对象用来表示日期和时间,该类提供了一系列操作日期和时间各组成部分的方法
Calendar类 也是用来操作日期和时间的类,它是抽象类,可以通过静态方法getInstance()获得Calender类的对象。它的方法如下:
| 方法 | 说明 |
|---|---|
| int get(int field) | 返回给定日历字段的值 |
| YEAR | 指示年 |
| MONTH | 指示月 |
| DAY_OF_MONTH | 指示一个月中的某天 |
| DAY_OF_WEEK | 指示一个星期中的某天 |
DateFormat类 是一个抽象类,提供了多种格式化和解析时间的方法。使用比较多的是它的子类SimpleDateFormat
Date date = new Date();
SimpleDateFormat formater = new SimpleDateFormat("yyyy-MM-dd HH:mm:ss");
System.out.println("当前时间为"+formater.format(date));
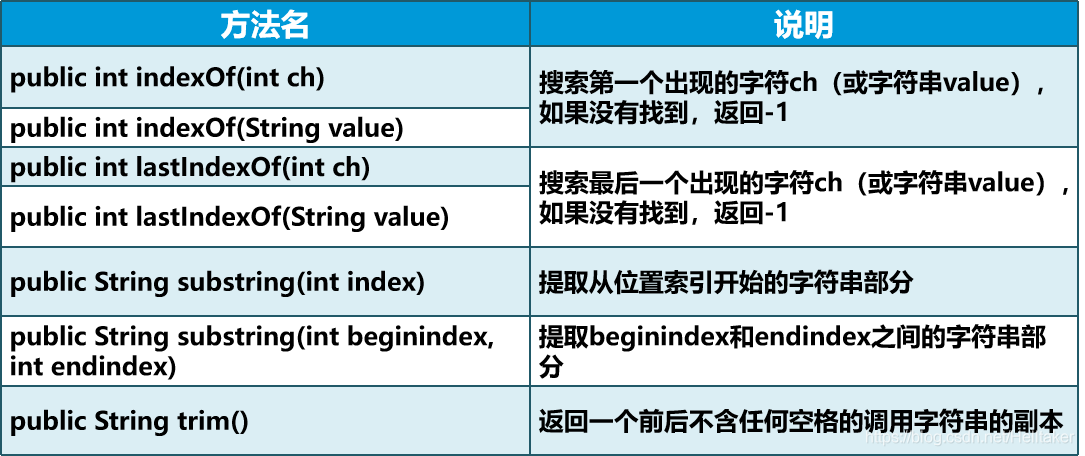
String类
String类的常用方法
1.求字符串长度 str.length()
2.字符串比较 字符串1.equals(字符串2)
需要注意的是:“==”比较的是两个字符串对象在内存中的地址,而equals()比较的是两个字符串对象的值
忽略大小的字符串比较字符串1.equalsIgnoreCase(字符串2)
转大小写 toLowerCase() / toUpperCase()
3.字符串拼接 字符串1.concat(字符串2)
4.字符串提取和查询
5.字符串拆分 字符串名.split(separator, limit);
separator和limit均为可选项
StringBuffer和StringBuilder类
1.toString()方法
2.append()方法
3.inset()方法 字符串.insert(位置,参数)
4.replace()方法字符串名.replace(int start,int end,String str)
三者比较
- String:不可被改变,真正意义上的安全,在频繁字符串拼接的情况下,速度非常慢
- StringBuffer:线程安全,速度慢
- StringBuilder:线程不安全,速度快
I/O
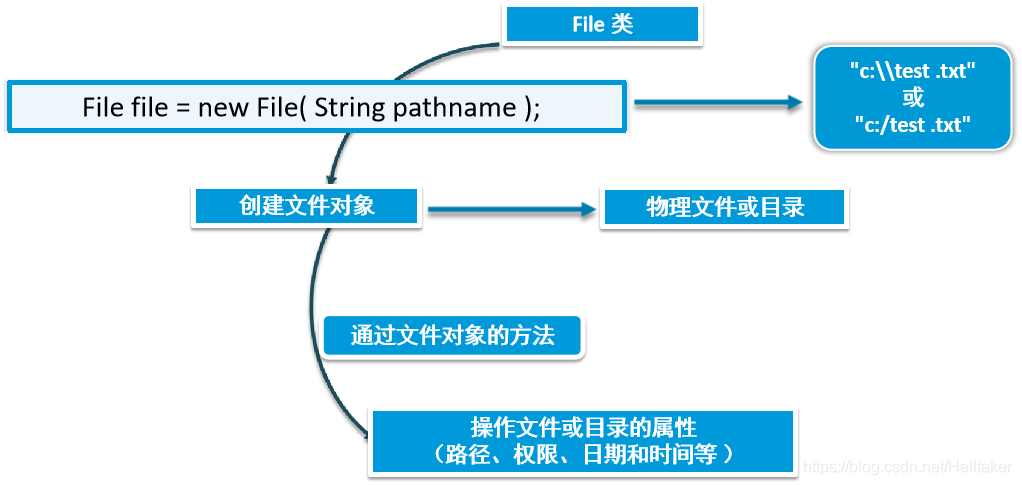
java.io包提供了一些接口和类,对文件进行基本的操作,包括对文件和目录属性的操作、对文件读写的操作等
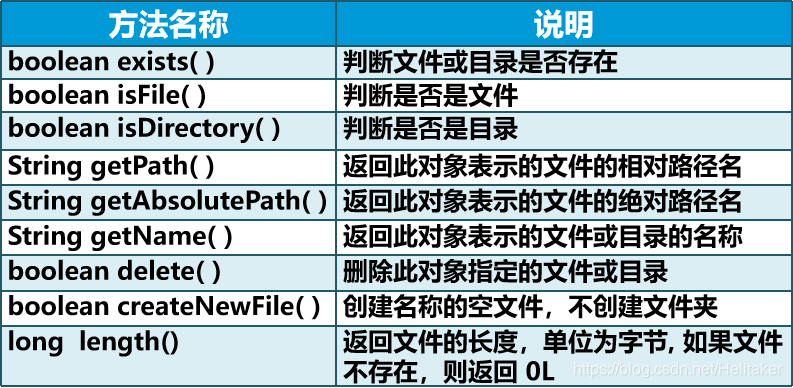
File类访问文件属性
File类的常用方法
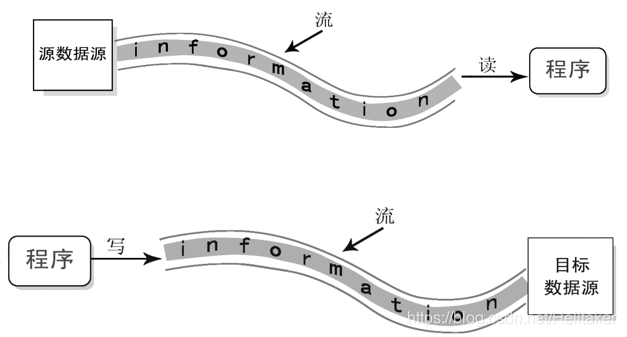
流
流是指一连串流动的字符,是以先进先出的方式发送和接受数据的通道
流的分类
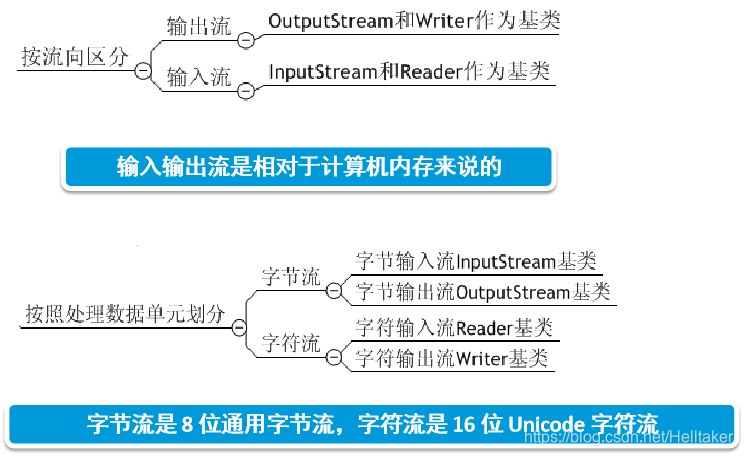
InputStream
| 方法 | 说明 |
|---|---|
| int read() | 从输入流中读取下一个字节数据 |
| int read(byte[] b) | 从输入流中读取数据,并将数据存储在缓冲区数组b中,返回实际读取的字节数 |
| int read(byte[] b, int off, int len) | 从输入流中读取最多len长度的字节,保存到字节数组b中,保存的位置从off开始 |
| void close() | 关闭输入流 |
InputStream类的常用子类有FileInputStream,用于从文件中读取数据
FileInputStream读文件的流程:
1、FileInputStream对象和String对象声明
2、创建FileInputStream对象(文件路径或File对象)
3、读单字节或整个读到byte数组中
4、转成字符串
5、关闭FileInputStream流
6、返回结果字符串
public static String readFile(String path){
	FileInputStream fis = null;
    String str = null;
    try {
        fis = new FileInputStream(path);
        byte[] b = new byte[fis.available()];
        fis.read(b);
        str = new String(b);
    } catch (FileNotFoundException e) {
        e.printStackTrace();
    } catch (IOException e) {
        e.printStackTrace();
    } finally {
        try {
            fis.close();
        } catch (IOException e) {
            e.printStackTrace();
        }
    }
    return str;
}
OutputStream
| 方法 | 说明 |
|---|---|
| void write(int c) | 将制定的字节数据写入此输出流中 |
| void write(byte[] buf) | 将数组buf中的所有字节写入此输出流中 |
| void write(byte[] b, int off, int len) | 将字节数组中从偏移量off开始的长度为len的字节数据输出到输出流中 |
| void close() | 关闭输出流 |
OutputStream类的常用子类为FileOutputStream,用于向文件写数据
FileOutputStream写文件的流程:
1、File对象装载文件路径
2、判断文件父级目录是否存在,不存在则创建
3、声明FileOutputStream对象
4、创建FileOutputStream对象(file对象,是否追加)
5、把要写的字符串转成byte数组,并写入输出流
6、关闭FileOutputStream流
public static void writeFile(String str, String path, boolean isAppend){
	File f =new File(path);
    if (!f.getParentFile().exists()){
        f.getParentFile().mkdirs();
    }
    FileOutputStream fos = null;
    try {
        fos = new FileOutputStream(f, isAppend);
        byte[] b = str.getBytes();
        fos.write(b);
    } catch (FileNotFoundException e) {
        e.printStackTrace();
    } catch (IOException e) {
        e.printStackTrace();
    } finally {
        try {
            fos.close();
        } catch (IOException e) {
            e.printStackTrace();
        }
    }
}
Reader
| 方法 | 说明 |
|---|---|
| int read() | 从输入流中读取单个字符,返回所读取的字符数据 |
| int read(byte[] c) | 从输入流中最多读取c.length个字符 |
| int read(char[] c, int off, int len) | 从输入流中读取最多len个字符 |
| void close() | 关闭流 |
Reader类的常用子类为BufferedReader,接受Reader对象作为参数,并对其添加字符缓冲器
使用BufferedReader类和FileReader类读取文本文件数据:
public static String readBuffer(String path){
    File f = new File(path);
    FileReader fr = null;
    BufferedReader br = null;
    String str = null;
    try {
        fr = new FileReader(f);
        br = new BufferedReader(fr);
        String s;
        StringBuffer sb = new StringBuffer();
        while ((s=br.readLine())!=null){
            sb.append(s);
        }
        str = sb.toString();
    } catch (FileNotFoundException e) {
        e.printStackTrace();
    } catch (IOException e) {
        e.printStackTrace();
    } finally {
        try {
            br.close();
        } catch (IOException e) {
            e.printStackTrace();
        }
        try {
            fr.close();
        } catch (IOException e) {
            e.printStackTrace();
        }
    }
    return str;
}
Writer
| 方法 | 说明 |
|---|---|
| void write(String str) | 将str字符串里包含的字符输出到指定的输出流中 |
| void write(String str, int off, int len) | 将str字符串里从off位置开始,长度为len的多个字符输出到输出流中 |
| void close() | 关闭输出流 |
| void flush() | 刷新输出流 |
Writer类的常用子类为BufferedWriter,用于将数据缓冲到字符输出流
使用BufferedWriter以及FileWirter对象向文本文件中写数据
public static void writeBuffer(String str, String path, boolean isAppend){
	FileWriter fw = null;
	BufferedWriter bw = null;
	try {
		fw = new FileWriter(path, isAppend);
		bw = new BufferedWriter(fw);
		bw.write(str);
	} catch (FileNotFoundException e) {
		e.printStackTrace();
	} catch (IOException e) {
		e.printStackTrace();
	} finally {
		try {
			bw.close();
		} catch (IOException e) {
			e.printStackTrace();
		}
		try {
			fw.close();
		} catch (IOException e) {
			e.printStackTrace();
		}
	}
}
注意! 在操作上字节流与字符流有一个区别,字符流在操作时使用了缓冲区(内部存储器),而字节流在操作时直接操作文件,不会使用缓冲区;所有的这些方法在出现错误时都会抛出IOException异常。
读写二进制文件
读写二进制文件(例如图片)文件常用的类有DataInputStream和DataOutputStream
实例:
public static void copyData(String fromPath, String targetPath){
    FileInputStream fis = null;
    DataInputStream dis = null;
    FileOutputStream fos = null;
    DataOutputStream dos = null;
    try {
        fis = new FileInputStream(fromPath);
        dis = new DataInputStream(fis);
        fos = new FileOutputStream(targetPath);
        dos = new DataOutputStream(fos);
        int tmp;
        while ((tmp=dis.read())!=-1){
            dos.write(tmp);
        }
    } catch (FileNotFoundException e) {
        e.printStackTrace();
    } catch (IOException e) {
        e.printStackTrace();
    } finally {
        try {
            dos.close();
            fos.close();
            dis.close();
            fis.close();
        } catch (IOException e) {
            e.printStackTrace();
        }
    }
}
对象流
序列化和反序列化:
- 场景一:内存对象需要在其它环境下使用
两个进程间进行网络通信时,无论是发送何种类型的数据,均需以二进制序列形式进行传送
发送方必须将数据对象(比如Java对象)转化为字节序列
接收方则需要将接收到的字节序列再还原成Java对象 - 场景二:内存对象需要在将来某个时间使用
将内存中的数据对象永久存储在磁盘中(持久化)
常用序列化方案:

序列化保存对象信息
步骤可以概括成如下两大步:
1.创建一个对象输出流(ObjectOutputStream),它可以包装一个其他类型的输出流,如文件输出流FileOutputStream
2.通过对象输出流的writeObject()方法写对象,也就是输出可序列化对象
实例:使用序列化将学生对象保存到文件中
1.引入相关类
2.创建学生类,实现Serializable接口
3.创建对象输出流
4.调用writeObject()方法将对象写入文件
5.关闭对象输出流
public class Student implements Serializable{
	//Student属性和方法
}

public class TestStudent{
	public static void main(String[] args){
		ObjectOutputStream oos = null;
		try{
			//创建ObjectOutputStream输出流
			oos=new ObjectOutputStream(new FileOutputStream("目标文件路径"));
			Student stu = new Student("李梅", 22, "女");
			//对象序列化,写入输出流
			oos.writeObject(stu);
		} catch(IOException e) {
			e.printStackTrace();
		} finally {
			if (oos!=null) {
				try {
					oos.close();
				} catch (IOException e) {
					e.printStackTrace();
				}
			}
		}
	}
}

//oos还可以写入集合中的对象
ArrayList<Student> list = new ArrayList<Student>();
list.add(stu);
list.add(stu1);
oos.writeObject(list);
反序列化获取对象信息
反序列化的步骤大致概括为以下两步:
1.创建一个对象输入流(ObjectInputStream),它可以包装一个其他类型的输入流,如文件输入流FileInputStream
2.通过对象输入流的readObject()方法读取对象,该方法返回一个Object类型的对象,如果程序知道该Java对象的类型,则可以将该对象强制转换成其真实的类型。
实例:使用反序列化读取文件中的学生对象
1.引入相关类
2.创建对象输入流
3.调用readObject()方法读取对象
4.关闭对象输入流
ObjectInputStream ois - null;
trry {
	ois = new ObjectInputStream(new FileInputStream("读取文件路径"));
	Student stu = (Student) ois.readObject();
	//输出生成后的对象信息
	System.out.println("姓名为"+stu.getName());
	...
} catach (IOException e) {
	e.printStackTrace();
} finally {
	if (ois!=null) {
		try {
			ois.close();
		} catch (IOException e) {
			e.printStackTrace();
		}
	}
}

//集合的反序列化
ArrayList<Student> List = (ArrayList<Student>) ois.readObject();
Student stu = (Student) ois.readObject();
for (Student stu:list) {
	System.out.println("姓名为"+stu.getName());
}
反射
Java的反射机制是Java特性之一;Java反射机制是指在运行状态中,动态获取信息以及动态调用对象方法的功能
反射的作用:
- 在运行时获取类的修饰符,包名,类名,实现的接口,继承的父类
- 在运行时获取类的所有属性名,修饰符,属性类型
- 在运行时获取所有方法,方法的返回值类型,方法名,方法参数数量,方法参数类型
- 在运行时调用加载类的方法
访问类包含的构造
public class TestConstructor {
    public static void main(String[] args) throws Exception{
        Class<Student> c = Student.class;
        Constructor<Student> sClass = c.getDeclaredConstructor(int.class, String.class, String.class);
        sClass.setAccessible(true);
        Student s = sClass.newInstance(2, "baba", "male");
        System.out.println(s);
    }
}
访问类包含的方法
public class TestMethod {
    public static void main(String[] args) throws Exception {
        Student s = TestStudent123.getStudent();
        Class<Student> c = Student.class;
        Method setStuId = c.getDeclaredMethod("setStuId", int.class);
        setStuId.setAccessible(true);

        setStuId.invoke(s, 3);
        Method getStuId = c.getDeclaredMethod("getStuId");
        getStuId.setAccessible(true);
        Object stuId = getStuId.invoke(s);

        System.out.println(s);
        System.out.println(stuId);
    }
}
访问类包含的属性
public class TestField {
    public static void main(String[] args) throws Exception{
        Student student = TestStudent123.getStudent();
        Class<Student> c = Student.class;
        Field stuId = c.getField("stuId");
        stuId.set(student, 11);
        Field stuName = c.getDeclaredField("stuName");
        stuName.setAccessible(true);
        stuName.set(student, "张三");

        Field[] fields = c.getDeclaredFields();
        for (Field field : fields) {
            field.setAccessible(true);
            System.out.println(field.get(student));
        }
        System.out.println(student);
    }
}
多线程
进程
进程是程序的一次动态执行过程,它有如下特点:
- 进程是系统运行程序的基本单位
- 每一个进程都有自己独立的一块内存空间、一组系统资源
- 每一个进程的内部数据和状态都是完全独立的
线程
线程是进程中执行运算的最小单位,一个进程在其执行过程中可以产生多个线程,而线程必须在某个进程内执行
线程和进程既有联系又有区别:
- 一个进程中至少要有一个线程
- 资源分配给进程,同一进程的所有线程共享该进程的所有资源
- 处理机分配给线程,即真正在处理机上运行的是线程
多线程的优势
多线程程序可以带来更好的用户体验,避免因程序执行过慢而导致出现计算机死机或者白屏的情况
多线程程序可以最大限度地提高计算机系统的利用效率
编写线程类
使用一个线程的过程可以分为如下4个步骤:

使用Thread类
定义MyThread类继承Thread类
重写run()方法,编写线程执行体
创建线程对象,调用start()方法启动线程
public class MyThread extends Thread{
	private int count=0;
	//重写run方法
	public void run(){
		while(count<100){
			count++;
			System.out.println(count)
		}
	}
}
publict class Test{
	public static void main(String[] args){
		MyThread mt = new MyThread();
		mt.start();
	}
}
使用Runnable接口
定义MyRunnable类实现Runnable接口
实现run()方法,编写线程执行体
创建线程对象,调用start()方法启动线程
public class MyThread implements Runnable{
	private int count = 0;
	public void run(){
		while(count<100){
			count++;
		}
	}
}
public class Test{
	public static void main(Stirng[] args){
		Thread thread = new Thread(new MyThread());
		thread.start();
	}
}
比较两种创建线程的方式
- 继承Thread类:
编写简单,可直接操作线程
适用于单继承 - 实现Runnable接口:
避免单继承局限性
便于共享资源
线程的状态

线程调度

实现线程调度的方法:
- join()方法
for(int i=0;i<10;i++){
	if(i==5){
		MyThread mt = new MyThread('MyThread');
		try{
			mt.start();
			mt.join();
		} catch...
	}
}
- sleep方法
try{
	Thread.sleep(100) //睡眠100毫秒
} catch...
- yield方法
for(int i=0;i<5;i++){
	System.out.println(Thread.currentThread().getName()+"正在运行:"+i);
	if(i==3){
		System.out.print("线程礼让:");
		Thread.yield();
	}
}
线程同步
多个线程操作同一共享资源时,将引发数据不安全问题
实现线程同步
1.同步方法
通过在方法声明中加入synchronized关键字来声明同步方法
访问修饰符 synchronized 返回类型 方法名{}
//或者
synchronized 访问修饰符 返回类型 方法名{}
2.同步代码块
同步代码块的语法格式如下:
synchronized(synObjcet){ //通常填写this
	//需要同步访问控制的代码
}
线程通信
Java提供了如下三个方法实现线程之间的通信:
- wait():调用wait()方法会挂起当前线程,并释放共享资源的锁
- notify():调用任意对象的notify()方法会在因调用该对象的wait()方法而阻塞的线程中随机选择一个线程解除阻塞,但要等到获得锁之后才可以真正执行
- notifyall():调用了notifyall()方法会将因调用该对象的wait()方法而阻塞的所有线程一次性全部解除阻塞
注意: 这三个方法被所有的类继承并且不允许重写,只能在同步方法或同步代码块中使用。
XML
XML简介
- XML(EXtensible Markup Language),可扩展标记语言
- 特点:
XML与操作系统、编程语言的开发平台无关
实现不同系统之间的数据交换 - 作用:
数据交互
配置应用程序和网站
Ajax基石
XML文本结构
<?xml version="1.0" encoding="UTF-8"?>
<books>
    <!--图书信息 -->
    <book id="bk101">
        <author>王珊</author>
        <title>.NET高级编程</title>
        <description>包含C#框架和网络编程等</description>
    </book>
    <book id="bk102">
        <author>李明明</author>
        <title>XML基础编程</title>
        <description>包含XML基础概念和基本作用</description>
    </book>
</books>
XML声明
<?xml version="1.0" encoding="UTF-8"?>
XML声明由以下几个部分组成:
version:文档符合XML1.0规范
encoding:文档字符编码,默认为“UTF-8”
XML标签
在XML中用<>括起来的各种标签来标记数据,如<author></author>
根元素
每个XML文档必须有且仅有一个根元素,如<book></book>
根元素的特点如下:
根元素是一个完全包括文档中其他所有元素的元素
根元素的起始标签要放在所有其他元素的起始标签之前
根元素的结束标签要放在所有其他元素的结束标签之后
元素与属性
XML文档内容由一系列标签元素组成
<元素名 属性名=“属性值”>元素内容</元素名>
编写注意事项
- 所有XML元素都必须有结束标签
- XML标签对大小写敏感
- XML必须正确的嵌套
- 同级标签以缩进对齐
- 元素名称可以包含字母、数字或其他的字符
- 元素名称不能以数字或者标点符号开始
- 元素名称中不能含空格
注意!!
属性值用双引号包裹
一个元素可以有多个属性
属性值中不能直接包含<、“、&
不建议使用的字符:‘、>
命名空间
命名空间的必要性: XML解析器在解析XML文档时,对于重名元素,可能会出现解析冲突。命名空间有助于标准化元素和属性,并为它们加上唯一的标识
声明命名空间:
xmlns:[prefix]="[命名空间的URL]"
属性和命名空间: 除非带有前缀,否则属性属于它们的元素所在的命名空间
实例应用
<?xml version="1.0" encoding="UTF-8"?>
<cameras xmlns:canon="http://www.canon"
    xmlns:nikon="http://www.nikon.com">
    <canon:camera prodID="P663" name="Camera傻瓜相机"/>
    <nikon:camera prodID=“K29B3” name=“Camera超级35毫米相机"/>
</cameras>
解析XML技术
- DOM
基于XML文档树结构的解析
适用于多次访问的XML文档
特点:比较消耗资源 - SAX
基于事件的解析
适用于大数据量的XML文档
特点:占用资源少,内存消耗小 - DOM4J
非常优秀的Java XML API
性能优异、功能强大
开放源代码
这里着重讲述使用DOM读取XML数据
DOM
DOM介绍:文档对象模型(Document Object Model)
DOM把XML文档映射成一个倒挂的树

访问DOM树节点

public class TestXML {
    Document document;
    public void setDocument(String xmlPath){
        DocumentBuilderFactory factory=DocumentBuilderFactory.newInstance();
        try {
            DocumentBuilder builder=factory.newDocumentBuilder();
            document=builder.parse(xmlPath);
        } catch (ParserConfigurationException e) {
            e.printStackTrace();
        } catch (SAXException e) {
            e.printStackTrace();
        } catch (IOException e) {
            e.printStackTrace();
        }
    }

    public static void main(String[] args) throws Exception{
        TestXML xml = new TestXML();
        xml.setDocument("D:\\KB09\\JAVA\\2020.8.7\\src\\Demo\\phone_info.xml");
        NodeList brands = xml.document.getElementsByTagName("brand");
        Node item = brands.item(0);

        Element e = (Element) item;
        System.out.println(e.getAttribute("name"));
//        for (int i = 0; i < brands.getLength(); i++) {
//            Node n = brands.item(i);
//            if (n instanceof Element){
//                Element e = (Element) n;
//                System.out.println(e.getAttribute("name"));
//            }
//        }
        NodeList hwTypes = e.getChildNodes();
        Node root = xml.document.getElementsByTagName("phoneInfo").item(0);
        Element sx = xml.document.createElement("brand");
        sx.setAttribute("name","三星");
        Element sxType = xml.document.createElement("type");
        sxType.setAttribute("name", "note20");
        sx.appendChild(sxType);
        root.appendChild(sx);


        //保存更改
        TransformerFactory tf = TransformerFactory.newInstance();
        tf.setAttribute("indent-number", 4);
        Transformer t = tf.newTransformer();
        t.setOutputProperty(OutputKeys.INDENT,"yes");
        t.setOutputProperty(OutputKeys.ENCODING,"UTF-8");
        DOMSource source = new DOMSource(xml.document);
        FileOutputStream fos = new FileOutputStream("D:\\KB09\\JAVA\\2020.8.7\\src\\Demo\\phone_info.xml");
        StreamResult sr = new StreamResult(new OutputStreamWriter(fos));
        t.transform(source, sr);

//        for (int i = 0; i < hwTypes.getLength(); i++) {
//            Node n = hwTypes.item(i);
//            if (n instanceof Element){
//                Element type = (Element) n;
//                Node firstChild = type.getFirstChild();
//                if (firstChild instanceof Text){
//                    Text t=(Text) firstChild;
//                    System.out.println(t.getWholeText().trim());
//                }
//            }
//        }
//
//        Node item2 =brands.item(1);
//        Element e2 = (Element) item2;
//        System.out.println(e2.getAttribute("name"));
//        NodeList appleTypes = e2.getChildNodes();
//        for (int i = 0; i < appleTypes.getLength(); i++) {
//            Node n = appleTypes.item(i);
//            if (n instanceof Element){
//                Element type = (Element) n;
//                Node firstChild = type.getFirstChild();
//                if (firstChild instanceof Text){
//                    Text t=(Text) firstChild;
//                    System.out.println(t.getWholeText().trim());
//                }
//            }
//        }


//        for (int i = 0; i < brands.getLength(); i++) {
//            Node item = brands.item(i);
//            Element e = (Element) item;
//            System.out.println(e.getAttribute("name"));
//            NodeList Types = e.getChildNodes();
//            for (int j = 0; j < Types.getLength(); j++) {
//                Node node = Types.item(j);
//                if (node instanceof Element){
//                    Element type = (Element) node;
//                    Node firstChild = type.getFirstChild();
//                    if (firstChild instanceof Text){
//                        Text t = (Text) firstChild;
//                        System.out.println(t.getWholeText().trim());
//                    }
//                }
//            }
//            System.out.println();
//        }

    }
}
JSON
JSON简介
- JSON(JavaScript Object Notation)是JavaScript中的对象表示法
- 轻量级的文本数据交换格式,独立于JavaScript语言
- 具有自我描述性
- 比XML传输速度快
JSON语法规则
- 数据由名称/值对构成
- 数据之间由逗号分隔
- 大括号内为对象
- 中括号内为数组
Java对象转为JSON字符串
使用FastJason(下载地址:FastJason)
class Student{
    private String name="";
    private int age;
    private List<String> skills;

    public Student(String name, int age, List<String> skills) {
        this.name = name;
        this.age = age;
        this.skills = skills;
    }
......//省略getter和setter
}

Student stu=new Student("Jason",20, Arrays.asList("Java", "Hadoop", "Python"));
String stuJson=com.alibaba.fastjson.JSON.toJSON(stu).toString();
System.out.println(stuJson);
JSON字符串转为Java对象
String json="{\"skills\":[\"Java\",\"Hadoop\",\"Python\"],
			\"name\":\"Jason\",
			\"age\":20
			}";
Student stuNew = com.alibaba.fastjson.JSON.parseObject(json,Student.class);
System.out.println(stuNew.getName());
正则表达式
正则表达式简介:
- 正则表达式描述了一种字符串匹配的模式,也称规则表达式
- 常用于检索、替换符合指定模式(规则)的文本
- 大多数语言都支持正则表达式
正则表达式语法
-
正则表达式是由普通字符与特殊字符组成的字符串
-
普通字符
原义字符、非打印字符 -
特殊字符
元字符:* + ? $ ^ . | \ ( ) { } [ ]

-
非打印字符

-
预定义字符

JAVA正则表达式
java.util.regex包
Pattern类:表示一个正则表达式,或者说匹配模式
Matcher类:Pattern对象matcher()方法的返回值,表示正则表达式对输入字符串的匹配结果
分组
如何获取字符串“hello”中的字符“e”?
Pattern p=Pattern.compile("h(\\w*)llo");
Matcher matcher=p.matcher("hello");
if(matcher.matches())
	System.out.println(matcher.group(1));//输出匹配结果
命名分组
如何获取字符串“hello”中的字符“e”?
Pattern p=Pattern.compile("h(?<result>\\w*)llo");
Matcher matcher=p.matcher("hello");
if(matcher.matches())
	System.out.println(matcher.group("result"));//输出匹配结果