一直用vue-cli创建项目,差点把原生引入vue的写法忘了,刚好项目有个需求就来做个小练习。
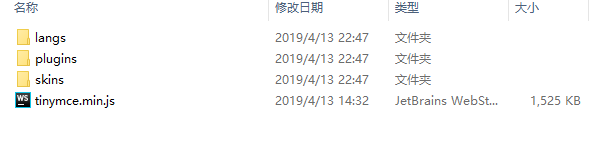
首先要先把富文本tinymce-4.7.5的js下载回来。
tinyMCE下载地址:https://www.tiny.cloud/get-tiny/self-hosted/
其中tinyMCE默认为英文,如需中文需要下载语言扩展包,下载地址:https://www.tiny.cloud/get-tiny/language-packages/ 。将zh_CN.js文件复制到langs文件夹下
![]()
tinymce-4.7.5文件里面:
然后在index.html里面引入主要的js文件,vue肯定是必须的,element-ui根据你个人情况需要,可以不引,然后是富文本的 tinymce-4.7.5的js,最后是自己写的富文本组件js。

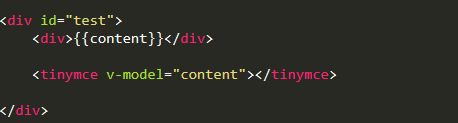
直接上代码:在html里引入这个tinymce组件就可以了
实例化一个vue对象:
new Vue({
    el:"#test",
	data(){
	    return{
	        content:"",
	         color: '#1890ff',
	         dialogVisible: true,
		    listObj: {},
		    fileList: []
	     }
	  },
	  mounted:function(){
	       //TODO
	   }
});
在tinymceTemplate.js写一个tinymce组件:
组件化tinyMCE并设置双向绑定
为了方便使用,我们使用vue component将tinyMCE组件化。同时为了满足实时监控富文本内容的需求,不能采用最后在ajax方法中手动get/set内容的策略了,需要用v-model实时双向绑定。
定义传入的字段props: ['value'],用来接收父组件的值,当编辑器检测到有变化时调用$emit(‘input’, value)将数据写出到父组件。
其中需要注意的小细节:toolbar中的|是用来分割工具栏的,|和工具栏的名称中间必须有空格,否则无法识别该按钮。<textarea>外面一定要用<div>套一层,否则无法正常显示。plugins对应toolbar的需要引入的插件,还有其他初始化的选项需要的就上官网查询。
Vue.component('tinymce', {
    props: ['value'],
    data(){
        return{
            flag:true,
            hasInit: false,
            hasChange: false,
        }
    },
    watch:{
        value(val){
            if(this.flag){
                tinyMCE.activeEditor.setContent(val);
            }
            this.flag=true;
        }
    },
    mounted: function(){
        var component = this;
        tinymce.init({
            selector: '#tinymceId',
            language: "zh_CN",
            hasChange: false,
            hasInit: false,
            menubar: false,
            body_class: 'panel-body ',
            object_resizing: false,
            end_container_on_empty_block: true,
            powerpaste_word_import: 'clean',
            code_dialog_height: 450,
            code_dialog_width: 1000,
            advlist_bullet_styles: 'square',
            advlist_number_styles: 'default',
            imagetools_cors_hosts: ['www.tinymce.com', 'codepen.io'],
            default_link_target: '_blank',
            link_title: false,
            nonbreaking_force_tab: true, // inserting nonbreaking space   need Nonbreaking Space Plugin
            plugins: ['advlist anchor autolink autosave code codesample colorpicker colorpicker contextmenu directionality emoticons fullscreen hr image imagetools insertdatetime link lists media nonbreaking noneditable pagebreak paste preview print save searchreplace spellchecker tabfocus table template textcolor textpattern visualblocks visualchars wordcount'],
            toolbar: ['searchreplace bold italic underline strikethrough alignleft aligncenter alignright outdent indent  blockquote undo redo removeformat subscript superscript code codesample', 'hr bullist numlist link image charmap preview anchor pagebreak insertdatetime media table emoticons forecolor backcolor fullscreen'],
            init_instance_callback: editor => {
              if (this.value) {
                editor.setContent(this.value)
              }
              this.hasInit = true
              editor.on('NodeChange Change KeyUp SetContent', () => {
                this.hasChange = true
                this.$emit('input', editor.getContent())
              })
            },
            setup: function(editor) {
                editor.on('input undo redo execCommand', function(e) {
                    component.flag=false;
                    component.$emit('input', editor.getContent());
                })
            }
        });
    },
    methods:{
        setContent(value) {
          window.tinymce.get(this.tinymceId).setContent(value)
        },
        getContent() {
          window.tinymce.get(this.tinymceId).getContent()
        },
        destroyTinymce() {
          const tinymce = window.tinymce.get(this.tinymceId)
          if (this.fullscreen) {
            tinymce.execCommand('mceFullScreen')
          }

          if (tinymce) {
            tinymce.destroy()
          }
        },
    },
  template: `<div><textarea id="tinymceId" style="height:300px" v-model="value"></textarea></div>`
});
效果图和预览连接:https://harrietjia.github.io/vue-tinymce-4.7.5/index.html

参考博客:https://blog.csdn.net/tonywu1992/article/details/82953577
最后附上GitHub的链接https://github.com/harrietjia/vue-tinymce-4.7.5
tinymce富文本编辑器如何增加字体大小、字体选择
tinymce编辑器:
第一步:
toolbar 增加自定义字体大小配置fontsizeselect及字体选择配置项fontselect
第二步:
tinymce.init 初始化增加配置:
2.1 字体大小选择具体项目:fontsize_formats: "8pt 10pt 12pt 14pt 18pt 24pt 36pt",
2.2 特别说明:有人会问那么 上面字体选择已经配置选项fontselect 那么这里要不要也增加字体选择,可以确定的是这里不需要增加任何配置即可生效

代码示例:
1 export default {
 2    name: 'tinymce',
 3   props: {
 4     id: {
 5       type: String
 6     },
 7     value: {
 8       type: String,
 9       default: ''
10     },
11     toolbar: {
12       type: Array,
13       required: false,
14       default() {
15         // return ['removeformat undo redo |  bullist numlist | outdent indent | forecolor | fullscreen code', 'bold italic blockquote | h2 p  media link | alignleft aligncenter alignright'] // 修改前
16         return ['removeformat undo redo |  bullist numlist | outdent indent | forecolor | fullscreen code', 'bold italic blockquote | h2 p  media link | alignleft aligncenter alignright | fontsizeselect | fontselect'] // 修改后 第一步
17       }
18     },
19   },
20   mounted() {
21     this.initTinymce()
22   },
23   methods: {
24     initTinymce() {
25     window.tinymce.init({
26       toolbar: this.toolbar,
27       menubar: this.menubar,
28       plugins: 'advlist,autolink,code,paste,textcolor,colorpicker,fullscreen,link,lists,media,wordcount,imagetools',
29       fontsize_formats: "8pt 10pt 12pt 14pt 18pt 24pt 36pt", // 第二步
30       end_container_on_empty_block: true,
31       powerpaste_word_import: 'clean',
32       code_dialog_height: 450,
33       code_dialog_width: 1000,
34       advlist_bullet_styles: 'square',
35       advlist_number_styles: 'default',
36     })
37    }
38   }
39 }
设置完成后效果: