前言:
这个Tinymce富文本编辑器是vue-element-admin内集成好的,使用过后体验非常不错,很简单易用。这里分享一下,同时又看到了网上帖子都没什么人写前后端同时展示的,很多人想知道编辑器编辑的文章格式展示在前端的。这里统一写一下前后端代码都展示,并配上注释,相信大家看起来会很清晰明了。
效果图
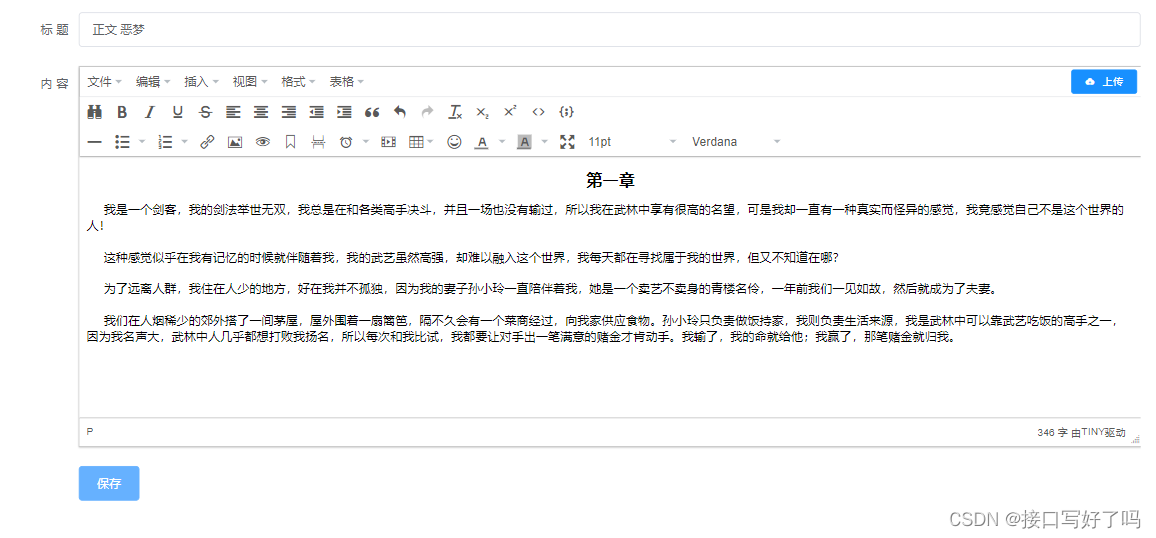
编辑文章的时候,我是直接百度搜了一个小说复制了一段直接粘贴来的,格式还可以自动保留
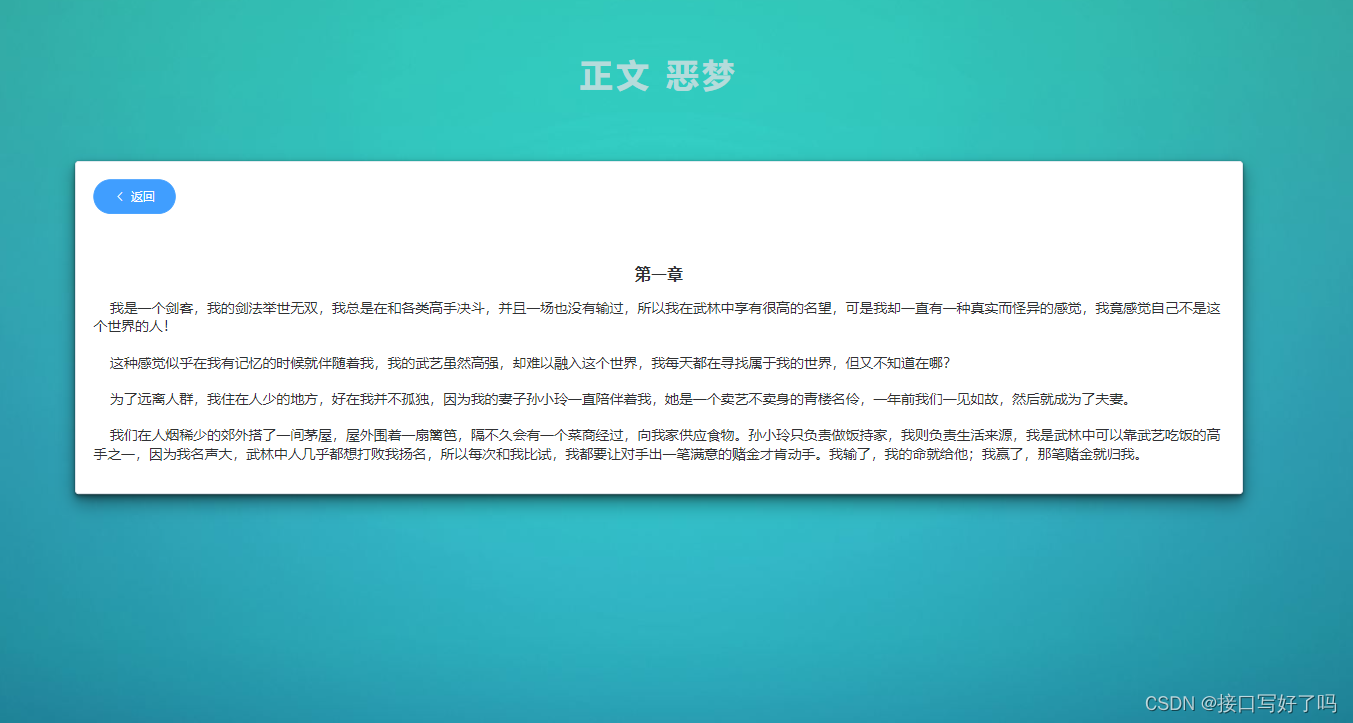
文章保存后,在页面展示格式也是存在的
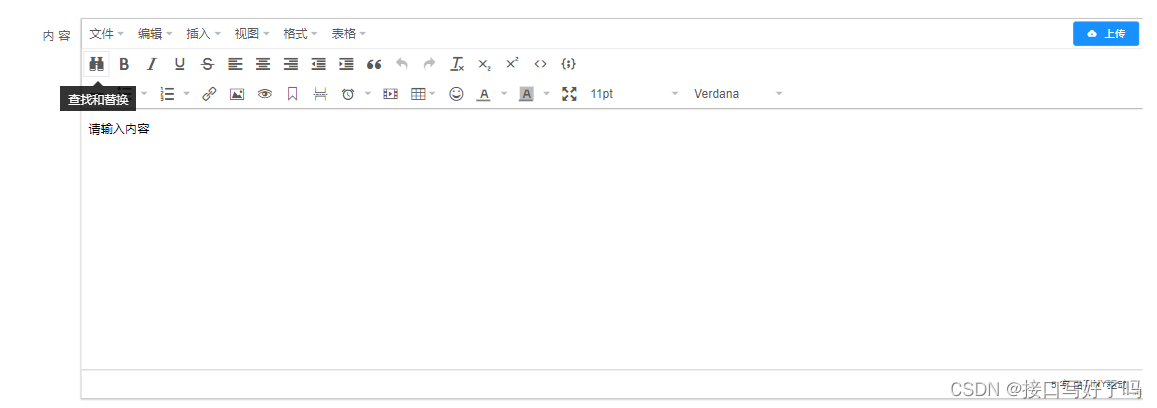
编辑器样式:鼠标移上去都会有功能介绍,功能很全
安装步骤
1,git下载vue-element-admin代码
直接新建个文件夹,用这个命令下载下来。
国内:
git clone -b i18n https://gitee.com/panjiachen/vue-element-admin.git

国外:
git clone -b i18n https://github.com/PanJiaChen/vue-element-admin.git
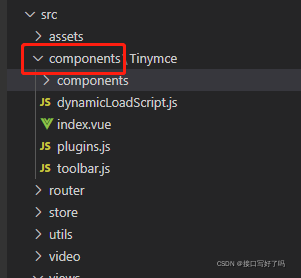
2,把这个Tinymce文件夹整个复制到你项目的components文件夹下面
这是Tinymce的路径
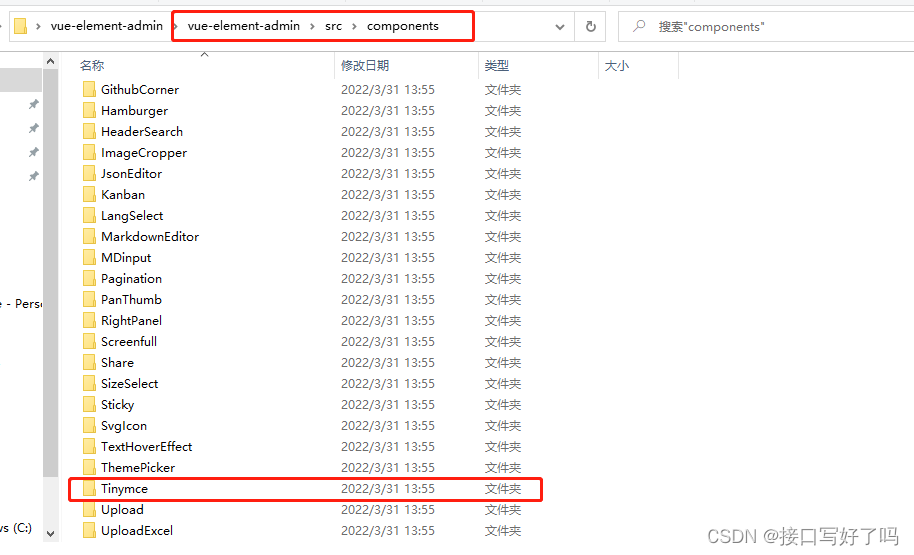
复制到components文件下
3,用npm安装一下tinymce
npm install @tinymce/tinymce-vue -S
npm install tinymce -S
用到sass没有的也安装下
cnpm install node-sass -s
4,使用方法:
直接引入组件,使用就行
设置中文
刚下载好的编辑器是英文的,所以设置一下中文
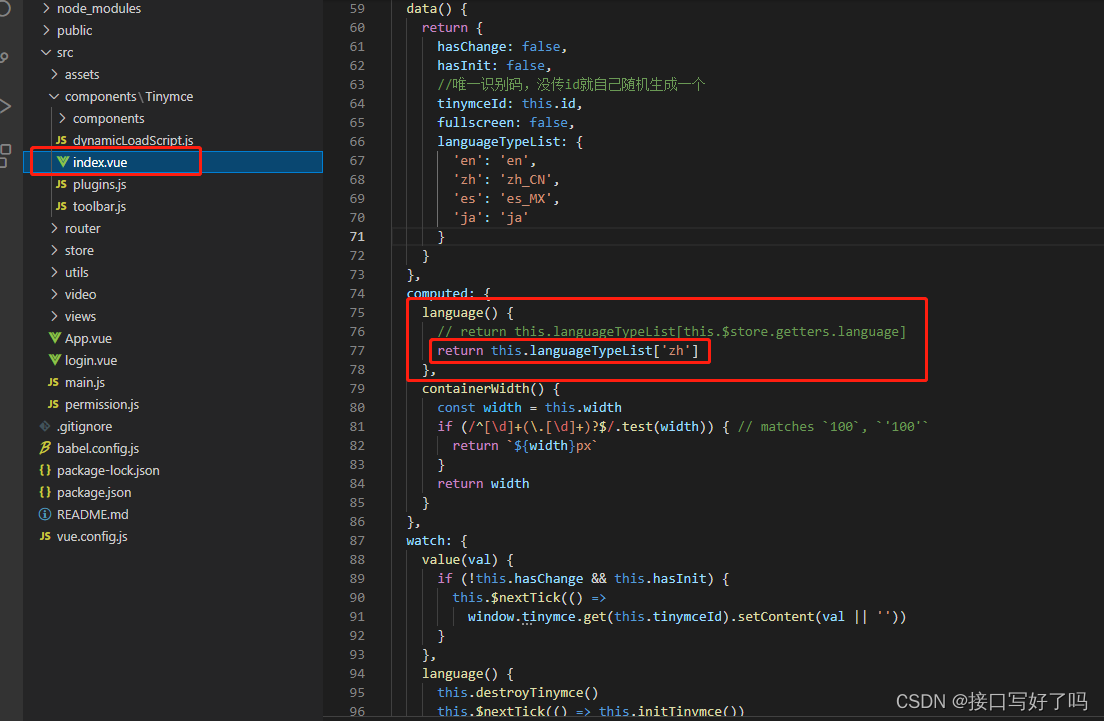
把这句话this.languageTypeList[‘zh’]替换上面注释的。
    language() {


      // return this.languageTypeList[this.$store.getters.language]
      return this.languageTypeList['zh']
    },
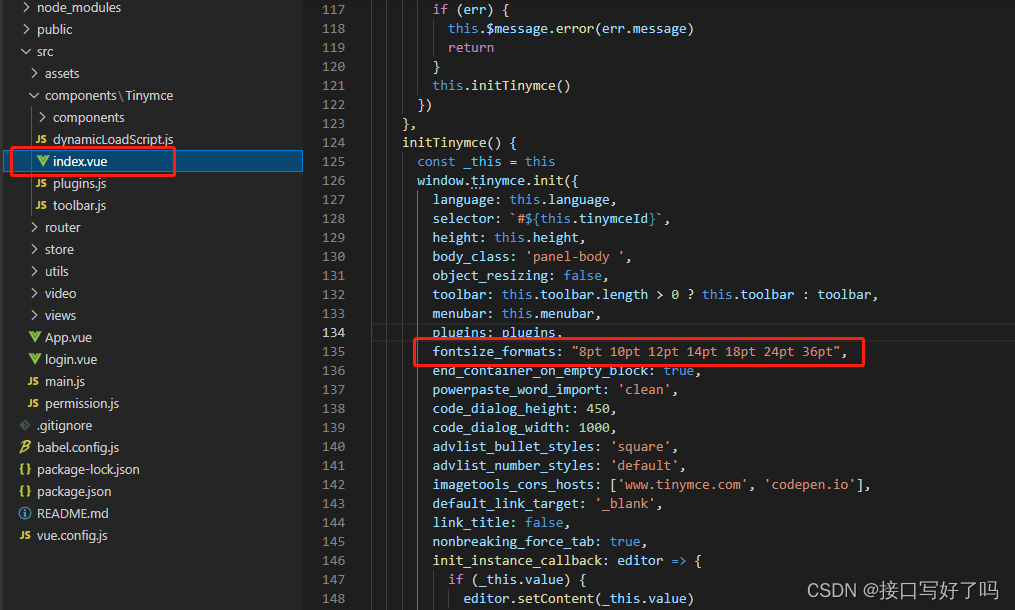
字体和字号设置添加
刚下载的编辑器也是没有带字号和字体设置的。所以可以添加一下
首先在initTinymce方法内添加这句话
fontsize_formats: "8pt 10pt 12pt 14pt 18pt 24pt 36pt",
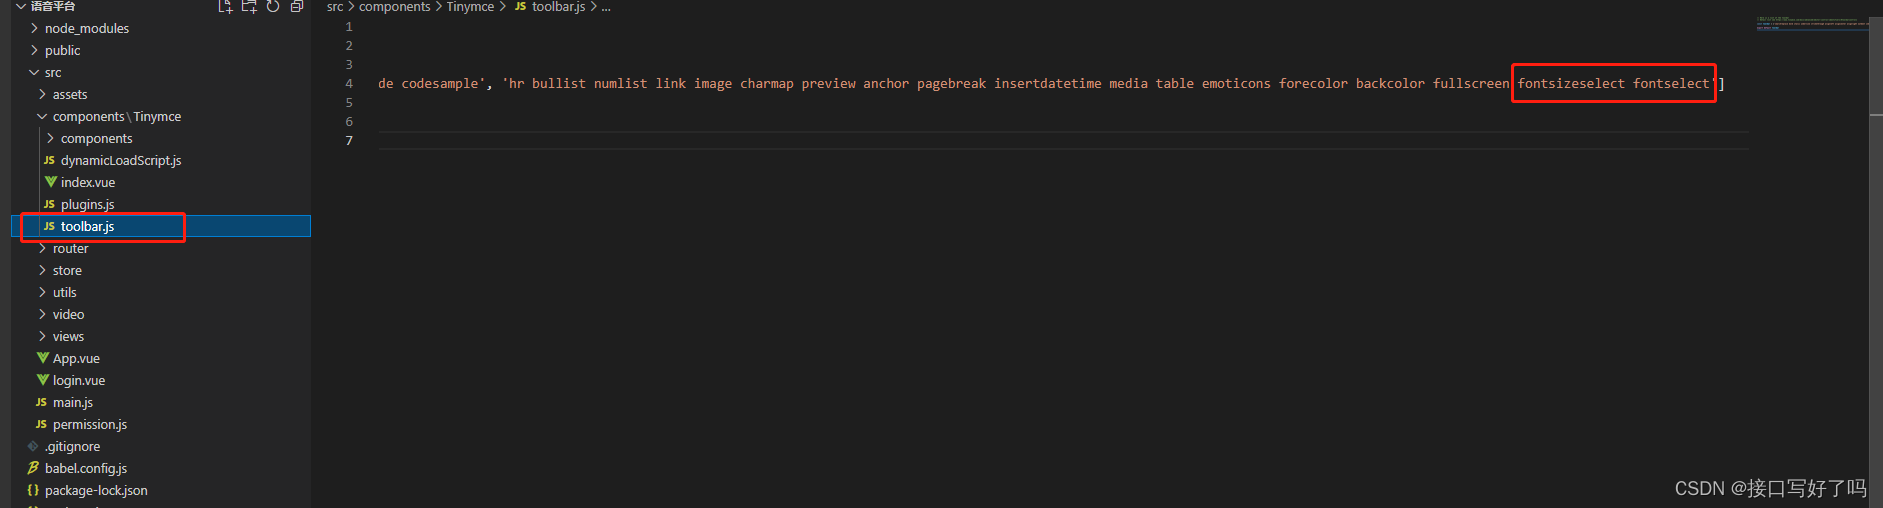
然后在toolbar内后面加入这两个词,toolbar就是配置项
前面是字号,后面是字体的意思,注意每个词中间要有空格啊
fontsizeselect fontselect
----------------------好了,到这就设置完了,可以使用用看看了--------------------------
代码(前端)
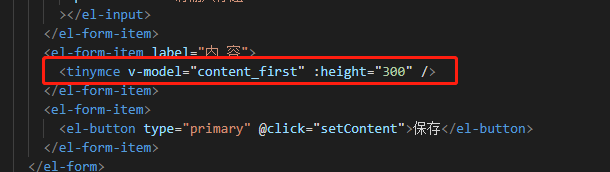
这里和上面的使用方法一样啊,就是注册个组件放你要的位置就行了。content_first就是你输入的文章内容了
<template>
<div class="release_wrap">
<el-input
v-model="title"
placeholder="请输入标题"
></el-input>
<tinymce v-model="content_first" :height="300" />
</div>
</template>
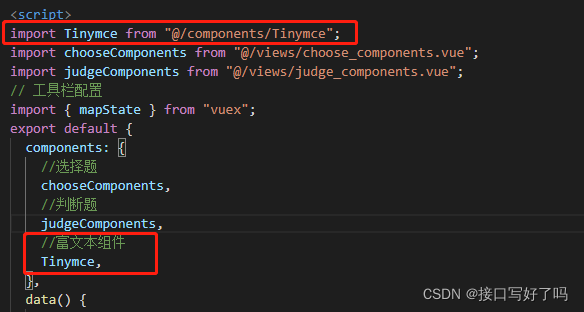
<script>
import Tinymce from "@/components/Tinymce";
export default {
components: {
//富文本组件
Tinymce,
},
data() {
return {
//富文本输入的值
//内容
content_first: "请输入内容",
//标题
title:""
};
},
};
</script>
文章按照格式显示
核心就是v-html。从后端把保存的文章拿出来,然后用v-html把文章展示出来就会有格式了,很简单
<template>
  <div class="release_wrap">
    <div class="release_title">{

    {

     title }}</div>
    <el-card class="release_card">
      <el-button
        type="primary"
        round
        icon="el-icon-arrow-left"
        style="margin-bottom: 40px"
        @click="jump_home"
        >返回</el-button
      >
      <div v-html="content"></div>
    </el-card>
  </div>
</template>

<script>

import {

     mapState } from "vuex";
export default {


  data() {


    return {


      //文章的标题
      title: "",
      //文章的内容
      content:''
    };
  },
  computed: {


    //引入vuex中state的变量,可以直接this.xxx调用到
    ...mapState(["articleIndex2"]),
  },
  created(){


    this.searchHtml()
  },
  methods: {


    jump_home() {


      this.$router.go(-1);
    },
    //请求后台,搜索信息拿到文章的数据
    searchHtml(){


      this.$axios.get("/Content/searchContentId",{


        id:this.articleIndex2
      }).then(res=>{


        this.title=res.contentTitle
        this.content=res.contentInfo
        console.log(res);
      })
    }
  },
};
</script>
代码(后端)
结构:
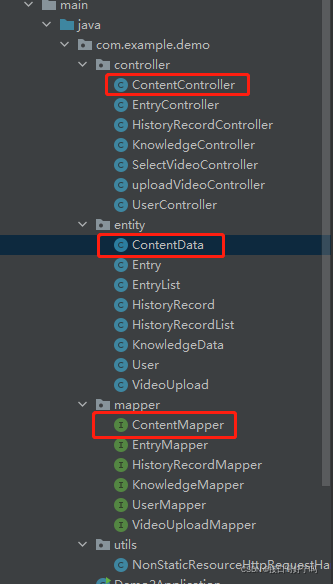
ContentData
数据库实体类,存放数据库字段映射。
package com.example.demo.entity;

import com.fasterxml.jackson.annotation.JsonFormat;

import java.sql.Timestamp;

public class ContentData {


    private int id;
    private String entryName;
    private String contentTitle;
    private String contentInfo;
    //日期时间返回的格式规定
    @JsonFormat(pattern = "yyyy-MM-dd HH:mm:ss",timezone = "GMT+8")
    private Timestamp createTime;

    public ContentData() {


    }

    public ContentData(int id, String entryName, String contentTitle, String contentInfo, Timestamp createTime) {


        this.id = id;
        this.entryName = entryName;
        this.contentTitle = contentTitle;
        this.contentInfo = contentInfo;
        this.createTime = createTime;
    }

    public int getId() {


        return id;
    }

    public void setId(int id) {


        this.id = id;
    }

    public String getEntryName() {


        return entryName;
    }

    public void setEntryName(String entryName) {


        this.entryName = entryName;
    }

    public String getContentTitle() {


        return contentTitle;
    }

    public void setContentTitle(String contentTitle) {


        this.contentTitle = contentTitle;
    }

    public String getContentInfo() {


        return contentInfo;
    }

    public void setContentInfo(String contentInfo) {


        this.contentInfo = contentInfo;
    }

    public Timestamp getCreateTime() {


        return createTime;
    }

    public void setCreateTime(Timestamp createTime) {


        this.createTime = createTime;
    }
}
ContentController
给前端的接口写在这里
package com.example.demo.controller;

import com.example.demo.entity.ContentData;
import com.example.demo.entity.EntryList;

import com.example.demo.mapper.ContentMapper;

import org.springframework.web.bind.annotation.*;

import javax.annotation.Resource;
import java.util.List;

@RestController
@RequestMapping("/Content")
public class ContentController {


    @Resource
    ContentMapper contentMapper;
    //保存词条,文章标题,文章内容
    @CrossOrigin(origins ="*",maxAge = 3600)
    @GetMapping("/setContent")
    public void findContent(@RequestParam("entryName") String entryName, @RequestParam("contentTitle") String contentTitle, @RequestParam("contentInfo") String contentInfo){


        contentMapper.save(entryName,contentTitle,contentInfo);
    }
    //搜索用于展示的表格,分页查询文章的标题等展示
    @CrossOrigin(origins = "*", maxAge = 3600)
    @GetMapping("/SelectContentList")
    public EntryList findContent(@RequestParam("currentPage") int currentPage, @RequestParam("pageSize") int pageSize, @RequestParam("searchValue") String searchValue,@RequestParam("entryName") String entryName) {


        if (searchValue == "") {


            //判断:如果searchValue内为空,代表输入框没有输入值,那就正常查询所有表格数据返回
            //当前页
            int cuIndex = (currentPage - 1) * pageSize;
            //调用数据库的方法返回的表格数据用数组保存
            List list = contentMapper.ContentAll(cuIndex, pageSize, searchValue,entryName);
            //存下当前页
            int currentPageIndex = currentPage;
            //存下每页数
            int pageSizeIndex = pageSize;
            //调用数据库表格总数方法返回的值存下来
            int totalIndex = contentMapper.ContentIndex();
            //new出要返回给前端的对象,不new出对象无法往里面赋值
            EntryList entryList = new EntryList();
            //往对象内list添加表格数据
            entryList.setList(list);
            //把当前页赋值进去
            entryList.setCurrentPage(currentPageIndex);
            //把每页数赋值进去
            entryList.setPageSize(pageSizeIndex);
            //把总数赋值进去
            entryList.setTotal(totalIndex);
            //对象的数据上面赋值都拿到了,返回整个对象给前端
            return entryList;
        } else {


            //在搜索框输入了值就走这边。

            //当前页
            int cuIndex = (currentPage - 1) * pageSize;
            //调用数据库的方法返回的表格数据用数组保存
            List list = contentMapper.ContentAll(cuIndex, pageSize, searchValue,entryName);
            //存下当前页
            int currentPageIndex = currentPage;
            //存下每页数
            int pageSizeIndex = pageSize;
            //调用数据库表格总数方法返回的值存下来,这里专门调用的查询对应条件的总数方法
            int totalIndex = contentMapper.ContentSearchIndex(searchValue);
            //new出要返回给前端的对象,不new出对象无法往里面赋值
            EntryList entryList = new EntryList();
            //往对象内list添加表格数据
            entryList.setList(list);
            //把当前页赋值进去
            entryList.setCurrentPage(currentPageIndex);
            //把每页数赋值进去
            entryList.setPageSize(pageSizeIndex);
            //把总数赋值进去
            entryList.setTotal(totalIndex);
            //对象的数据上面赋值都拿到了,返回整个对象给前端
            return entryList;
        }
    }

    @CrossOrigin(origins = "*", maxAge = 3600)
    @GetMapping("/searchContentId")
    //根据id查询对应文章
    public ContentData searchContent(@RequestParam("id") Long id){


        return contentMapper.searchById(id);
    }
}
ContentMapper
后端链接数据库操作的文件
package com.example.demo.mapper;

import com.example.demo.entity.ContentData;
import com.example.demo.entity.KnowledgeData;
import org.apache.ibatis.annotations.Param;
import org.apache.ibatis.annotations.Select;
import org.apache.ibatis.annotations.Update;

import java.util.List;

public interface ContentMapper {


    //把知识点的数据存进数据库,参数:词条名,文章标题,文章内容
    @Update("INSERT INTO `content_data`( `entryName`, `contentTitle`, `contentInfo`) VALUES (#{entryName},#{contentTitle},#{contentInfo});")
    void save(@Param("entryName") String entryName, @Param("contentTitle") String contentTitle, @Param("contentInfo") String contentInfo);

    //搜索数据库分页对应数据,搜索数据库模糊查询(这里参数要这么写:like concat('%',#{searchValue},'%'))
    @Select("select * from content_data where contentTitle like concat('%',#{searchValue},'%') and entryName=#{entryName} limit #{currentPage},#{pageSize}")
    List<ContentData> ContentAll(@Param("currentPage") int currentPage, @Param("pageSize") int pageSize, @Param("searchValue") String searchValue,@Param("entryName") String entryName);

    //搜索数据库数据总条数
    @Select("SELECT count(*) FROM content_data")
    int ContentIndex();

    //搜索数据库数据条件筛选后的总条数
    @Select("select count(*) from content_data where contentTitle like concat('%',#{searchValue},'%')")
    int ContentSearchIndex(@Param("searchValue") String searchValue);

    @Select("select * from content_data where id=#{id}")
    ContentData searchById(Long id);
}
解释一下:因为我做了分页还有保存等操作,所以有三个接口,如果不需要的,只看@GetMapping(“/searchContentId”)的接口就行了。然后改改比如不用id根据别的来查询都可以。
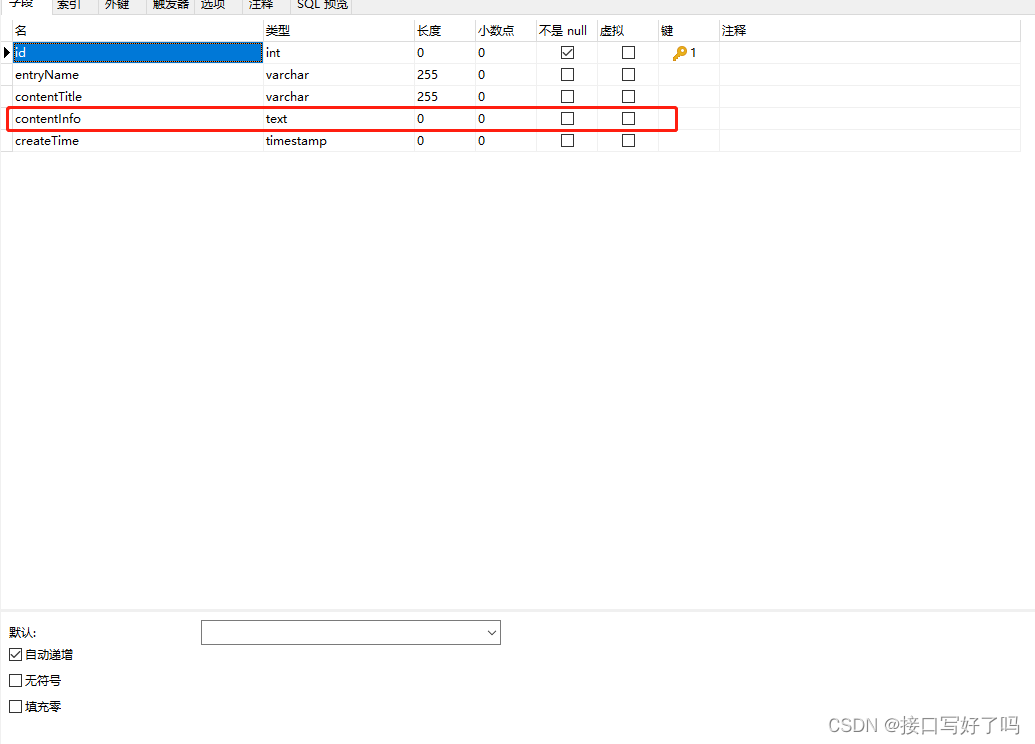
数据库接收文章,类型设置为text。varchar不够长,如果再不够就longtext最长
清空富文本编辑器内容方法
刚下载的里面不包含清空方法,所以需要手动加一个。
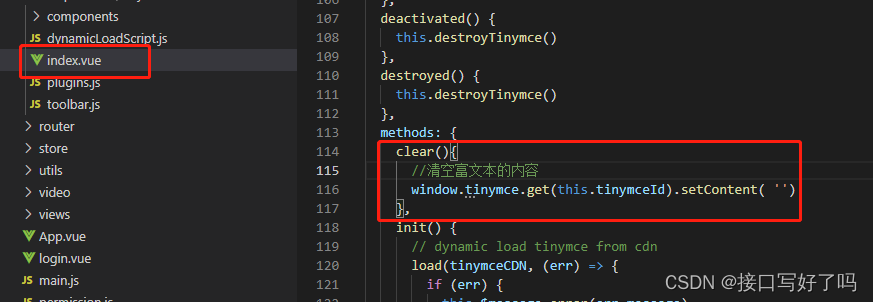
1,在编辑器文件内加一个clear方法,里面写上这句话
    clear(){


      //清空富文本的内容
      window.tinymce.get(this.tinymceId).setContent( '')
    },
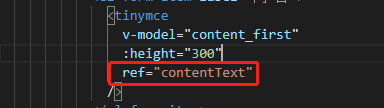
2,在你的组件上加上ref绑定dom
              <tinymce
                v-model="content_third"
                :height="300"
                ref="knowledgeText"
              />
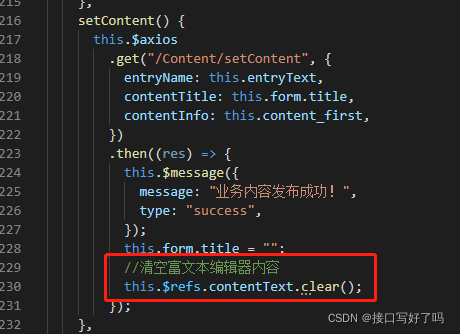
3,操作dom调用子组件里面的clear方法清空数据
    setContent() {


      this.$axios
        .get("/Content/setContent", {


          entryName: this.entryText,
          contentTitle: this.form.title,
          contentInfo: this.content_first,
        })
        .then((res) => {


          this.$message({


            message: "业务内容发布成功!",
            type: "success",
          });
          this.form.title = "";
          //清空富文本编辑器内容
          this.$refs.contentText.clear();
        });
    },
后端接收前端发来的文章提示请求头太大,Request header is too large 报错处理
问题原因:一个新增的接口,因为前端传入一段很长的JSON数组,导致了打印台报错
错误描述:java.lang.IllegalArgumentException: Request header is too large
请求头超过了tomcat的限值。本来post请求是没有参数大小限制,但是服务器有自己的默认大小
那就修改服务器的大小
普通tomcat
在server.xml中
处加上maxHttpHeaderSize =”102400”
SpringBoot
SpringBoot项目更方便了,在application.properties文件中添加
server.max-http-header-size=102400