1. 计算属性
1.1 计算属性
模板内的表达式非常便利,但是设计它们的初衷是用于简单运算的。在模板中放入太多的逻辑会让模板过重且难以维护。例如:
<div id="example">
  {{ message.split('').reverse().join('') }}
</div>
如果上面代码在后期加入越来越多逻辑就会变得非常难以阅读和维护
所以复杂逻辑,应当使用计算属性
计算属性例子如下
<div id="app-1">
			<p>{{message}}</p>
			<p>{{reverseMessage}}</p>
		</div>

		var app1=new Vue({
			el:"#app-1",
			data:{
				message:"HEllOWORLD"
			},
			computed:{
				reverseMessage:function(){
					return this.message.split("").reverse().join("")
				}
			}
		})
		<!--调用app1.message-->
		app1.message ==> 得到HELLOWORLD
		<!--调用app1.reverseMessage-->
		app1.reverseMessage ==> 得到DLROWOllEH

		<!--在浏览器控制台中输入app1.message="nihao"-->
		app1.message="nihao" ==>浏览器输入nihao
        app1.reverseMessage ==>得到oahin
- 效果图

computed和methods实现的功能一样,Vue 知道vm.reversedMessage依赖于vm.message,因此当vm.message发生改变时,所有依赖vm.reversedMessage的绑定({{reverseMessage}})也会更新。
1.2 计算属性缓存VS方法
使用方法也可以达到和计算属性一样的效果,例子如下
<div id="app-1">
			<p>{{message}}</p>
			<p>{{reverseMessage}}</p>
			<p>{{reverseMessageFun()}}</p>
		</div>

		var app1=new Vue({
			el:"#app-1",
			data:{
				message:"HEllOWORLD"
			},
			computed:{
				reverseMessage:function(){
					return this.message.split("").reverse().join("")
				}
			},
			methods:{
				reverseMessageFun:function(){
					return this.message.split("").reverse().join("")
				}
			}
		})
那为什么还需要computed呢?因为计算属性是基于它们的响应式依赖进行缓存的,也就是说只有reverseMessage依赖的message发生改变时,<reverseMessage才会重新计算。否则就一直使用之前计算的值。
- 一句话就是计算属性性能要高于方法
1.2 计算属性VS侦听属性
Vue提供了一种更通用的方式来观察和响应Vue实例上的数据变动那就是
侦听属性当你有一些数据需要随着其它数据变动而变动时,你很容易滥用 watch——特别是如果你之前使用过 AngularJS。然而,通常更好的做法是使用计算属性而不是命令式的watch回调。
通过下面的例子可以看出计算属性和watch的差别
- watch例子
<div id="app-7">
   <p>{{fullName}}</p>
</div>


var app7=new Vue({
   		el:"#app-7",
   		data:{
   			firstName:"foo",
   			lastName:"bar",
   			fullName:"foobar"
   		},
   		<!--监听-->
   		watch:{
   		    <!--如果firstName发生变化,就会触发该函数,val是改变后的值-->
   			firstName:function(val){

   				this.fullName=val+this.lastName
   			},
   			<!--如果lasttName发生变化,就会触发该函数,val是改变后的值-->
   			lastName:function(val){
   				this.fullName=this.firstName+val
   			}
   		}
   	})
- computed例子
<div id="app-8">
	<p>{{fullName}}</p>
</div>

var app8=new Vue({
			el:"#app-8",
			data:{
				firstName:"foo",
				lastName:"bar"
			},

			computed:{
				fullName:function(){
					return this.firstName+this.lastName
				}
			}
		})
显然易见计算属性要比watch简洁明了
1.3 计算属性的setter
- 如果我们没有写set函数时,我们给
fullName赋值会发生什么
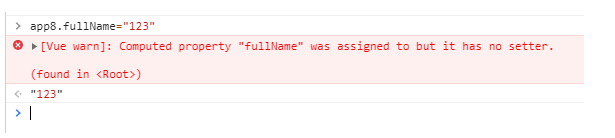
<div id="app-9">
	<p>{{fullName}}</p>
</div>

var app9=new  Vue({
			el:"#app-9",
			data:{
				firstName:"foo",
				lastName:"bar"
			},
			computed:{
				fullName:{
				    <!--getter-->
					get:function(){
						return this.firstName+' '+this.lastName
					},
					<!--setter-->
					set:function(newVal){
						var strs=newVal.split(" ")
						this.firstName=strs[0]
						this.lastName=strs[strs.length-1]

					}
				}
			}
		})
如果我们没有写setter时,计算属性会默认提供一个getter。但是如果写了setter就要手动写上getter。有点类似java的无参构造函数和有参构造函数
2.1 侦听器
计算属性虽好也有它的局限性,比如无法限制操作的频率。这时候就需要watch
- 引用一下官方的例子如下
        <!--需要用到的js-->
        <script type="text/javascript" src="../js/vue.js" ></script>
		<!-- 因为 AJAX 库和通用工具的生态已经相当丰富,Vue 核心代码没有重复 -->
		<!-- 提供这些功能以保持精简。这也可以让你自由选择自己更熟悉的工具。 -->
		<script src="https://cdn.jsdelivr.net/npm/[email protected]/dist/axios.min.js"></script>
		<script src="https://cdn.jsdelivr.net/npm/[email protected]/lodash.min.js"></script>

		<!--html代码-->
		<div id="watch-example">
            <p>
                Ask a yes/no question:
                <input v-model="question">
            </p>
            <p>{{ answer }}</p>
        </div>
<!--JS代码-->

<script>
        var watchExampleVM = new Vue({
          el: '#watch-example',
          data: {
            question: '',
            answer: 'I cannot give you an answer until you ask a question!'
          },
          watch: {
            // 如果 `question` 发生改变,这个函数就会运行
            question: function (newQuestion, oldQuestion) {
              this.answer = 'Waiting for you to stop typing...'
              this.debouncedGetAnswer()
            }
          },
          created: function () {
            // `_.debounce` 是一个通过 Lodash 限制操作频率的函数。
            // 在这个例子中,我们希望限制访问 yesno.wtf/api 的频率
            // AJAX 请求直到用户输入完毕才会发出。想要了解更多关于
            // `_.debounce` 函数 (及其近亲 `_.throttle`) 的知识,
            // 请参考:https://lodash.com/docs#debounce
            this.debouncedGetAnswer = _.debounce(this.getAnswer, 500)
          },
          methods: {
            getAnswer: function () {
              if (this.question.indexOf('?') === -1) {
                this.answer = 'Questions usually contain a question mark. ;-)'
                return
              }
              this.answer = 'Thinking...'
              var vm = this
              axios.get('https://yesno.wtf/api')
                .then(function (response) {
                  vm.answer = _.capitalize(response.data.answer)
                })
                .catch(function (error) {
                  vm.answer = 'Error! Could not reach the API. ' + error
                })
            }
          }
        })
</script>
作为菜鸟的我看见这些很懵逼,于是我按自己找的资料重新写了一个相对简单的例子,去除了大部分和演示无关的代码
- 按照我自己查找资料步骤,一段一段解释
v-model,本质上是<input :value=“question” @input=“question = $event.target.value”>:value是v-bind:的缩写,@input是v-on:input的缩写,input是文本框输入的事件$event.target.value的event是当前的事件对象,$event.target.value指向的是当前input的值。
我学习的时候通过该篇博客了解的v-model博客链接不过例子比较多,不想看直接看下面例子吧
<!--v-bind和v-on-->
<div id="app-5">
	<input v-bind:value="test" v-on:input="fun" />
	<p>{{test}}</p>
</div>
<!--v-mode-->
<div id="app-2">
	<input v-model="test" />
	<p>{{test}}</p>
</div>

        var app5=new Vue({
			el:"#app-5",
			data:{
				test:'nihao'
			},
			methods:{
				fun:function(event){
					this.test=event.target.value
				}
			}
		})

		var app2=new Vue({
			el:"#app-2",
			data:{
				test:"这是一个测试"
			}
		})
当文本框输入时P标签的文本也会跟着变。v-model和<input :value=“question” @input=“question = $event.target.value”>效果一样
-
created是钩子函数,所谓钩子函数就是系统调用,而不是用户调用。当Vue实列创建时被调用 -
this.debouncedGetAnswer表示在Vue实列上添加了一个属性 -
_.debounce(this.getAnswer, 500)是lodash的函数,叫作防抖动函数常被用来控制 前端异步请求及其它高耗任务的频率。
概念比较抽象,通过一个例子就很好理解了
<div id="app-12">
	输入信息<input v-model="str" />
</div>

var app12=new Vue({
			el:"#app-12",
			data:{
				str:""
			},
			methods:{
				send:function(){
					console.log("正在向后端发送用户输入的"+this.str+"信息")
				}
			},
			watch:{
				str:function(){
					this.send()
				}
			}

		})
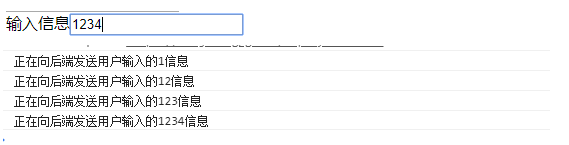
用户输4个入字符串时会向后端发送4次请求,这样是非常消耗资源的,这时候就需要使用debounce()函数,第一个参数是请求后端的函数,第二个是需要延迟的毫秒数。和JS的setTimeout很相似
使用debounce试一次效果
<div id="app-12">
	输入信息<input v-model="str" />
</div>

var app12=new Vue({
			el:"#app-12",
			data:{
				str:""
			},
			methods:{
				send:function(){
					console.log("正在向后端发送用户输入的"+this.str+"信息")
				}
			},
			watch:{
		    	<!--str发生改变时被调用-->
				str:function(){
					this.myfun()
				}
			},
			<!--Vue实列创建时调用-->
			created:function(){
				/*debounce() 返回新的 debounced(防抖动)函数。*/
				this.myfun=_.debounce(this.send,500)
			}

		})
- 再就是
axios.get()和ajax用法差不多,https://yesno.wtf/api帮你作出yes/no的网站 _.capitalize()是将字符串的一次字符变成大写
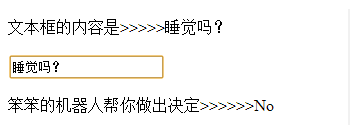
完整案列
<div id="app-10">
			<p>文本框的内容是>>>>>{{text}}</p>
			<input v-model="text"  />
			<p>{{msg}}</p>
		</div>


var app10=new Vue({
			el:"#app-10",
			data:{
				text:'',
				msg:"输入信息让我帮你做决定吧!"
			},
			methods:{
				send:function(){
					console.log("正在发送信息给后台.....")
					var vm=this
					axios.get("https://yesno.wtf/api")
						 .then(function(response){
						 	vm.msg="笨笨的机器人帮你做出决定>>>>>>"+_.capitalize(response.data.answer)
						 })
						 .catch(function(error){
						 	vm.msg="出错啦>>>>>>"+error
						 })
				}
			},

			watch:{
				text:function(val){
					this.text=val
					this.myfun()

				}
			},
			created:function(){
				this.myfun=_.debounce(this.send,500)
			}
		})