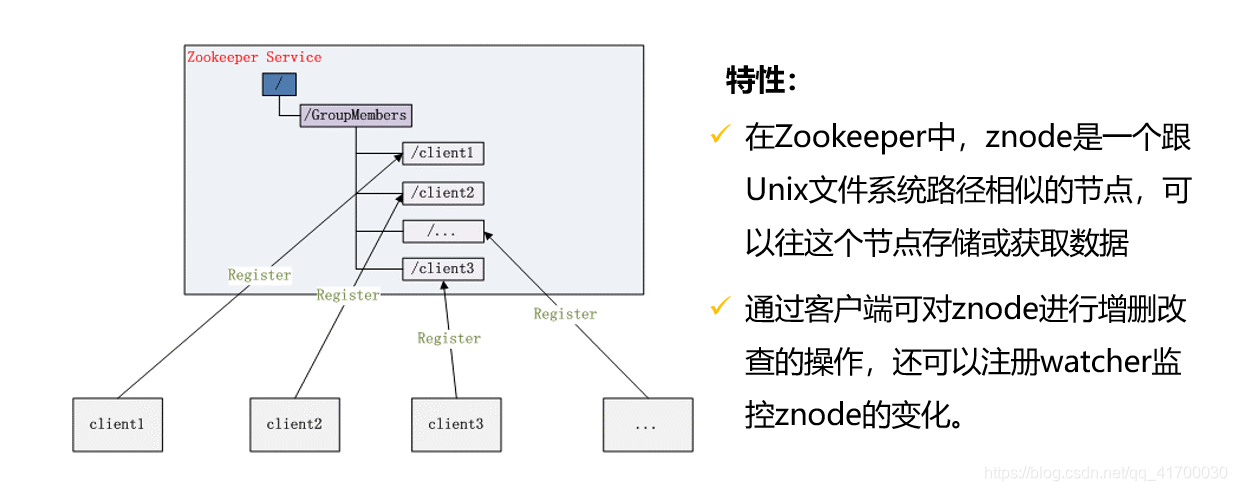
Zookeeper简介
Zookeeper是提供高性能、高可用 且具备严格的顺序访问控制能力的分布式协调服务。
设计目标
简单的数据结构:共享的树形结构,类似文件系统,存储于内存
可以构建集群:避免单点故障,3-5台机器就可以组成集群,超过半数正常工作就能对外提供服务
顺序访问:对于每个读请求,zk会分配一个全局唯一的递增编号,利用这个特性可以实现高级协调服务;
高性能:基于内存操作,服务于非事务请求,适用于读操作为主的业务场景。3台zk集群能达到13w QPS;
使用场景如下:
数据发布订阅,负载均衡,命名服务,Master选举,集群管理,配置管理,分布式队列,分布式锁
下载安装
wget  https://mirror.bit.edu.cn/apache/zookeeper/zookeeper-3.6.0/apache-zookeeper-3.6.0.tar.gz
tar -zxvf apache-zookeeper-3.6.0.tar.gz
## 进入conf文件夹下,重命名配置文件,因为zookeeper默认找zoo.cfg
cp  zoo_sample.cfg  zoo.cfg
#启动 bin目录下
./zkServer.sh start
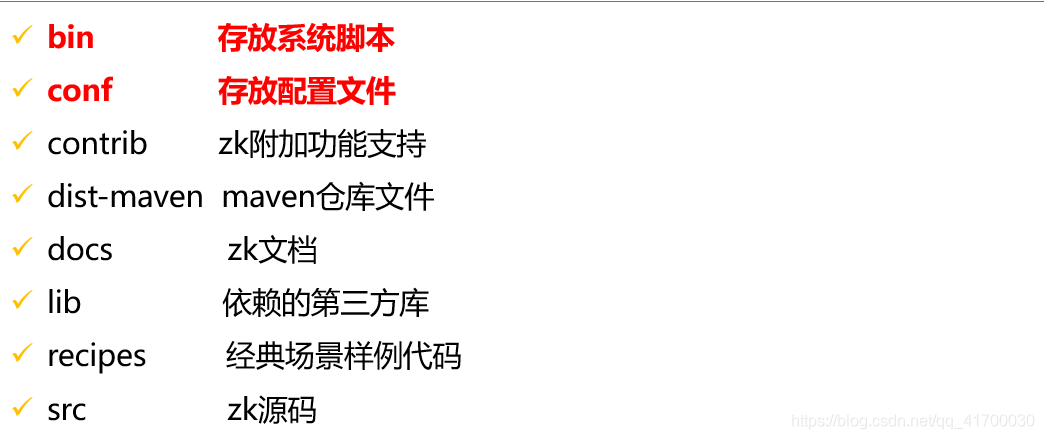
目录结构
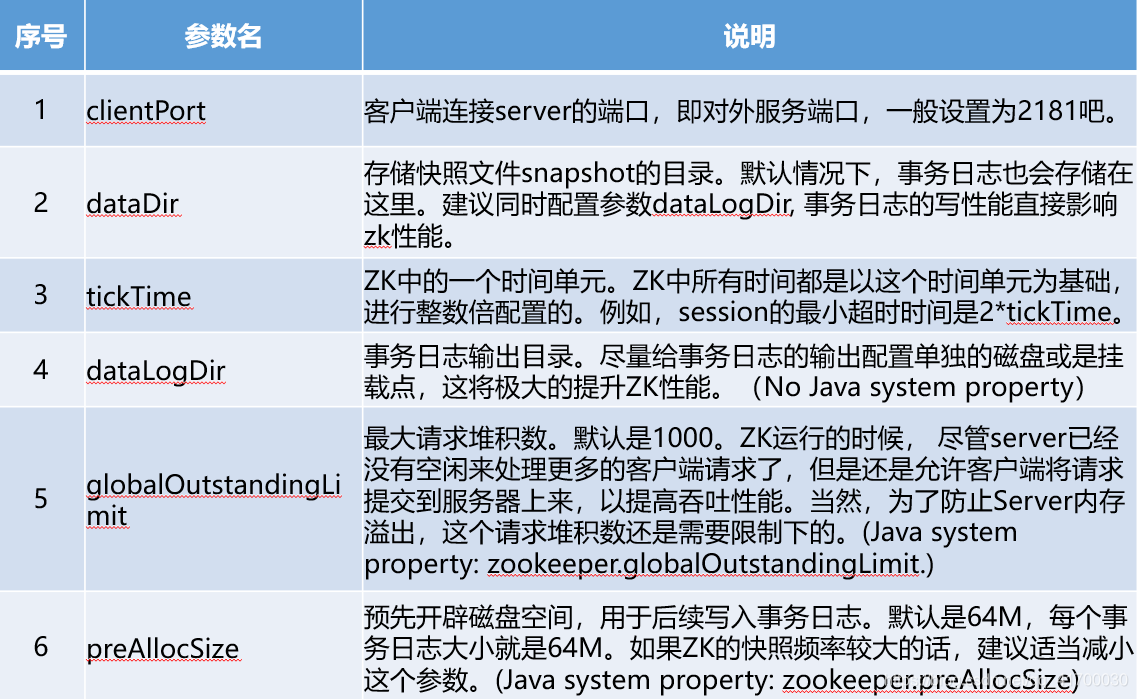
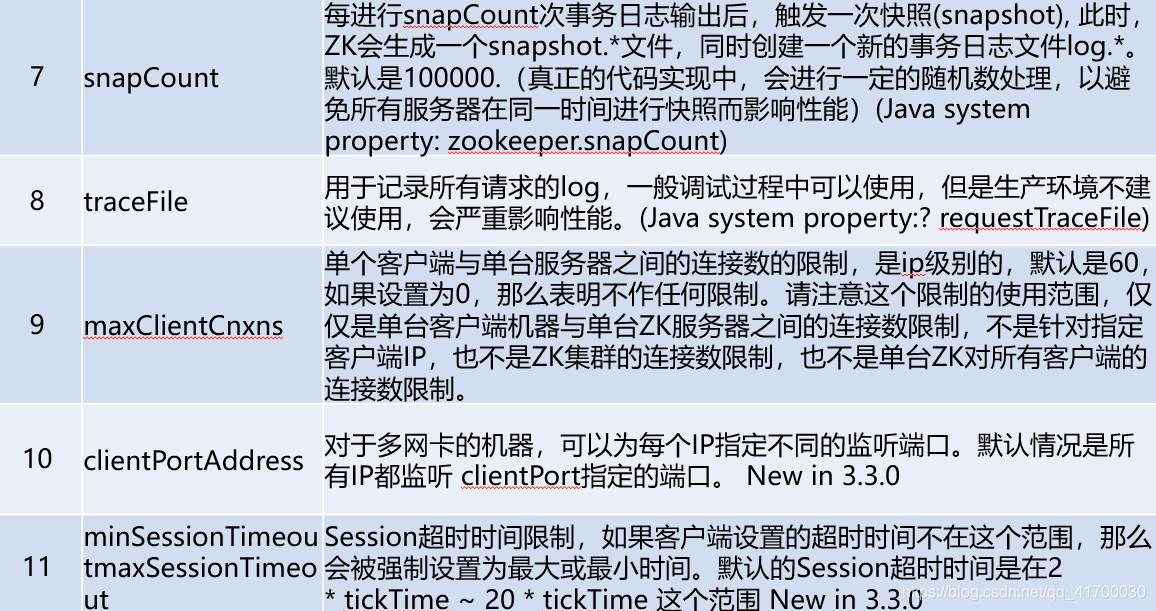
配置文件解析
打开后是这样的(比较乱,直接看解析吧)
s conf]# # The number of ticks that the initial
[root@VM_0_4_centos conf]# # synchronization phase can take
[root@VM_0_4_centos conf]# initLimit=10
[root@VM_0_4_centos conf]# # The number of ticks that can pass between
[root@VM_0_4_centos conf]# # sending a request and getting an acknowledgement
[root@VM_0_4_centos conf]# syncLimit=5
[root@VM_0_4_centos conf]# # the directory where the snapshot is stored.
[root@VM_0_4_centos conf]# # do not use /tmp for storage, /tmp here is just
[root@VM_0_4_centos conf]# # example sakes.
[root@VM_0_4_centos conf]# dataDir=/lisz/data
[root@VM_0_4_centos conf]# # the port at which the clients will connect
[root@VM_0_4_centos conf]# clientPort=2181
[root@VM_0_4_centos conf]# # the maximum number of client connections.
[root@VM_0_4_centos conf]# # increase this if you need to handle more clients
[root@VM_0_4_centos conf]# #maxClientCnxns=60
[root@VM_0_4_centos conf]# #
[root@VM_0_4_centos conf]# # Be sure to read the maintenance section of the
[root@VM_0_4_centos conf]# # administrator guide before turning on autopurge.
[root@VM_0_4_centos conf]# #
[root@VM_0_4_centos conf]# # http://zookeeper.apache.org/doc/current/zookeeperAdmin.html#sc_maintenance
[root@VM_0_4_centos conf]# #
[root@VM_0_4_centos conf]# # The number of snapshots to retain in dataDir
[root@VM_0_4_centos conf]# #autopurge.snapRetainCount=3
[root@VM_0_4_centos conf]# # Purge task interval in hours
[root@VM_0_4_centos conf]# # Set to "0" to disable auto purge feature
[root@VM_0_4_centos conf]# #autopurge.purgeInterval=1
[root@VM_0_4_centos conf]# snapCount=100000
[root@VM_0_4_centos conf]# ## Metrics Providers
[root@VM_0_4_centos conf]# #
[root@VM_0_4_centos conf]# # https://prometheus.io Metrics Exporter
[root@VM_0_4_centos conf]# #metricsProvider.className=org.apache.zookeeper.metrics.prometheus.PrometheusMetricsProvider
[root@VM_0_4_centos conf]# #metricsProvider.httpPort=7000
[root@VM_0_4_centos conf]# #metricsProvider.exportJvmInfo=true
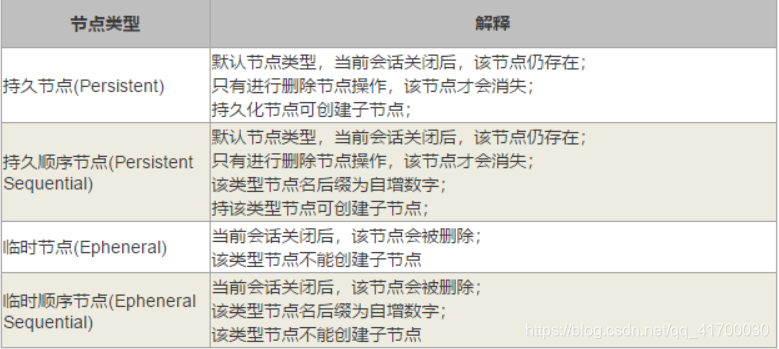
Znode节点
四种节点类型
我们可以启动客户端,尝试创建相关节点(节点必须有值)
//conf 下启动客户端脚本
[root@VM_0_4_centos bin]# ./zkCli.sh
//进入根目录,创建节点
[zk: localhost:2181(CONNECTED) 2] ls /
[zookeeper]
[zk: localhost:2181(CONNECTED) 3] create /aaaa aaa  //必须指定aaa的值,否则无法创建
//获取节点
[zk: localhost:2181(CONNECTED) 10] get /aaaa
创建临时节点
create -e /aaaa aaa
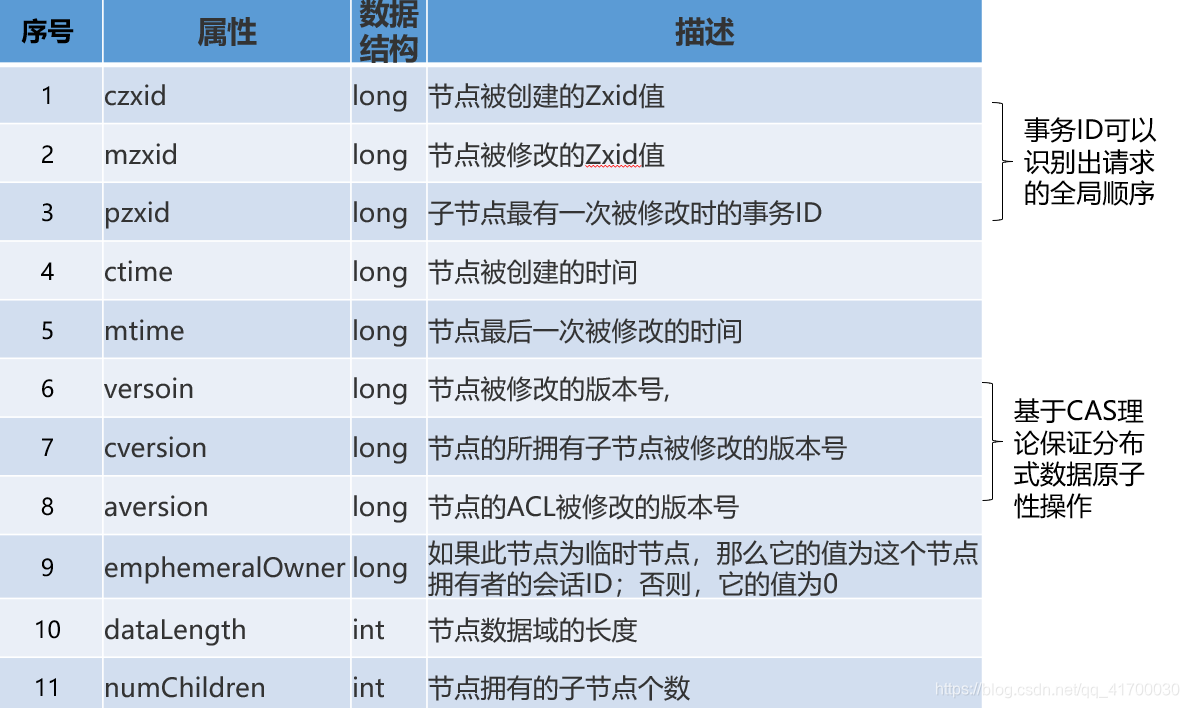
获取节点返回的是这样的

每个参数的含义如下
启动ZK服务: sh bin/zkServer.sh start
查看ZK服务状态: sh bin/zkServer.sh status
停止ZK服务: sh bin/zkServer.sh stop
重启ZK服务: sh bin/zkServer.sh restart