文章目录
PXE个人理解
PXE自动安装,在工作环境中是很常见的一种多设备的系统安装方式。面对大量的裸金属服务器,逐台安装可能往往有些不现实,所以大部分公司更喜欢用PXE这种安装方式去进行大面积的安装。
PXE部署实验
设备配置:
CentOS服务器
4核心
4G内存
300G硬盘
需要软件
服务端:
1、DHCP服务 指定分配ip地址 定位引导文件
next-server #指向TFTP路径
filename #引导程序文件位置
—————————————————————————
2、TFTP服务(简单文件传输协议) UDP69端口
高效率 容量小
(引导程序pxelinnx.0(syslinux包),压缩内核vmlinuz,
系统初始化文件initrd.img,启动菜单default)
—————————————————————————
3.FTP (vsftp) 文件传输协议 系统镜像(centos7)
安全 容量大 TCP 20(数据传输), 21(连接)
—————————————————————————
安装包:dhcp, tftp-server, vsftp, syslinux
实验步骤
给服务器增加一块网卡,方便连接其他的裸金属

可以看到新加的网卡设备名为ens37,对其进行设置

TYPE=Ethernet
PROXY_METHOD=none
BROWSER_ONLY=no
BOOTPROTO=none
DEFROUTE=yes
IPV4_FAILURE_FATAL=no
IPV6INIT=no
IPV6_AUTOCONF=yes
IPV6_DEFROUTE=yes
IPV6_FAILURE_FATAL=no
IPV6_ADDR_GEN_MODE=stable-privacy
NAME=ens37
DEVICE=ens37
ONBOOT=yes
IPADDR=192.168.10.10
PREFIX=24
GATEWAY=192.168.10.10
然后重启网络服务
[root@localhost network-scripts]# systemctl restart network
配置DHCP服务
安装DHCP
[root@localhost /]# yum -y install dhcp*
已安装:
  dhcp.x86_64 12:4.2.5-79.el7.centos      dhcp-devel.x86_64 12:4.2.5-79.el7.centos
作为依赖被安装:
  bind-export-libs.x86_64 32:9.11.4-16.P2.el7_8.6
更新完毕:
  dhcp-common.x86_64 12:4.2.5-79.el7.centos   dhcp-libs.x86_64 12:4.2.5-79.el7.centos
作为依赖被升级:
  dhclient.x86_64 12:4.2.5-79.el7.centos
配置DHCP文件
[root@localhost /]# cp -p /usr/share/doc/dhcp-4.2.5/dhcpd.conf.example /etc/dhcp/dhcpd.conf
cp:是否覆盖"/etc/dhcp/dhcpd.conf"? y
[root@localhost /]# vim /etc/dhcp/dhcpd.conf
subnet 192.168.10.0 netmask 255.255.255.0 {
  range 192.168.10.20 192.168.10.150;  #声明地址池范围
  option routers 192.168.10.10;             #网关 指向本机客户端
  next-server 192.168.10.10;                 #指向 TFTP 服务器 还是自己
  filename "pxelinux.0";                        # //ftp 站点底下的引导程序文件位置
}
安装引导程序文件
[root@localhost /]# yum -y install syslinux
  正在安装    : syslinux-4.05-15.el7.x86_64                                        1/1
  验证中      : syslinux-4.05-15.el7.x86_64                                        1/1
已安装:
  syslinux.x86_64 0:4.05-15.el7
完毕!
引导程序为 pxelinux.0  由本程序提供
[root@localhost /]# rpm -ql syslinux |grep pxe
/usr/share/doc/syslinux-4.05/pxelinux.txt
/usr/share/syslinux/gpxecmd.c32
/usr/share/syslinux/gpxelinux.0
/usr/share/syslinux/gpxelinuxk.0
/usr/share/syslinux/pxechain.com
/usr/share/syslinux/pxelinux.0  #引导程序
安装TFTP服务
注:TFTP安装包名称为 tftp-server
[root@localhost /]# yum -y install tftp-server
  正在安装    : tftp-server-5.2-22.el7.x86_64                                      1/1
  验证中      : tftp-server-5.2-22.el7.x86_64                                      1/1
已安装:
  tftp-server.x86_64 0:5.2-22.el7
完毕!
[root@localhost /]# rpm -ql tftp-server  #查看相关文件
/etc/xinetd.d/tftp   #主配置文件
/usr/lib/systemd/system/tftp.service
/usr/lib/systemd/system/tftp.socket
/usr/sbin/in.tftpd
/usr/share/doc/tftp-server-5.2
/usr/share/doc/tftp-server-5.2/CHANGES
/usr/share/doc/tftp-server-5.2/README
/usr/share/doc/tftp-server-5.2/README.security
/usr/share/man/man8/in.tftpd.8.gz
/usr/share/man/man8/tftpd.8.gz
/var/lib/tftpboot   #站点目录
将引导程序复制到tftp站点
[root@localhost /]# cp -p /usr/share/syslinux/pxelinux.0 /var/lib/tftpboot/
[root@localhost /]# ls /var/lib/tftpboot/
pxelinux.0
配置TFTP服务
[root@localhost /]# vim etc/xinetd.d/tftp
service tftp
{
        socket_type             = dgram
        protocol                = udp
        wait                    = yes
        user                    = root
        server                  = /usr/sbin/in.tftpd
        server_args             = -s /var/lib/tftpboot
        disable                 =no   #原本是yes 改成no 不禁用
        per_source              = 11
        cps                     = 100 2
        flags                   = IPv4
}
安装VSFTP文件传输协议
注:vsftp使用的是tcp协议,优点是安全 使用端口 20 用来传输数据 端口21 用来连接
[root@localhost /]# yum -y install vsftpd
  正在安装    : vsftpd-3.0.2-27.el7.x86_64                                         1/1
  验证中      : vsftpd-3.0.2-27.el7.x86_64                                         1/1
已安装:
  vsftpd.x86_64 0:3.0.2-27.el7
完毕!
放入光盘,挂载镜像

[root@localhost /]# cd /var/ftp/
[root@localhost ftp]# ls
pub
[root@localhost ftp]# mkdir pxelj  #创建文件夹 把光盘挂进去
[root@localhost ftp]# mount /dev/cdrom /var/ftp/pxelj
mount: /dev/sr0 写保护,将以只读方式挂载
[root@localhost ftp]# df -Th
文件系统                类型      容量  已用  可用 已用% 挂载点
/dev/mapper/centos-root xfs        50G  5.0G   46G   10% /
devtmpfs                devtmpfs  3.8G     0  3.8G    0% /dev
tmpfs                   tmpfs     3.9G     0  3.9G    0% /dev/shm
tmpfs                   tmpfs     3.9G   13M  3.8G    1% /run
tmpfs                   tmpfs     3.9G     0  3.9G    0% /sys/fs/cgroup
/dev/sda1               xfs      1014M  179M  836M   18% /boot
/dev/mapper/centos-home xfs       241G   33M  241G    1% /home
tmpfs                   tmpfs     781M  4.0K  781M    1% /run/user/42
tmpfs                   tmpfs     781M   36K  781M    1% /run/user/0
/dev/sr0                iso9660   4.3G  4.3G     0  100% /var/ftp/pxelj
将光盘中的系统内核及初始化文件放进站点
[root@localhost ftp]# cd pxelj/
[root@localhost pxelj]# ls -a
.                EFI     isolinux  RPM-GPG-KEY-CentOS-7
..               EULA    LiveOS    RPM-GPG-KEY-CentOS-Testing-7
CentOS_BuildTag  GPL     Packages  TRANS.TBL
.discinfo        images  repodata  .treeinfo
[root@localhost pxelj]# cd images/
[root@localhost images]# ls
efiboot.img  pxeboot  TRANS.TBL
[root@localhost images]#
[root@localhost images]# cd pxeboot/
[root@localhost pxeboot]# ls
initrd.img  TRANS.TBL  vmlinuz   #第一个是初始化文件   第三个是系统内核
[root@localhost pxeboot]# cp initrd.img vmlinuz /var/lib/tftpboot/
[root@localhost pxeboot]# ls
initrd.img  TRANS.TBL  vmlinuz
在站点目录中配置启动菜单
注:手敲的!
default auto
prompt 0

label auto
  kernel vmlinuz
  append initrd=initrd.img method=ftp://192.168.10.10/pxelj

label linux text
  kernel vmlinuz
  append text initrd=initrd.img method=ftp://192.168.10.10/pxelj

label linux rescue
  kernel vmlinuz
  append rescue initrd=initrd.img method=ftp://192.168.10.10/pxelj
关闭防火墙和核心防护 开启服务
[root@localhost /]# systemctl start dhcpd
[root@localhost /]# systemctl start tftp
[root@localhost /]# systemctl start vsftpd
[root@localhost /]# setenforce 0
[root@localhost /]# iptables -F

PXE无人值守
安装软件
[root@localhost ~]# yum install system-config-kickstart -y
 这时候就要偶尔借用下图形界面的应用程序了
在图形界面下打开刚刚安装的软件


设置新的分区大小
 /boot 500M
/home 4096M
swap 4096M
/ 余下全部空间


 然后点击文件 保存
 最后点击退出
然后进入配置界面
[root@localhost ~]# ls
anaconda-ks.cfg  initial-setup-ks.cfg  公共  模板  视频  图片  文档  下载  音乐  桌面
将家目录下的 an开头的软件,一下部分复制粘贴到 ks文件里
 然后编辑配置文件
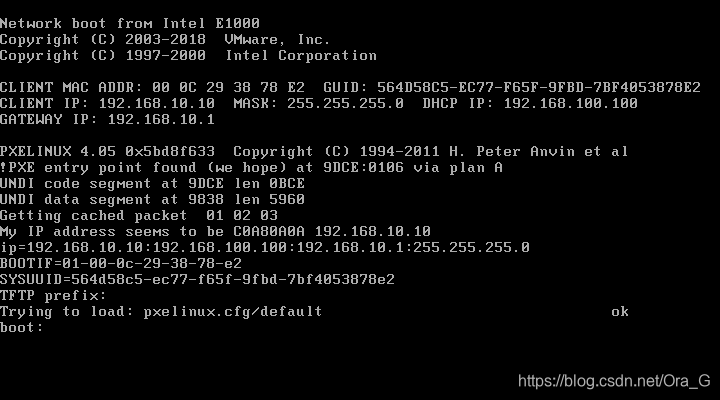
[root@localhost ~]# vim /var/lib/tftpboot/pxelinux.cfg/default
default auto
prompt 2

label auto
  kernel vmlinuz
  append initrd=initrd.img method=ftp://192.168.100.100/pxelj ks=ftp://192.168.100.100/ks.cfg

label linux text
  kernel vmlinuz
  append text initrd=initrd.img method=ftp://192.168.100.100/pxelj

label linux rescue
  kernel vmlinuz
  append rescue initrd=initrd.img method=ftp://192.168.100.100/pxelj
~
重启服务
[root@localhost ~]# systemctl start dhcpd
[root@localhost ~]# systemctl start vsftpd
[root@localhost ~]# systemctl start tftp
全自动安装完成
